

To fix a laptop not recognizing monitors, check the monitor’s power and input, reconnect the video cable, then use your laptop’s display controls to enable or detect the screen. If it remains missing, test a direct connection without the dock before updating drivers. The Windows steps use Windows 11 menus; separate steps cover Mac laptops and Chromebooks.
The short version
- Check the connection: Power the monitor and select the input connected to your laptop.
- Enable Windows output: Press Windows + P and select Extend.
- Isolate the hardware: Test one monitor directly before troubleshooting a dock or multiple displays.
- Follow your platform: Mac accessory approval, Chromebook cable capability, and DisplayLink software need different checks.
| Fix | When to use it | What to check |
|---|---|---|
| Power and cable checks | A wired monitor stays dark | Power supply, selected input, video cable |
| Windows display controls | Windows 11 misses the screen | Extend and Detect |
| Dock and display limits | One screen works but others fail | Direct connection and supported display count |
| Windows driver repair | Connection checks do not help | Updates or a recent driver change |
| Mac detection and approval | A Mac misses an external display | Detect Displays and accessory permission |
| DisplayLink setup | A DisplayLink dock drives the monitor | Matching software and permissions |
| Chromebook display checks | A Chromebook misses the monitor | USB-C cable capability and display settings |
| Monitor diagnostics | A Dell monitor still fails | Standalone test and model-specific reset |
Check monitor power and the video connection
Connect the monitor and dock to their required power supplies. Use the monitor’s physical controls to select the input receiving the laptop’s cable. Input-menu labels depend on your monitor model.
On a Windows 11 laptop, reconnect both ends of the video cable securely, then test a known-good replacement cable. Disconnect accessories and bypass the dock, connecting the monitor directly to a compatible laptop video output. If the screen remains missing, try another compatible output port and test the monitor with another computer.
For a Mac, test a direct connection without the dock and check the cable and adapter’s video capabilities alongside your Mac’s supported resolution and refresh rate. Disconnect the monitor from both power and the Mac, then reconnect it. Close and reopen the laptop lid to put it to sleep and wake it, and restart if necessary.
Enable and detect the display in Windows
Press Windows + P, then select Extend to use the external screen as additional desktop space. You can instead select Duplicate or Second screen only for your preferred output.
On Windows 11, open Start > Settings > System > Display. Expand Multiple displays and select Detect. If the monitor still does not appear, continue with the dock and driver checks.
For a previously working setup, press Windows + Ctrl + Shift + B to reset the graphics driver. If output does not return, restart your Windows computer.
Check the dock and multiple monitor limits
Test one monitor first on Windows 11, then check the laptop or graphics hardware’s supported display count before adding more. Additional monitors require hardware support. A splitter that duplicates one video signal cannot provide independent desktops, so replace it with a compatible dock or video adapter when you need separate desktop space.
On a Dell Windows laptop, disconnect all external monitors and reconnect them individually. If additional screens fail, reduce their resolutions and check the computer’s simultaneous-display limit. For a Mac, check the exact model and chip’s supported display count, resolution, and refresh rate.
For a Dell WD19 dock, disconnect its USB-C connection, then disconnect its power adapter. Reconnect dock power before reconnecting USB-C to the laptop. If necessary, undock and restart the laptop. Follow your model’s instructions when troubleshooting another dock, since this connection order applies to the WD19.
Update or repair the Windows graphics driver
On Windows 11, open Settings > Windows Update and select Check for updates. Install available updates and restart. If the monitor remains missing, check optional driver updates next.
On Windows 11, open Start > Settings > Windows Update > Advanced options, then turn on Receive updates for other Microsoft products. Open Optional updates, select the applicable offered driver entries, and select Download and install. Restart afterward; driver entry names depend on your hardware and the offered packages.
You can also check through Device Manager: right-click Start, open Device Manager, and expand Display adapters. Right-click your GPU, select Update driver, and choose the automatic driver-search option. Microsoft calls it Search automatically for updated driver software, although the wording can differ between Windows builds.
If you need to find and update your graphics driver manually, use a manufacturer package matching your hardware, Windows version, and architecture. For supported Dell hardware, open Dell Drivers & Downloads, identify the product by Service Tag or model, or select Browse all products. Obtain the applicable package and follow its model-specific installation instructions.
To install an already-downloaded driver on Windows 11, right-click Start, open Device Manager, and expand Display adapters. Right-click your GPU, select Update driver, then select Browse my computer for drivers and Browse.... Choose the extracted driver folder, select OK, then select Next.
If the problem began after a graphics driver update, rolling back replaces the current driver with an available previous version. In Device Manager, expand Display adapters, right-click the GPU, and select Properties > Driver > Roll Back Driver. Choose the applicable reason, select Yes, and restart if prompted. This requires administrator permissions and an available previous driver; if you cannot roll back, continue with the reinstall option.
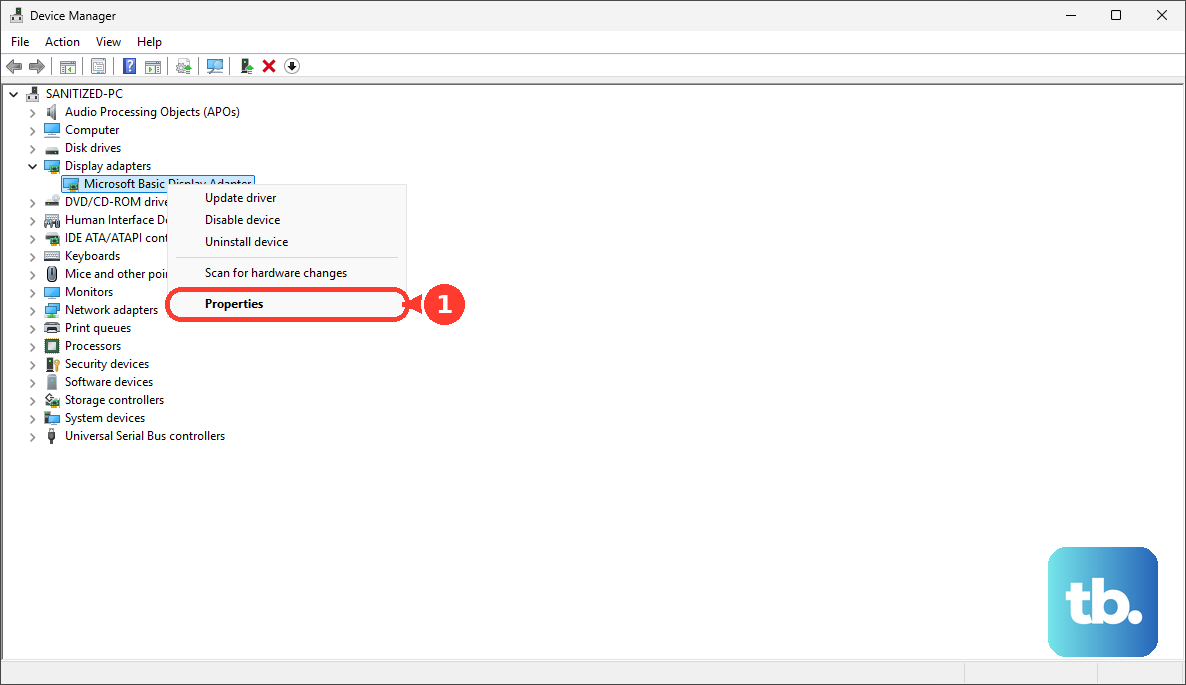
Uninstalling removes the graphics device, and Windows attempts to reinstall its driver after a restart; save your work before proceeding. In Device Manager, expand Display adapters, right-click the GPU, and select Uninstall device. Select Uninstall, then restart Windows.
Detect the monitor and approve accessories on a Mac
Open the Apple menu > System Settings > Displays. Hold Option, then click Detect Displays. If the monitor remains missing on an Apple silicon laptop, check accessory approval next.
Unlock your Apple silicon Mac and reconnect the display or dock. When prompted, click Allow. If accessory permission is controlled on a supervised Mac, ask its administrator to review the accessory-access configuration.
Before using a Mac laptop with its lid closed, connect laptop power, an external keyboard, and a mouse. On Apple silicon, approve the display, keyboard, and mouse before closing the lid.
Open the Apple menu > System Settings > General > Software Update and install the compatible update offered. To refresh the check, click Check for Updates or press Command + R. You can also find Software Update through Spotlight or Siri in the menu bar and open the result.
macOS updates also deliver Apple display firmware. For another manufacturer’s monitor, obtain any applicable firmware and model-specific installation instructions from that manufacturer.
Check software for a DisplayLink dock
Use these steps when your dock or adapter is based on DisplayLink. On Windows, obtain the matching package from the official DisplayLink Windows download page. On a Mac, obtain DisplayLink Manager from the official DisplayLink macOS download page and choose a release explicitly supporting your installed macOS version. Installing this software does not add DisplayLink support to ordinary USB-C or Thunderbolt hardware.
For Plugable DisplayLink hardware on macOS Tahoe 26, Sequoia 15, or Sonoma 14, click Open System Settings in the setup wizard. Under Screen & System Audio Recording, enable DisplayLink Manager, authenticate, and click Modify Settings. Click Quit and Reopen, then click Allow if the screen and audio access prompt appears.
If the wizard requests background permission, click Open System Settings and enable the requested DisplayLink Manager background activity. Return to the wizard and finish setup.
On those macOS versions, launch DisplayLink Manager and keep it running. Open its menu-bar icon, select Displays, and turn on the affected display’s switch. Under Settings, enable Automatic app startup.
If closing the lid makes the external displays sleep, open DisplayLink Manager’s menu-bar icon and select Settings. In versions that expose the option, turn off System sleep in display-closed mode if you want the external displays to stay active. Connect external power, a keyboard, and a mouse.
Check the cable and display settings on a Chromebook
If a USB-C monitor does not respond, or ChromeOS reports Cable may not support displays, replace the cable with one that meets the monitor or dock’s connection requirements. Check this before changing display output settings, since the mirroring option appears only after the monitor connects.
Select the time, then open Settings > Device > Displays. Once the monitor is connected, select Mirror Built-in Display to mirror your screen. For external-only output, hold Decrease brightness.
When the monitor is listed but its output needs adjustment, select its name under Displays. Adjust Resolution and the available refresh-rate setting to a supported mode. These controls apply to a detected monitor, so return to the cable check if the screen is absent.
Run monitor diagnostics when the screen still fails
For a Dell monitor supporting a standalone self-test or built-in diagnostics, follow the exact model’s manual to run that test. Dell specifies disconnecting the video cable for BIST in self-test mode. The button sequence varies by model, and the test diagnoses the monitor rather than repairing laptop software.
A factory reset erases your customized monitor settings. For a Dell monitor with an on-screen reset feature, use its on-screen menu to restore factory settings, following the exact model manual for the menu path and confirmation.
Frequently Asked Questions
How do you reconnect a wireless monitor in Windows 11?
Turn on Wi-Fi and the Miracast receiver, then press Windows + K to check support and connect. This requires Miracast-capable graphics and Wi-Fi plus a compatible receiver. If it still fails, restart the laptop and receiver, then obtain applicable updates through the receiver manufacturer’s support site or Microsoft Store companion app.
How do you remove and reconnect a saved wireless display?
Removing the device removes its saved wireless pairing. On Windows 11, open Settings > Bluetooth & devices > Devices, then under Wireless displays & docks, select the receiver and select Remove device. Press Windows + K to reconnect; these steps apply to wireless displays, not ordinary HDMI or DisplayPort monitors.
What should you check when a Mac cannot find an AirPlay display?
Power on the nearby AirPlay devices, connect them to the same Wi-Fi network, update their software, and restart them. For a receiver configured in Home, open Home > More > Home Settings > Speakers & TV and review access restrictions. These steps apply to compatible Apple TV or smart-TV receivers used for screen mirroring.
Can NVIDIA Control Panel detect a missing monitor?
Yes, when NVIDIA Control Panel exposes display controls for the connected GPU, open Set Up Multiple Displays, select My display is not shown, then select Rigorous Display Detection. For a connected television, the dialog also offers Force Television Detection. Hybrid laptops may not expose these controls, so use the Windows display detection steps instead.
Why is a Mac monitor detected but still dark?
The display may be dimmed, so raise its brightness through System Settings > Displays or the physical brightness controls on a third-party monitor. If the screen turned black immediately after a resolution change on macOS Tahoe 26, wait 15 seconds, then press Esc if it does not recover. If necessary, start in safe mode, open System Settings > Displays, select Default, and restart normally.
Can your Mac approve a display automatically while unlocked?
On a Mac laptop with Apple silicon, open the Apple menu > System Settings > Privacy & Security > Accessories, then find Allow accessories to connect. Choose Automatically allow when unlocked if you want automatic accessory approval while the Mac is unlocked. If your supervised Mac’s administrator controls this setting, ask them to review it.