

To find a saved screenshot on your Mac, open Finder, press Shift + Command + D to open Desktop, and look for an image named Screenshot or Screen Shot with the capture date and time. The desktop is the default screenshot destination. If the image is elsewhere, check Screenshot’s save destination or search with Finder and Spotlight.
The short version
- Start on the desktop: Look for Screenshot or Screen Shot followed by a date and time.
- Check the destination: Press Shift + Command + 5, choose a screenshot capture tool, and open Options to inspect Save to.
- Search beyond the filename: Finder image and date filters can help you locate a renamed screenshot.
- Check the clipboard: A capture made with Control added to the shortcut may still be available to paste with Command + V.
- Recover deleted images: Check Trash, an available Time Machine backup, or the relevant cloud recovery location.
| Place or method | When it helps |
|---|---|
| Desktop | You used the default save destination |
| Finder folder shortcuts | You know the saved or downloaded image’s folder |
| Screenshot save destination | You need to check where captures save |
| Floating thumbnail | The thumbnail is visible or you dragged it elsewhere |
| Desktop stacks | The screenshot is inside a collapsed stack |
| Desktop visibility settings | Desktop items are hidden |
| Spotlight search | You know a filename or screenshot naming term |
| Spotlight filters | You need to narrow file or cloud results |
| Finder search filters | You need filename, image type, or date criteria |
| Finder Recents | You recently viewed or changed the image |
| Apple menu Recent Items | The screenshot remains in the recent documents list |
| Preview | You opened the image there or know its location |
| Smart Folder | You want to reuse a screenshot search |
| iCloud Drive in Finder | The screenshot’s folder synced to iCloud Drive |
| iCloud Drive in a browser | You need to download an uploaded screenshot |
| Files on iPhone or iPad | The image synced through the same Apple Account |
| Local iCloud archive or another cloud service | An archive was retained or another service stored the image |
| Current clipboard | The capture remains available to paste |
| Spotlight clipboard history | History was enabled and retained the capture |
| Photos Screenshots collection | The image is already in your photo library |
| Photos visibility setting | Screenshots are hidden from the library view |
| Trash | The deleted file remains in Trash |
| Time Machine | An available backup contains the image |
| iCloud Drive Recently Deleted | The file remains recoverable within 30 days |
| iCloud Data Recovery | The file appears among recoverable files |
| Photos Recently Deleted | The image remains recoverable within 30 days |
| iCloud Photos in a browser | The synced image remains recoverable within 30 days |
| Spotlight settings and indexing | Search misses an existing file |
| Device management restriction | A managed Mac prevents captures from saving |
Look on the desktop
Check the desktop for Screenshot or Screen Shot followed by the date and time you took it, then double-click the image to open it. To browse the desktop as a folder, activate Finder and press Shift + Command + D.
If you use desktop stacks, click a stack to expand it, then double-click the screenshot. You can also browse a stack by swiping across it with two fingers on a trackpad or one finger on a Magic Mouse. To group stacks by file type, hold Control, click the desktop, and choose Group Stacks By > Kind.
On macOS 27, open System Settings > Desktop & Dock > Desktop & Stage Manager if desktop items are hidden. Under Show Items, select On Desktop. If you use Stage Manager, select In Stage Manager, or click the desktop to reveal hidden items.
Check where Screenshot saves your captures
In macOS Mojave 10.14 and later, press Shift + Command + 5, choose a screenshot capture tool, then click Options. Inspect the destination under Save to and browse that folder in Finder. Locate the screenshot and double-click it to open it.
In Finder, press Shift + Command + O for Documents or Option + Command + L for Downloads. Downloads is relevant if you downloaded the image from a browser or service. For a folder path you already know, press Shift + Command + G and enter that path.
Choose Other Location if you want to select a destination for subsequent captures. Changing this setting does not locate or move earlier screenshots.
Search with Spotlight or Finder
Press Command + Space to open Spotlight, then enter Screenshot, Screen Shot, or a filename you remember. You can also open Spotlight by clicking Spotlight in the menu bar or pressing your keyboard’s Search key, if available. Select a result and press Return to open it. In macOS 27, press Space to preview a selected result or hold Command to locate the file.
On macOS Tahoe 26 and later, Spotlight lets you narrow the search to files. With Spotlight open, press Command + 2, then enter your search. If Screenshot appears among the categories below the search field, click it to narrow the results.
For more control, open Finder and enter Screenshot or Screen Shot in the search field. Click the + button below that field, then choose Name to filter by filename or Kind > Image to show only images. To find images regardless of their names, enter kind:images in the search field instead of Screenshot or Screen Shot. Add a date criterion if you remember when you made the capture.
An image search helps when you renamed the screenshot or saved it in a format other than PNG. Enter kind:images without a screenshot term in Finder’s search field to find image files.
Reopen a recently used screenshot
Activate Finder and press Shift + Command + F to browse Recents. Look through files you recently viewed or changed, select a likely image, and press Command + Y to preview it. Press Command + I to inspect its information, or open the matching screenshot.
If you previously opened the screenshot in Preview, open Preview, choose File > Open Recent, and select the image. You can also choose File > Open and browse its saved location. Another route is the Apple menu > Recent Items, where you can select the screenshot under Documents if it remains in that list.
Look in your synced folders
If your screenshot destination synced through iCloud Drive, open iCloud Drive in Finder, then open Desktop, Documents, or the folder you used. In macOS Tahoe 26 and later, synced Desktop and Documents shortcuts appear under Favorites with cloud icons. Earlier macOS versions place those shortcuts in the sidebar’s iCloud section.
If another Mac contributed desktop files, open the folder named after that Mac. If another cloud service stored the screenshot, check its folder under Locations in Finder or open the service’s app.
To retrieve an uploaded screenshot through a browser, sign in to your Apple Account on iCloud.com, then go to iCloud Drive. Open Desktop, Documents, or the folder containing the image, select it, and click Download. This route applies to screenshots previously uploaded to iCloud Drive.
Retrieve a capture from the clipboard
If you added Control when you used a shortcut to take a screenshot on your Mac, the capture went to the clipboard. The same applies if you Control-clicked the screenshot thumbnail and chose Save to Clipboard. While the image remains on the clipboard, paste it into a compatible app with Command + V, or open Preview and choose File > New from Clipboard.
On macOS Tahoe 26 and later, check Spotlight clipboard history if the feature was enabled and the capture is still retained. Press Command + Space, then Command + 4, or click the Clipboard button. During initial setup, click Enable on macOS Tahoe 26 or Allow on macOS 27 if prompted, but do not assume that enabling it now retained an earlier capture.
Locate the retained image, select it, and press Command + C. Paste it into a compatible app with Command + V. This retrieves clipboard contents rather than locating an already saved desktop file.
Check screenshots in Photos
Open Photos, expand Media Types in the sidebar if necessary, and click Screenshots. Open the matching image from that collection. This applies to screenshots already in your photo library, including imported images and images synced through iCloud Photos; desktop captures are not automatically added to Photos.
In Photos versions with the screenshot visibility option, screenshots can be hidden from the main library view. Open Library > All Photos, open the Action menu in the toolbar, and select Screenshots. This changes visibility for images already in the Photos library.
Recover a screenshot you deleted
Open Trash and look for the screenshot. Hold Control and click the image, then choose Put Back, or drag it to the desktop or another folder. This works while the file remains in Trash.
If an available Time Machine backup contains the image, open the Finder folder that previously contained it; a missing desktop item does not require an open window. Use Spotlight to open Time Machine, browse backups with the arrows or timeline, and select the screenshot. Click Restore to return it to its original location.
For an iCloud Drive screenshot deleted within 30 days and not permanently removed, sign in to iCloud Drive at icloud.com/iclouddrive in your browser. Select Recently Deleted, select the screenshot, then select Recover. Choose Recover All instead if you want to recover all the files there.
Alternatively, sign in to iCloud Data Recovery at icloud.com/recovery and select Restore Files. Select the desired files, then confirm the restore and check their original folders after recovery. This applies to recoverable files listed within the 30-day window; permanently removed files cannot be restored.
For a screenshot deleted from Photos, open Utilities > Recently Deleted in Photos. If the album is locked, click View Album and authenticate, then select the screenshot and click Recover. This applies to images deleted within 30 days that have not been permanently removed.
Fix missing search results or blocked captures
If you can browse to an existing screenshot but search does not find it, open the Apple menu > System Settings > Spotlight and enable the relevant content categories. Older versions use Siri & Spotlight. Open Search Privacy, called Spotlight Privacy on some versions, and check whether the screenshot’s folder is excluded.
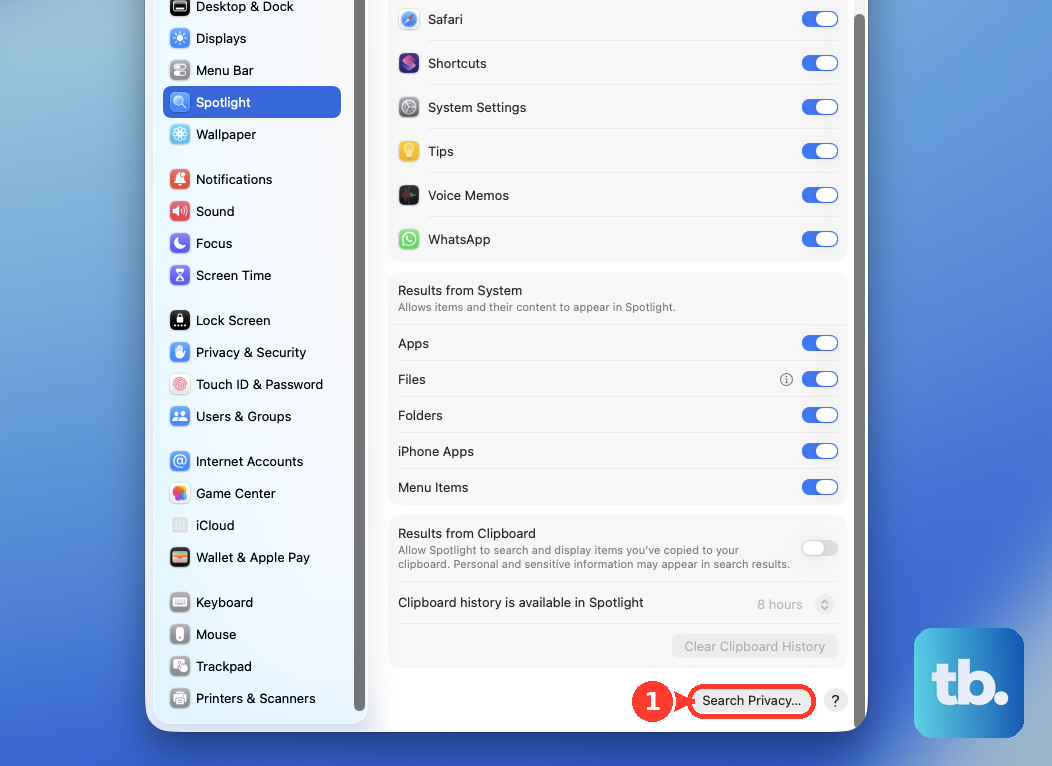
To rebuild the folder’s index, add it with the + button, wait a few seconds, then remove it from the privacy list with the − button and click Done. Allow indexing to finish before searching again. Rebuilding the index helps search find existing files; it does not recover deleted screenshots.
If captures never save on a managed work or school Mac, ask your administrator to inspect the Screenshots and screen recordings restriction. Apple says this restriction prevents saving screenshots and screen recordings. Checking it addresses blocked captures rather than retrieving an existing file.
Frequently Asked Questions
Can you open a screenshot directly after taking it?
While the floating thumbnail remains visible, click it to view the image, drag it into a Finder window, or swipe right to save it immediately. If you previously dragged it into a document, email, or note, check that destination. For future captures, press Shift + Command + 5, click Options, and select Show Floating Thumbnail.
Can you find a Mac screenshot on an iPhone or iPad?
Yes, if the screenshot synced to iCloud Drive and the iPhone or iPad uses the same Apple Account with iCloud Drive. Open Files, then Browse > Locations > iCloud Drive. Open Desktop, Documents, or the screenshot’s synced folder, then open the image.
Can you save a Finder search for screenshots?
Yes, choose File > New Smart Folder in Finder, enter a screenshot filename term, and add image or date criteria with the + button. Click Save, enter a name and location, then click Save again. Open the Smart Folder later to see matching files, but a filename rule will miss screenshots renamed without that term.
Where should you look after turning off iCloud Drive?
If your Mac retained a local iCloud archive, open Finder and browse Macintosh HD > Users > your username > iCloud Drive (Archive). Check that archive for the screenshot. This location applies when iCloud Drive was turned off or the account was signed out and an archive was retained.
How can you check whether Desktop and Documents sync to iCloud?
Open the Apple menu > System Settings > your name > iCloud > Drive. Check the state of Sync this Mac and Desktop & Documents Folders.
Where can you change Spotlight clipboard history settings?
On macOS Tahoe 26 and later, open System Settings > Spotlight. The setting Results from Clipboard controls availability, while Clipboard history is available in Spotlight controls the retention interval.
Can you restrict a Spotlight search to iCloud Drive?
Yes, on macOS Tahoe 26 and later, press Command + Space to open Spotlight and type iCloud Drive. Press Tab, then enter the filename to restrict the search to cloud files.
Can you recover an iCloud Photos screenshot through a browser?
Yes, sign in to iCloud in your browser and open Photos. Select Recently Deleted in the sidebar, select the screenshot, then click Recover. This applies to screenshots in iCloud Photos that remain recoverable within 30 days of deletion.