

To change the local IP address on your Mac, open System Settings > Network, select your connection, then open Details > TCP/IP and set Configure IPv4 to Manually. Enter an available address assigned for that network, along with its subnet mask and router address, then click OK.
For an automatically assigned address, use Renew DHCP Lease instead, although your router can give you the same address again. A router reservation lets you choose a specific address while keeping your Mac configured to use DHCP.
The short version
- Choose a specific address: Use Manually in your connection’s TCP/IP settings and enter the correct network values.
- Request an automatic address: Click Renew DHCP Lease, but expect that the address may stay the same.
- Keep an address consistent: Create a DHCP reservation on your router and leave your Mac on Using DHCP.
- Undo a manual change: Set Configure IPv4 back to Using DHCP on a network that provides DHCP.
| Method | What it does | Main limitation |
|---|---|---|
| Manual IPv4 settings | Sets a specific local address | Requires available address and correct network values |
| DHCP lease renewal | Requests automatic assignment | May return the same address |
| Using DHCP | Replaces manual IPv4 configuration | Requires a DHCP server |
| Using DHCP with manual address | Combines a chosen address with DHCP configuration | Availability depends on the service |
| ASUS browser reservation | Reserves an address through router settings | Requires compatible firmware and router access |
| ASUS app reservation | Reserves an address through IP Binding | Requires a supported router and app |
| Deco app reservation | Reserves or changes a client address | Selecting a client alone retains its current address |
| Google Home reservation | Reserves an address on Google Wifi or Nest Wifi | Requires the router to supply DHCP |
| Another Wi-Fi network | Uses the destination network’s addressing | The numerical address can match the previous one |
| Ethernet connection | Uses the Ethernet interface’s address | Does not change the Wi-Fi address |
| Manual IPv4 through Terminal | Applies persistent manual settings | Requires administrative authorization |
| DHCP through Terminal | Enables automatic addressing | May return the previous address |
| Manual IPv6 | Sets a supplied IPv6 address | Requires router address and prefix length |
| Automatic IPv6 | Replaces manual IPv6 configuration | Does not select a specific address |
| Link-local IPv6 | Limits IPv6 traffic to the local network | Does not let you choose an arbitrary address |
| Wi-Fi reconnection | Reconnects your existing Wi-Fi service | Does not guarantee a different address |
| Mac restart | Automatically renews DHCP addressing over Wi-Fi | Does not replace manual settings |
Choose the connection you want to change
Open the Apple menu, select System Settings, then click Network. Choose Wi-Fi, Ethernet, or the relevant adapter service, then open Details > TCP/IP.
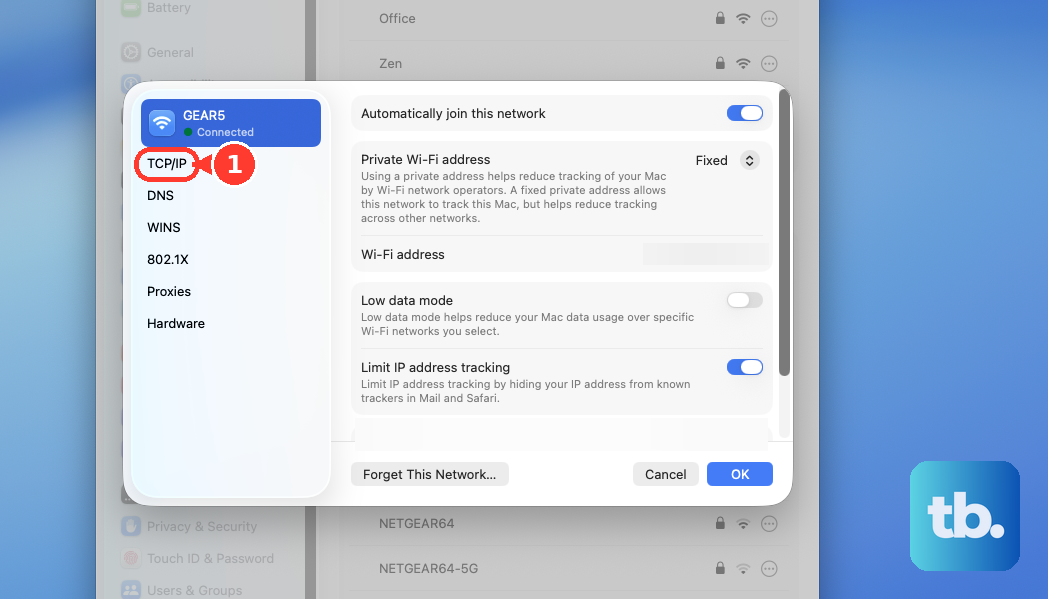
Your Mac can have several IPv4 and IPv6 addresses because each network interface has its own addressing. Changing Ethernet settings does not change the Wi-Fi interface’s address, so select the connection you intend to use. VPNs, browser proxies, and iCloud Private Relay concern tunnel or internet-facing addresses and do not replace your physical connection’s local address.
Set a specific local IPv4 address
In TCP/IP, change Configure IPv4 to Manually. Enter the assigned address in IP address, fill in Subnet mask and Router with the values for that network, then click OK.
You need an available address appropriate for your network, together with the correct subnet mask and router values. If you do not have those values, use automatic assignment or a router reservation. If manual settings leave you without a usable connection, return Configure IPv4 to Using DHCP on a network that provides DHCP.
To choose an IPv4 address while retaining DHCP-supplied configuration, select Using DHCP with manual address under Configure IPv4. Enter the assigned address and click OK. This option depends on the network service; if it is unavailable, use Manually with all the required network values.
Request an address through DHCP
For a connection already using DHCP, open System Settings > Network, select the service, and choose Details > TCP/IP. Click Renew DHCP Lease, then click OK.
Renewal requests an address from the DHCP server, but it does not force a different number. Getting the same address again is an expected outcome. If you need a specific replacement, use manual settings or change the router reservation.
To replace an existing manual configuration with automatic assignment, set Configure IPv4 to Using DHCP and click OK. On a network providing DHCP, the server supplies your address. It can still assign an address you used previously.
Reserve an address on your router
A DHCP reservation lets your router assign a chosen local address to your Mac. Leave Configure IPv4 set to Using DHCP, create the reservation using the instructions for your router below, then renew the lease. The available controls depend on your router model, app, and firmware.
For an ASUS router, open its LAN address in a browser and sign in. Go to Advanced Settings > LAN > DHCP server, then set Enable Manual Assignment to Yes. Under Manually Assigned IP, select your Mac in Client Name (MAC Address), enter the desired address within your router’s DHCP address pool, click +, then click Apply. To replace an existing reservation, delete the old entry and apply that change before creating its replacement.
You can also get the ASUS Router app and open Settings > LAN > IP Binding > IP Binding List > +. Choose Select by device list or Manual Setup, identify your Mac, enter an address within your router’s DHCP address pool, and tap OK. To change an existing entry in the app, tap the device, tap the Edit icon, change the address, and tap OK.
For a supported Deco network, get the TP-Link Deco app and open More > Advanced > Address Reservation > + > Custom. Enter your Mac’s MAC Address and desired IP Address, then tap Save.
Alternatively, choose Select from Client, select your Mac, and tap Done. Open its reservation, change the address, and tap Save. Selecting a client without editing the reservation reserves its existing address.
For a Google Nest Wifi or Google Wifi network, get the Google Home app and open Home > Wifi > Network settings > Advanced Networking > DHCP IP reservations > Add IP reservations. Select your Mac, enter the desired address, and tap Save. Disconnect and reconnect your Mac if needed to receive the reserved address.
If the reservation does not take effect, check that it matches the MAC address your Mac actually uses on that network. Your private Wi-Fi address can differ from the hardware MAC address. Keep your Mac on Using DHCP and renew its lease after correcting the reservation.
Use another network or Ethernet connection
To use another Wi-Fi network, open the Wi-Fi menu in the menu bar and select a network under Known Networks or Personal Hotspot. For another visible network, open Other Networks and select its name. The destination network supplies its own addressing, although the numerical address can coincidentally match the previous one.
For Ethernet, connect a cable from the destination network to your Mac’s Ethernet port or a supported USB or Thunderbolt Ethernet adapter. Open System Settings > Network, select the Ethernet or adapter service, then open Details > TCP/IP. Choose Using DHCP or enter that network’s assigned manual settings, then click OK.
Ethernet has its own addressing, so using it does not change your Wi-Fi address. If you need a particular address on the Ethernet connection, configure that service or its router reservation.
Change the address through Terminal
Apple supports the networksetup command for applying manual and DHCP settings. Open Terminal and run this command to find the exact network service name:
networksetup -listallnetworkservicesTo set a manual IPv4 address, replace SERVICE with that exact name and replace ADDRESS, MASK, and ROUTER with the network’s assigned values. Run the following command and authenticate when prompted:
sudo networksetup -setmanual "SERVICE" ADDRESS MASK ROUTERTo return the service to automatic addressing, replace SERVICE with its exact name in the command below. This requires a network providing DHCP, and the server may assign the previous address again:
sudo networksetup -setdhcp "SERVICE"Both changes require administrative authorization. If you cannot authorize the change on a managed Mac, contact your administrator. Apple discourages using ipconfig outside testing and debugging, so use networksetup for these configuration changes.
Change IPv6 settings when needed
You configure IPv6 separately from IPv4. For a network supplying manual IPv6 values, open the service’s Details > TCP/IP panel and set Configure IPv6 to Manually. Enter the supplied IPv6 address, router address, and prefix length, then click OK.
To undo manual IPv6 configuration, choose Automatically under Configure IPv6 and click OK. If you need to limit IPv6 traffic to the local network, choose Link-local only instead and click OK. That option does not let you choose an arbitrary address.
Restore your connection after an unsuccessful change
When manual IPv4 settings do not give you a usable connection, return to that service’s TCP/IP panel. Set Configure IPv4 to Using DHCP, click OK, then renew the lease on a network providing DHCP.
To reconnect Wi-Fi, open System Settings > Wi-Fi, then turn Wi-Fi off and back on. Reconnecting can leave you with the same local IP address. Forgetting and rejoining the network also does not guarantee a different address.
For a Wi-Fi connection using DHCP, choose Apple menu > Restart to restart your Mac. Apple says restarting automatically renews the address assigned when joining Wi-Fi, although you may receive the same address. Restarting does not replace a manually configured address. If your computer is unresponsive, follow the steps to restart a computer that is frozen.
Frequently Asked Questions
Does Private Wi-Fi Address change my local IP address?
Private Wi-Fi Address changes the MAC address used on a Wi-Fi network. Off uses the hardware MAC address, Fixed uses a private address, and Rotating changes the private address every two weeks. That identity change may affect DHCP assignment, but Apple does not guarantee a different local IP address.
Can I save different IP settings for different networks?
Yes, you can create network locations with different configurations. Open System Settings > Network, open the pop-up menu that contains Locations, choose Locations > Edit Locations, click +, name the location, and click Done. Configure its TCP/IP settings, then exit Network settings or quit System Settings to complete the switch. After creating additional locations, you can switch through Apple menu > Location.
How do I make my Mac prefer Ethernet over Wi-Fi?
Open System Settings > Network > the Action pop-up menu > Set Service Order. Drag the desired service above the others and click OK. This changes connection preference rather than assigning a new address, and you cannot change VPN connection order this way.
Can I change IP settings using voice commands?
Yes, you can operate the network settings through Voice Control with an available microphone. Enable it in System Settings > Accessibility > Voice Control, or ask Siri to turn on Voice Control. Say “Show numbers” and “Click” followed by a displayed number to operate the same TCP/IP controls.