If your iPhone 17e screen is stuck and won't rotate when you turn it sideways, you're not alone. This is a common glitch that can happen on any iPhone, and it's usually a quick software setting to fix.
Since the iPhone 17e is a brand new model, there's always a chance of early software bugs. I'd start with the simplest fix first, which almost always does the trick.
Turn Off Portrait Orientation Lock
This is the number one reason an iPhone screen won't rotate. The Portrait Orientation Lock is a feature that keeps your screen fixed in one position, and it's easy to turn on by accident.
You can check this right from the Control Center. Swipe down from the top-right corner of your screen to open it. Look for the icon that looks like a lock with a circular arrow around it.
If that icon is highlighted or orange, it means Portrait Orientation Lock is on. Just tap it once to turn it off. The icon should go gray, and your screen should start rotating again immediately.
Force Restart Your iPhone 17e
If the lock wasn't on, the next step is a force restart. This clears out any temporary software glitches without affecting your data. For the iPhone 17e, the process is quick.
Press and quickly release the Volume Up button. Then, press and quickly release the Volume Down button. Finally, press and hold the Side button.
Keep holding the Side button until you see the Apple logo appear, then let go. This takes about 10-15 seconds. Once your phone boots back up, try rotating it again.
Check the App Itself
Not every app supports landscape mode. If your screen rotates fine in Safari or Messages but not in a specific app, the developer may have chosen to lock it to portrait.
This is common with some social media, banking, or reading apps. The easiest way to test is to open an app you know works, like the Camera or Photos app, and see if it rotates there.
Update to the Latest iOS
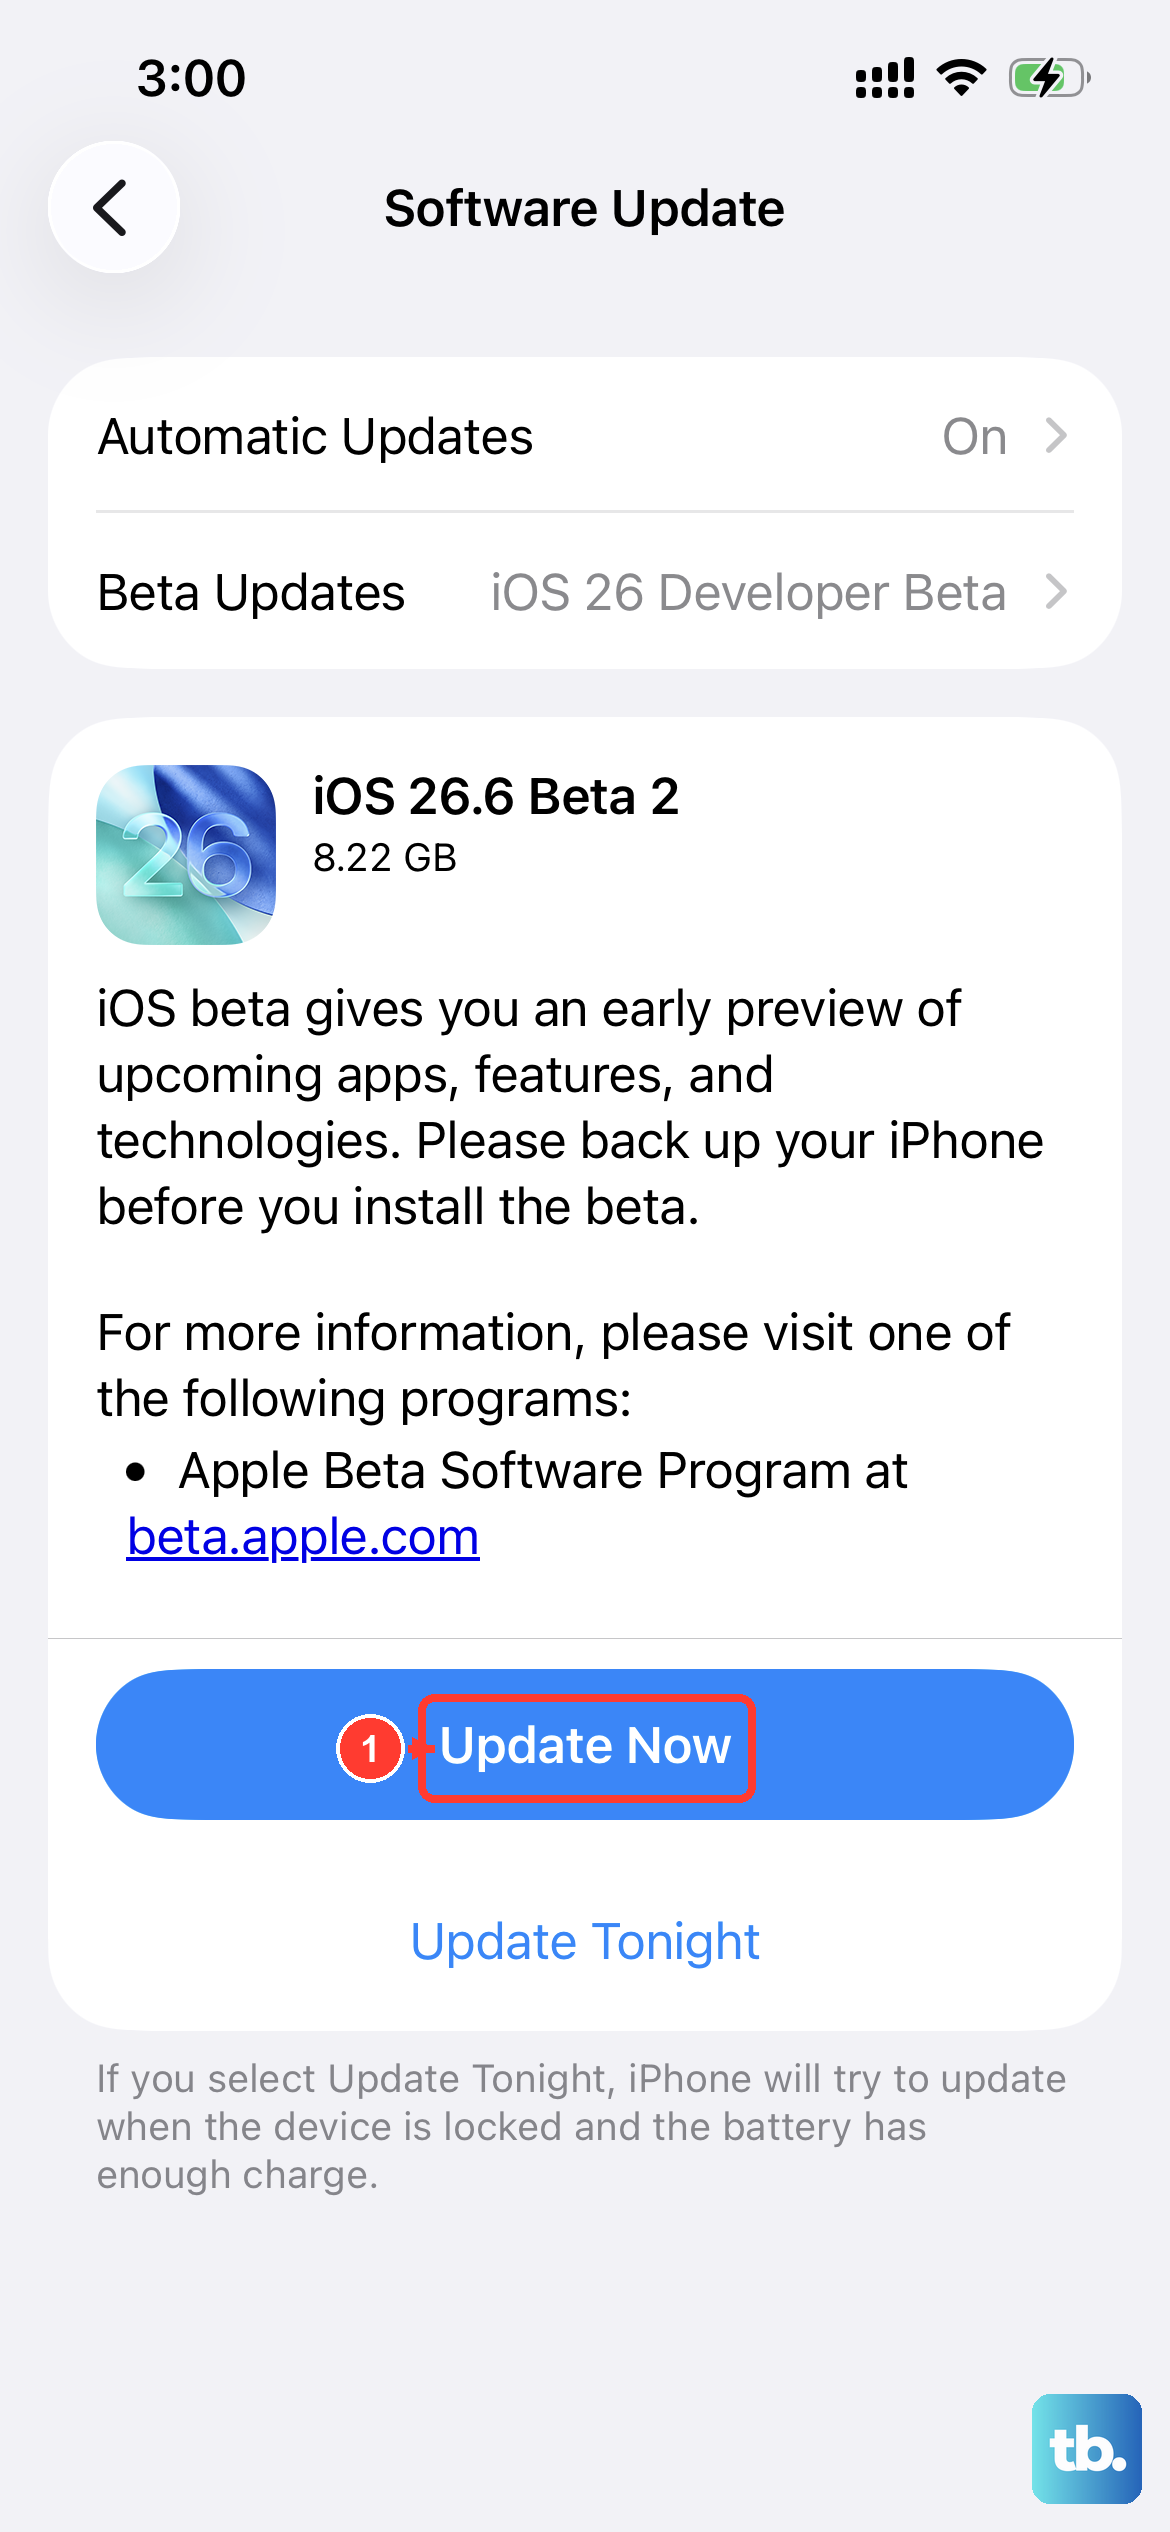
Given the iPhone 17e just launched, Apple is likely pushing out early software updates to squash bugs. A screen rotation issue could be a known bug that's already been patched.
Go to Settings > General > Software Update. If an update is available, tap "Download and Install." Make sure your phone is connected to Wi-Fi and has enough battery, or plug it into its 20W USB-C charger first.
Check for Guided Access or Accessibility Settings
Sometimes, features meant to help can accidentally interfere. Guided Access is a mode that locks your phone into a single app and can disable rotation.
Triple-click the Side button to see if Guided Access is active. If it is, you'll need to enter your passcode or use Face ID to exit it.
Also, check Settings > Accessibility > Touch and make sure "Shake to Undo" isn't interfering, though this is less common.
Test Your Sensors with a Level Tool
Your iPhone uses a gyroscope and accelerometer to know when it's being tilted. While there's no official diagnostic code like on older phones, you can test them easily.
Open the built-in Measure app. There's a level tool built into it. Place your iPhone 17e on a flat surface and see if the tool reads 0 degrees.
Then, carefully tilt the phone. If the numbers change accurately, your sensors are working and the problem is purely software.
Reset All Settings
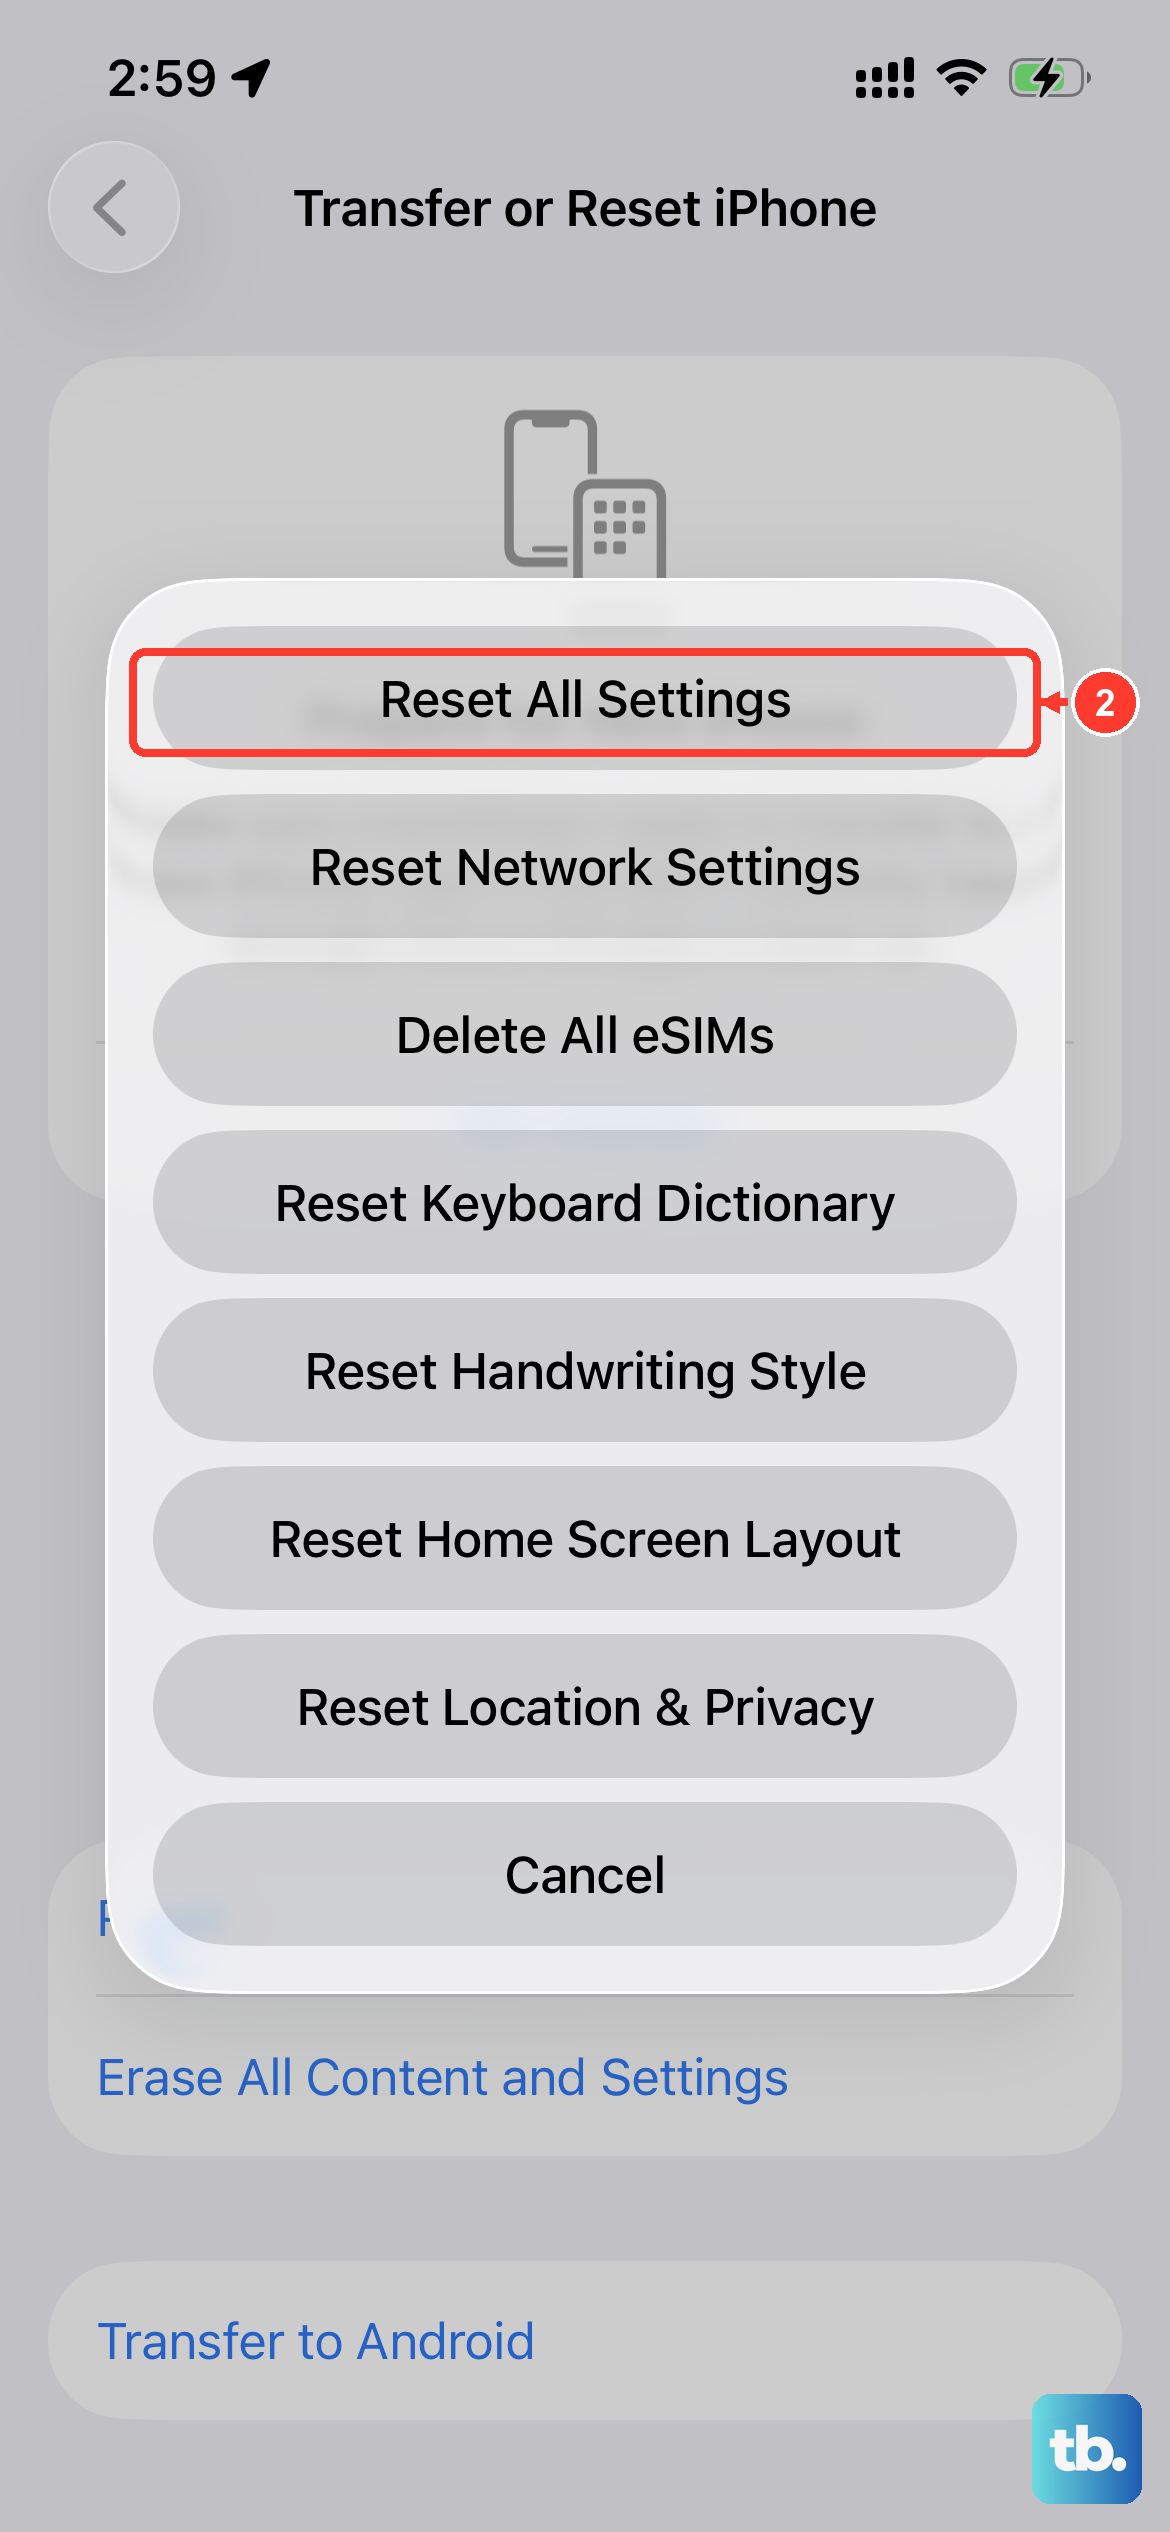
This is a more thorough step that resets all your preferences, like wallpaper, Wi-Fi passwords, and privacy settings, back to default. It won't delete your photos or apps, but you will have to set some things up again.
It can fix deeper configuration conflicts. Go to Settings > General > Transfer or Reset iPhone > Reset > Reset All Settings.
Enter your passcode and confirm. Your phone will restart, and you should test rotation as soon as it boots.
Consider a Software Restoration
If nothing else has worked, the last software step is to restore your iPhone using a computer. This installs a completely fresh copy of iOS 26.
You have two options here. You can do a standard restore, which will wipe your phone, so you must have a recent backup in iCloud or on your computer.
Alternatively, you can put your iPhone 17e into Recovery Mode and choose "Update" instead of "Restore." This reinstalls iOS without erasing your data, though it's always safest to have a backup first. Connect your phone to a Mac or PC with a USB-C cable, open Finder or iTunes, and follow the prompts.


