


To troubleshoot dead or stuck pixels on your laptop, gently clean the screen, inspect it with a solid-color test, then run your model’s hardware diagnostics to choose between software troubleshooting and display repair. A bright stuck pixel may respond to a browser repair tool, but a genuinely dead pixel requires panel replacement. Dell advises against using pixel-fixing software on its displays.
Start with cleaning and the browser color test, then follow the instructions for your laptop brand. The Windows Settings steps below use Windows 11 menus, and the Surface driver procedure applies only to the specified Intel and NVIDIA models.
The short version
- Clean first: Gently wipe the display with a lint-free cloth and inspect the spot again.
- Identify the dot: Use solid black, white, red, green and blue screens to locate pixel defects.
- Check the hardware: Run the diagnostic procedure supported by your laptop model.
- Match the repair: Consider a browser tool for a bright stuck pixel on a non-Dell display, or seek a repair assessment for a dead pixel.
| Check or option | When it applies | Purpose |
|---|---|---|
| Gentle cleaning | A spot resembles a pixel defect | Remove surface dirt |
| Browser color test | A compatible laptop browser | Identify pixel defects |
| Dell LCD self-test | Dell laptops with LCD BIST | Check the panel independently of Windows |
| Dell enhanced self-test | Newer models with supporting BIOS | Inspect patterns and record LED sequences |
| Dell boot diagnostics | Laptops covered by Dell’s pixel guidance | Inspect solid-color screens |
| Lenovo LCD self-test | Models whose manuals confirm support | Inspect full-screen colors |
| Apple-silicon diagnostics | Apple-silicon MacBook Air and Pro | Run diagnostics and collect reference codes |
| Intel MacBook diagnostics | Intel models supporting Apple Diagnostics | Run diagnostics and collect reference codes |
| Surface button entry to UEFI | Models with the documented volume-up procedure | Check the dot outside Windows |
| Surface Windows entry to UEFI | Windows 11 Surface devices | Inspect the display through firmware |
| Surface driver reinstall | Eligible Intel or NVIDIA models when the dot disappears in UEFI | Address a possible software problem |
| HP BIOS and graphics updates | Covered HP notebooks with small dark or light dots | Address software display artifacts |
| HP Software and Drivers | Supported HP laptop models | Find model-specific update packages |
| JScreenFix repair tool | Bright stuck pixels on non-Dell displays | Attempt repair without a guarantee |
| JScreenFix product information | You are considering the browser tool | Review diagnosis and repair information |
| ASUS OLED Care Pixel refresh | Selected ASUS OLED laptops | Maintain OLED image quality |
| ASUS OLED Care Pixel shift | Selected ASUS OLED laptops | Reduce prolonged static-image exposure |
| Dell repair assessment | Persistent Dell laptop pixel defects | Check coverage and replacement eligibility |
| Apple professional inspection | MacBook LCD pixel anomalies | Assess defects or internal debris |
| Apple Self Service Repair | Eligible models, regions and experienced repairers | Follow a model-specific display replacement procedure |
| Surface service request | Consumer Surface devices | Arrange available repair service |
| Surface app or browser support | You need assisted troubleshooting | Get help or escalate the defect |
| Organization IT helpdesk | Managed Surface devices with restrictions | Handle restricted access, changes or repair |
Clean the screen and identify the defect
Gently clean the screen with a lint-free cloth, then inspect the spot again. Surface dirt can resemble a defective pixel, so make this your first check. Do not press on the panel; material trapped inside the display requires professional service.
If the spot remains, open EIZO Monitor Test in a compatible browser. Choose Select none, select Defective Pixels, then select Start test. You can use this diagnostic with laptop screens accessible through compatible browsers on Windows, macOS and ChromeOS.
Inspect the black, white, red, green and blue screens, using the Arrow keys to advance. Press Space to hide the controls and Esc to exit. A lit dot against black indicates an illuminated subpixel, while a black dot against white indicates a missing pixel. This test identifies defects but does not repair them.
Run the supported Dell or Lenovo screen test
On a Dell laptop with LCD BIST support, shut down, disconnect peripherals and connect the charger. Hold D and press the Power button, then release D when colors appear. Inspect each solid-color screen for dots that stay in the same place.
Press Esc to stop the test, or hold the Power button for 10 seconds. This checks the panel independently of Windows and does not repair pixels. Record any persistent defects for a repair assessment.
Newer Dell laptops with supporting BIOS may run an enhanced version through the same startup procedure. Inspect the patterns, record any amber and white LED sequences, and photograph abnormalities for Dell support. Models without enhanced-test support continue with the basic test.
Dell also provides a boot-menu diagnostic route on laptops covered by its pixel guidance. Restart and press F12 repeatedly at the Dell logo, then select Diagnostics. Inspect the solid colors for bright dots on black, dark dots on white and mismatched dots on red, green or blue.
For a Lenovo laptop, first check its Hardware Maintenance Manual for LCD Self-Test support. The procedure covers most ThinkPads released after 2022, specified earlier ThinkPads and selected Lenovo Notebook and ThinkBook models. Use this keyboard procedure only when your model’s manual confirms support; otherwise, you can still inspect the display with the browser color test.
On a supported Lenovo, turn off the laptop and connect AC power. Press Fn + Left Ctrl + Power together and inspect the full-screen colors. The test ends after approximately 20 seconds; pressing the Power button also exits.
Run Apple Diagnostics on a MacBook
On an Apple-silicon MacBook Air or MacBook Pro, shut down and disconnect unnecessary peripherals, keeping AC power connected. Hold the Power or Touch ID button until Options appears. Release the button, then hold Command + D until the Mac restarts.
If offered, click Run Offline. In macOS Tahoe 26 or later, choose the built-in display diagnostic when prompted. Record any reference codes for the repair assessment.
On an Intel MacBook that supports Apple Diagnostics, shut down and disconnect unnecessary peripherals. Start the Mac while holding D, or use Option + D if that does not work. Release the keys when a progress bar or language prompt appears, follow the diagnostic prompts and record any reference codes.
Check whether a Surface pixel persists in UEFI
On a Surface with the documented volume-up button procedure, turn it off and wait 10 seconds. Hold Volume Up while pressing and releasing Power, then release Volume Up when UEFI appears. Check whether the dot remains visible.
You can also use the Windows route, which Microsoft documents for Surface models including the Surface Laptop, Laptop Go and Laptop Studio families. On Windows 11, open Start > Settings > System > Recovery. Beside Advanced startup, select Restart Now.
Under Choose an option, select Troubleshoot > Advanced Options > UEFI Firmware Settings > Restart. Inspect the display without changing firmware settings. To leave, select Exit > Restart now.
A dot that persists in UEFI suggests a hardware problem, so move to service assessment. If it disappears, continue with the eligible Surface driver procedure below. On an organization-managed Surface, contact your IT helpdesk for restricted diagnostics, driver changes or repair, and ask the administrator to handle password-protected UEFI access.
Reinstall Surface drivers when the dot disappears in UEFI
This procedure applies only to Windows 11 Surface models using the documented Intel or NVIDIA adapters, and only when the defect disappears in UEFI. Microsoft excludes Microsoft SQ-based devices, including Surface Pro X and Surface Pro 9 with 5G. For those devices or models outside this driver scope, open the Surface app, describe the pixel problem and select Get Help.
The next step uninstalls the Surface panel driver. Right-click Start, select Device Manager and expand Monitor. Right-click the Surface panel driver, select Uninstall device, then select Uninstall and restart.
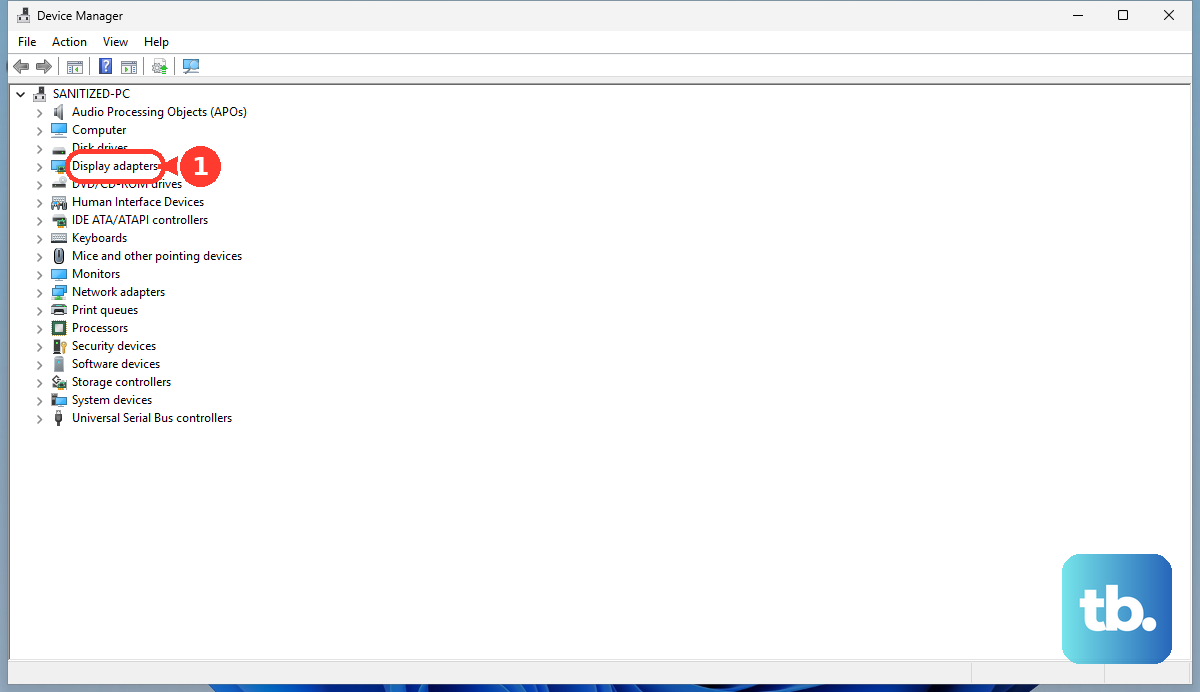
The next step uninstalls the graphics adapter and attempts to remove its driver. In Device Manager, expand Display adapters, right-click the Intel or NVIDIA adapter and select Uninstall device. Select Attempt to remove the driver for this device, select Uninstall and restart.
On Windows 11, open Start > Settings > Windows Update, then select Check for updates and install available updates. Recheck the display afterward. If the defect remains, use Surface support for further assessment.
Update an HP laptop to address software artifacts
For HP notebooks covered by its Windows 10 and Windows 11 screen troubleshooting, HP recommends the model’s latest BIOS and graphics driver for small dark or light dots. Open HP Software and Drivers, choose Laptop and identify your exact model. Obtain its updates and follow each package’s installation instructions.
You can find and update your graphics driver as part of this software check, using the package appropriate to your HP model and operating system. These updates can address software display problems, but they do not restore electrically failed pixels. Recheck the display and seek assessment if the dot persists.
Try a browser tool for a bright stuck pixel
For a bright stuck pixel on a non-Dell display, JScreenFix offers a browser-based repair attempt. Its publisher supports use on LCD and OLED displays with a JavaScript-capable browser, but success is not guaranteed and this is not a laptop-manufacturer endorsement. Dell advises against this software approach on its displays, so use Dell’s diagnostic and service routes instead.
You can review the publisher’s diagnosis and repair information on its product page before proceeding. Open the official JScreenFix repair tool, drag the animated square over the bright stuck pixel and leave it running for at least 10 minutes. Use Fullscreen for a pixel near the screen’s edge, then recheck the dot against black afterward.
The publisher permits repeating the attempt, but says that failure after one hour probably means the tool cannot fix the pixel. At that point, move to a repair assessment. A genuinely dead pixel requires panel replacement.
Use ASUS OLED Care for display maintenance
On selected ASUS OLED laptops, open MyASUS > Device Settings > Audio & Visual > ASUS OLED Care. Enable Pixel refresh where available for OLED protection and image-quality maintenance. ASUS describes this feature as maintenance, not a cure for failed pixels.
In the same controls, enable Pixel shift where available. It slightly moves displayed content to reduce prolonged static-image exposure. Availability varies by model, and neither maintenance option replaces assessment of an individual dead or stuck pixel.
Get a persistent defect assessed for repair
For a Dell laptop, record the number and locations of bright and dark defects. Enter the laptop’s Service Tag at Dell Support, check coverage and compare the laptop-specific pixel-policy table, then contact Dell Technical Support for assessment. Dell lists all Dell laptops with HD+ (1600 x 900) or higher resolution under Premium Panel Exchange, which allows no bright pixels during the warranty period, while dark-pixel allowances and lower-resolution displays follow the laptop pixel-policy table and your coverage.
For a MacBook with LCD pixel anomalies, arrange an assessment through an Apple Store, Apple Authorized Service Provider or Independent Repair Provider. Have the display examined for pixel defects or internal debris. Bring any reference codes collected during Apple Diagnostics.
Apple Self Service Repair is another option for eligible Mac models and regions, intended for people experienced in electronics repair. The procedure replaces the display. Open Self Service Repair, choose Mac laptop and read your exact model’s manual before ordering parts and tools through Self Service Repair Store. Follow the model-specific replacement procedure and any required Repair Assistant or System Configuration steps.
For assisted Surface troubleshooting, open the Surface app or use the web-browser support link on Microsoft’s display-support page. Describe the pixel problem and select Get Help. This gives you a route to further assessment when the applicable checks do not resolve the defect.
For a consumer Surface service request, open the devices page in your Microsoft account, choose the device requiring service, select Next and complete the request. Follow Microsoft’s preparation and shipping instructions. Authorized Service Provider appointments are another option in supported regions, and service availability and charges depend on the model, region and coverage.
Frequently Asked Questions
Do you need to install JScreenFix on your laptop?
No installation is required for the current JScreenFix product. It runs in a browser, so you do not need an operating-system-specific download.
Does Dell Premium Panel Exchange cover a laptop with one defective pixel?
Dell lists all Dell laptops with HD+ (1600 x 900) or higher resolution under Premium Panel Exchange, so one bright pixel during the warranty period qualifies for a display replacement on those models. Dark pixels and lower-resolution displays follow Dell’s laptop pixel-policy table, so check your resolution and warranty coverage with Dell Support.
Will Apple charge to assess a MacBook pixel defect?
An evaluation may incur a charge. Repairs performed by an Independent Repair Provider are not covered by Apple’s warranty or AppleCare.
When does ASUS Pixel refresh activate?
On selected ASUS OLED laptops with the feature enabled, Pixel refresh activates a special screensaver after 30 minutes of inactivity. You should expect an inactivity-triggered maintenance feature rather than an immediate repair of a failed pixel.
What happens to ASUS OLED Care controls if you remove MyASUS?
Removing the app named MyASUS removes access to the OLED Care controls. If you use those controls on a supported ASUS OLED laptop, keep that consequence in mind before removing the app.