


If your PC doesn't support Miracast, turn on Wi-Fi and update its graphics and wireless drivers, then use a compatible display cable or Google Cast if support remains unavailable. Check the sending PC first by pressing Windows + K. Installing Wireless Display on a receiving PC cannot fix missing hardware support on the sender. The steps below use Windows 11 menus.
The short version
- Check support: Press Windows + K to see available receivers; an unsupported PC might show a message that a cable is needed.
- Restore Wi-Fi: Turn on Wi-Fi and enable a disabled wireless adapter before retrying.
- Update both drivers: Check for compatible graphics and Wi-Fi driver updates for your PC.
- Choose an alternative: Use a suitable display cable or Google Cast when the sending PC lacks Miracast support.
| Check or fix | When to use it | Action |
|---|---|---|
| Windows compatibility check | You need to check sender support | Press Windows + K |
| DirectX report | You want another compatibility check | Run dxdiag and save the report |
| Wi-Fi control | Wi-Fi is off | Turn on Wi-Fi |
| Taskbar casting | Your PC supports Miracast | Select Network > Cast |
| Wireless adapter or radio | The adapter or physical switch is off | Enable the adapter or turn on the switch |
| Wireless service | Wi-Fi is missing or malfunctioning | Restart WLAN AutoConfig |
| Windows updates | Compatible hardware cannot cast | Install Windows and applicable optional driver updates |
| Manufacturer drivers | You need compatible graphics and Wi-Fi drivers | Identify your model on its manufacturer's support site |
| Dell driver downloads | You have a Dell PC | Identify your product on Dell's driver page |
| TV receiving mode | Your Miracast TV is missing from the list | Open its mirroring mode |
| External Miracast receiver | Your display lacks built-in Miracast | Connect a receiver to HDMI and USB power |
| Projection mode | The connection works but the picture is unexpected | Press Windows + P and choose a mode |
| Restart both devices | A connection has stopped working | Restart the PC and wireless display |
| Pair again | A saved receiver will not reconnect | Remove its saved connection and reconnect |
| Driver reinstallation | A compatible device may have a damaged driver | Uninstall the affected driver and restart |
| Receiving PC feature | Another compatible PC should receive your screen | Install Wireless Display |
| Receiving PC app | The receiving feature is installed | Open Wireless Display before connecting |
| Microsoft adapter placement | A Microsoft adapter has connection trouble | Check USB power, distance, and interference |
| Microsoft adapter app | You need its firmware controls | Select Get in Microsoft Store |
| Microsoft adapter firmware | You can connect to the adapter | Open Update & security > Update |
| Wireless band selection | Microsoft adapter pairing fails and the driver exposes band controls | Set Band to Auto |
| ScreenBeam VPN check | A visible ScreenBeam receiver will not connect | Disconnect the VPN and retry |
| Wired connection | The PC has a suitable video output | Connect a cable and press Windows + P |
| Chrome download | You need the browser for Google Cast | Get Chrome from Google's download page |
| Google Cast | You have a compatible Google Cast receiver | Share a tab or screen from Chrome |
Check the sending PC first
Press Windows + K on the PC whose screen you want to share. Windows lists available displays, and if your PC doesn't support Miracast, you might see a message saying you need to connect an external display with a cable. If you see your receiver, select it and try connecting before changing drivers or other settings.
For another compatibility check, inspect the DirectX diagnostic report. Press Windows + R, type the command below, then press Enter.
dxdiagSelect Save All Information and open the saved DxDiag.txt file. Locate the Miracast entry under System Information and read its reported availability. You can also use this diagnostic on Windows 10.
If Windows reports that Miracast is unsupported, check the wireless adapter and drivers next. A receiver attached to your TV cannot add missing Miracast capability to the sending PC. If support remains unavailable after those checks, use the cable or Google Cast options below.
Turn on Wi-Fi and restore a missing adapter
Select the taskbar Network, Sound, or Battery area, then turn on Wi-Fi. Press Windows + K again and select your receiver. On a Miracast-capable PC, you can also select the taskbar Network icon, choose Cast, and select the display.
If your laptop has a physical Wi-Fi switch, turn it on. To restore a disabled adapter, open Device Manager and expand Network adapters. Right-click the disabled Wi-Fi adapter and select Enable device.
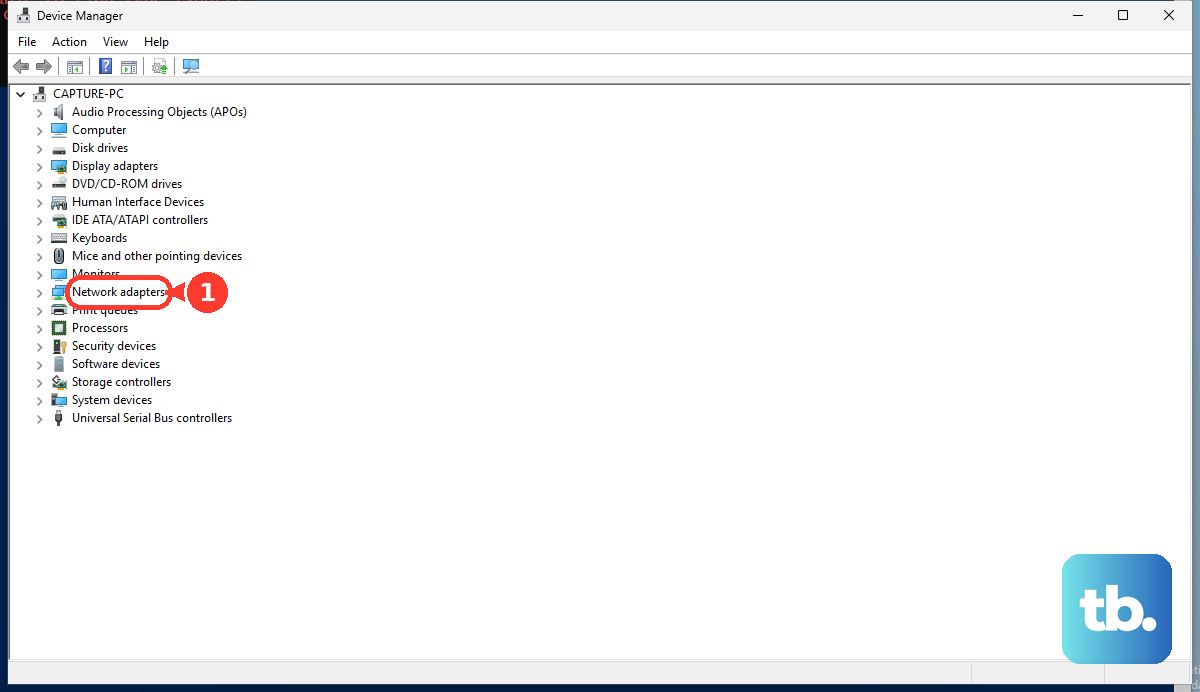
When Wi-Fi is missing or malfunctioning, restart its Windows service. Press Windows + R, enter the command below, and press Enter.
services.mscRight-click WLAN AutoConfig and select Restart. Once Wi-Fi is working, retry the connection with Windows + K. If the receiver still does not appear, check its receiving mode after updating the drivers.
Update the graphics and wireless drivers
Check both the graphics and Wi-Fi drivers when compatible hardware will not cast. On Windows 11, open Settings > Windows Update and select Check for updates. Install the available updates.
For optional drivers, on Windows 11 open Settings > Windows Update > Advanced options and turn on Receive updates for other Microsoft products. Open Optional updates, select applicable driver entries, and select Download and install. Restart the PC after installing the updates.
If Windows offers no applicable driver update, identify your PC model and installed Windows version on its manufacturer's support site. Install compatible graphics and Wi-Fi drivers, then press Windows + K again. For the graphics portion, follow the steps to find and update your graphics driver.
For a Dell PC, open Dell's driver download page and identify your product. Choose drivers compatible with that model and its supported operating system. For another brand, use the corresponding PC manufacturer's support site.
Make the display ready to receive
Turn on your Miracast-capable TV and open its input or source menu. Select Screen Mirroring, Miracast, or Wireless Display, depending on the model. Wait for its ready-to-connect screen, then select it from the PC using Windows + K.
For a display without built-in Miracast, connect a Miracast receiver to its HDMI input and the receiver's required USB power supply. Select that HDMI input on the display, then connect from the PC with Windows + K. This option requires a Miracast-capable sending PC and a display with suitable inputs.
Once a connection succeeds, an unexpected or apparently empty second screen may need a different projection mode. On Windows 11, press Windows + P and select Duplicate, Extend, or Second screen only, as appropriate. If another Windows PC will receive your screen, follow the receiving PC setup below.
Repair a connection that previously worked
Restart the PC and wireless display, then reconnect with Windows + K. If a saved receiver still refuses to connect, remove its saved connection and pair it again.
Removing the device deletes its saved wireless-display connection, so you will need to reconnect it. On Windows 11, open Start > Settings > Bluetooth & devices > Devices > Wireless displays & docks. Select the receiver, select Remove device, then select Yes and reconnect using Windows + K.
If compatible hardware still fails and a graphics or Wi-Fi driver may be damaged, reinstall that driver. Save your work, right-click Start, open Device Manager, and expand Display adapters or Network adapters for the affected device.
After you uninstall the device and restart, Windows attempts to reinstall its driver. Right-click the affected device, select Uninstall device, then select Uninstall. Restart the PC and retry casting after Windows attempts to reinstall the driver.
Set up another PC as the receiver
Install Wireless Display on the compatible PC that will receive the picture. On the receiving Windows 11 PC, open Start > Settings > System > Projecting to this PC > Optional features. Beside Add an optional feature, select View features.
Search for Wireless Display, check Wireless Display, and select Next > Install. Return to Projecting to this PC to configure discovery. Installing this feature does not supply missing Miracast hardware support on the sender.
On Windows 11 version 22H2 and later, search the receiving PC's taskbar for Wireless Display and open Wireless Display. On the sending PC, press Windows + K and select the receiving PC.
Check settings specific to your receiver
For a Microsoft Wireless Display Adapter, check its power supply and placement. Use stable USB power of at least 5W (5V/1A), keep the PC within 7 meters, and move interfering electronics away. These requirements apply specifically to Microsoft Wireless Display Adapters.
If you can connect to that adapter, update its firmware using the Microsoft Wireless Display Adapter app; select Get in Microsoft Store to obtain it. Connect to the adapter, open Microsoft Wireless Display Adapter, and select Update & security > Update. Keep the connection and app open until the update finishes.
For Microsoft adapter pairing problems, check automatic band selection if your driver exposes these controls. Open Device Manager > Network adapters, right-click the adapter, and select Properties > Advanced > Band. Set Value to Auto and select OK. If those controls are absent, skip this check and use another applicable fix or display method.
For a ScreenBeam receiver that appears in the list but fails to connect, disconnect your VPN using its client and retry the ScreenBeam connection. The exact disconnect control depends on the VPN app. This troubleshooting step applies specifically to ScreenBeam connections.
Use a cable or Google Cast instead
A wired connection works with a Windows 11 PC that has a suitable video output, including a PC without Miracast. Connect that output to the display using a compatible cable or adapter, then press Windows + P and select Extend. If the connection fails, test another cable, output port, or display.
Google Cast offers another option with current Chrome on a supported Windows PC and a compatible receiver. Receivers include Google TV Streamer, supported Chromecast devices, and TVs with Google Cast. Get Chrome from Google's Chrome download page if you need the browser, then connect the PC and receiver to the same Wi-Fi network.
In Chrome, select More > Cast, save, and share > Cast…, then choose the receiver to share a tab. To share your desktop, select Sources > Cast screen before choosing the receiver.
Frequently Asked Questions
Should you download Intel WiDi to fix Miracast?
No, Intel discontinued WiDi and Pro WiDi and removed their downloads. Use supported Windows Miracast functionality or another display method instead.
What can help when a wireless display keeps disconnecting?
On Windows 11, you can disable Wi-Fi adapter power saving if the adapter exposes a Power Management tab. Open Device Manager, expand Network adapters, open the Wi-Fi adapter's Properties, select Power Management, and uncheck Allow the computer to turn off this device to save power. If that tab is absent, skip this check and try the applicable driver or receiver fixes.
Can changing the network improve a Microsoft 4K Wireless Display Adapter connection?
Joining the PC's network can improve performance for the Microsoft 4K Wireless Display Adapter. Connect to the adapter, open Microsoft Wireless Display Adapter, select Network, choose the network, and select Connect. This option applies specifically to the 4K model.
Can Chrome cast a local video instead of your whole desktop?
Yes, you can open a supported local file in Chrome and cast it to a compatible Google Cast receiver. Press Ctrl + O, open the file, then select More > Cast, save, and share > Cast…. On a Google Cast-enabled website, you can instead use the media player's Cast control.