

To set up Network Solutions email on your iPhone, open Settings > Apps > Mail > Mail Accounts > Add Account, enter your mailbox credentials, and use manual IMAP settings if automatic discovery fails. You need an existing mailbox, its password, and the server settings for your domain. The Apple Mail paths below use the iOS 26 and iOS 27 interface.
The short version
- Start with Apple Mail: Add your email account and let Mail try to discover its settings.
- Use your mailbox password: Enter the email password rather than your Network Solutions account-management password.
- Get the right servers: Look up your domain in the Email Settings Portal before entering manual settings.
- Choose IMAP for synchronization: IMAP keeps mail synchronized across devices.
- Check migrated accounts: Former Domain.com, Dotster, and MyDomain mailboxes have separate server settings.
| Option | When it applies | What you need |
|---|---|---|
| Email Settings Portal | Finding standard mailbox settings | Your domain |
| Apple Mail automatic discovery | Adding an existing mailbox | Mailbox address and password |
| Apple Mail manual IMAP | Synchronizing mail across devices | IMAP and SMTP settings |
| Apple Mail POP | Your mailbox has POP access | POP and SMTP settings |
| Webmail configuration profile | Webmail offers Connect this device | Mailbox credentials and iPhone passcode |
| Domains Dashboard configuration | Your account has this dashboard | Domain and mailbox access |
| Migrated mailbox settings | Former Domain.com, Dotster, or MyDomain mailbox | Matching brand servers |
| Outlook IMAP setup | Adding your mailbox to Outlook | IMAP and SMTP credentials |
| Outlook installation | You need the Outlook app | iOS 26.0 or later |
| Gmail IMAP setup | Adding your mailbox to Gmail | IMAP and SMTP credentials |
| Gmail installation | You need the Gmail app | iOS 18.0 or later |
| Safari webmail | Browser access to your mailbox | Domain-based webmail credentials |
| Account Manager webmail | You administer the email account | Account Manager access |
| Apple Mail Exchange setup | You have an actual Exchange mailbox | ActiveSync enabled |
| Exchange administration | Your hosted Exchange account uses the Control Panel | Administrator access |
| Managed Mail configuration | Your iPhone is enrolled in device management | Your administrator’s Mail configuration |
| Enable an existing mailbox | The account is already added | The account’s Mail setting |
| Fetch schedule | The account lacks Push support | Fetch New Data settings |
| Rebuild a manual account | A manually added account still fails | Preserved local mail and correct settings |
| Rebuild a profile account | A profile-configured account still fails | Access to its configuration profile |
| Cloud Mail forwarding | Receiving mail in another mailbox | A destination email address |
| AppSuite or MegaMail forwarding | You use webmail version 7.10.2 | A destination email address |
Get your mailbox credentials and server settings
Have your full email address and mailbox password ready. Use the mailbox password rather than your Network Solutions account-management password. Enter your mailbox credentials only in Network Solutions webmail or a legitimate email app, and never share a code, password, or remote access with someone who contacts you.
Open the Email Settings Portal and enter your domain in Enter yourdomainname.com. Use the returned server names for your mailbox. Standard Network Solutions POP/IMAP mailboxes use incoming IMAP port 993 or POP port 995 and outgoing SMTP port 587.
Use SSL/TLS with a TLS 1.2-capable client. Outgoing SMTP requires authentication with your full email address and mailbox password. Mailboxes purchased from Domain.com, Dotster, or MyDomain before migration use the brand-specific settings below.
For a former Domain.com mailbox, use imap.domain.com or pop.domain.com, plus smtp.domain.com. For Dotster, use imap.dotster.com or pop.dotster.com, plus smtp.dotster.com. For MyDomain, use imap.mydomain.com or pop.mydomain.com, plus smtp.mydomain.com. These migrated mailboxes use encrypted IMAP port 993, POP port 995, and SMTP port 465, with the full mailbox address and password.
If your Powered by Network Solutions account has the Domains Dashboard, sign in and select your domain, or select Manage in Card view. Open Standard, then open the three-dot menu beside the mailbox and select Client Setup > Mobile Setup. Choose the iOS client from the drop-down, select IMAP or POP and the SSL setting, then follow the generated instructions. Access to Standard may require a hosting plan.
Add the account in Apple Mail
Open Settings > Apps > Mail > Mail Accounts > Add Account. Enter your email address and tap Next. Tap Add Other Account, then select Mail Account.
Fill in Name, Email, Password, and Description, then tap Next. Mail will try to discover the account settings. If it succeeds, tap Done; if discovery fails, continue with manual setup.
Select IMAP to synchronize mail across devices. Fill in Incoming Mail Server and Outgoing Mail Server with your domain-specific settings. Enter your full mailbox address and mailbox password for both servers, including the outgoing server even if you have already supplied them for incoming mail.
For a standard Network Solutions mailbox, use incoming IMAP port 993 and outgoing SMTP port 587 with SSL/TLS. For the migrated brands listed above, use their matching servers and SMTP port 465. Tap Next, then tap Save.
If your mailbox has POP access and you want to use it, select POP instead of IMAP in the same manual setup flow. Enter the mailbox’s POP incoming server and SMTP outgoing server, using the full email address and mailbox password for authentication. Use encrypted incoming POP port 995 and the SMTP port for your mailbox’s platform, then tap Next and Save.
Install a configuration profile from webmail
If your Network Solutions webmail includes Connect this device, you can download its automatic configuration profile. In Safari, open mail.yourdomain.com, substituting your own domain. Enter your mailbox credentials and tap Sign In.
Open Menu > Connect this device, choose the application, and tap Download configuration. Tap Allow, then tap Close. Open Settings > Profile Downloaded and tap Install.
Enter your iPhone passcode, then tap Install again. Enter the mailbox password and tap Next. On Profile Installed, tap the upper-right check mark to finish.
Set up the mailbox in Outlook or Gmail
To use Outlook, install Microsoft Outlook for iPhone, which requires iOS 26.0 or later. Open Outlook, go to its settings, and add an email account using your mailbox address.
When Outlook asks for the account type, choose IMAP and enter the mailbox password. Use the advanced settings to enter your Network Solutions IMAP and SMTP server information and credentials, then tap Sign In to finish.
For Gmail, install Gmail for iPhone, which requires iOS 18.0 or later. Open Gmail and tap Profile > Add another account > Other (IMAP). Enter your full Network Solutions email address and tap Next.
Enter the mailbox’s IMAP settings and password, then complete the remaining setup prompts using its SMTP settings when requested. This gives you direct IMAP access inside Gmail. In either app, use the server names and ports for your mailbox’s platform.
Configure an Exchange or managed work mailbox
Choose Exchange only if you have an actual Network Solutions Exchange/ActiveSync mailbox with ActiveSync enabled. For an ordinary POP/IMAP mailbox, use the Apple Mail setup above. Your Exchange administrator supplies the connection details needed for manual configuration.
If you administer a hosted Exchange account using the Network Solutions Control Panel, open Users and select the user’s Display Name. Open Exchange > Optional Services > ActiveSync, then select Enable ActiveSync. Find the connection details under Services > Mailboxes > Mobile > ActiveSync. Use the displayed Exchange Proxy server name, Exchange domain, and full email address or ActiveSync username on the iPhone.
On the iPhone, open Settings > Apps > Mail > Mail Accounts > Add Account > Microsoft Exchange. Enter your email address and an optional description, then tap Next. Tap Sign In for discovery and authentication.
If your server supports Basic authentication, you can instead tap Configure Manually and enter the administrator-provided server information. Enable Mail and any supported Contacts, Calendars, Reminders, or Notes synchronization. Tap Save to finish.
For an enrolled work iPhone, your administrator can deploy a Mail configuration through the organization’s device-management service. If you administer that service, configure a Mail payload with Account type set to POP or IMAP, the Account email address, and the incoming and outgoing server and authentication settings, then deploy it to the enrolled iPhone. The administration menus depend on your management vendor.
Enable Mail and choose when messages arrive
After adding the account in Apple Mail, open Settings > Apps > Mail > Mail Accounts and select your Network Solutions account. Turn on Mail to use the mailbox. Check this setting if the account is already added but is not enabled.
For an account without Push support, open Settings > Apps > Mail > Mail Accounts > Fetch New Data. Under Fetch, choose a schedule. The Automatically option retrieves data while your iPhone is charging and connected to Wi-Fi, so choose a timed schedule for checks outside those conditions.
Access your mailbox through Safari
To access domain-based webmail, open Safari and visit mail.yourdomain.com, replacing the domain with your own. Enter your mailbox credentials and select Login, or Sign In if you use Cloud Mail. Bookmark the page for repeat access without adding an iPhone mail account.
If you administer the email account, you can also sign in to Network Solutions Account Manager and select Professional Email. Open the vertical ellipsis beside the mailbox and select Webmail Login. Enter your mailbox credentials on the resulting login page.
Forward messages to a mailbox already on your iPhone
Cloud Mail, AppSuite, and MegaMail let you forward incoming messages to another mailbox you already access on your iPhone. Forwarding is a receive-only alternative. It does not configure your iPhone to send as the Network Solutions address.
In Cloud Mail, open the gear icon, then select All Settings > Mail > Rules > Auto forward. Enable forwarding and enter the destination mailbox. Select keep a copy of the message, then click Apply changes.
Alternatively, under Rules, select Add new rule and name the rule. Select Add Condition > To and enter your Network Solutions address. Select Add action > Redirect to, enter the destination address, and select Save.
For AppSuite webmail version 7.10.2, sign in to domain-based webmail and open the user profile, then select Settings > Auto forward.... Enable forwarding and enter the destination mailbox. Enable Keep a copy of the message, then click Apply changes.
For MegaMail webmail version 7.10.2, sign in to domain-based webmail, open the gear icon, and select Settings. Open My Account, then select Forwarding. Turn forwarding on, enter the destination mailbox, and select Save local copy.
Rebuild an account that still will not connect
Before rebuilding the setup, check that you entered the mailbox password rather than the account-management password. Compare both server names and ports with your domain’s settings, and confirm that SMTP authentication uses your full email address and mailbox password. If those details are correct but the connection still fails, remove the existing setup and add it again.
Removing an account can lose mail stored only locally, especially with POP, so preserve any locally stored mail first. For a manually added account, open Settings > Apps > Mail > Mail Accounts, select the account, and tap Delete Account. Add it again using your mailbox’s correct settings.
Removing a configuration profile also removes the accounts and settings supplied by that profile. For an account installed through a profile, open Settings > General > VPN & Device Management, select the relevant email profile, and tap Remove Profile. Repeat the webmail profile setup or configure the mailbox manually. If your organization manages the profile, you may need administrator assistance to remove it.
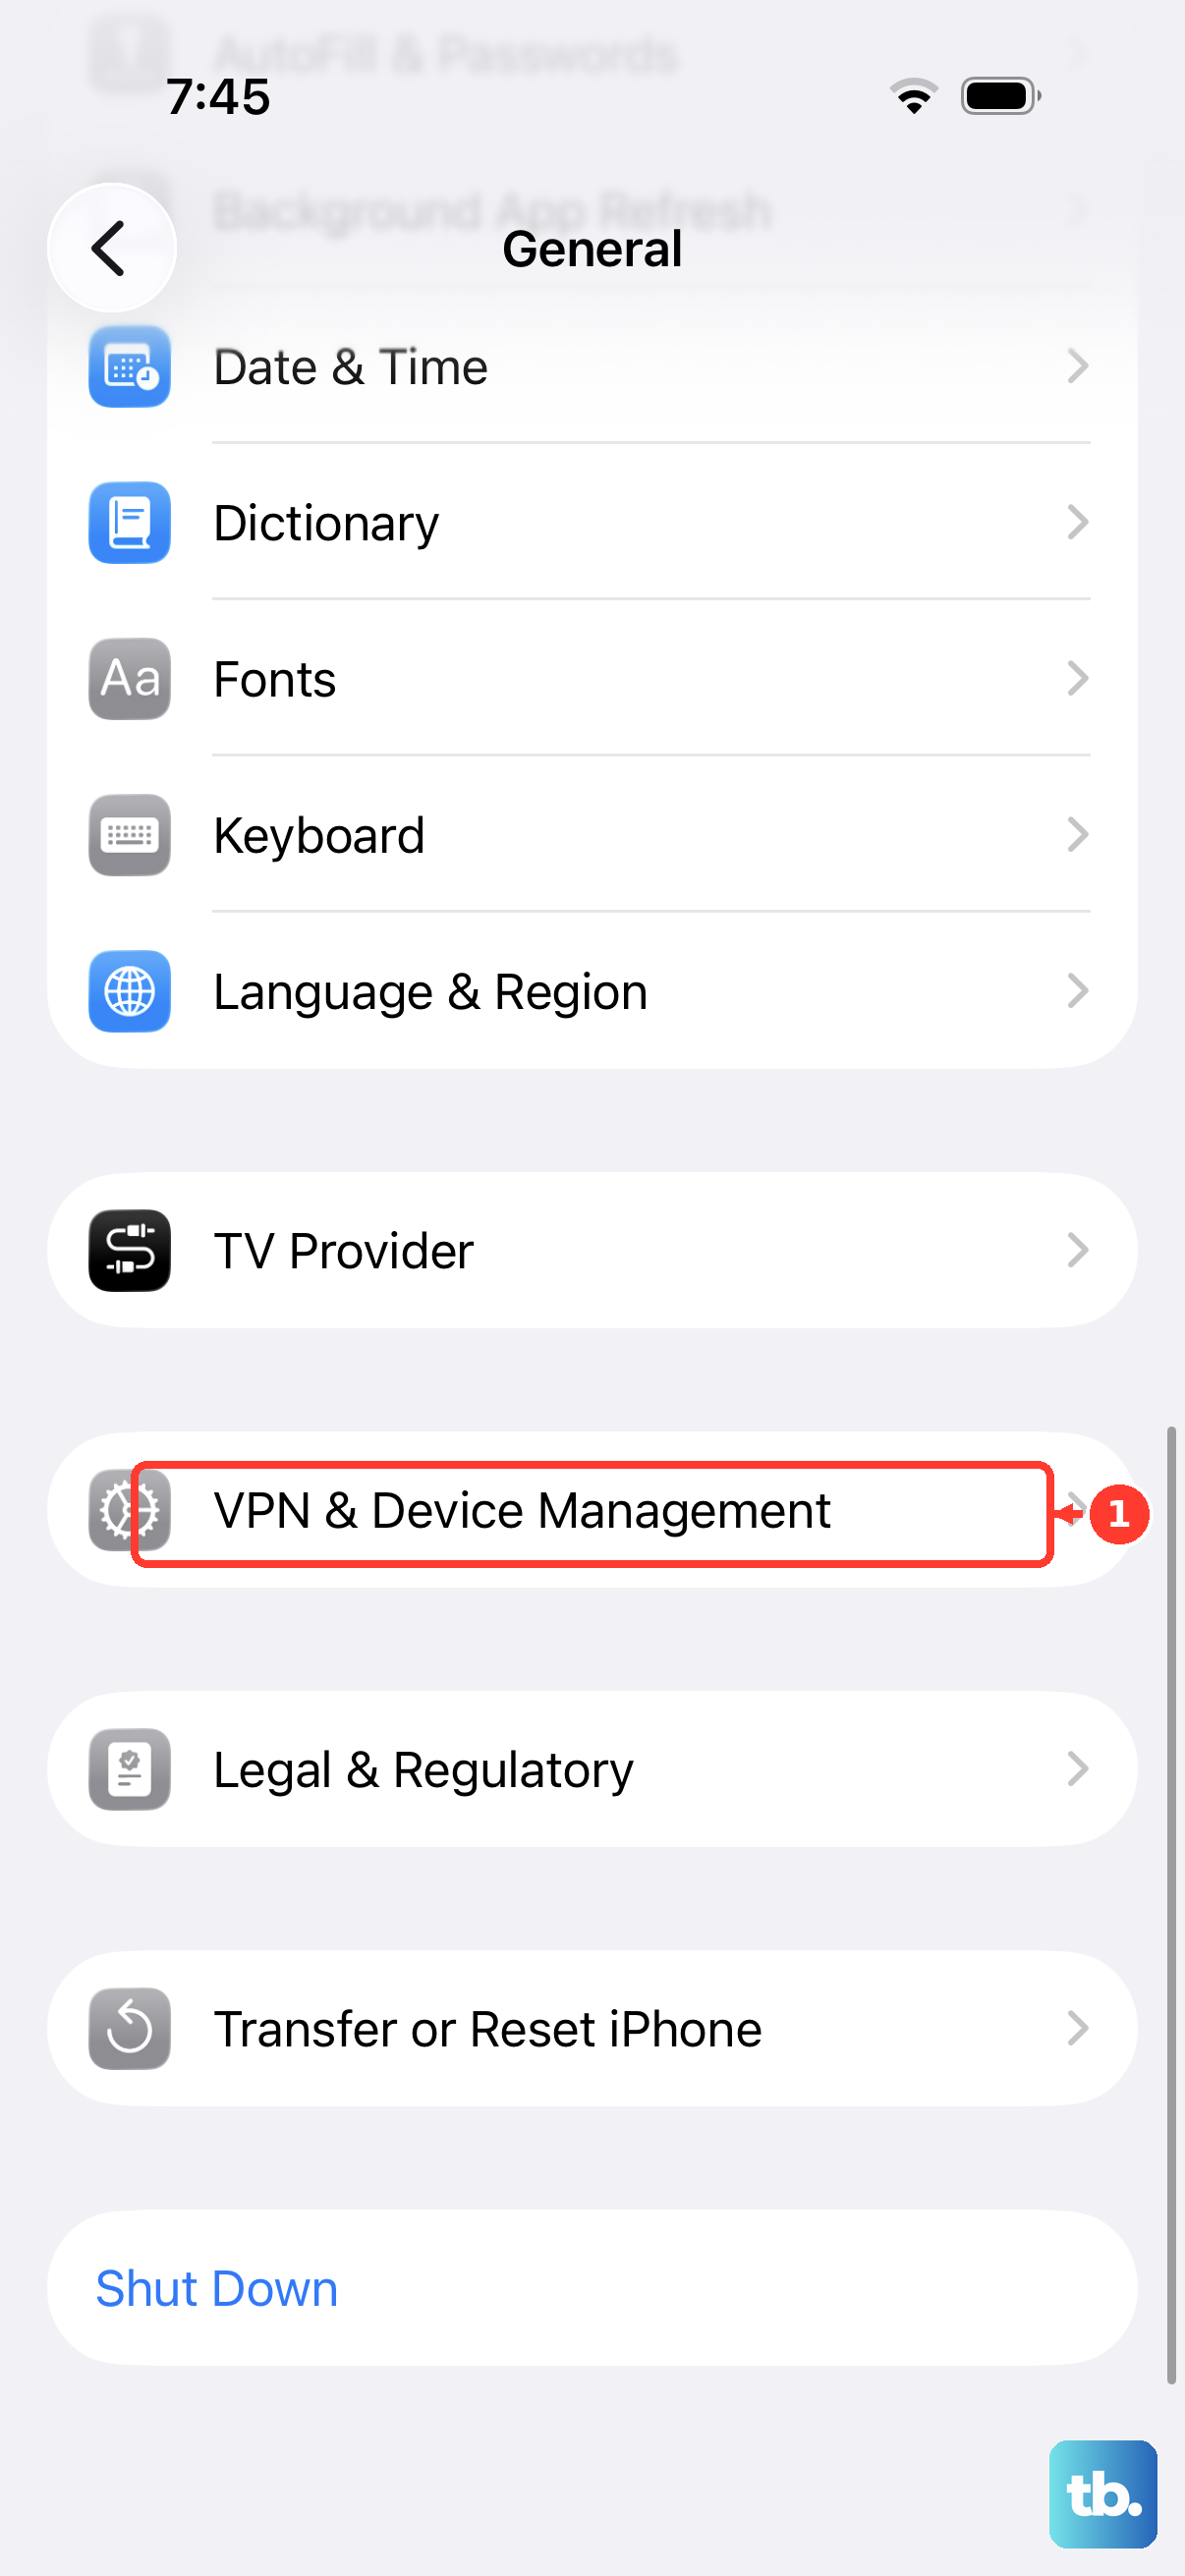
If the account still will not connect, use Network Solutions’ official connection troubleshooting help. For an organization-managed account or profile, ask your administrator for assistance.
Frequently Asked Questions
Does POP synchronize folders and read status like IMAP?
No, POP does not provide IMAP-style folder and message-state synchronization. If you want those changes synchronized across devices, choose IMAP.
Will adding the mailbox to Outlook also sync contacts and calendars?
No, Outlook’s IMAP setup synchronizes email only. It does not synchronize your contacts or calendars.
Can you temporarily stop using the mailbox without removing it?
Yes, open Settings > Apps > Mail > Mail Accounts, select your Network Solutions account, and turn off Mail. This pauses its use without removing the account.
Does deleting the email account from your iPhone cancel the mailbox subscription?
No, removing the account from your iPhone does not cancel the mailbox subscription. Deleting the iPhone account is separate from canceling the email service.
Can an older iPhone use the webmail configuration profile?
Network Solutions specifies iOS 9 or later for its automatic configuration profile method. Your webmail account must offer Connect this device to use that method.