


To add a passkey to your Microsoft account, open its security settings, select Add a new way to sign in or verify, then select Face, Fingerprint, PIN, or Security Key and complete registration. You can save the passkey on a compatible device, in a password manager, or on a physical security key.
These steps apply to personal Microsoft accounts, including those used for Outlook.com, OneDrive, and consumer Microsoft 365. The Windows settings steps use Windows 11 menus. Sign in only through Microsoft’s own app or website, and never share a code, password, or remote access with someone who contacts you.
The short version
- Start with your account: Open Microsoft’s security settings, select Add a new way to sign in or verify, then select Face, Fingerprint, PIN, or Security Key.
- Choose the destination: Accept the proposed storage location or select Change or Save another way to choose another.
- Use your phone: The nearby-device option lets you scan a QR code and finish verification on a compatible phone or tablet.
- Replace before removing: Create a replacement passkey before removing an old one from your account.
| Storage option | What you need | How you approve setup |
|---|---|---|
| Windows Hello | A Windows device with Windows Hello configured | Face, fingerprint, or PIN |
| Nearby phone or tablet | A compatible mobile device, Bluetooth, and internet connectivity | Scan the QR code and verify on the mobile device |
| Android passkey provider | A compatible Android device with a selected provider | Device screen unlock |
| Apple Passwords and iCloud Keychain | A compatible Apple device with iCloud Keychain and Apple Account two-factor authentication enabled | Device authentication |
| Microsoft Password Manager | Edge 142 or newer with a personal account profile | The offered registration prompts |
| Google Password Manager | Supported Chrome signed in to your Google Account | The storage prompt and a manager PIN when requested |
| Local Chrome profile on Mac | Chrome on macOS without an iCloud account configured | The offered local storage prompt |
| FIDO2 security key | A compatible key, browser, and device | The key’s PIN and physical verification |
| 1Password extension | An unlocked extension in a supported browser | The extension’s save prompt |
| 1Password Windows provider | Updated Windows 11 and the current app installed with its MSIX installer | The Windows 1Password offer |
Start in your Microsoft account security settings
Open Microsoft’s sign-in method settings and sign in to your personal account. Choose Add a new way to sign in or verify, then select Face, Fingerprint, PIN, or Security Key. This starts the registration flow used by the storage options below.
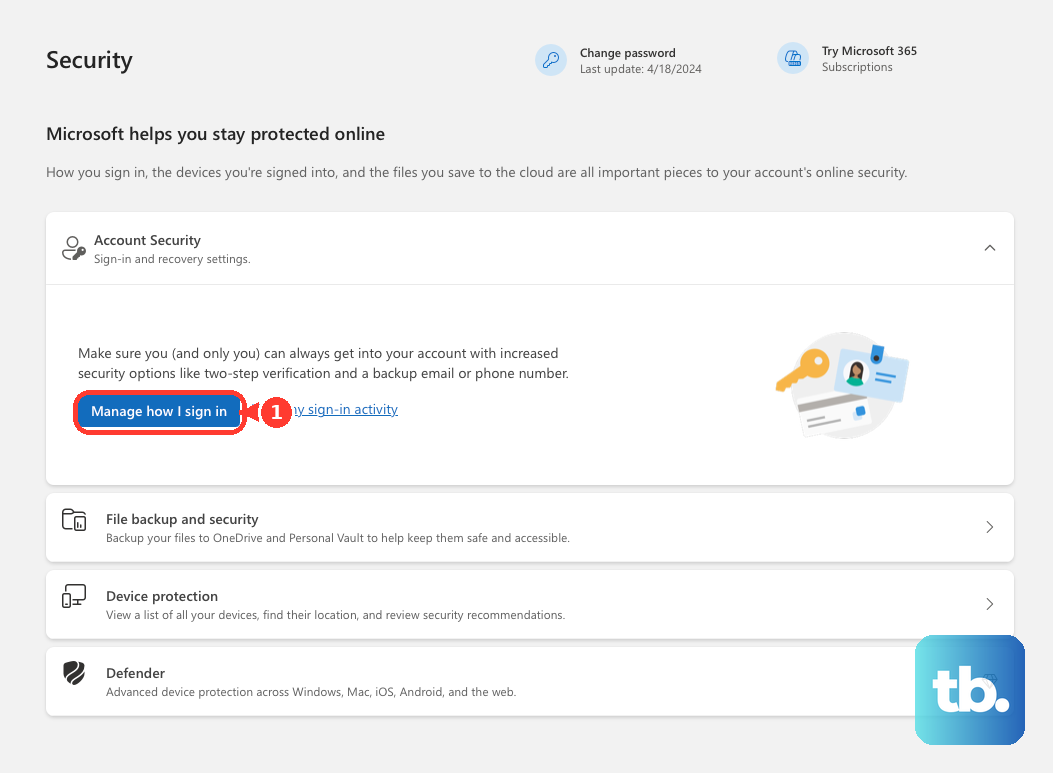
You can also start from the Microsoft account dashboard’s Security page and select Manage how I sign in. From there, select Add a new way to sign in or verify and continue with the same passkey option.
Review the proposed destination before continuing. Select Continue or Create to accept it, or select Change or Save another way to choose a different destination. Complete the device verification requested for your choice.
Save a passkey with Windows Hello
For a passkey stored locally on your Windows device, choose Windows device or Windows Hello during registration. Authenticate with your face, fingerprint, or PIN to finish. The available biometric choices depend on your hardware.
If you need to configure Windows Hello first, on Windows 11 open Settings > Accounts > Sign-in options. Under Ways to sign in, select Facial recognition (Windows Hello), Fingerprint recognition (Windows Hello), or PIN (Windows Hello), then select Set up and follow the on-screen instructions. Then return to Microsoft’s website and register the passkey.
The Windows Hello destination can be absent after you save another passkey in a synced manager. On an updated Windows 11 device that exposes Advanced options, open Settings > Accounts > Passkeys > Advanced options and enable Save passkeys to this Windows device to permit local storage. These controls enable storage choices; you still need to complete registration on Microsoft’s website.
Create the passkey on your phone
To save a passkey on a nearby phone or tablet while registering from another device, choose iPhone, iPad or Android device. Scan the displayed QR code with your mobile camera, tap Use passkey, and complete verification on the mobile device. Cross-device operation requires Bluetooth and internet connectivity.
To create the passkey directly on a compatible Android phone, first open Settings > Passwords, passkeys & accounts, select the password manager’s name, and choose your preferred manager. Android settings labels vary by manufacturer, and supported providers include Google Password Manager, Samsung Pass, and compatible third-party managers. Start Microsoft account registration in the phone browser, review the proposed credential, and authenticate with your device’s screen unlock.
On a passkey-capable iPhone, enable iCloud Keychain and Apple Account two-factor authentication before starting registration in the browser. At Apple’s save prompt, tap Continue and complete any device authentication prompt. Microsoft lists iOS 16 or later as the baseline for this option.
Set up Apple synchronization and Mac storage
On a current iPhone or iPad, open Settings, select your name, then open iCloud > Passwords. Enable Sync this [Device] for the device you are using. On iOS 17 or earlier, select Passwords and Keychain instead of Passwords.
On a current Mac, open the Apple menu > System Settings, select your name, then open iCloud > Passwords. Enable Sync this Mac, then select Done. On macOS Sonoma or earlier, select Passwords & Keychain instead. Apple Account two-factor authentication must also be enabled.
With iCloud Keychain enabled, start Microsoft account passkey registration in a compatible Mac browser. Microsoft lists macOS Ventura or later and Safari 16 or later as baselines. At Apple’s passkey prompt, authenticate with Touch ID on a compatible Mac or Magic Keyboard. Select Other Options for nearby-device or external-security-key alternatives.
Save through Edge or Chrome
To use Microsoft Password Manager, sign in to Edge with a personal Microsoft account profile, then start Microsoft account registration. Choose Microsoft Password Manager as the destination and complete the prompts. This option requires Edge 142 or newer, and Windows integration requires the signed-in personal Edge profile.
You can manage that destination in Edge through Settings > Passwords and autofill > Microsoft Password Manager. Passkeys saved through Microsoft Password Manager are synced.
For Google Password Manager, sign in to Chrome with your Google Account and start Microsoft account passkey registration. At Google’s storage prompt, select Create, then set up a Google Password Manager PIN if requested. This method uses Google Account synchronization and applies to current Chrome on Windows 10 or later, macOS, Linux, or ChromeOS 129 or later.
Use a physical security key
For this option, you need a FIDO2 security key with a compatible browser and device. During Microsoft account registration, choose Security key as the destination. Complete the insertion, PIN, and physical verification prompts for your key; the exact touch, USB, or NFC actions depend on the hardware. Preparing a key alone does not register it with your Microsoft account.
Save with an existing 1Password setup
If you already use the 1Password browser extension, unlock it before starting Microsoft account registration. In the extension’s save prompt, add the passkey to an existing Login item or create a new item. This flow applies to supported desktop browsers and Safari on iPhone or iPad.
To control whether the extension offers to save passkeys, open its account menu, then Settings > Autofill & save. Enable Offer to save passkeys, then return to registration. Other providers use their own interfaces.
On updated Windows 11, 1Password also supports a native provider option with the current app installed using its MSIX installer. Unlock the app, select your account or collection, open Settings > Autofill, and select Show passkey suggestions. In Windows 11, open Settings > Accounts > Passkeys > Advanced options, turn on 1Password, then register the Microsoft account passkey through the Windows 1Password offer.
Check permissions when registration cannot continue
If the destination you want is not the proposed one, select Change or Save another way in the registration flow. For a nearby phone or tablet, make sure Bluetooth and internet connectivity are available before trying again. Complete the final verification on the device that will save the passkey.
On updated Windows 11 devices that expose provider controls, open Settings > Accounts > Passkeys > Advanced options and enable the desired provider. Organizational management can restrict the availability of these controls.
On Windows 11 version 24H2 or later with the passkey privacy-consent feature, open Settings > Privacy & security > Passkey access. Find the application, enable its access switch, and retry registration.
Manage or replace a saved passkey
You can rename a passkey in the Microsoft account dashboard to make it easier to recognize. When replacing one, create the replacement first. Synced passkeys normally become available on replacement devices after you sign in to their provider.
Removing a passkey from your Microsoft account removes that account sign-in method. Open Microsoft’s sign-in method settings, expand the obsolete passkey, and select Remove. This is separate from deleting a copy stored on your device.
Deleting a Windows-local passkey removes the copy saved on that Windows device. On Windows 11, open Settings > Accounts > Passkeys, open the passkey’s action menu, and select Delete passkey. Use the account dashboard for account-side removal.
Frequently Asked Questions
Can you create a passkey from Microsoft’s sign-in invitation?
Yes, when Microsoft displays Sign in faster, select Next and complete the offered creation and storage flow. This invitation depends on your account.
Can Edge automatically create passkeys?
In current Edge versions that expose the setting, open Settings > Passwords and autofill > Microsoft Password Manager > More settings and turn on Automatically upgrade to passkeys. Automatic creation depends on the website offering an upgrade.
How do you enable automatic passkey creation in Chrome?
In current desktop Chrome, open More > Passwords and autofill > Google Password Manager > Settings and enable Automatically create a passkey to sign in faster. If that setting is absent, first enable Offer to save passwords and passkeys. Automatic creation depends on the website supporting it after password sign-in.
Can Microsoft Authenticator store a personal Microsoft account passkey?
Microsoft Authenticator passkey storage is for supported Microsoft Entra work or school accounts permitted by organizational policy. You cannot use it to store a personal Microsoft account passkey.
How do you save a passkey locally in Chrome on a Mac?
When no iCloud account is configured, start Microsoft account registration in Chrome on macOS and choose its offered local storage destination. You can manage the passkey through More > Passwords and autofill > Google Password Manager > Settings > Manage passkeys in your Chrome profile. Those local credentials are lost if you delete the profile or lose the computer.
How does setup differ for a work or school account?
For a Microsoft Entra work or school account, sign in to Microsoft’s Security info portal, select Add sign-in method > Passkey, and complete the offered storage and verification prompts. Your organization must permit the selected provider.