

To set a print area in Excel, select the cells you want on paper, open the Page Layout tab, click Print Area and choose Set Print Area. Then press Ctrl + P and check that only those cells appear in the preview. Excel keeps the print area when you save the workbook, and it controls later printouts as long as Print Selection and Ignore Print Area are not chosen in the print settings.
A saved print area is not the only way to print part of a sheet. To print a few cells once without saving a print area, select them and choose Print Selection in the print settings instead. The table below shows which command does which job, because mixing them up is the usual reason the wrong cells come out of the printer.
The short version
- Save an area: select the cells, then Page Layout > Print Area > Set Print Area.
- Check it: press Ctrl + P and read the preview before you print.
- Grow it: select cells along a whole side of the area and choose Add to Print Area, while cells further away become a page of their own.
- Print once: Print Selection prints the selected cells without saving a print area.
- Remove it: Clear Print Area removes all print areas on that sheet at once.
Which print command to use
| What you want | Choose | What we saw |
|---|---|---|
| Save a default print range | Page Layout > Print Area > Set Print Area | Only A1:C5, and the area was still set after we reopened the file |
| See what will print, with Ctrl + P | The print preview, which follows the print settings | Only the A1:C5 report, on one page |
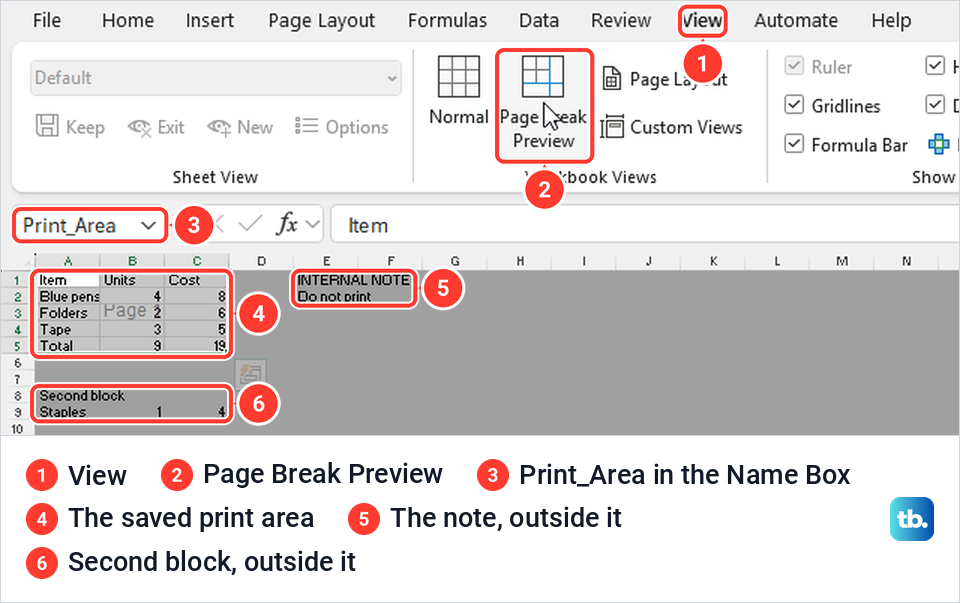
| Inspect the saved area on the sheet | View > Page Break Preview | The print area as a white page, with everything outside it grey |
| Type an exact range | The Page Setup dialog, Sheet tab, Print area box | Typing $A$1:$B$4 over A1:C5 cut the page down to two columns |
| Make the area bigger | Select cells along a whole side of the area, then Print Area > Add to Print Area | A1:B4 plus C1:C4 as one area, A1:C4, on one page |
| Print a separate block as well | Hold Ctrl while selecting both blocks, then Set Print Area | Each block on a page of its own |
| Print some cells just once | Print Selection in the print settings | Only A2:B3, and no print area was saved |
| Print the whole sheet but keep the area | Ignore Print Area in the print settings | The whole sheet, with the area kept and the tick still on later in the session |
| Remove the print area | Page Layout > Print Area > Clear Print Area | The whole sheet again, after one click removed both saved areas |
| Print selected cells in a browser | File > Print, then Current selection in Excel for the web | Only the selected rows |
Set the print area in Excel
Start by selecting the cells you want to print, dragging from the first cell to the last. If you prefer the keyboard, the navigation and selection shortcuts in Excel extend a selection without dragging. On our Orders sheet the report sat in A1:C5, with a note in E1:E2 that should stay off the paper and a second block in A8:C9.
Open the Page Layout tab, click Print Area in the Page Setup group and choose Set Print Area. Our menu had two entries at this point, Set Print Area and Clear Print Area. A third command, Add to Print Area, only appears once an area exists, which the section on adding cells explains.
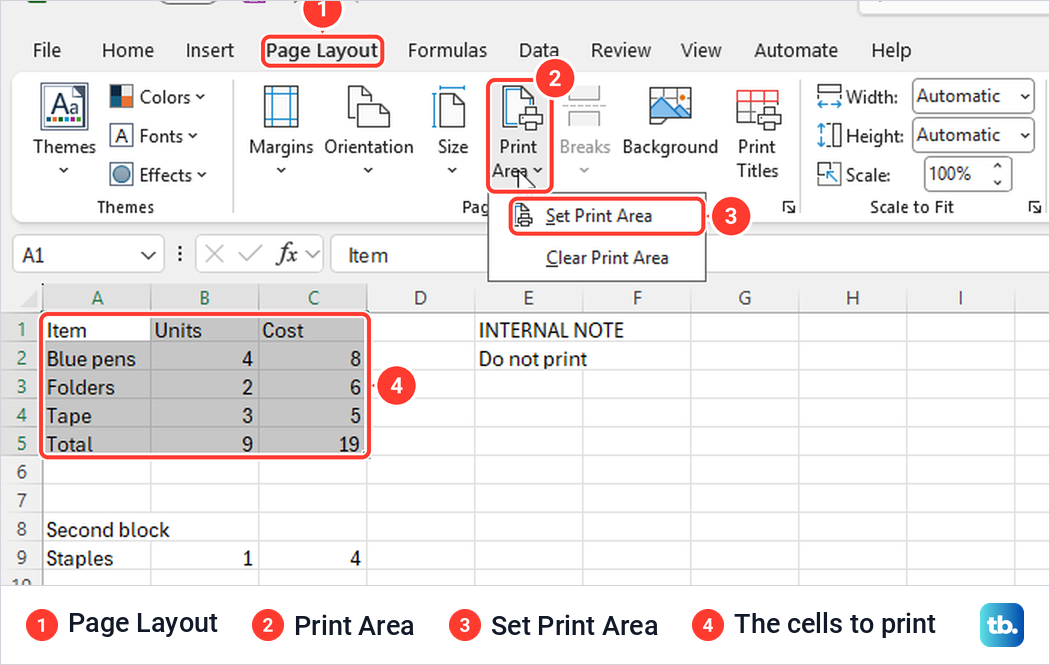
With the same cells still selected, the Name Box at the left of the formula bar read Print_Area, the name Excel gives a print area. Apart from that name, the sheet looked the same in Normal view. That is why it is worth checking the result before you print anything, first on the sheet and then in the print preview.
Check exactly what will print
Press Ctrl + P, or choose File > Print, to see what will actually print. Our preview showed one page, 1 of 1, with only the five rows of the report. The first box under Settings read Print Active Sheets, the default, and with that choice the preview held the print area alone. The print preview is the check that counts, because it follows those settings.
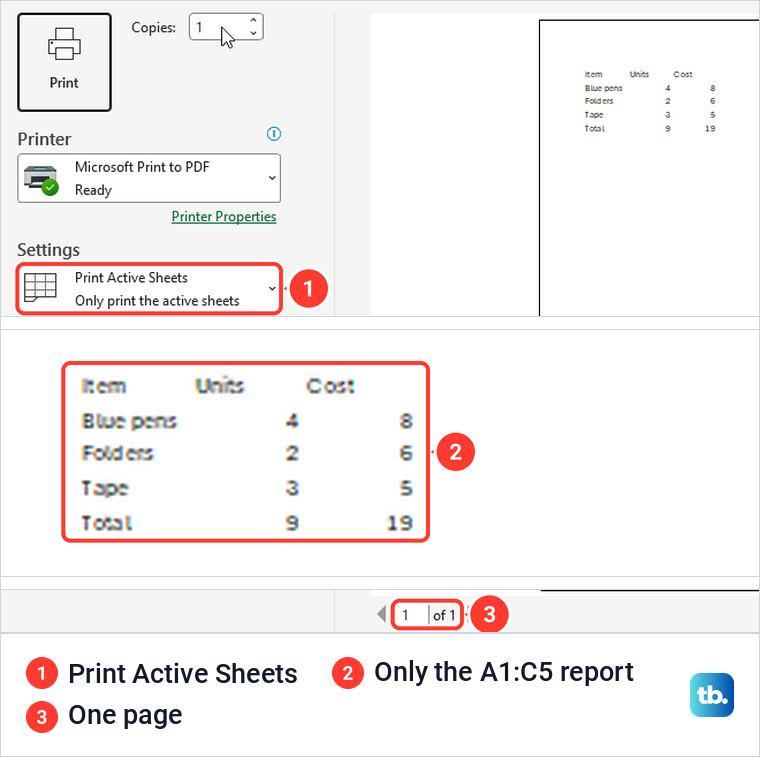
Microsoft's print guide puts the rule plainly: if a worksheet has a defined print area, Excel prints only that area. The Settings box matters, though, because two other choices in it change what prints, and both come up further down.
To inspect the saved area on the sheet, open the View tab and click Page Break Preview, which Microsoft recommends for seeing all the print areas on a sheet. On ours, the A1:C5 report was the only white page, while the note in column E and the second block were greyed out. Grey cells sit outside the saved area. Page Break Preview does not show the print settings, though, so if Ignore Print Area is ticked, grey cells appear in the print preview too.
The print area is saved with the workbook
Microsoft says the print area you set is saved when you save the workbook. We saved ours, closed it and opened it again from the recent files list, and the A1:C5 area still controlled the preview, which showed the report alone on one page. The workbook even reopened in Page Break Preview, the view it was in when we saved it.
Excel keeps the area as a named range that belongs to the sheet. In Formulas > Name Manager, which Ctrl + F3 also opens, ours was listed as Print_Area, referring to =Orders!$A$1:$C$5 with the scope Orders, the sheet's own name.
Because the area travels with the file, anyone who opens a shared report prints your chosen cells too. If the report is a template other people rely on, make a copy of the workbook before you replace its print area.
Change the print area to a different range
The most precise way to change the range is the Page Setup dialog. On the Page Layout tab, click the small arrow at the bottom right of the Page Setup group, then open the Sheet tab. Our Print area box showed A1:C5, written without dollar signs.
We typed $A$1:$B$4 over it and clicked OK. The preview then showed only the Item and Units columns for rows 1 to 4, with no Cost column and no Total row. Microsoft's Page Setup help adds that you can click the Print area box and select the range on the sheet instead of typing it.
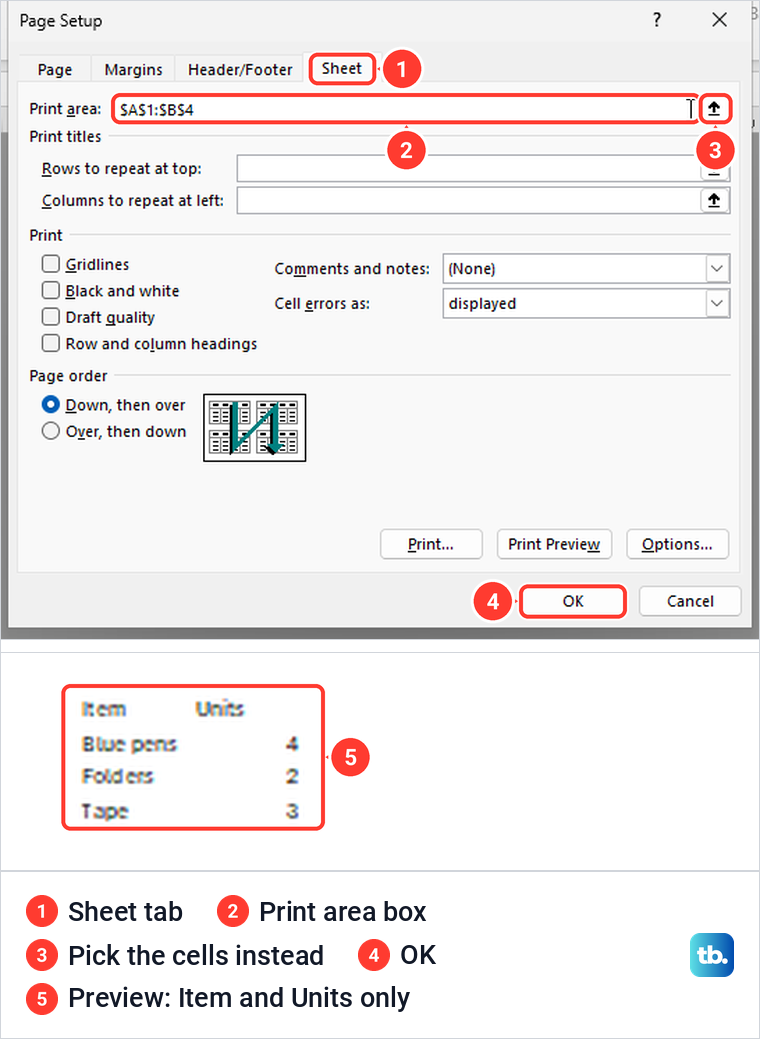
Typing is handy for a long range such as A1:F81 that is awkward to drag across. If you prefer the ribbon, clear the old area with Clear Print Area, select the new cells and choose Set Print Area again, which is exactly how we moved between our examples.
Add cells to a print area
If you cannot find Add to Print Area, look at what is selected. On our sheet it appeared only when a print area already existed and the selected cells were outside it. With a cell inside the area selected, the menu showed just Set Print Area and Clear Print Area.
We set A1:B4 as the area, selected C1:C4 right beside it and chose Page Layout > Print Area > Add to Print Area. Excel joined the two into a single area, A1:C4, and the preview showed one page with the Item, Units and Cost columns for the three products. When new rows or columns next to your report stop printing, select them across the full width or height of the report, as we did with C1:C4, and add them the same way.
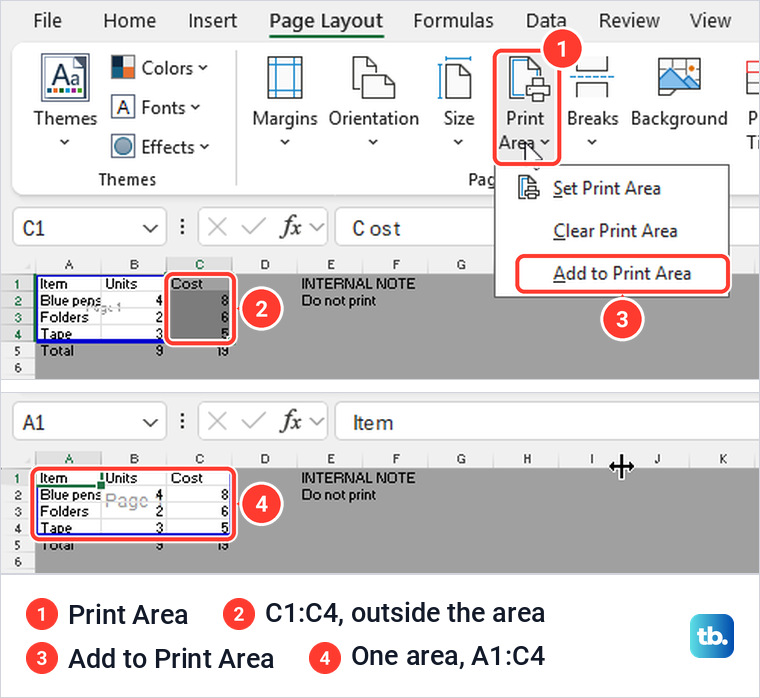
Cells that do not touch the area behave differently. Microsoft says that if you add cells that are not adjacent to the print area, Excel creates a new print area for them. When we added A8:C9 to our A1:C4 area, Excel made a second area and a second preview page rather than one bigger area.
Print two separate areas from one sheet
To set two blocks in one go, select the first, hold Ctrl, select the second, then choose Set Print Area. We selected A1:C5 and A8:C9 this way. Page Break Preview showed two separate page areas, and the print preview had two pages, with the second holding only the Second block rows.
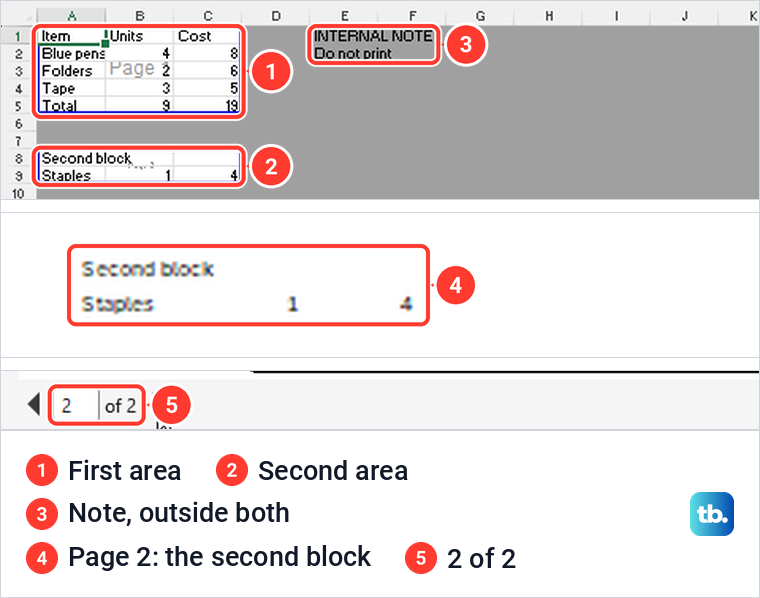
The note in E1:E2 appeared on neither page, because it sat outside both areas. Microsoft says each print area prints as a separate page, so this is how Excel is meant to behave, not a fault. If you want both blocks on one sheet of paper, clear the areas and set a single area that spans both blocks instead.
Clear the print area
Click any cell on the sheet, then choose Page Layout > Print Area > Clear Print Area. Microsoft warns that if the sheet has more than one print area, clearing removes all of them. That is what happened on ours, where one click removed both saved areas.
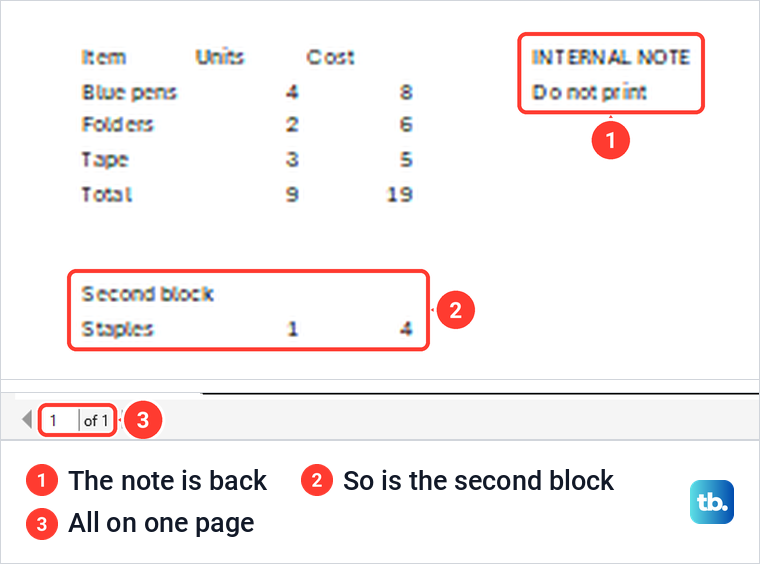
After clearing, Page Break Preview showed a single page over all the used cells, and the print preview put the report, the note and the second block on one page. There is no command to clear only one of two areas, so to keep one of them, clear both and set the one you still need.
Print selected cells without saving a print area
For a one-off printout, select the cells, press Ctrl + P, open the first box under Settings and choose Print Selection. With A2:B3 selected on our sheet, the preview showed just two rows, Blue pens 4 and Folders 2, on a single page.
Print Selection does not save a print area. When we opened the Page Setup dialog afterwards, the Print area box on the Sheet tab was still empty. Use Print Selection for a one-off job and Set Print Area for cells you print again and again.
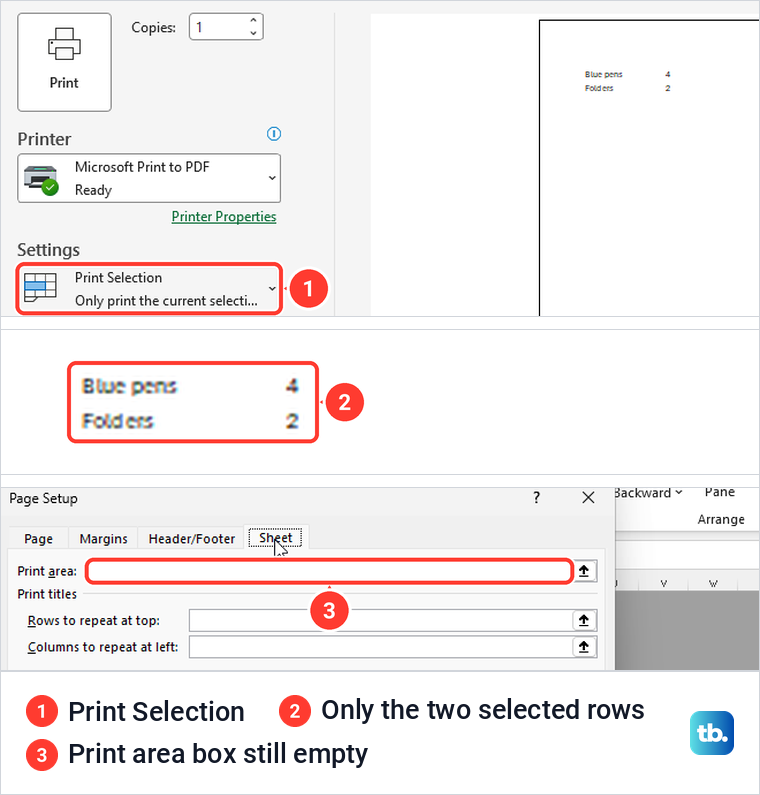
Excel also remembers the choice. The next time we opened the print screen in the same session, Print Selection was still chosen, so the preview showed only the one cell we had selected at the time. Check the first Settings box every time you print, and switch it back to Print Active Sheets to print the saved area again.
Print the whole sheet without clearing the print area
Sometimes you need the full sheet once but want to keep the saved area for later. Open the first box under Settings and click Ignore Print Area at the bottom of the list. Microsoft gives the same advice for when you do not want to print only the defined print area.
With A1:C5 saved, choosing it put the note and the second block back in our preview, while the label above still read Print Active Sheets. Back on the sheet, Page Break Preview still showed the A1:C5 area, so nothing was lost. It also means Page Break Preview alone would not have warned us that the whole sheet was about to print.
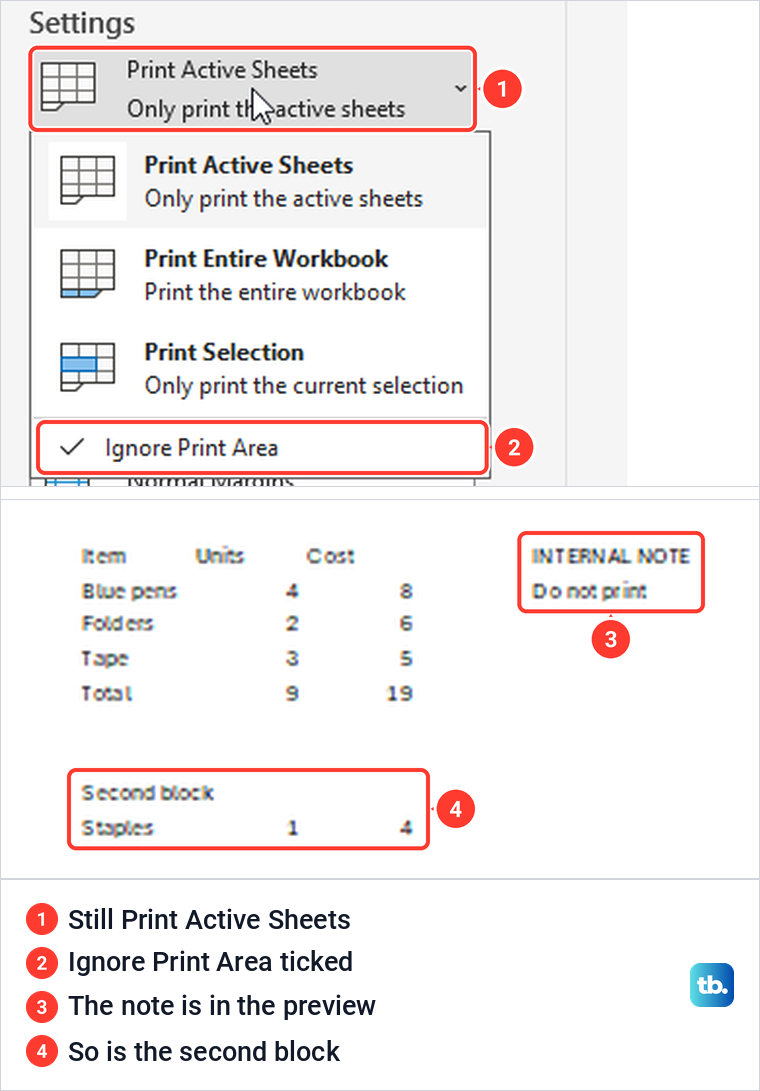
The catch is that the tick stayed on later in the same session. When we set a new area, the preview still showed the whole sheet, and the Settings list had a tick beside Ignore Print Area. Clicking it again removed the tick and the preview went back to the print area alone, so check it before you print.
Ignore Print Area is also greyed out while Print Selection is chosen, and our click on it did nothing in that state. Choose Print Active Sheets first if you cannot select it.
Print selected cells in Excel for the web
To print selected cells in Excel for the web, select them, then open File > Print. In Microsoft Edge it opened the print page straight away, without the second Print step Microsoft's help page describes. Microsoft also says to use the Print command in Excel for the web, not your browser's own Print command, for the best results.
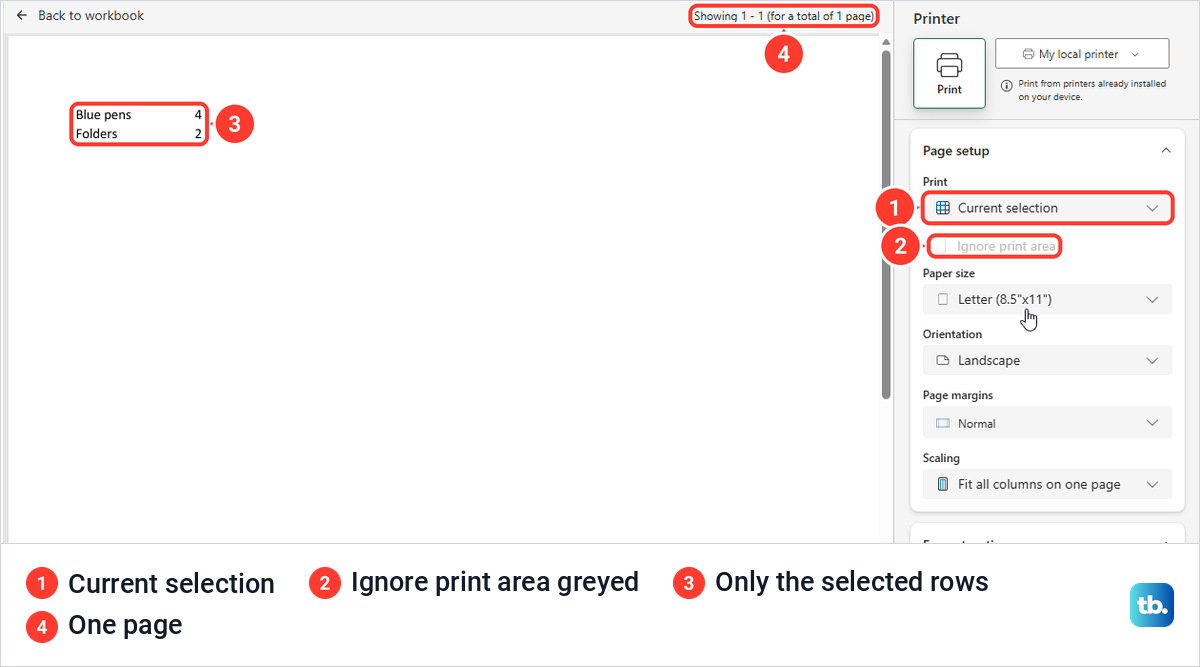
Under Page setup, open the Print list, which offered Active sheet, Entire workbook and Current selection. With A1:C5 selected, Current selection previewed only the report, and the Ignore print area box below it was greyed out.
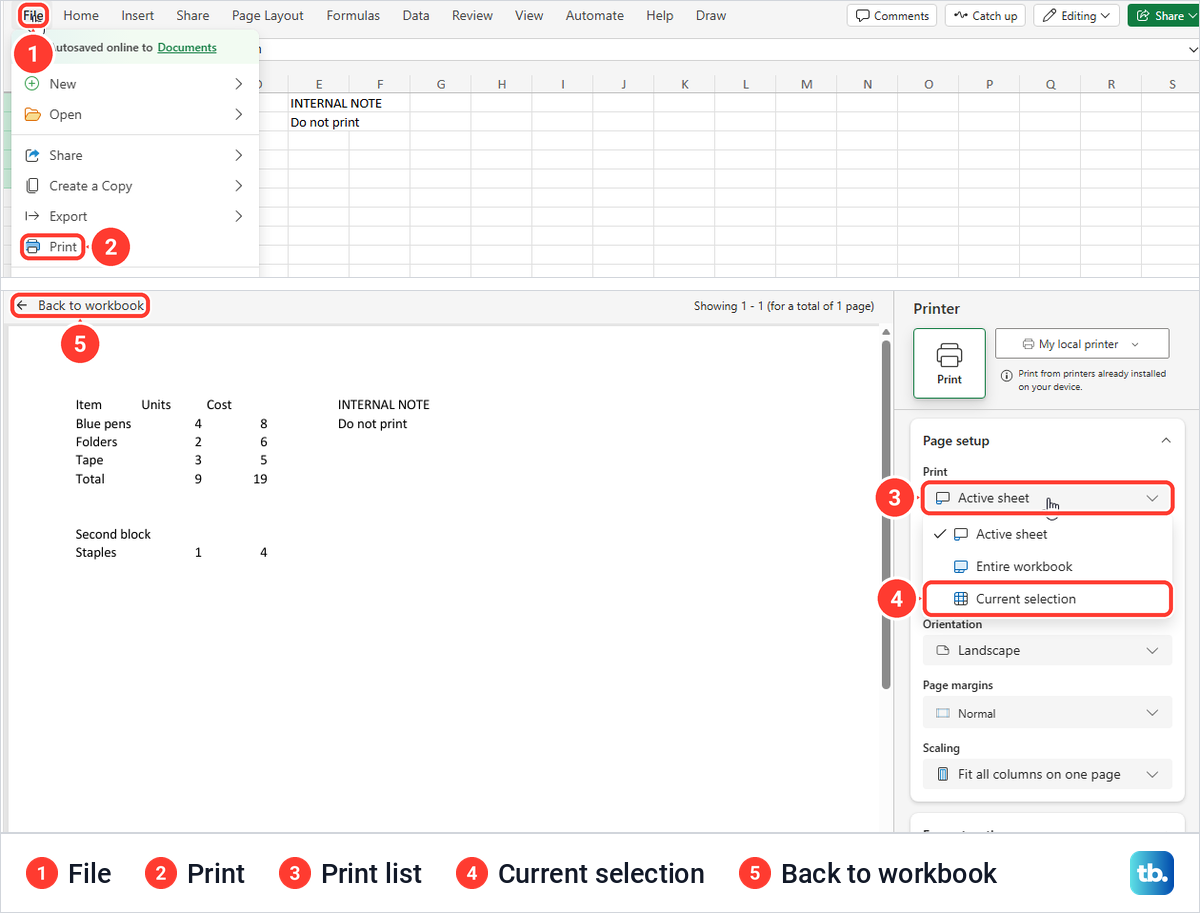
To print different cells, click Back to workbook, select the new range and open the print page again. We reselected A2:B3, and Current selection previewed just those two rows on one page. Switching the list back to Active sheet brought the whole sheet back into the preview.
For setting several print areas on one sheet, Microsoft points to the desktop app. If you have it, open the workbook in Excel and set the areas there with the steps above. If you have not opened Excel in a browser before, our Excel for beginners guide shows where to find it.
Set a print area in Excel for Mac
Microsoft's steps for Excel for Mac use the File menu. Select the cells, point to File > Print Area and click Set Print Area, then choose File > Print to print. Microsoft says Excel saves the print area together with the workbook on a Mac as well.
To remove it, point to File > Print Area and click Clear Print Area. For a one-off printout, select the cells, choose File > Print and pick Selection in the drop-down list in the Print box.
When the wrong cells or pages print
If the whole sheet prints although you set an area, open the print screen and the first Settings box, and check that Ignore Print Area has no tick beside it. Then confirm in the preview that only your area appears. On our sheet, a leftover tick from an earlier job was the whole cause.
If an extra page appears, open Page Break Preview and count the white page areas. Separate blocks, including cells added with Add to Print Area that do not touch the first area, each print on a page of their own. When the right cells appear but split across the wrong pages, check paper size and scaling, then fix page breaks in Excel for the page boundaries themselves.
Protection did not block Set Print Area on our sheet. When we protected it with Review > Protect Sheet, the Page Layout tab greyed out Themes, Breaks and Background, but Print Area stayed available and Set Print Area still worked. If you lock cells and protect the sheet, try the print area steps before you remove protection, because ours changed with protection still on.
When the preview is right but nothing comes out, the problem may be in Excel, Windows or the printer. Our guide to fix a failed Excel print job covers the common causes, and you may need to clear a stuck printer queue if an old job is blocking the new one.
If no printer shows in the print screen, add a printer in Windows 11 and open the preview again. If Excel keeps picking the wrong device, set the default printer in Windows 11, and when paper or two-sided settings are wrong, change Windows printing preferences once the Excel range is right.
How we tested this guide
We tested this in Excel for Microsoft 365 on Windows 11, version 25H2, and in Excel for the web in Microsoft Edge, previewing parts of a made-up order sheet.
Frequently Asked Questions
How do I set a print area in Excel?
Select the cells, then choose Page Layout, Print Area, Set Print Area. Press Ctrl + P to check that only those cells appear in the preview.
How do I change the print area without starting over?
Open the Page Setup dialog from the small arrow in the Page Setup group, go to the Sheet tab and type the new range in the Print area box. To make the area bigger, select cells along a whole side of it and choose Add to Print Area.
Can one sheet have more than one print area?
Yes. Hold Ctrl while you select each block, then choose Set Print Area, and each block prints on a page of its own.
Does Print Selection save a print area?
No. It prints the selected cells for that job only, and the Print area box in Page Setup stayed empty after we used it.
Why does Excel print the whole sheet when I set a print area?
Open the first box under Settings in the print screen and check whether Ignore Print Area is ticked. On our sheet it was still ticked from an earlier job, and the preview showed the whole sheet until we cleared the tick.
How do I remove a print area in Excel?
Choose Page Layout, Print Area, Clear Print Area. It removes all print areas on that sheet at once, so set again any area you still need.
How do I print selected cells in Excel for the web?
Select the cells, open File, Print, and choose Current selection in the Print list, and the print page shows just those cells. For setting several print areas on one sheet, Microsoft points to the Excel desktop app.