A stuck printer queue stops every new document behind it. Start with the Windows 11 print queue, then reset the Print Spooler if the job refuses to disappear. Cancel stuck print jobs, clear the spool folder, and handle work or school printer queues with the current Microsoft-supported paths.
1. Cancel the stuck job from Windows Settings
Use the Windows 11 Settings queue first. It is the main path for removing one stuck document.
Open Start, select Settings, then choose Bluetooth & devices. Select Printers & scanners, choose the printer with the stuck job, and select Open print queue.
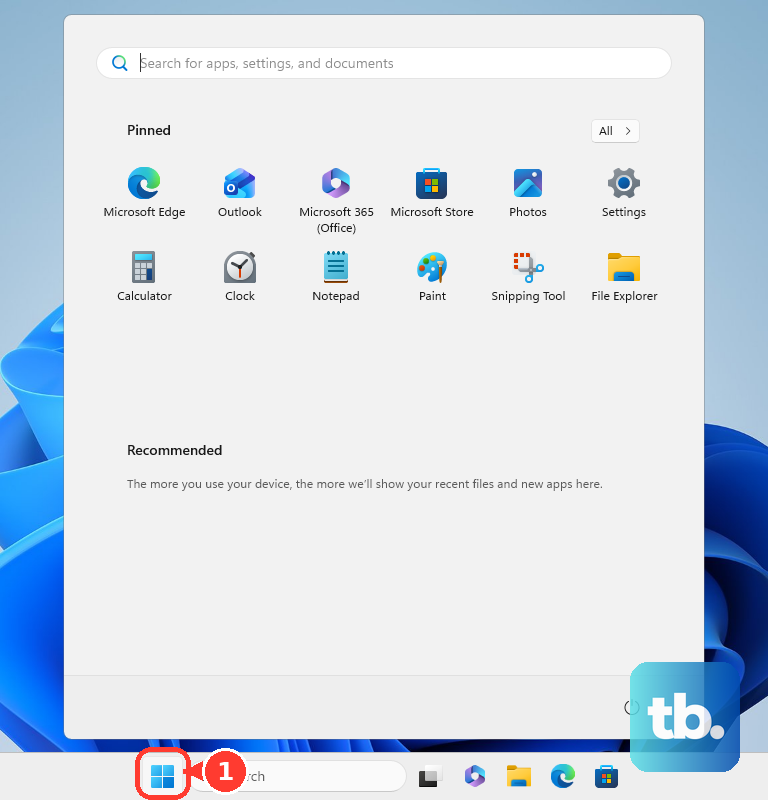
Right-click the print job and select Cancel. Wait for the job to disappear before sending the document again.
2. Clear every waiting job at once
- 1.Open Start > Settings > Bluetooth & devices > Printers & scanners.
- 2.Select your printer.
- 3.Choose Open print queue.
- 4.Select the ... menu.
- 5.Choose Cancel all.
If several documents are lined up and none of them need to print, this removes the pending jobs for that printer queue in one move.
3. Jump in through the taskbar printer icon
When Windows shows a printer icon in the bottom-right corner of the taskbar, it gives you a faster route to active jobs.
Right-click the Printer icon on the taskbar and select Open All Active Printers. Choose the printer, select the print job, then open Document.
Select Cancel, then select Yes. If the Printer icon is not visible, select the arrow on the taskbar to show hidden icons.
If you still do not see it, Microsoft says the job has already been sent to the printer and it is too late to stop printing in Windows. Use the printer's own controls, or the Print Spooler steps below, to clear what is left.
4. Stop the print request inside the app
The cleanest cancel happens before the job reaches the Windows queue.
In Excel, select Cancel in the Printing dialog right after choosing Print. In Microsoft Edge, select Cancel while the Edge print dialog is still open.
Once that dialog closes, use the Windows queue steps above.
5. Restart the Print Spooler service
Use this when the job changes to canceling and stays there. Restarting Print Spooler refreshes the Windows service that handles print jobs.
Press Windows key + R, type services.msc, and press Enter. Find Print Spooler, right-click Print Spooler, then select Restart.
If Windows blocks the restart, sign in with an administrator account and repeat the steps.
6. Delete the stuck spool files
Use this when the normal queue and spooler restart fail.
Stop Print Spooler, clear C:\Windows\System32\spool\PRINTERS, then start Print Spooler again. Use an administrator account for this method.
Press Windows key + R, type services.msc, and press Enter. Right-click Print Spooler and select Stop.
Open File Explorer and go to C:\Windows\System32\spool\PRINTERS. Delete all files in that folder, then return to Services.

Right-click Print Spooler and select Start. Open the print queue again before printing. It should be empty.
7. Power cycle the printer and PC
After clearing the Windows side, restart the hardware so old job data stops feeding back into the queue.
Turn off the printer and wait at least 60 seconds. Turn the printer back on, then on the PC, open Start.
Select Power and select Restart. On supported Canon PIXMA models, press Stop to cancel printing.
On supported Brother models, press and hold Go for about two seconds to cancel the current job, or six seconds to cancel multiple jobs. On Epson models with that documented control, press Cancel; the verified Epson guide says holding Cancel for more than three seconds deletes all jobs from product memory.
8. Remove and add the printer again
Open Start > Settings > Bluetooth & devices > Printers & scanners. Select the printer, choose Remove, then select Yes.
Return to Printers & scanners and select Add device. Follow the prompts, then use this after the queue clears but the same printer keeps failing.
For Windows 11, use the Settings path above. Older Control Panel printer queue paths are not the current Windows 11 guidance.
9. Cancel managed printer jobs in the right portal
Work and school printers can route jobs through Universal Print or a printer web portal.
For Universal Print secure release, scan the printer's QR code, open the Universal Print portal link, sign in with your work account, confirm the printer, select the pending job, and choose Cancel before releasing it.
For Universal Print admins, open Azure Portal > Universal Print > Printers, select the printer, open Jobs, select one or more jobs, and choose Cancel in the command bar. Completed, canceled, and aborted jobs cannot be canceled again.
Frequently Asked Questions
What is the fastest way to clear a stuck printer queue on Windows 11?
Open Start > Settings > Bluetooth & devices > Printers & scanners, select the printer, open the print queue, then cancel the stuck job.
How do I clear all print jobs at once?
Open the printer queue from Windows 11 Settings, select the ellipsis menu, and choose Cancel all.
Why does my print job stay on canceling?
The Print Spooler service is stuck. Restart Print Spooler from Services, then check the print queue again.
Does turning off the printer clear the Windows queue?
Power cycling helps after queue cleanup, but Windows jobs remain until you cancel them from the queue or reset the Print Spooler.
Can I cancel a Universal Print job from my phone?
Yes. If your organization uses Universal Print secure release, scan the printer QR code, sign in, select the held job, and choose Cancel before release.