


Turn on Sync this Mac in iCloud Drive settings, then add files or enable Desktop & Documents Folders to save MacBook Pro files to iCloud, but this does not back up your entire Mac. iCloud stores selected documents, photos, and supported app data. Use a separate backup, such as Time Machine, for broader Mac recovery.
The short version
- Start with Drive: Turn on Sync this Mac, then choose which files and folders to sync.
- Check uploads: A file marked Waiting to Upload is not yet stored in iCloud.
- Keep separate copies: Synced files remain subject to changes and deletions across devices.
- Back up the Mac separately: More iCloud storage does not add whole Mac backup functionality.
| Option | What you save | Main limit |
|---|---|---|
| Finder uploads | Files and folders you add to iCloud Drive | Files elsewhere need separate attention |
| Desktop and Documents syncing | Files saved in those two folders | Another provider must stop managing those folders first |
| Saving from an app | Documents saved directly to iCloud Drive | Save options vary by app |
| iCloud Photos | Your System Photo Library | Edits and deletions propagate |
| Third-party app syncing | Data from enabled apps | Only participating apps support it |
| Messages syncing | Messages and attachments | Syncing does not create a separate historical backup |
| Browser uploads | Files you upload to iCloud Drive | Browser data access must be enabled |
| Independent file copies | Selected files copied or downloaded outside iCloud Drive | You must make the separate copies |
| Time Machine | A separate Mac backup | Requires a suitable backup destination |
Turn on iCloud Drive
Open the Apple menu > System Settings, select your name, then open iCloud > Drive. Turn on Sync this Mac and sign in to your Apple Account if prompted. The Sync this Mac control applies to macOS 13.3 and later, and the Drive category can also be labeled iCloud Drive.
If another cloud provider manages your Desktop and Documents folders, disable that provider’s management of them before enabling iCloud syncing for those folders. Turn on Desktop & Documents Folders, then click Done. Eligible files you save in those folders will then sync to iCloud, but iMovie, Photos, and Aperture libraries there are labeled Ineligible and do not upload, so back them up separately.
Files elsewhere on your Mac need to be added to iCloud Drive or handled through their own supported app settings.
Add files or save directly to iCloud
Open Finder and select iCloud Drive, then drag the files or folders you want into it. You can also choose Go > iCloud Drive or press Shift + Command + I. Choose a general folder for mixed files, since app-specific folders accept only files their app can open.
To copy files instead of moving them, select the files, press Command + C, open the destination in iCloud Drive, then press Command + V. You can select files on a Mac before copying them together. Holding Option while dragging also copies instead of moving.
In an app that supports the standard save dialog, choose File > Save, enter a filename, and choose iCloud Drive as the location. Expand the dialog if necessary, then click Save. For a separate document copy, use File > Duplicate or File > Save As when supported; hold Option while opening File if Save As is hidden.
Choose photos and app data separately
For your photo library, open System Settings, select your name, then choose iCloud > Photos and turn on Sync this Mac. Find Photos under Saved to iCloud, or Apps Using iCloud on macOS Sonoma and earlier. Photo edits and deletions propagate across devices, so treat this as a synced library.
You can also open Photos and choose Photos > Settings > iCloud, then select iCloud Photos. Only the System Photo Library syncs when your Mac has multiple photo libraries. Select Download Originals to this Mac for full-resolution local copies, or Optimize Mac Storage to allow smaller local versions when space is limited.
For compatible third-party apps on macOS 13.3 and later, return to System Settings, select your name, and open iCloud > Drive or iCloud Drive. With Sync this Mac enabled, click Apps Syncing to iCloud Drive and turn on the desired app. Only participating apps support this feature.
To sync messages and attachments, open Messages and choose Messages > Settings > iMessage, then select Enable Messages in iCloud. Use the same Apple Account across devices, with two-factor authentication and iCloud Keychain enabled, to access your messages synced with iCloud. Click Sync Now for an immediate Messages sync; that control does not start a Mac-wide backup.
Check uploads and fix storage problems
In Finder, open iCloud Drive and choose View > as List. Next, choose View > Show View Options and select iCloud Status. Use the status to distinguish files still waiting to upload from items with a storage or eligibility problem.
A status of Waiting to Upload means the item is not yet stored in iCloud. Out of Space means your cloud storage has insufficient capacity. For Ineligible, check the file or folder size: Apple identifies the 50 GB individual-file-or-folder limit as a common cause.
On macOS Sequoia 15 and later, open System Settings, select your name, then choose iCloud to review the storage bar. Click Manage to review usage. Drive, Photos, mobile-device backups, and other iCloud data share your storage allowance.
If you need more capacity, click Manage Plan under iCloud+ Features for an existing paid plan, or click Upgrade to iCloud+ for a first paid plan. Choose a plan and complete the displayed purchase flow. Extra capacity allows more iCloud storage but does not add whole Mac backup functionality.
On a managed work or school Mac, ask your administrator whether the organization blocks iCloud Documents and Data, iCloud Photos, or other iCloud categories. These restrictions can prevent uploads even when your settings are otherwise correct. The administrator must change the relevant restriction.
Keep important files available offline
In Finder, open iCloud Drive, hold Control, and click a file or folder. Choose Download Now for offline access or Keep Downloaded to retain it locally. A downloaded file is still synced, so local availability does not protect it from synced edits or deletions.
To save Mac disk space, open System Settings, select your name, then choose iCloud > Drive. Turn on Optimize Mac Storage and click Done. Older downloaded documents can then be removed locally when space is needed while remaining in iCloud; this reduces Mac storage use, not iCloud storage use.
Use iCloud Drive in a browser
For uploads without Finder syncing, open iCloud Drive in your browser and sign in. Click File Upload, select the files, then click Upload, or drag files from Finder into the browser’s iCloud Drive window. The upload button is unavailable in Recently Deleted and Shared, so leave those views before uploading.
If browser data access is disabled, on macOS 26.4 or later open System Settings, select your name, then choose iCloud > Data Access on iCloud.com and turn on Allow Data Access. On macOS 13.1 through versions before 26.4, use Access iCloud Data on the Web instead. Advanced Data Protection initially disables browser data access.
You can also select files in the browser and click Download to make separate copies in your browser’s download destination. Changes to those downloaded copies do not return to iCloud unless you upload them again.
Create independent copies and a Mac backup
For an independent copy, select your files in Finder’s iCloud Drive, then press Command + C. Open a destination outside iCloud Drive, such as an external disk, and press Command + V. Optimized files download before copying, and the destination needs enough space for them.
Keep that separate copy to protect against changes propagating through sync. Moving files out of iCloud Drive removes them from iCloud Drive across synced devices, so copy them when you want both versions. A file retained with Keep Downloaded remains part of the synced set.
For a separate Mac backup on macOS Ventura 13 and later, connect a suitable external storage device. Time Machine setup may require erasing the destination, which removes its existing contents. Open System Settings > General > Time Machine > Add Backup Disk, select the device, and click Set Up Disk.
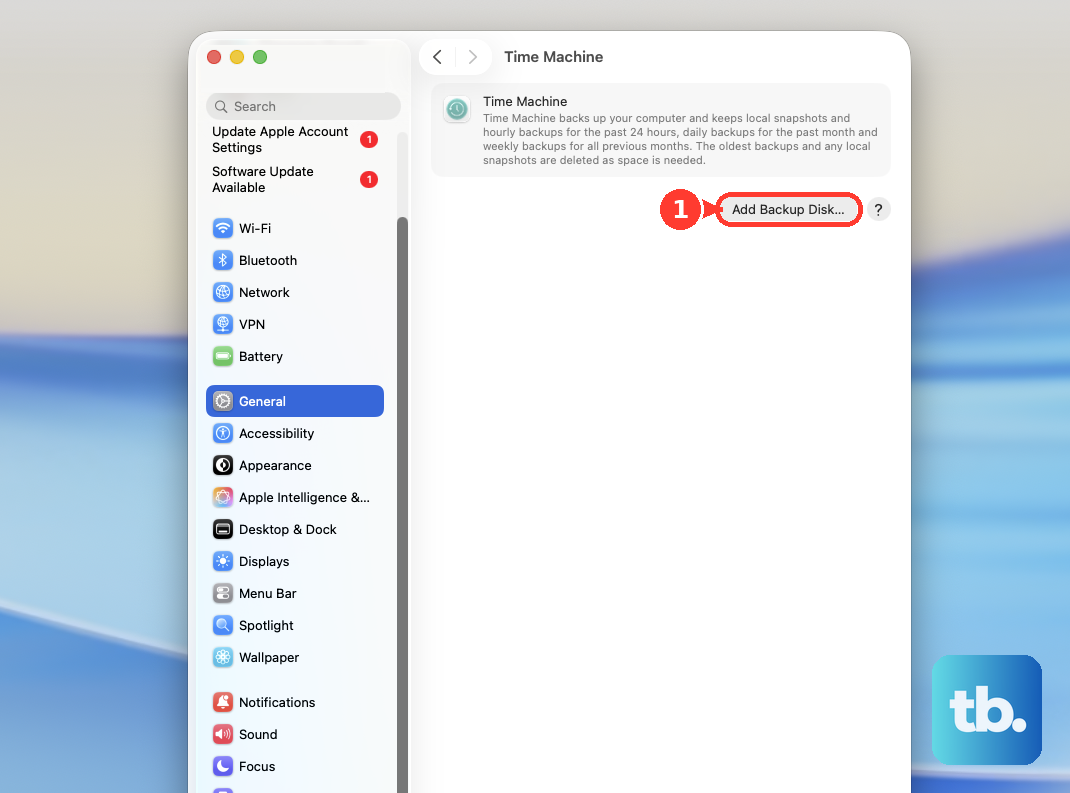
To encrypt the backup, turn on Encrypt Backup and create its password during setup. After setup, choose Back Up Now from the Time Machine menu for an immediate backup.
Recover a recently deleted file
In iCloud Drive on the web, open Recently Deleted, select the files, and click Recover. Choose Recover All to recover all eligible files there. Recovery generally covers 30 days, and permanently removed files cannot be recovered.
For other supported app files, open iCloud data recovery and choose Restore Files. Select the files you need, then click Restore Files.
Frequently Asked Questions
What happens if you turn off Desktop and Documents syncing?
Existing cloud files remain in iCloud Drive, and macOS creates new local Desktop and Documents folders. To stop syncing, open System Settings, select your name, choose iCloud > Drive, and turn off Desktop & Documents Folders. Copy wanted files back explicitly because they do not automatically return to the new local folders.
How can you open saved Mac files on an iPhone or iPad?
Use the same Apple Account with iCloud Drive enabled. Open Files and choose Browse > Locations > iCloud Drive, then open an uploaded file or its Desktop or Documents folder. Edits affect the synced file.
How do you move an open Pages document to iCloud?
With iCloud Drive enabled, open the document in Pages on your Mac and choose File > Move To. Open Where, choose iCloud Drive, then click Move.
What does the Store in iCloud recommendation do?
The Store in iCloud recommendation connects to Desktop and Documents, Photos, and Messages storage features. Open the Apple menu > System Settings > General > Storage and choose Store in iCloud if offered. Its availability depends on your existing configuration, and you should review the corresponding iCloud, Photos, and Messages settings afterward.
How do you include Notes and their attachments?
On macOS 15 and later, open System Settings, select your name, and choose iCloud. Under Saved to iCloud, click Notes, using See All if needed, then turn on Sync this Mac. On macOS 13.3 through 14, find Notes under Apps Using iCloud, using Show All or Show More Apps. In Notes, open All iCloud or a folder under iCloud for synced notes; notes under On My Mac are local.