An iTunes restore iPhone search usually means you want to erase the device or restore your data from a backup. The right app depends on the computer in front of you: iTunes on Windows, Apple Devices on newer Windows setups, and Finder on current Macs. Start with the path that matches your situation, then use recovery mode only when the iPhone is locked, stuck, or not recognized.
1. Choose the correct restore route first
If the iPhone opens and you want a normal computer restore, turn off Find My at Settings > [Your Name] > Find My > Find My [device]. On Windows with Apple Devices installed, use Apple Devices for the current Windows restore path.
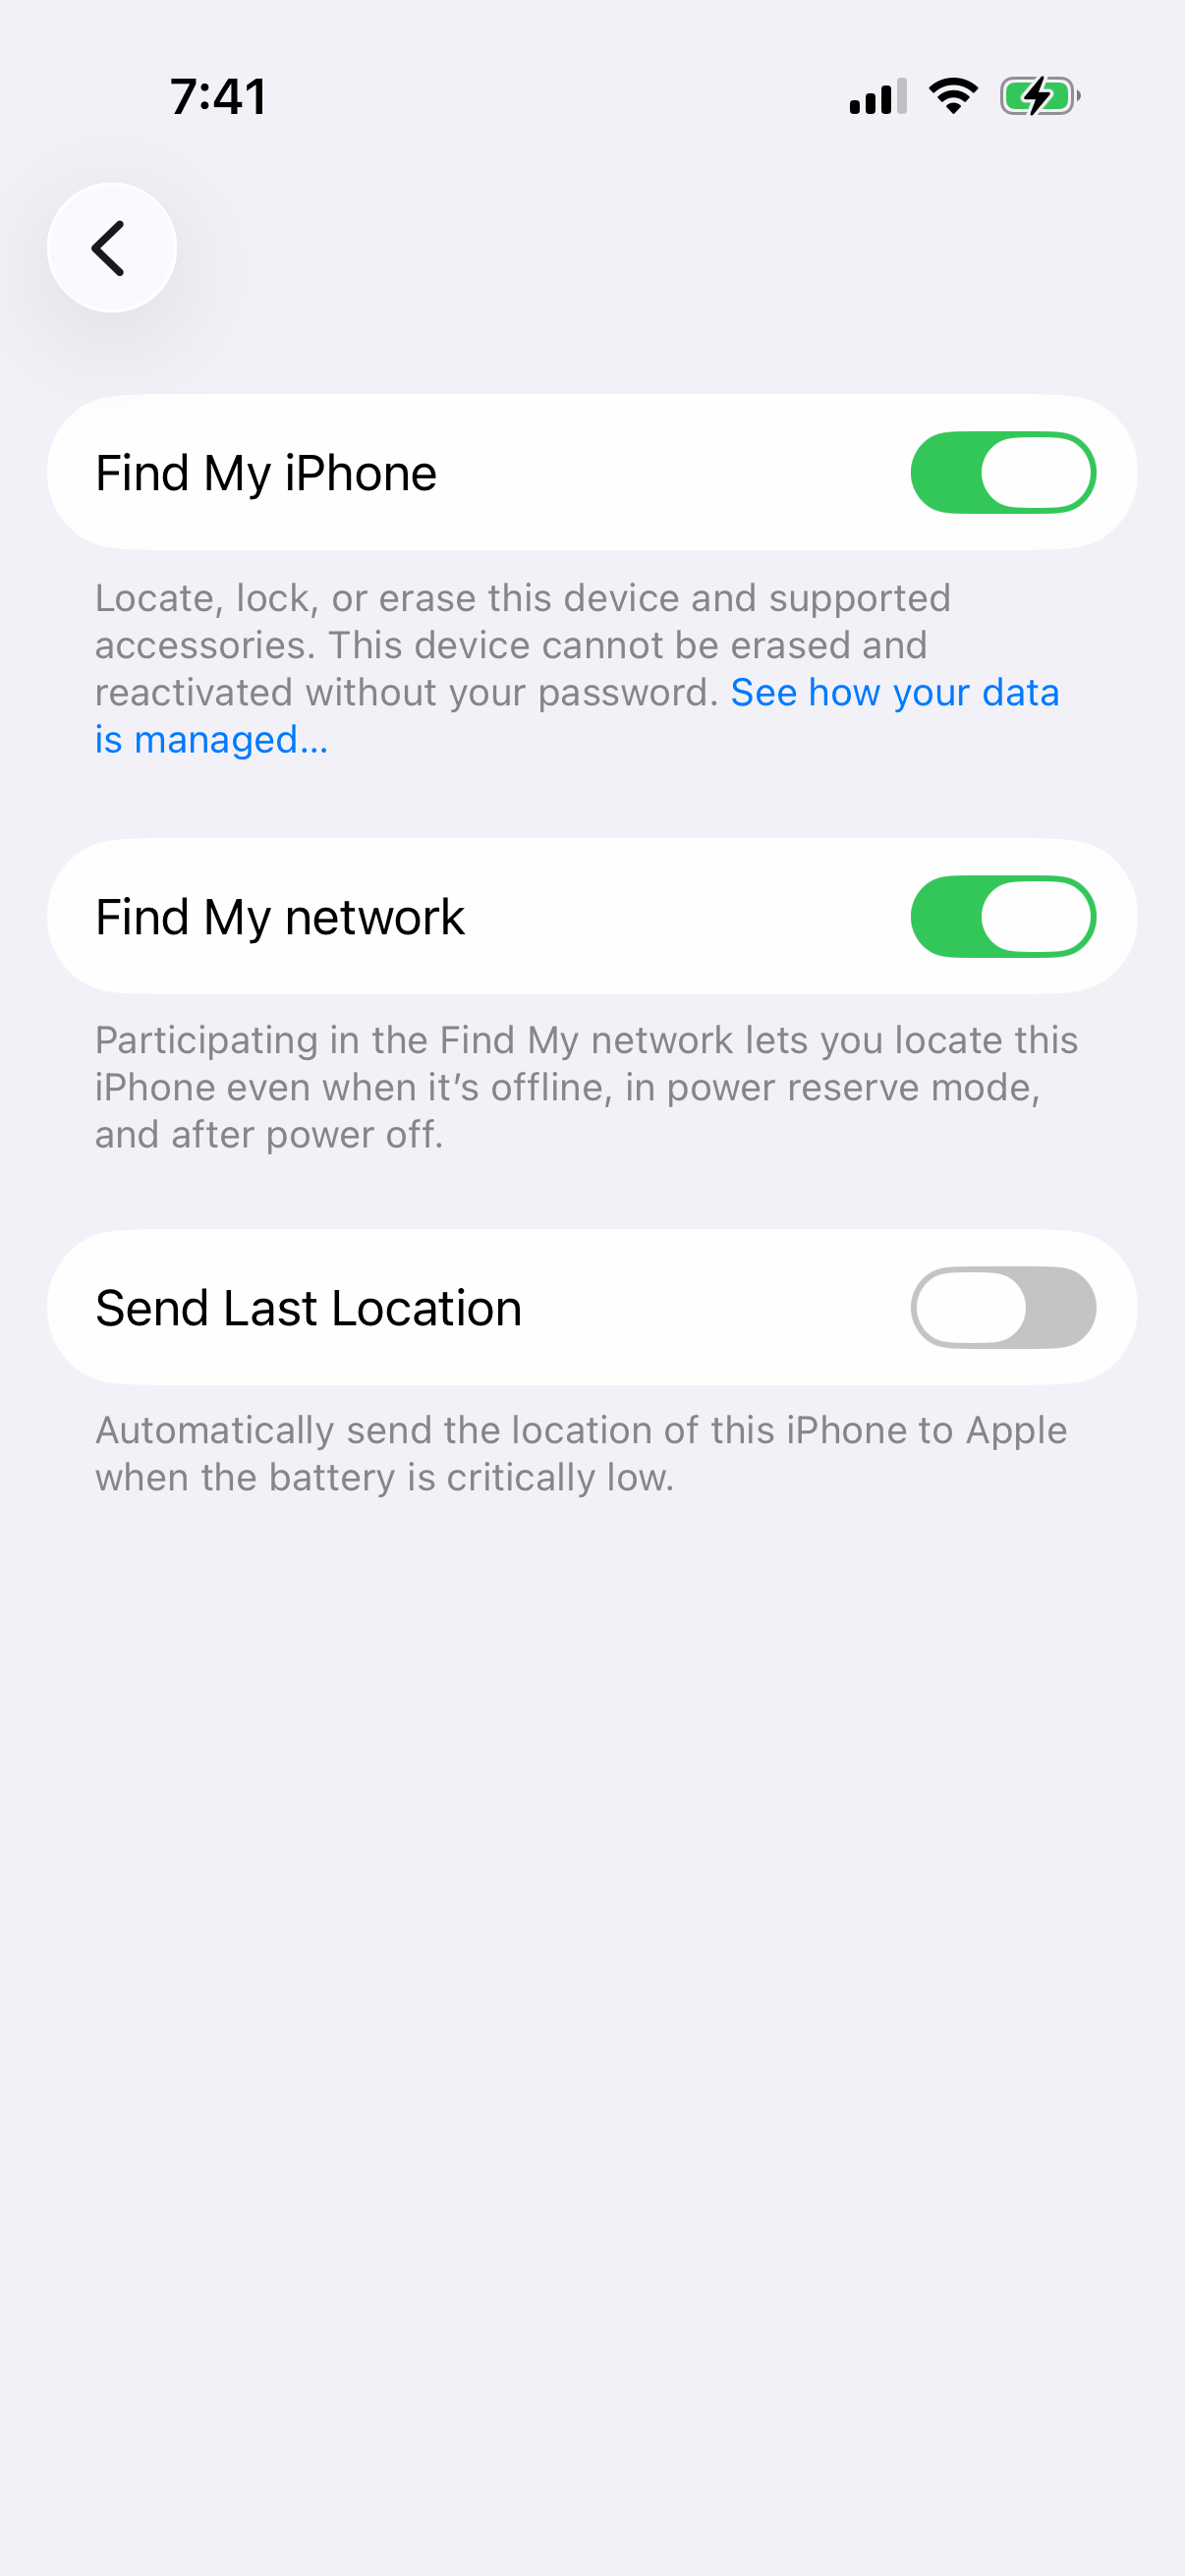
On Windows without Apple Devices, use iTunes for Windows. On macOS Catalina or later, use Finder.
If the iPhone is locked, stuck on the Apple logo, not recognized, or showing the computer connection screen, use recovery mode. If the iPhone is already erased and you want your data back, restore from iCloud Backup or a computer backup.
2. See what replaced iTunes on newer computers
Apple Devices is Apple's current Windows app for iPhone restore, backup, update, management, and sync. After you select the iPhone in the sidebar, the restore path is General > Restore [device].
iTunes for Windows still uses Summary > Restore and remains available for PCs that do not use the newer Apple apps. On macOS Catalina or later, iPhone restore happens in Finder, not iTunes.
3. Restore the iPhone to factory settings in iTunes on Windows
Connect the iPhone to the computer, then open iTunes on the PC. Click the Device button near the top left of the iTunes window.
Next, click Summary. Click Restore, then follow the onscreen instructions.
4. Use Apple Devices on Windows when that app is installed
Open Apple Devices on the PC, then connect the iPhone by USB or USB-C. Select the iPhone in the sidebar.
After that, select General and select Restore [device]. Follow the onscreen instructions.
Tip: Use Apple Devices first on Windows when it is installed, and use iTunes only on Windows PCs that do not use the newer Apple apps.
5. Restore on a Mac with Finder
On a Mac with macOS Catalina or later, open Finder. Connect the iPhone, enter the device passcode or choose Trust This Computer when prompted, then select the iPhone when it appears.
Confirm the factory restore with Restore [Device] > Restore. If the iPhone opens and Find My is on, turn it off first at Settings > [Your Name] > Find My > Find My [device].
6. Force a stuck iPhone into recovery mode
This fixes an iPhone that will not start, is stuck on the Apple logo, shows the computer connection screen, is not recognized, or needs recovery mode.
- 1.Update your Mac or PC. On Windows, get the latest Apple Devices app or iTunes.
- 2.Connect the iPhone by USB, then open Finder on Mac, Apple Devices on PC, or iTunes on a PC that does not use Apple Devices.
- 3.For iPhone 8 or later, including iPhone SE 2nd generation and later, press and quickly release Volume Up, press and quickly release Volume Down, then hold the Side button until the Connect to computer screen appears.
- 4.For iPhone 7 or iPhone 7 Plus, hold the Top or Side button and Volume Down together until the Connect to computer screen appears.
- 5.For iPhone 6s or earlier, including iPhone SE 1st generation, hold Home and the Top or Side button together until the Connect to computer screen appears.
- 6.Locate the iPhone on the computer and choose Restore when Update or Restore appears. Restore reinstalls iOS and erases all your data, so if you have not tried updating from a computer yet, try Update first.
7. Reset a forgotten passcode from a computer
A forgotten passcode reset uses recovery mode from a powered-off iPhone. Turn off the iPhone, connect the cable while holding the model-specific recovery button, and keep holding until the computer-and-cable image appears.
On Windows, open Apple Devices and use General > Restore; on a PC using iTunes, locate the iPhone and choose Restore when Restore or Update appears. Use this computer reset when Passcode Reset or a Lock Screen reset cannot be used.
8. Bring your data back from a backup
For iCloud Backup, turn on the new or newly erased iPhone and reach the Hello screen. Follow setup to Transfer Your Apps & Data, tap From iCloud Backup, sign in to your Apple Account, choose a backup, sign in for apps and purchases when asked, and keep Wi-Fi and power connected while the restore completes.
For a computer backup in Finder or Apple Devices, open Finder or Apple Devices. Connect by USB, complete passcode or Trust This Computer prompts, select the iPhone, select Restore Backup, choose the most relevant backup by date, click Restore, enter the encrypted-backup password when asked, and keep the device connected until restart and sync finish.
For an iTunes backup on Windows, connect the iPhone to the computer you normally synced with by USB, USB-C, or Wi-Fi when configured. Open iTunes, click the Device button, go to Summary > Restore Backup, and enter the encrypted-backup password when asked.
Tip: Pick the backup date that matches the version of your photos, apps, and data you want back.
9. Erase without iTunes when a computer is not the answer
This fixes cases where the iPhone opens, is locked with the right Apple Account, is lost, or belongs to work or school. For an accessible iPhone, open Settings > General > Transfer or Reset iPhone > Erase All Content and Settings, enter the iPhone passcode or Apple Account password when asked, then tap Continue.
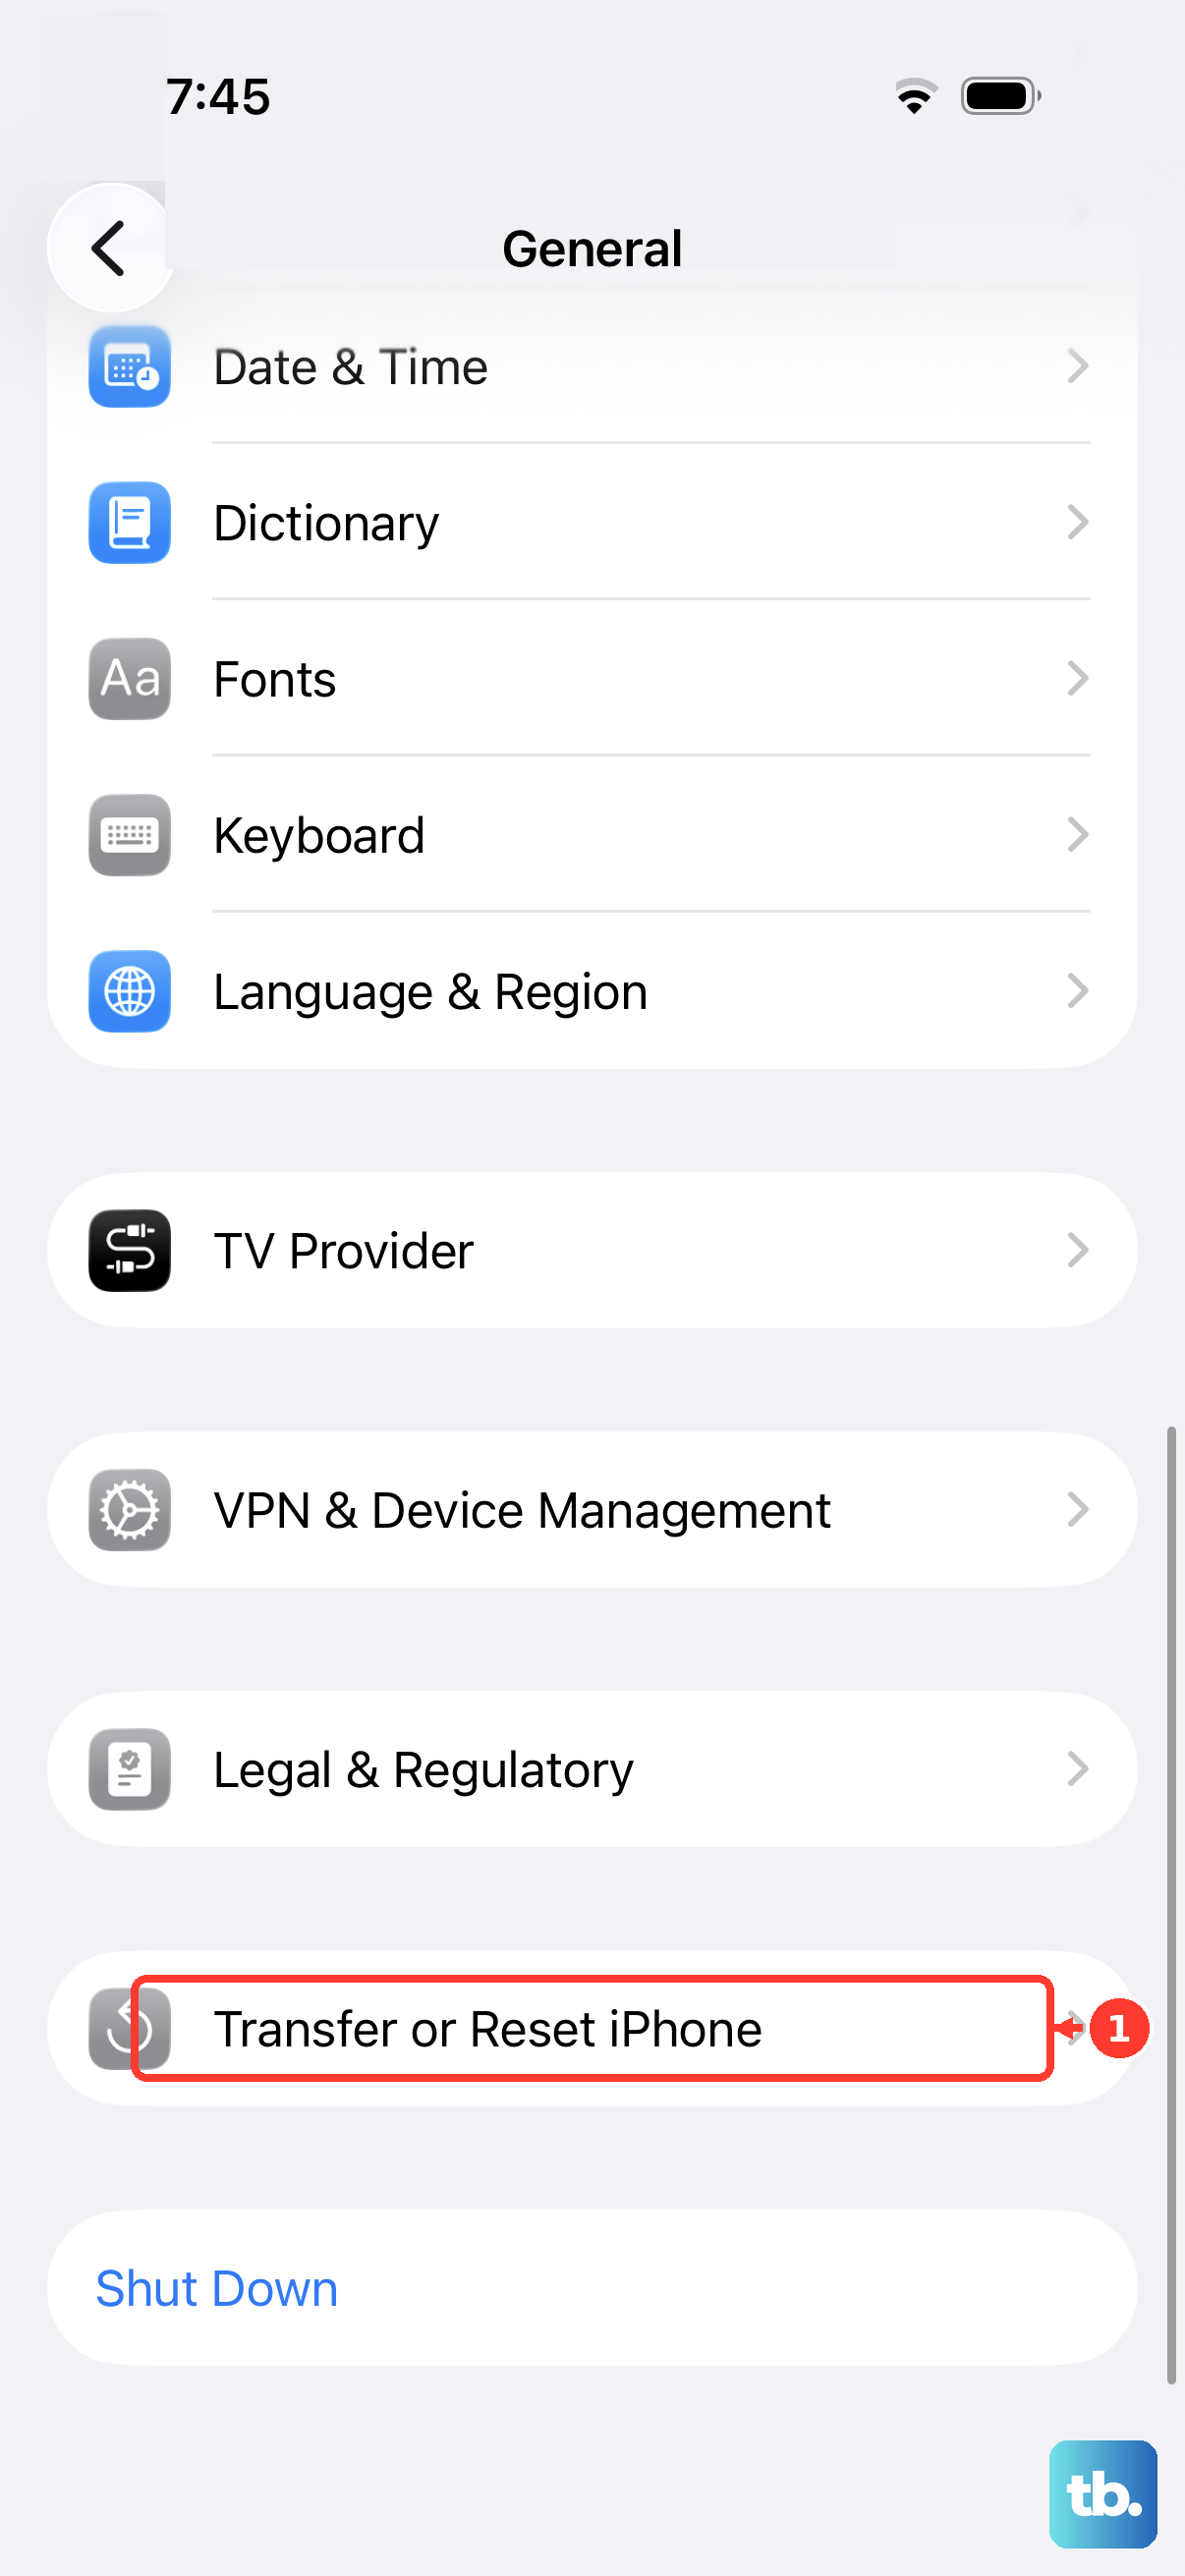
If you use eSIM, choose whether to erase or keep the eSIM. For a locked iPhone on iOS 17 or later, enter passcode attempts from the Lock Screen until [Device] Unavailable appears, tap Forgot Passcode?, tap Start [Device] Reset, enter the Apple Account password, then tap Erase [Device].
On iOS 15.2 or iOS 16 the lockout screen shows an Erase [Device] option directly instead, so tap that and confirm the erase. This requires Find My to have been enabled, an active cellular or Wi-Fi connection, and the Apple Account password.
For a lost iPhone, open Find My, go to Devices, select the lost device, choose Erase or Erase This Device, and complete the onscreen steps. That Find My app route needs two-factor authentication on your Apple Account; without it, erase from the web instead.
From iCloud.com/find, choose the lost device, select Erase [Device], then tap Erase to confirm. For a work or school iPhone, contact the organization that manages the enrolled device and ask the admin to erase it through device management.
Frequently Asked Questions
Can I still use iTunes to restore an iPhone?
Yes, on Windows. Apple also offers Apple Devices for newer Windows device management, while macOS Catalina or later uses Finder for iPhone restores.
Do I need to turn off Find My before restoring?
Yes, for a normal computer restore when the iPhone is accessible. Go to Settings > [Your Name] > Find My > Find My [device] and turn it off before using Finder, Apple Devices, or iTunes.
What should I choose when iTunes shows Update or Restore?
Choose Restore when you are using recovery mode to reset the iPhone. Apple lists Restore as the recovery-mode option.
How do I get my photos, apps, and data back after restoring?
Restore from iCloud Backup during setup, or use Restore Backup in Finder, Apple Devices, or iTunes. Choose the most relevant backup by date and enter the encrypted-backup password when asked.