“Windows cannot be installed to this disk” stops Setup even after you've picked the drive you want. The rest of the error message points to the fix, whether it mentions GPT, MBR, a read-only disk, or another problem. Start with the matching solution below, and back up your files before any step that erases the target disk.
Match the installer’s boot mode to your disk
A mismatch between the installer’s boot mode and the disk’s partition style is the common cause to check first.
If Setup rejects a GPT disk because it started in Legacy BIOS mode, restart your PC.
Open the manufacturer’s boot menu using your PC’s startup key. Microsoft lists Esc, Delete, F1, F2, F10, F11, and F12 as common options; the correct key depends on the manufacturer.
Select the installation USB entry marked UEFI, such as UEFI: USB Drive.
Retry the installation.
If Windows 11 still opens, another route to firmware settings starts at Settings > System > Recovery.
Under Advanced startup, select Restart now.
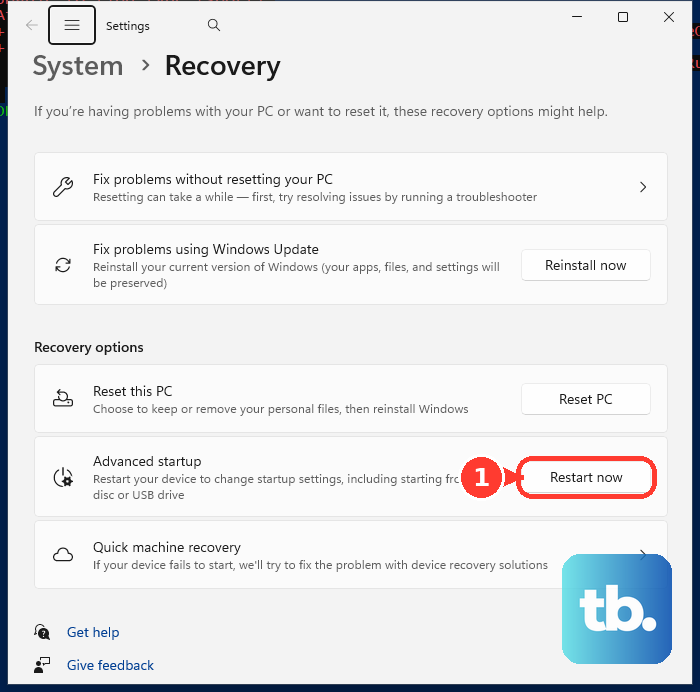
Choose Troubleshoot > Advanced options > UEFI Firmware Settings > Restart.
Before changing the boot mode of an existing MBR Windows system disk, convert it using the MBR2GPT method below.
In the manufacturer’s firmware interface, set UEFI as the first or only boot mode. The setting’s label depends on your PC.
Windows 11 requires UEFI and Secure Boot capability. Legacy BIOS mode and converting GPT to MBR are older installation alternatives, not supported Windows 11 fixes.
Choose the Windows destination carefully
Return to the Select location to install Windows 11 screen.
Select the intended Windows partition or suitable unallocated space. The EFI system partition, Microsoft reserved partition, and recovery partition are not Windows installation destinations.
Select Next to continue.
Keep the partition formats straight: the Windows partition uses NTFS, while the EFI system partition must remain FAT32.
Keep an existing installation with MBR2GPT
Use MBR2GPT when you need to convert an existing Windows system disk from MBR to GPT without deleting its data. It supports eligible Windows 10 and Windows 11 system disks that pass validation, not general data disks.
Back up your files before starting.
Confirm that the PC supports UEFI. You'll need that boot mode after conversion.
For BitLocker-encrypted volumes, suspend BitLocker protection before converting. Microsoft also requires recreating the protectors afterward.
Open Command Prompt with administrator privileges in the existing Windows installation.
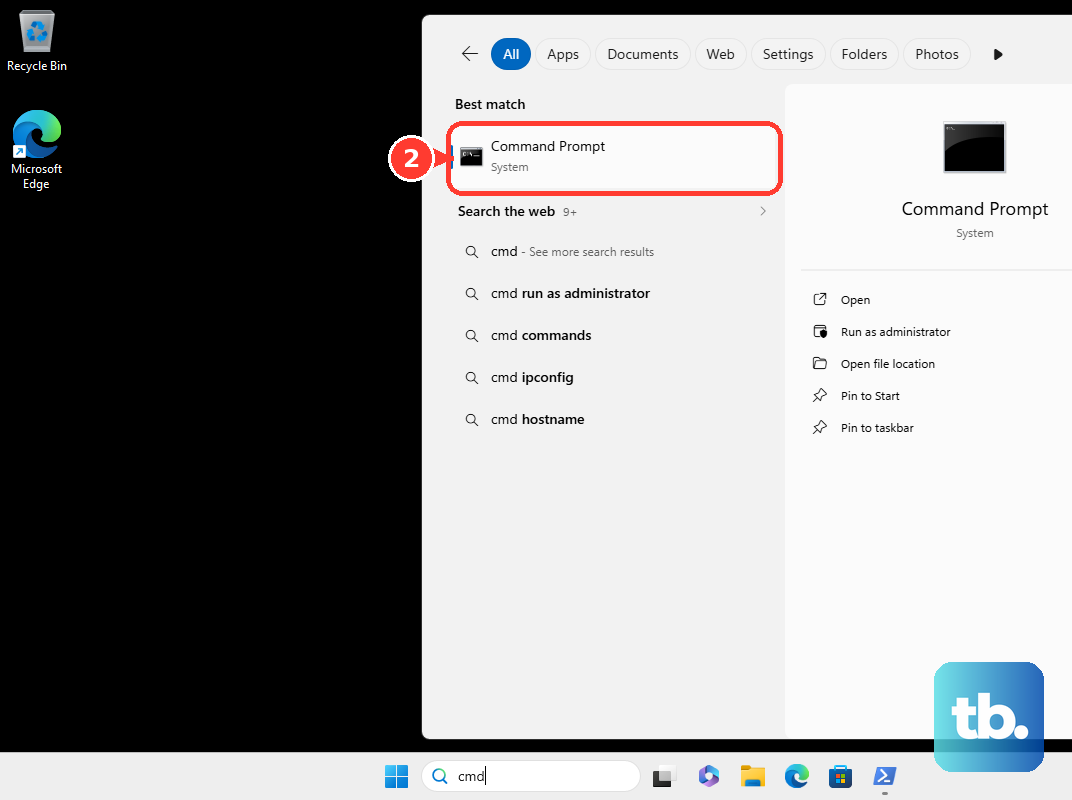
Run mbr2gpt /validate /disk:N /allowFullOS, replacing N with the confirmed number of the Windows system disk.
After validation succeeds, run mbr2gpt /convert /disk:N /allowFullOS with the same disk number. If validation fails, stop here.
After successful conversion, configure the firmware to boot in UEFI mode using the firmware route above.
If you're running these commands from Windows PE instead of the installed Windows system, omit /allowFullOS from both commands.
Start fresh by deleting the target partitions
For a clean installation, erasing the target disk lets Windows Setup create the required layout.
- 1.Back up everything you need from the target disk.
- 2.Boot the Windows installation USB using its UEFI entry.
- 3.At Select location to install Windows 11, identify the correct target disk. Do not assume it is Disk 0.
- 4.Select each partition on that disk and choose Delete Partition. Leave partitions on other disks alone.
- 5.Select the target disk’s resulting unallocated space, then choose Next.
Clear a read-only or offline disk state
Use these commands only when the target disk is explicitly reported as read-only or offline. They correct those states; they do not convert MBR to GPT.
From Windows Setup, press Shift+F10 to open Command Prompt.
Run diskpart.
Run list disk to display the disks.
Run select disk N, replacing N with the confirmed target disk number. Every following disk command applies to that selection, so check it carefully.
For a read-only target, run attributes disk to inspect its attributes.
If the disk has the software read-only attribute, run attributes disk clear readonly. This does not override physical write protection or repair a failing drive.
For a target reported as offline, run online disk after resolving any read-only state. The command fails on read-only disks.
Retry installation after correcting the disk’s state.
If installation still fails, follow the storage-driver or diagnostic steps below that match the remaining problem.
Restore a drive missing from Windows Setup
For a missing drive, obtain the compatible storage-controller F6 driver package for your exact PC, using the ASUS Download Center or Dell Drivers & Downloads, where downloads are identified by Service Tag or model. Extract the package to a USB drive. The F6 name refers to the package; loading it uses Setup’s on-screen controls.
In Setup, select Load driver > Browse. Choose the extracted driver folder and select OK. Select the matching controller driver, choose Next, then select the newly visible installation disk.
On ASUS Lunar Lake Core Ultra and newer platforms covered by ASUS’s native-NVMe guidance, recreate the installer using Windows 11 24H2 or later. Those platforms do not require manually loading IRST. Use Microsoft’s Create Windows 11 Installation Media option for the x64 media-creation tool, or its architecture-appropriate download for an ARM PC.
If the drive remains missing on a supported Dell PC, press F12 at startup and select Diagnostics. Record any failure codes. For a drive absent from firmware or failing diagnostics, power off and disconnect power before following the model’s service manual to reseat storage connections; seek repair if failures persist.
Frequently Asked Questions
Can I reach UEFI settings from the Windows sign-in screen?
Yes. Open the power menu, hold Shift, and select Restart. Choose Troubleshoot > Advanced options > UEFI Firmware Settings > Restart. This route requires access to Windows Recovery Environment and the UEFI firmware option.
Can I convert a dynamic disk to use it for Windows 11?
Yes. Microsoft still documents conversion back to a basic disk, although dynamic disks are deprecated. Back up all target-disk data first. With administrator privileges, run diskmgmt.msc. Right-click each target volume and choose Delete Volume > Yes. Once all volumes are deleted, right-click the disk label and select Convert to Basic Disk. Prepare the resulting disk as GPT before installing Windows 11 in UEFI mode.
Should I change RAID or VMD settings to make the drive appear?
Use the procedure for your exact model and clean-install scenario. Disabling VMD on supported ASUS Intel systems removes RAID capability. Dell documents RAID-to-AHCI changes for certain clean-install detection problems, but changing a working installation’s controller mode can prevent it from booting.
Does Windows To Go fix an external USB installation error?
No. Microsoft removed Windows To Go starting with Windows 10 version 2004. It is not a current supported Windows 11 workaround for an external-disk installation rejection.