


To fix a WD My Passport drive not showing up on a Mac, reconnect it directly to the Mac, enable external disks in Finder, and mount its volume in Disk Utility. On an Apple silicon laptop, you may also need to approve the USB connection. Unlock a password-protected drive before attempting filesystem repair.
Start with the connection and visibility checks, then follow the steps that match where your drive appears. Erasing deletes every file on the drive, so back up or recover anything you need before formatting it.
The short version
- Check the connection: Connect directly to your Mac and try another port or compatible data cable.
- Check visibility: Show external disks in Finder settings and inspect the drive in Disk Utility.
- Approve or unlock: Approve the USB accessory on applicable Mac laptops and unlock password-protected drives.
- Repair before erasing: Back up accessible files, run First Aid, and protect needed files before formatting.
| Check or fix | When it helps |
|---|---|
| Reconnect and bypass the hub | The drive is missing or a USB power error appears |
| Change the cable and computer | You need to isolate a cable, port, Mac, or drive problem |
| Approve the accessory | An Apple silicon laptop requires connection permission |
| Adjust accessory settings | You want connections allowed while the laptop is unlocked |
| Enable external disks in Finder | A mounted drive is hidden from the desktop or sidebar |
| Reveal the sidebar and Locations | Finder’s layout hides connected drives |
| Show all devices in Disk Utility | You need to inspect the physical drive and its volumes |
| Mount the volume | Disk Utility recognizes an unmounted volume |
| Check System Information | You need to check USB hardware detection |
| Shut down and isolate hardware | The drive remains absent from Disk Utility |
| Use WD Unlocker | A supported locked drive exposes a compatible unlocker |
| Use WD Security | A supported HDD needs its password entered |
| Install Rosetta for WD Security | The Intel-based installer prompts for Rosetta on Apple silicon |
| Use SANDISK App | A supported WDBAGF SSD needs unlocking |
| Run First Aid | Disk Utility detects a filesystem it can repair |
| Test in safe mode | You suspect startup software interference |
| Update macOS | Compatibility or stability problems remain |
| Run WD hardware diagnostics | A supported HDD may have a hardware fault |
| Arrange recovery or replacement | Files remain inaccessible or the drive fails diagnostics |
| Erase and reformat | A detected drive remains unusable and needed files are protected |
Check the cable and USB connection
Disconnect and reconnect the drive, then try another USB port. If you use a USB or Thunderbolt hub, connect the drive directly to your Mac. If you use a self-powered hub, connect its AC adapter, especially when macOS reports USB Devices Disabled or insufficient power.
If reconnecting does not help, try another compatible data cable, then another port. Next, connect the drive to another computer that supports its filesystem. These checks help distinguish a drive problem from a cable, port, or Mac problem.
Allow the USB accessory on your Mac laptop
On Mac laptops with Apple silicon running macOS Ventura 13 or later, unlock the Mac, reconnect the drive, and click Allow when prompted. If you use the laptop with its lid closed, first approve the external display, keyboard, and mouse. Then retry the drive connection.
To adjust this behavior on current Apple silicon Mac laptops, open the Apple menu > System Settings > Privacy & Security > Accessories. Open Allow accessories to connect and choose Automatically allow when unlocked. Reconnect the drive while your Mac is unlocked.
On earlier macOS versions with accessory security, the accessory connection menu appears directly under Privacy & Security. Open it there, then reconnect the drive with the Mac unlocked.
Show external disks in Finder
In Finder, choose Finder > Settings, click General, then select external disks among the items to show on the desktop. Click Sidebar and select external disks there too. These settings control where an already mounted drive appears.
Open a Finder window and press Control + Command + S if its sidebar is hidden. Click the arrow beside Locations to reveal its contents. If the drive remains missing, check whether macOS detects it outside Finder.
Find the drive in Disk Utility and mount it
Open Applications > Utilities > Disk Utility, then choose View > Show All Devices. Look for the physical drive and the volumes beneath it. This view lets you distinguish a detected device from its individual volumes.
For a recognized but unmounted volume, select the volume and click Mount. Check Finder again after mounting it. If mounting fails, continue with the password and First Aid checks below.
When the physical drive is absent from Disk Utility, hold Option and choose the Apple menu > System Information. Look under Hardware, including USB, for the drive. If it appears there but remains unusable, continue with mounting, unlocking, and filesystem checks.
If Disk Utility still cannot find the device, shut down your Mac and disconnect nonessential devices. Start the Mac and retry the drive, checking its cable, connections, and power. If detection still fails, use the cable and second-computer checks above to narrow down the cause.
Unlock a password protected drive
For a supported HDD exposing a compatible virtual unlocker, double-click WD Unlocker in Finder, then WD Drive Unlock, and click OK. Enter the drive password, click Unlock Drive, then click Close. The same sequence applies to SSD model WDBAGF when it exposes a compatible WD Unlocker.
For a supported HDD, get WD Security from its official download and installation page using the WD Security for macOS download. WD lists supported HDD configurations on macOS 15, 26, and 27, and installation requires an administrator account. Connect the drive, open WD Security, select the drive, enter its password, and click Unlock Drive.
On an Apple silicon Mac using the Intel-based WD Security installer, click Install at the Rosetta prompt. Enter the administrator username and password, then complete installation. If an older 32-bit WD Unlocker won't run on modern macOS, use the supported companion software for your drive model.
For SSD model WDBAGF, you can instead get SANDISK App from its download page, which lists macOS 14, 15, and 26. Select SANDISK App for macOS, open sandiskapp-mac.dmg, click Open, and drag SANDISK App to Applications, authenticating if requested. In the app, select the locked-drive tile, choose its unlock action, enter your password in Password, and click Continue.
Sandisk has ended WD Security support for SSD model WDBAGF and directs you to SANDISK App. For a supported HDD, follow the WD Security workflow above.
Repair the drive with First Aid
Back up accessible files before running a repair. In Disk Utility, choose View > Show All Devices, then select the drive’s last volume. Click First Aid, then Run.
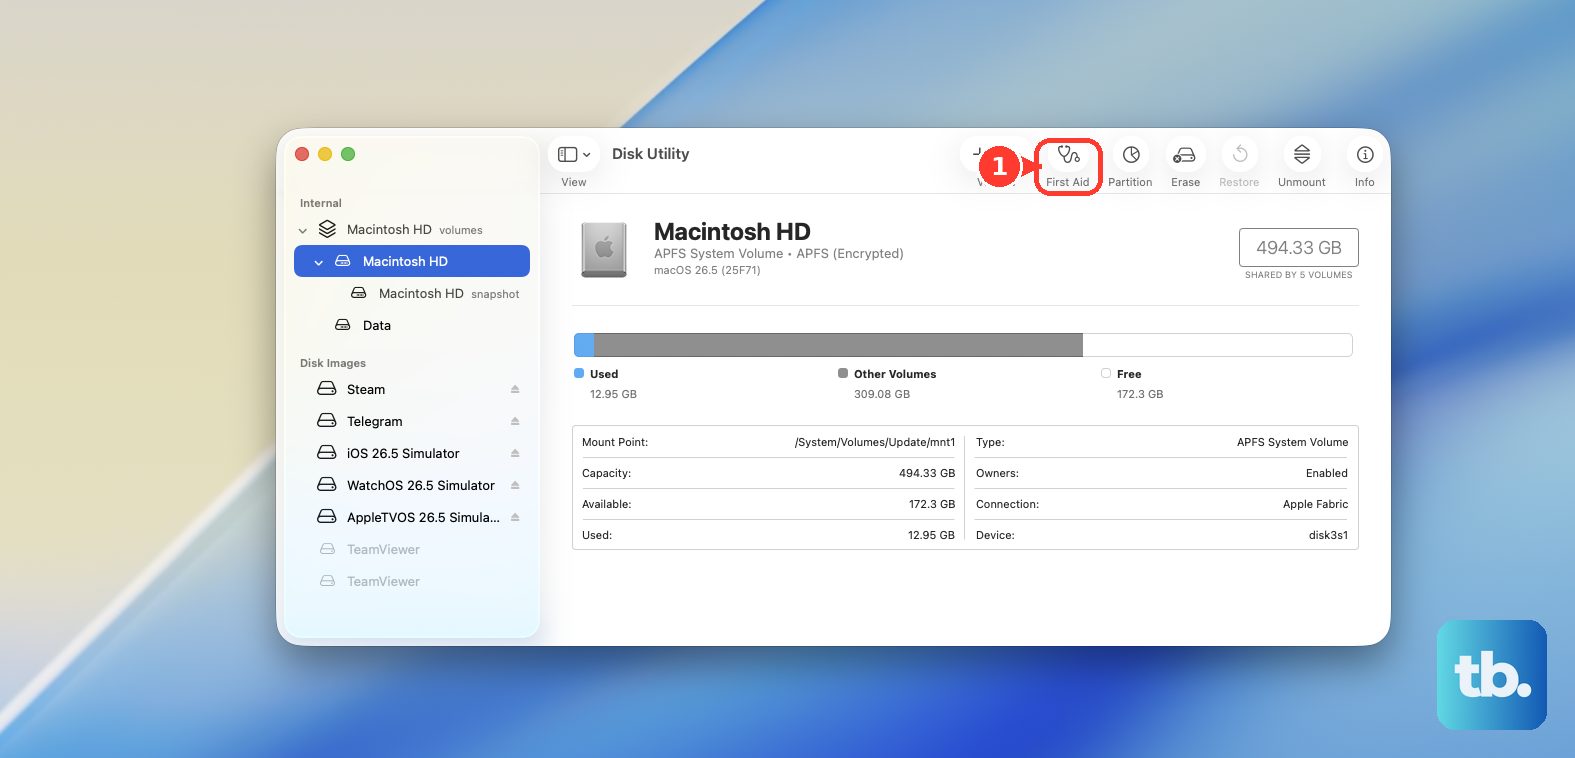
Repeat the repair upward through the drive’s volumes, volume groups, containers, and finally the physical device. First Aid applies to detected devices with a filesystem Disk Utility can repair. If the errors cannot be repaired, back up or recover needed files before considering the erase procedure below.
Check for software interference and macOS updates
Safe mode helps you check for startup software interference. On an Apple silicon Mac, choose the Apple menu > Shut Down, then hold the Power button until startup options appear. Select the startup volume, hold Shift, and click Continue in Safe Mode. Log in and retest the drive.
On an Intel Mac, start or restart while holding Shift until the login window appears. Log in and retest the drive. Safe mode helps isolate a cause, but it does not guarantee a repair.
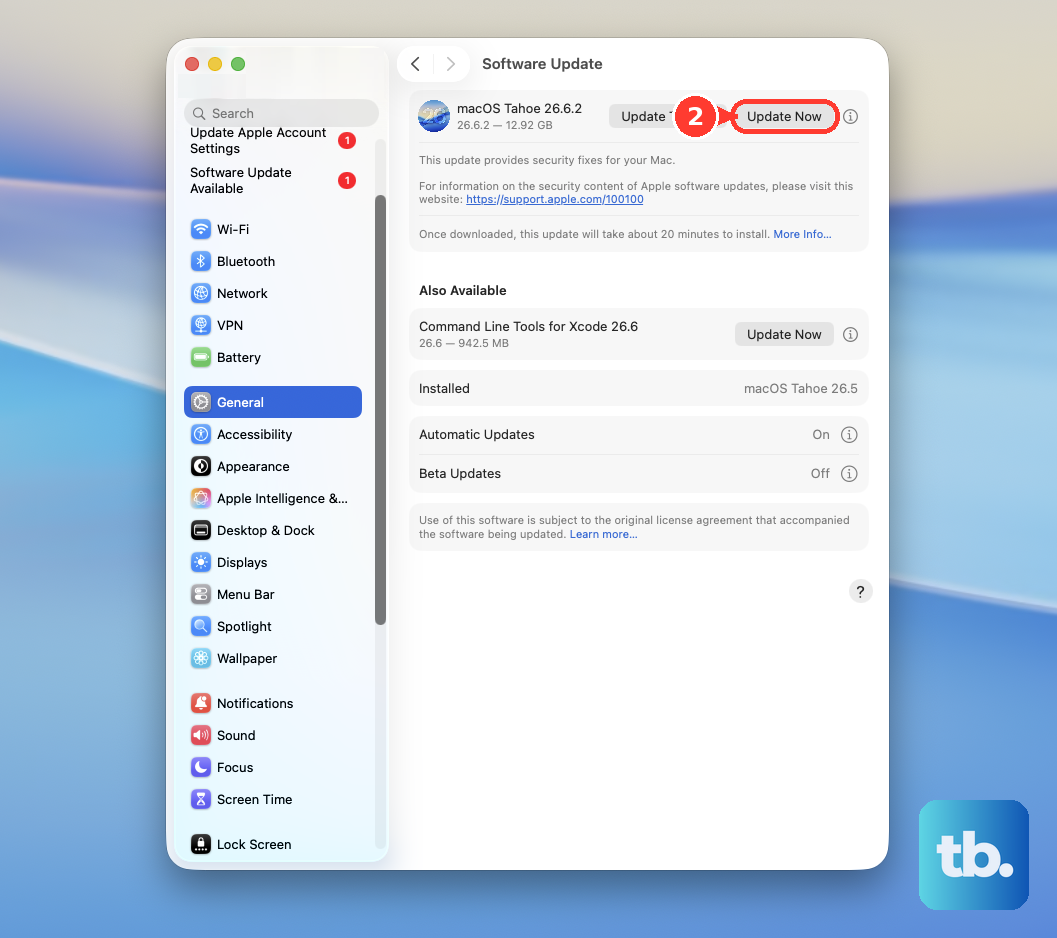
For compatibility or stability problems, back up accessible data and open the Apple menu > System Settings > General > Software Update. Install the compatible update offered. To check again, press Command + R or click Check for Updates.
Check hardware and arrange recovery if needed
For supported HDD variants, get WD Drive Utilities from its official download page using WD Drive Utilities for macOS. Check that your model and Mac configuration are supported; WD lists macOS 15, 26, and 27. Open the utility, select the drive, and click Diagnose. Choose Drive Status Check, Quick Drive Test, or Complete Drive Test.
These tests check hardware, and WD advises replacing a drive that fails diagnostics. They do not repair the filesystem. WD Drive Utilities support has ended for SSD models WDBK3E and WDBKVX, so use macOS storage tools for their accessible volumes.
If you need files from a WD-supported HDD and have no backup, contact a WD-listed Data Recovery Partner before returning the drive. For replacement, find the serial number and use Warranty Status Check, then sign in to WD’s Support Portal and create a Warranty Replacement request with purchase details and label photographs. Warranty and recovery eligibility depend on your product and region.
Reformat only after protecting your files
Consider reformatting when Disk Utility detects the drive but its filesystem is unusable or unsupported, or its errors cannot be repaired. Complete the connection, unlocking, mounting, and repair checks first. Choose APFS for modern Mac use or ExFAT for sharing between Mac and Windows.
Erasing deletes all data on the drive, so back up or recover needed files first. In Disk Utility, choose View > Show All Devices, select the physical WD My Passport drive, and click Erase. Set Scheme to GUID Partition Map, choose the appropriate Format, and enter a name. Click Erase, then Done.
Frequently Asked Questions
Why can you open the drive but not copy files onto it?
macOS can normally read an NTFS-formatted drive, so a write-access problem needs different checks. Select the drive in Finder and choose File > Get Info to inspect Format. WD provides a Paragon NTFS driver download and installation option; verify compatibility before installing it.
What should you check if the drive disappears after inactivity?
On supported WD My Passport HDDs with a sleep timer, open WD Drive Utilities, select the drive, and click Settings. Turn off Sleep Timer or choose a longer interval. This option excludes the SSD, Go, and Pro models.
Why can Finder see the drive when another app cannot?
The affected app may need permission to access the storage location. Open the Apple menu > System Settings > Privacy & Security > Files & Folders, find the app, and enable access to the relevant listed location. Reopen the app; the available permissions depend on what it has requested.
What if only SANDISK App fails to detect your supported SSD?
First confirm that Finder can access the drive. Temporarily stop suspected third-party security software or driver software and retest SANDISK App. If you identify interference, configure that software to permit the app, then restore normal protection.
Should you change the UAS setting in WD Discovery for an SSD?
Sandisk no longer supports the old WD Discovery UAS control for WD My Passport SSD WDBAGF and Go WDBMCG. Sandisk directs affected users to SANDISK App instead.
Can a work or school Mac block the drive?
On supervised Macs running macOS 15 or later, storage management policies can prevent a writable drive from mounting, including policies set to Disallowed or Read-only. Ask your administrator to review Storage management > External storage devices and choose Allowed if policy permits; console paths vary. On managed Apple silicon laptops running macOS 13 or later, ask the administrator to review allowUSBRestrictedMode if accessory authorization is managed.
Why does WD Unlocker ask for your SSD password every time?
For SSD model WDBAGF, automatic unlocking is unavailable for passwords created with SANDISK App. Enter the password through the compatible WD Unlocker or SANDISK App when you need to unlock the drive.