

To disable Windows write-cache buffer flushing, open Device Manager, expand Disk drives, open your drive’s Properties > Policies, check Turn off Windows write-cache buffer flushing on the device, and select OK. These steps apply to Windows 11 and Windows 10 when the drive and its driver expose the checkbox.
The short version
- Main route: Open the physical drive’s Properties > Policies in Device Manager.
- Checkbox meaning: Checking Turn off Windows write-cache buffer flushing on the device disables flushing, while unchecking it restores flushing.
- Data risk: Disabling flushing can cause data loss or corruption after a power failure.
- Different controls: External-drive removal policies control caching and are separate from the buffer-flushing checkbox.
| Route or option | What it does | When it applies |
|---|---|---|
| Device Manager | Changes the individual drive’s flushing checkbox | Windows 11 and Windows 10 with a drive and driver that expose it |
| Disk Management | Opens the same per-drive policy | Disks and drivers that expose the policy |
| External-drive removal policy | Controls caching through Better performance or Quick removal | External USB and Thunderbolt storage on Windows 11 and Windows 10 |
| Windows + R shortcut | Opens Device Manager to reach caching controls | Windows devices exposing the relevant policies |
| PowerShell storage-pool setting | Suppresses flushing for a power-protected storage pool | Storage pools managed by the Windows Storage PowerShell module |
Open the drive’s policy settings
Press Windows + R to open Run. Enter the following command, then press Enter.
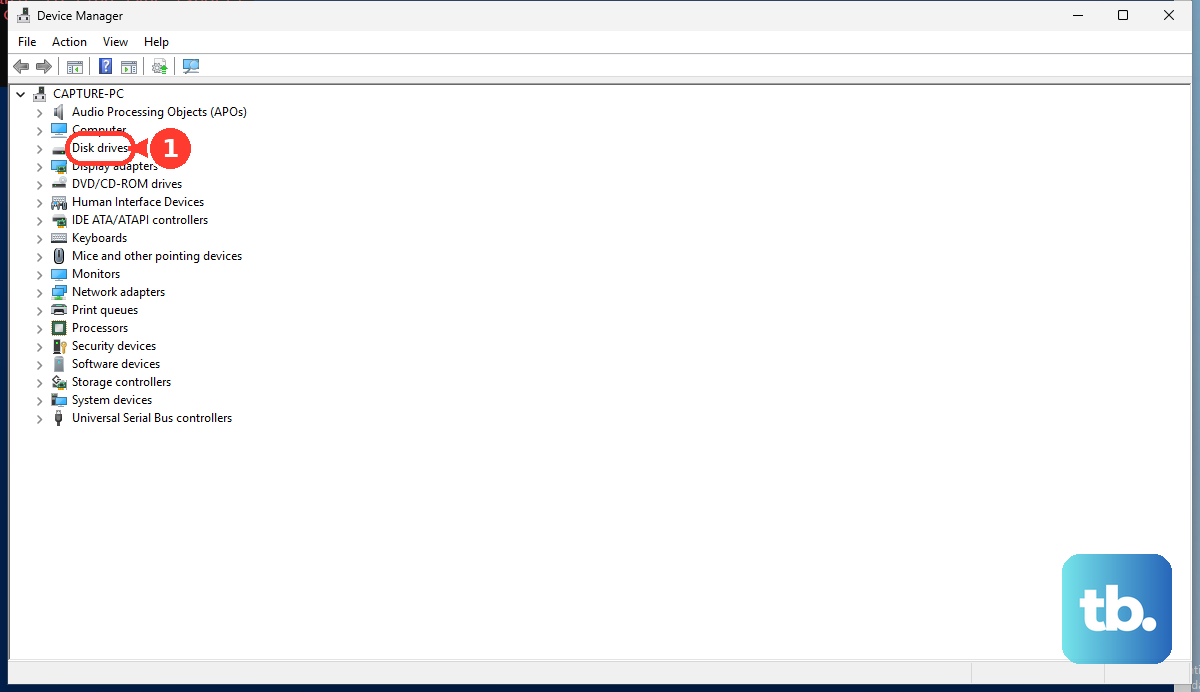
devmgmt.mscExpand Disk drives, right-click the physical drive you want to change, and select Properties. Open the Policies tab to reach its caching controls. The setting applies to the drive you selected, so choose the intended physical device.
The flushing checkbox depends on your storage hardware and driver. Kingston describes this procedure for its NVMe SSDs using Microsoft’s native driver. If you are working with an external drive and the Policies tab is missing, follow the Hardware route below.
Disable flushing or turn it back on
On the Policies tab, find Turn off Windows write-cache buffer flushing on the device. The wording matters: checking this box turns flushing off, while unchecking it turns flushing back on.
Disabling write-cache buffer flushing can cause data loss or corruption after a power failure. To disable flushing, check Turn off Windows write-cache buffer flushing on the device, then select OK.
To restore flushing, return to the same drive’s Properties > Policies. Uncheck Turn off Windows write-cache buffer flushing on the device, then select OK.
Use Disk Management as another entry point
On Windows 11 and Windows 10, you can also open the per-drive policy through Disk Management. Open Disk Management, right-click the target disk’s label in the lower pane, and select Properties > Policies. This route also requires a disk and driver that expose the policy.
Disabling write-cache buffer flushing can cause data loss or corruption after a power failure. To disable flushing, check Turn off Windows write-cache buffer flushing on the device and select OK. To restore flushing instead, uncheck the same checkbox and select OK.
Find the controls for an external drive
On Windows 11 and Windows 10, connect your external USB drive or Thunderbolt storage device first. Right-click Start, select File Explorer, and identify its drive letter. Then right-click Start, select Disk Management, and find the device in the lower pane.
Right-click the device label and select Properties > Policies. If the Policies tab is missing, select Hardware, choose the drive under All disk drives, then select Properties > Policies.
The external-drive removal policy controls Windows write caching. Selecting Better performance permits caching, while Quick removal disables Windows write caching. These options are separate from the buffer-flushing checkbox.
With Better performance, Microsoft requires safe removal before you disconnect the drive. To permit caching, select Better performance, then select OK.
If your external drive exposes the additional caching control, you can enable it through Device Manager. Open it with the Windows + R shortcut and devmgmt.msc command above, expand Disk drives, right-click the external drive, and select Properties > Policies.
With Better performance, Microsoft requires safe removal before you disconnect the drive. Select Better performance, check Enable write caching on the device, and select OK.
Enabling caching does not itself turn off buffer flushing. To change flushing afterward, follow the checkbox steps above if your drive exposes that setting. To disable Windows write caching instead, select Quick removal and select OK.
Change flushing for a power protected storage pool
For storage pools managed by the Windows Storage PowerShell module, IsPowerProtected provides a separate pool-level control. Microsoft describes it in its Windows Server 2025 command reference. It is not a general replacement for an individual drive’s flushing checkbox.
Use this setting only when the pool’s physical disks actually have backup power protection. In an elevated PowerShell session, identify the intended pool with this command.
Get-StoragePoolReplace POOL_NAME below with the actual pool name to declare the pool power protected and suppress its flush operations. Disabling flushing can cause data loss or corruption after a power failure.
Set-StoragePool -FriendlyName "POOL_NAME" -IsPowerProtected $trueTo withdraw that power-protection declaration, run the following command with the same pool name. This changes the pool-level declaration rather than the individual drive’s checkbox.
Set-StoragePool -FriendlyName "POOL_NAME" -IsPowerProtected $falseFrequently Asked Questions
Will an external drive keep its removal policy after reconnection?
Yes, Microsoft says the removal policy persists when you reconnect the device to the same computer port. That persistence statement concerns the external-drive removal policy.
What do older Windows caching instructions change?
Microsoft’s historical instructions, including a Windows Server 2008 variant, control write caching rather than the separate buffer-flushing policy. For Windows 11 and Windows 10, follow the current Device Manager or Disk Management steps above.
Which Dell external drives have documented caching steps?
Dell lists its SD1-U0250, SD1-T0500 and SD1-T1000 portable SSDs, along with its 500GB and 1TB USB 3.0 external hard drives. Its procedure uses Better performance and Enable write caching on the device to enable caching.
What else does the storage pool power protection setting change?
Setting IsPowerProtected to $true also removes write-through attributes from commands. You must have actual backup power protection for the pool’s physical disks before making that declaration.