A slow-booting PC wastes minutes every single day and usually points to a fixable software problem, not failing hardware. Whether you are on Windows 11 or still running Windows 10, the cause is almost always the same short list: too many startup apps, an aging drive, outdated drivers, or low free space.
This guide walks through 12 distinct fixes, ordered from the quickest software tweaks to the bigger changes. Work down the list and stop once your boot time feels normal. Most people see the biggest gain from the first two or three steps alone.
One note before you start. Windows 10 reached end of support on October 14, 2025, so it no longer receives security or feature updates. The steps below still work on Windows 10, but if your hardware supports it, upgrading to Windows 11 is the most durable long-term fix.
Quick Reference Table
Use this table to pick where to start. The fastest, lowest-risk fixes are at the top. Difficulty reflects how comfortable you need to be with Windows settings, not how risky the change is.
| Fix | What it targets | Time | Difficulty |
|---|---|---|---|
| 1. Disable startup apps | Programs loading at boot | 5 min | Easy |
| 2. Toggle Fast Startup | Hybrid shutdown conflicts | 3 min | Easy |
| 3. Free up disk space | Nearly full system drive | 10 min | Easy |
| 4. Turn on Storage Sense | Recurring junk file buildup | 5 min | Easy |
| 5. Install Windows updates | Outdated system files | 15 min | Easy |
| 6. Update graphics and chipset drivers | Driver delays at boot | 15 min | Medium |
| 7. Adjust visual effects | Animation overhead | 3 min | Easy |
| 8. Optimize your drive | HDD fragmentation, SSD TRIM | 10 min | Easy |
| 9. Run SFC and DISM | Corrupted system files | 30 min | Medium |
| 10. Scan for malware | Background malware | 20 min | Easy |
| 11. Perform a clean boot | Hidden software conflicts | 20 min | Medium |
| 12. Upgrade hardware or reset | Old drive, low RAM, deep corruption | 1 hour+ | Hard |
Why Windows Starts Slowly
Startup time is shared between hardware and software. Your drive type sets the floor, your startup apps and services pile time on top, and corruption or low free space can stretch it further.
The most common causes are too many apps launching at boot, a traditional hard drive instead of an SSD, outdated or corrupt drivers, low free storage, insufficient RAM, and background malware. The fixes below address each of these in order.
1. Disable Startup Apps
Startup apps are the single biggest cause of slow boots. Every program that launches with Windows competes for CPU, memory, and disk the moment you sign in, so trimming this list often gives the largest improvement.
Task Manager is the best place to do this because it shows a Startup impact rating for each entry. Open it with Ctrl + Shift + Esc, then select the Startup apps tab. Sort by the impact column, then right-click anything rated High or Medium that you do not need and choose Disable.
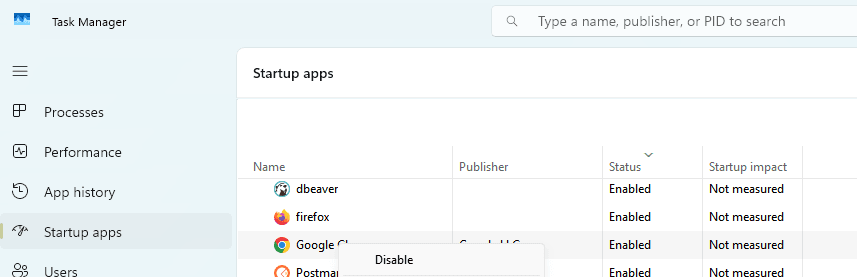
On Windows 11 you can also manage the same list at Settings > Apps > Startup and flip each toggle off. Safe candidates to disable include cloud storage clients, media players, chat apps, printer and accessory utilities, and updater helpers. Leave your antivirus and essential hardware drivers enabled, and if you do not recognize a name, look it up before disabling it.
2. Toggle Fast Startup
Fast Startup saves part of the system state to a hibernation file on shutdown so the next boot is quicker. It usually helps, but on some PCs it causes conflicts that actually slow startup or leave devices in a bad state, so testing it both ways is worth a few minutes.
Open Control Panel and go to Hardware and Sound > Power Options. In the left pane, choose what the power buttons do, then click Change settings that are currently unavailable, which requires administrator rights.
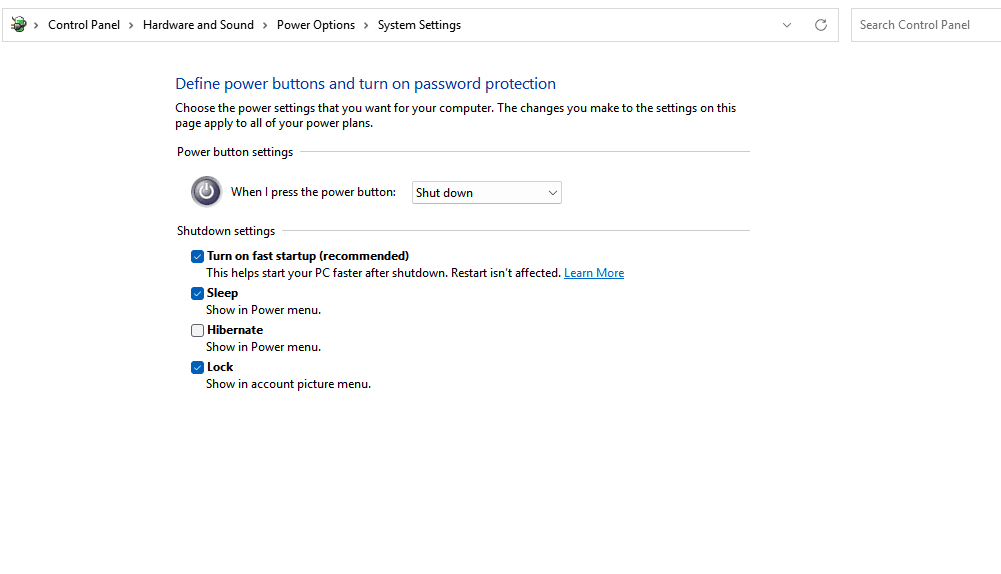
Under Shutdown settings, clear the Turn on fast startup box, save changes, and restart twice to compare. If boot is no faster or feels worse, turn it back on. If the option is missing entirely, hibernation is off on your system, which is common on PCs with an SSD where the feature offers little benefit anyway.
3. Free Up Disk Space
Windows needs free space to manage temporary files, the page file, and updates during startup. A nearly full system drive slows everything, so keeping a healthy buffer of free space on your C: drive matters.
The built-in Disk Cleanup tool clears most of the safe-to-delete junk. Search the Start menu for Disk Cleanup, select your main drive, then tick categories such as Temporary files, Delivery Optimization files, and Windows upgrade log files.
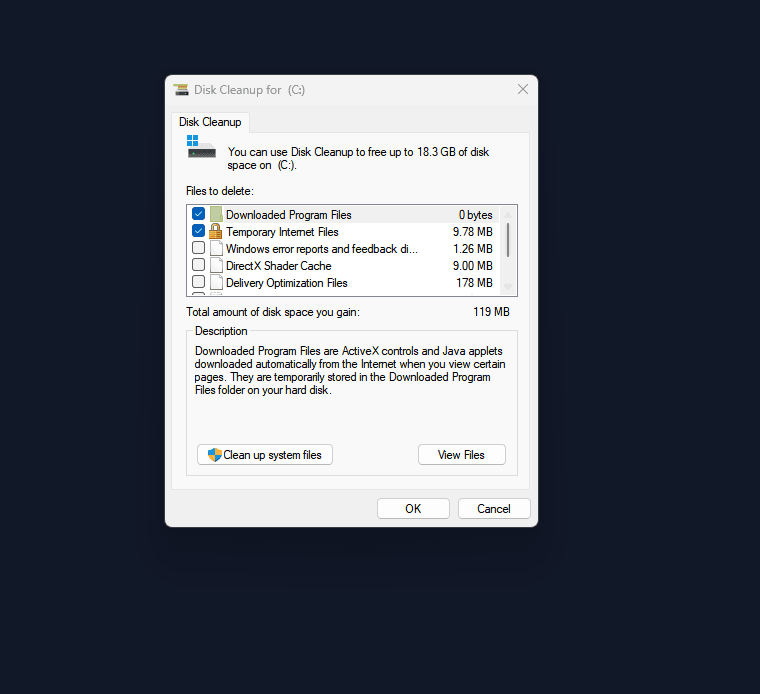
Click OK, then Delete Files to confirm. For a deeper clean, reopen the tool and choose Clean up system files, which surfaces old update leftovers and previous Windows installations that can reclaim several gigabytes.
4. Turn On Storage Sense
Storage Sense automates the cleanup you just did by hand, so junk never builds back up to the point where it drags on startup. It runs on the system drive and can clear temporary files and empty the Recycle Bin on a schedule.
Go to Settings > System > Storage and switch Storage Sense on. This path is the same on Windows 11 and Windows 10.

Select Storage Sense to set when it runs, how long to keep items in the Recycle Bin and Downloads, and cloud content rules if you use OneDrive. You can also trigger an immediate cleanup from this screen, which is handy after installing or removing large programs.
5. Install Windows Updates
Outdated system files and missing driver updates can both add seconds to boot. Keeping Windows current is one of the lowest-effort fixes and often resolves performance regressions introduced by earlier builds.
Open Settings > Windows Update and click Check for updates. Install everything offered, including optional driver updates if they appear, then restart when prompted.
If you are still on Windows 10, note that it stopped receiving updates on October 14, 2025. Check for updates anyway in case Extended Security Updates apply to your setup, but plan to move to Windows 11 for ongoing fixes.
6. Update Graphics and Chipset Drivers
Display and chipset drivers load early in the boot sequence, so an outdated or buggy version can stall startup before you reach the desktop. Updating them often smooths out both boot time and general responsiveness.
Press Windows key + X and open Device Manager. Expand Display adapters, right-click your graphics card, and choose Update driver, then select Search automatically for drivers.
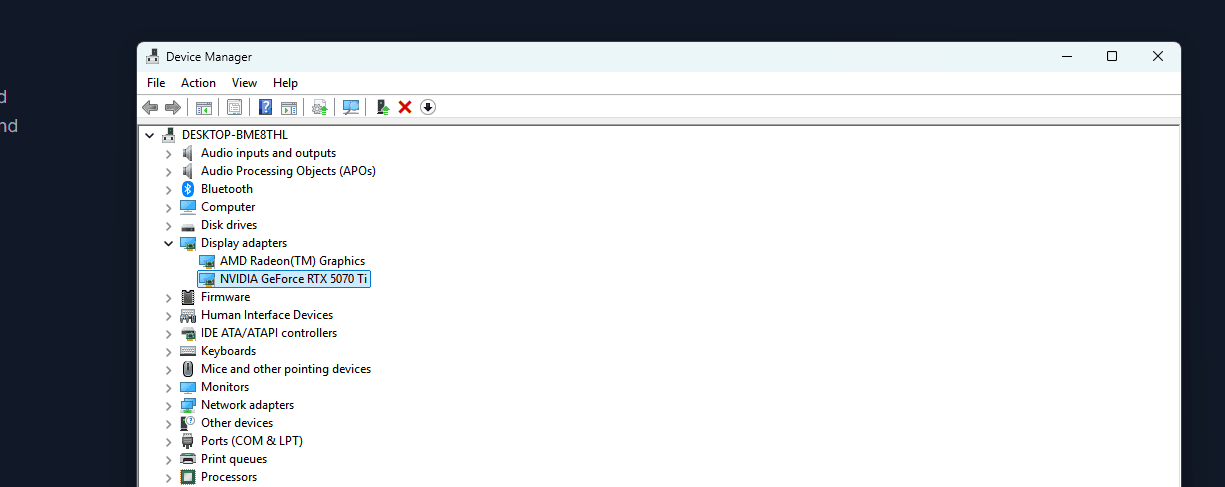
Repeat for network adapters and any chipset entries. For graphics, the most reliable updates come straight from the maker's own app, such as NVIDIA, AMD, or Intel software, and chipset drivers are best pulled from your laptop or motherboard maker's support page rather than relying only on Windows.
7. Adjust Visual Effects
Windows animations and shadows are light on modern PCs but can add noticeable lag on older or low-RAM machines, especially as the desktop draws after sign-in. Trimming them is harmless and reversible.
Press Windows key + R, type sysdm.cpl, and press Enter to open System Properties. On the Advanced tab, click Settings under Performance.
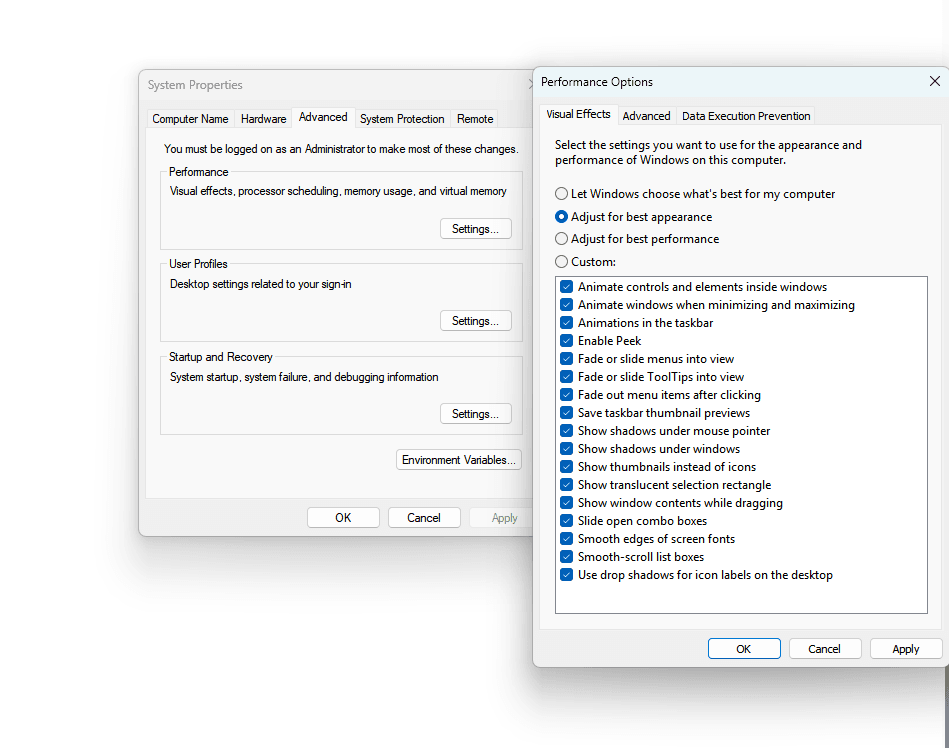
Choose Adjust for best performance to disable all effects, or keep a few you like such as smooth font edges, then click Apply and OK. The change takes effect immediately, so you can judge the difference without restarting.
8. Optimize Your Drive
Drive optimization keeps a hard drive's files in order and tells an SSD which blocks it can clear, both of which protect read speed at boot. Windows runs this weekly by default, but a manual pass helps if the schedule has been missed.
Search the taskbar for defrag and open Defragment and Optimize Drives. Select your system drive and click Optimize.
Windows automatically picks the right action: it defragments a traditional hard drive and runs a TRIM pass on an SSD, so you never need to defragment an SSD manually. To confirm the weekly schedule is active, click Change settings under Scheduled optimization.
9. Run SFC and DISM
Corrupted system files can quietly slow startup and cause intermittent hangs. Two built-in command-line tools repair them without reinstalling Windows, and running them in the correct order matters.
Open the Start menu, search for Command Prompt, right-click it, and choose Run as administrator. Run the image repair first with this command, since the System File Checker relies on a healthy image:
DISM /Online /Cleanup-Image /RestoreHealth
When that finishes, run sfc /scannow to scan and repair protected system files. The SFC scan can take 10 to 15 minutes, and if either tool reports that it fixed something, restart and check whether boot has improved.
10. Scan for Malware
Malware frequently sets itself to launch at startup and runs hidden background processes, which both slows boot and degrades overall speed. A full scan rules this out before you move on to harder fixes.
Open Windows Security from the Start menu and go to Virus & threat protection. Under Current threats, choose Scan options, then select Full scan and start it.
A full scan is more thorough than the default quick scan and can take a while, so run it when you do not need the PC. If it finds anything, remove or quarantine it, restart, and retest your boot time.
11. Perform a Clean Boot
A clean boot starts Windows with only Microsoft services and no third-party startup items, which isolates whether outside software is the cause. It is the most reliable way to find a stubborn conflict that the earlier steps missed.
Press Windows key + R, type msconfig, and press Enter. On the Services tab, tick Hide all Microsoft services, then click Disable all.
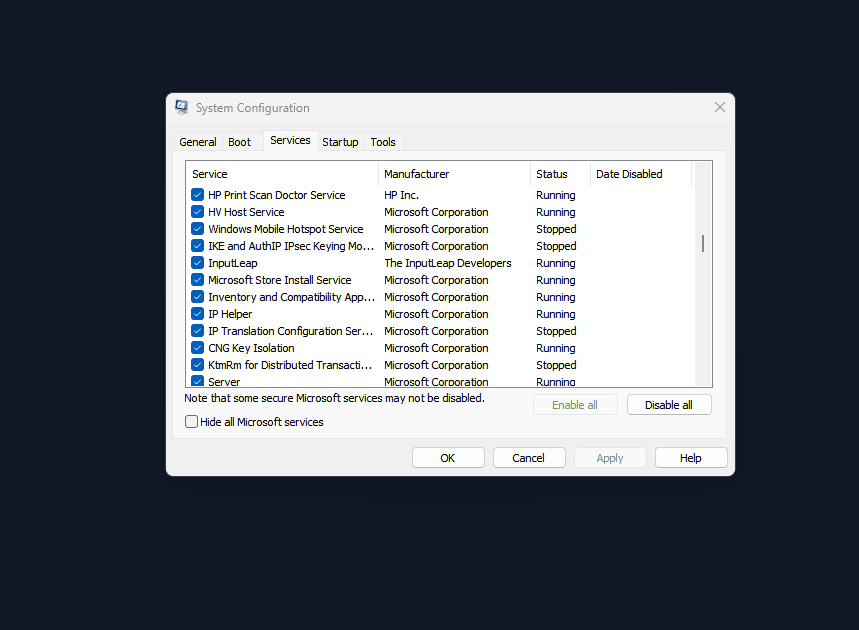
Switch to the Startup tab, open Task Manager, and disable every remaining item there. Click OK and restart. If boot is fast in this state, re-enable services and startup items in small groups, restarting each time, until the slow one reveals itself.
12. Upgrade Hardware or Reset Windows
If software fixes only get you so far, the bottleneck is likely the drive, the RAM, or deep corruption. These changes take more time and, for hardware, some money, but they deliver the biggest jump.
The most impactful upgrade is moving from a traditional hard drive to an SSD. An SSD reads data far faster than a spinning drive, which transforms boot time on older machines. Adding RAM is the next step if you routinely run low. Windows 11 lists 4 GB as the minimum, but more memory removes the slow page-file fallback that hammers your drive during startup.
If the system is corrupted beyond repair, reset it as a last resort. Go to Settings > System > Recovery, select Reset PC, and choose Keep my files to preserve your personal data. This removes installed apps, so back up first and have your reinstall files ready.
Frequently Asked Questions
How long should Windows take to start up?
With an SSD, Windows 11 or Windows 10 should reach a usable desktop in roughly 10 to 30 seconds. A traditional hard drive is slower, often 60 to 120 seconds. Boot times consistently over two minutes point to a problem worth fixing.
Will disabling startup apps break anything?
No. Disabling a startup app only stops it from launching automatically, and you can still open it manually whenever you need it. Keep security software enabled, and look up any unfamiliar entry before turning it off.
Should I disable Windows services to speed up startup?
Generally no. Windows manages its own services efficiently, and disabling essential ones can cause instability. Focus on third-party startup apps instead, and only touch services as part of a temporary clean boot to find a conflict.
Does turning off Fast Startup always help?
Not always. Fast Startup speeds up most PCs, but it can cause conflicts on some systems, especially with dual-boot setups or certain drivers. Test your boot time with it both on and off, then keep whichever is faster.
My PC boots fast but the desktop takes forever to load. What gives?
That usually means startup apps are loading after sign-in. Trim the Startup apps list in Task Manager, clear excess desktop icons and widgets, and check whether a mapped network drive is timing out as the desktop loads.
Is upgrading to an SSD really worth it?
For an older PC on a hard drive, it is the single most effective fix on this list. An SSD can cut boot time from a minute or two down to a handful of seconds and also speeds up app launches and file access across the board.
First published December 15, 2025. Last updated June 4, 2026.