Few things are more frustrating than seeing the Wi-Fi icon lit up on your Mac while web pages refuse to load. In most cases the connection looks fine but your Mac never actually received a working IP address from the router, so nothing reaches the internet.

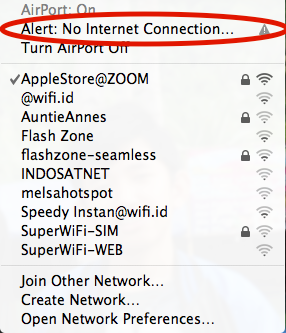
An exclamation mark or a missing signal on the Wi-Fi icon in the menu bar is the clearest warning sign. Click the Wi-Fi icon, then click the information button next to your network to see its current status and IP address.
The steps below move from the quickest fixes to the deeper resets, and they use the current macOS layout (System Settings on Ventura, Sonoma, Sequoia, and Tahoe). If you are on an older version that still shows System Preferences, the same options live under similar names.
Restart Your Mac and Router
Before changing any settings, restart both your Mac and your router. A restart forces your Mac to drop its old network configuration and request a fresh IP address, which clears the majority of temporary connection faults.
Shut down your Mac, unplug the router for about 30 seconds, then plug it back in. Wait for the router lights to stabilize before turning your Mac back on and reconnecting to the network.
Spot a Self-Assigned IP Address
When your Mac cannot reach the router's DHCP server, it gives itself a placeholder address that starts with 169.254. That address never reaches the internet, so the connection appears active while every page times out.
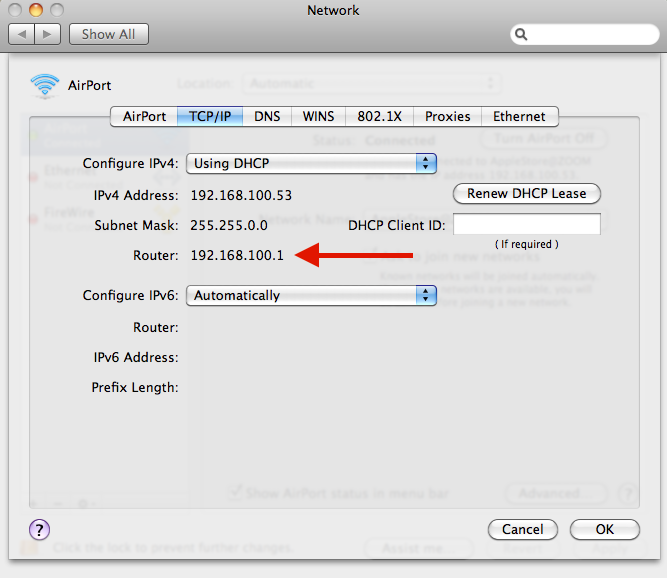
To check, go to the path below and open the TCP/IP tab. If the IP address begins with 169.254, or the Router field is empty while Configure IPv4 is set to Using DHCP, you have found the cause.
System Settings > Network > Wi-Fi > Details > TCP/IP
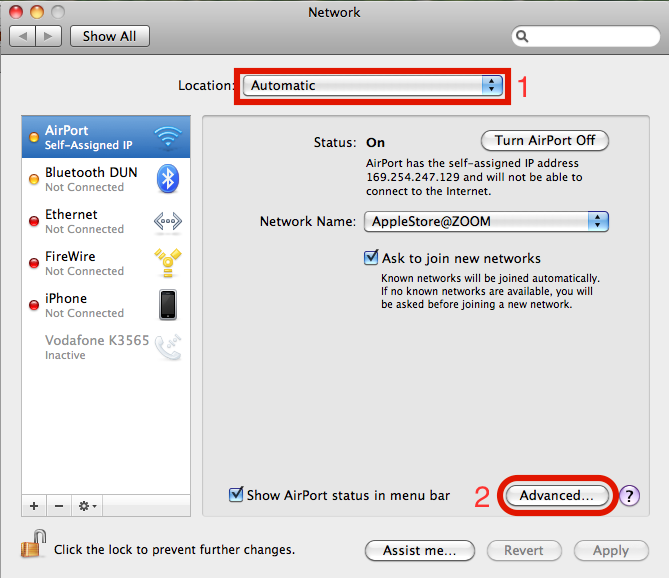
This screen is also where the next two fixes happen, so keep it open. The Renew DHCP Lease button sits at the top of the TCP/IP tab.
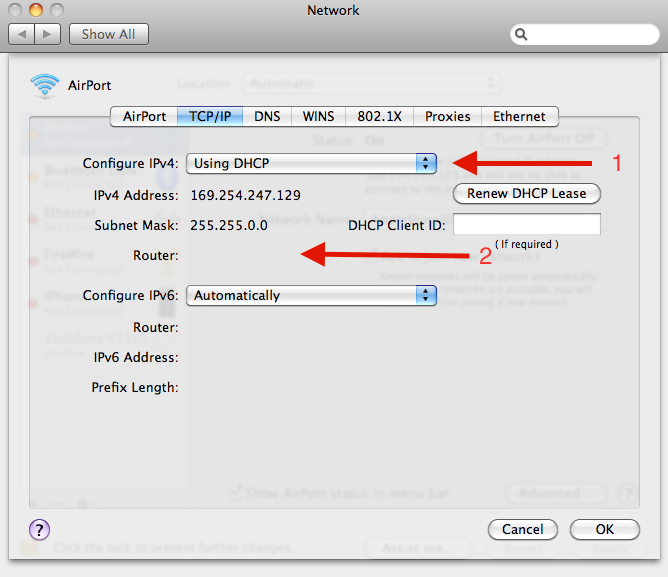
Renew the DHCP Lease
Renewing the lease is the single most effective fix for a self-assigned IP, and it takes seconds. It asks the router for a brand new address instead of the broken one your Mac is holding onto.
- 1.Open Apple menu > System Settings, then click Network in the sidebar
- 2.Click Wi-Fi, then click Details next to your connected network
- 3.Click the TCP/IP tab
- 4.Click Renew DHCP Lease, then click OK
Give it a moment, then recheck the IP address. A normal private address usually starts with 192.168 or 10, and the Router field should now show your router's address.
Forget the Network and Rejoin
A saved network can hold onto stale settings that block a clean reconnection. Removing it and joining again rebuilds the connection from scratch.
- 1.Go to System Settings > Wi-Fi and scroll down to Advanced
- 2.Find your network under Known Networks, click the More button (three dots), then choose Remove From List
- 3.Confirm with your password or Touch ID, then close the window
- 4.Reselect the network from the Wi-Fi menu and enter the password again
If iCloud Keychain sync is on, removing the network here also removes it from your other Apple devices, so you may need to re-enter the password on each one.
Change Your DNS Servers
If pages still fail to load even with a valid IP, the problem may be DNS, the service that turns site names into addresses. Switching to a reliable public DNS provider often restores browsing immediately.
- 1.Go to System Settings > Network > Wi-Fi > Details
- 2.Click the DNS tab
- 3.Click the + button under DNS Servers and add the addresses below, one at a time
- 4.Click OK to save
8.8.8.8
8.8.4.4
1.1.1.1
9.9.9.9
The first two belong to Google and the others to Cloudflare and Quad9. You can use any one pair on its own, and you can remove them later with the minus button if you want to return to your router's default DNS.
Reset Network Configuration Files
When the quick fixes fail, the network preference files themselves may be corrupted. Deleting them forces macOS to rebuild clean copies after a restart, which clears stubborn self-assigned IP problems.
First, turn off Wi-Fi from the menu bar. Then open Finder and use the Go menu to reach the configuration folder.
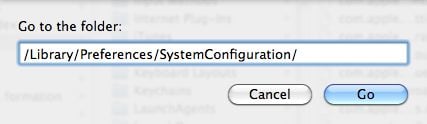
- 1.In Finder, click Go > Go to Folder in the menu bar
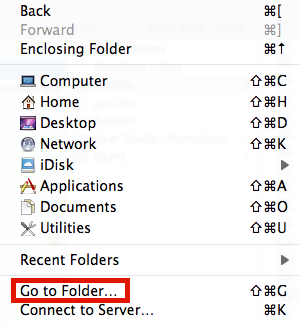
/Library/Preferences/SystemConfiguration/
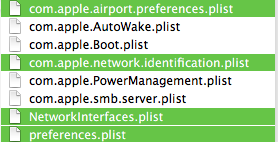
macOS recreates these files automatically, so copy them to the desktop first as a backup before you delete anything. Then drag the following files to the Trash, entering your administrator password when asked.
- preferences.plist
- com.apple.airport.preferences.plist
- NetworkInterfaces.plist
- com.apple.network.identification.plist
- Settings.plist
Restart your Mac, then turn Wi-Fi back on and rejoin your network. macOS rebuilds clean copies of these files during startup, so the connection should come back with fresh settings.
Create a New Network Location
A network location stores a separate set of network settings. Building a fresh one gives your Mac a clean configuration without disturbing your current setup.
- 1.Go to System Settings > Network
- 2.Click the More button (three dots) below the list, then choose Locations > Edit Locations
- 3.Click the + button, name the new location, then click Done
- 4.Select Wi-Fi, open Details > TCP/IP, and click Renew DHCP Lease
Switch between locations any time from Apple menu > Location. If the new location connects normally, the trouble was in your old configuration.
Set the Network Service Order
If your Mac has more than one connection, such as Wi-Fi and an Ethernet adapter, it may try the wrong one first. Putting Wi-Fi at the top of the service order tells macOS to prefer it.
- 1.Go to System Settings > Network
- 2.Click the More button (three dots), then choose Set Service Order
- 3.Drag Wi-Fi to the top of the list, then click OK
- 4.Click Apply if prompted
Note that any active VPN connection always takes priority and cannot be moved in this list.
Check the Firewall and Security Software
An overly strict firewall or third-party security tool can block traffic even when the connection is healthy. Reviewing these rules out software that is quietly cutting off access.
Open the firewall settings at the path below and confirm that Block all incoming connections is not preventing the apps you need. In current macOS the firewall is configured here rather than through preference files, so toggling it off briefly is a quick way to test whether it is the cause.
System Settings > Network > Firewall
If you run a VPN, content filter, or antivirus app, temporarily disable it and retest. Re-enable it once you confirm whether it was interfering.
Run Wireless Diagnostics
Apple includes a built-in tool that scans your connection and suggests fixes. It is useful when nothing obvious is wrong and you want a deeper look at signal quality and interference.
Hold the Option key while clicking the Wi-Fi icon in the menu bar or Control Center, then choose Open Wireless Diagnostics and follow the prompts. The tool can monitor your connection over time and produce a report you can share if you contact support.
If you have worked through every step and still cannot connect, the fault may lie with your router or internet provider. Test another network or a different device to confirm, then contact your provider or Apple Support for further help.
Frequently Asked Questions
Why does my Mac say it is connected to Wi-Fi but has no internet?
This usually means your Mac joined the network but never received a working IP address from the router, so traffic has nowhere to go. Renewing the DHCP lease or restarting your router fixes most cases.
What is a self-assigned IP address on a Mac?
It is a fallback address starting with 169.254 that your Mac creates when it cannot reach the router's DHCP server. That address cannot access the internet, which is why pages fail to load.
How do I renew my IP address on a Mac?
Go to System Settings > Network > Wi-Fi > Details > TCP/IP, then click Renew DHCP Lease and click OK. Your Mac will request a fresh address from the router.
Is it safe to delete the SystemConfiguration files?
Yes, macOS automatically rebuilds these network preference files after a restart. Copy them to your desktop first as a backup so you can restore them if needed.
Why is my Mac Wi-Fi slow or dropping after a macOS update?
Updates can reset network settings or leave a stale configuration behind. Forgetting and rejoining the network, renewing the DHCP lease, or running Wireless Diagnostics usually restores normal speed.
Should I change my DNS servers to fix Wi-Fi issues?
If you have a valid IP address but pages still will not load, switching to public DNS such as 8.8.8.8 or 1.1.1.1 often resolves the problem. You can revert to your router's default DNS at any time.
First published October 15, 2025. Last updated June 4, 2026.