Vertical lines on a monitor point to one of two places: the display hardware or the signal path feeding it. Start by making the screen test itself, then work outward through the cable, input, display settings, drivers, and apps. By the end, you will know whether this is a fixable setup problem or a service case.
1. Make the monitor test itself
The fastest split is simple: if the line appears when the monitor draws its own test screen, the computer, cable, app, and graphics driver are not the cause.
- 1.Open the monitor’s On-Screen Display menu using its buttons, joystick, or remote.
- 2.Find the model's Built-in diagnostics or Self-test option. Use the model manual because the exact label varies.
- 3.Run the monitor's built-in test and look for the same vertical line pattern.
- 4.If the line appears in the test, go to warranty, repair, or replacement options.
- 5.If the test image is clean, continue with the cable, port, source, resolution, refresh rate, and driver checks below.
Diagnostic names and menu paths vary by model. For Dell monitors, go to Dell.com/support/manuals, enter the monitor model or Service Tag, open Documentation, choose the User Guide, then check Troubleshooting for Built-in diagnostics or Self-test. For another brand, use the exact model's manual instead of a menu path from a different display.
2. Reseat the cable and restart the display
A weak display signal is the easiest fix to rule out. Strip the setup down before changing software.
Disconnect extra docks, dongles, adapters, and accessories from the video path.
Push the HDMI, DisplayPort, USB-C, DVI, or VGA cable firmly into the computer and the monitor.
Swap in one known-good video cable that matches the ports you are using.
Unplug the monitor from the power outlet, wait briefly, plug it back in, turn it on, and retest.
If a replacement cable clears the lines, replace the original cable. If the lines remain fixed after a power reset and the monitor self-test shows them too, treat the display as the fault.
3. Change the input port and source
Move the cable to another video output on the computer, such as another HDMI, DisplayPort, USB-C, DVI, or VGA port.
Open the monitor’s Input or Source menu.
Select the exact port connected to the cable.
Connect the same monitor to a different computer or source device.
Compare that result with the monitor’s self-test result.
Lines that follow the monitor across computers and appear in the self-test belong on the monitor side. Lines that disappear on another computer point back to the original computer’s port, graphics hardware, driver, resolution, or refresh rate.
4. Set resolution and refresh rate to stable values
On Windows 11, set the affected screen to its recommended resolution first. Go to Start > Settings > System > Display, select the affected display, open Scale & layout, choose Display resolution, then select the option marked Recommended.
Next, use a supported fixed refresh rate. Go to Start > Settings > System > Display > Advanced display, select the affected display, open Choose a refresh rate, and choose 60 Hz for testing. If the device shows Dynamic refresh rate, turn it off while testing.
On a Mac, open Apple menu > System Settings > Displays, select the external display, and choose the display’s default or native resolution. Use the Refresh Rate menu and choose a fixed supported value such as 60 Hertz. If the display is dark, low resolution, or stuck at the wrong refresh rate, check the supported resolution and refresh-rate limits for the Mac, display, cable, adapter, and any other connected displays, then lower the setting and retest.
5. Reset the Windows graphics path
Press Windows + Ctrl + Shift + B. A beep or brief screen flicker means Windows reset the graphics driver. This only resets the software side, so it does not fix a line that appears in the monitor’s own test.
Then press Windows + P and compare PC screen only, Duplicate, Extend, and Second screen only. If the line changes only with the display mode, keep troubleshooting the computer path. If it stays fixed on the monitor and the self-test shows it, move to service options.
6. Repair the display driver path
Driver work belongs after the monitor self-test is clean and the symptom follows the computer.
Install optional driver updates in Windows 11 through Start > Settings > Windows Update > Advanced options > Optional updates. If Driver updates are listed, select them, choose Download and install, and restart.
Update the adapter through Device Manager > Display adapters, right-click the graphics adapter, then choose Update driver.
After a bad update, use Device Manager > Display adapters > the adapter's Properties > Driver > Roll Back Driver, choose a reason when prompted, select Yes, then restart if prompted.
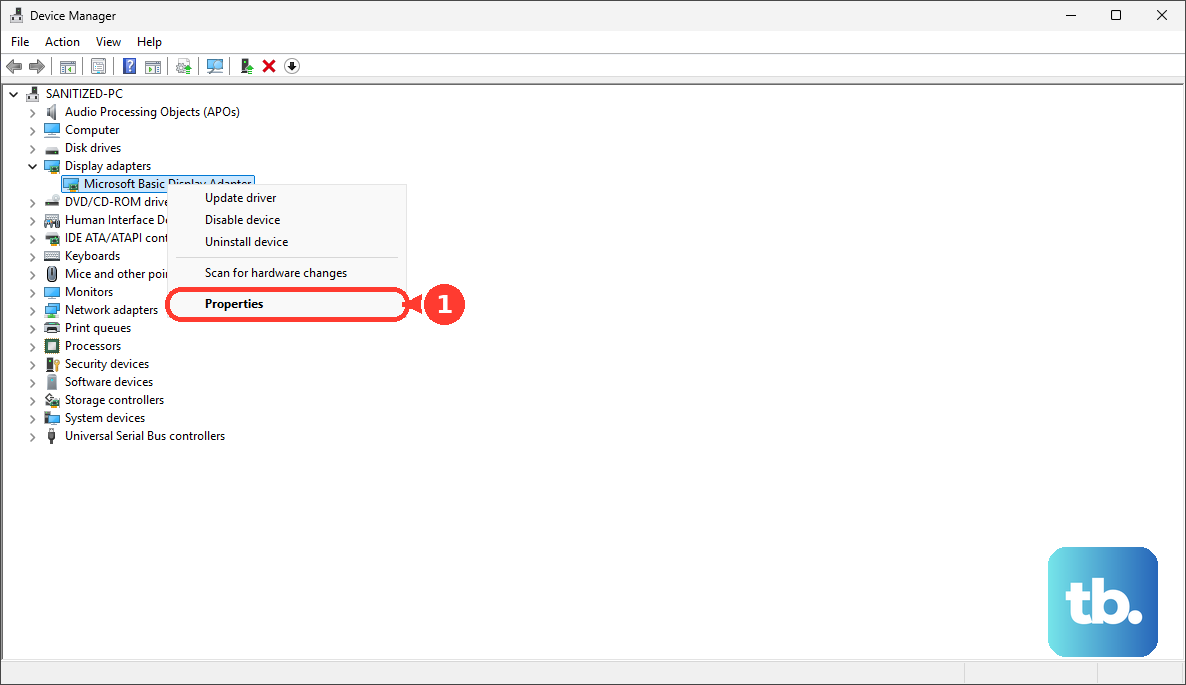
If update and rollback fail, right-click the adapter, choose Uninstall device, confirm with Uninstall, then restart so Windows attempts to reinstall the driver.
For direct manufacturer drivers, use NVIDIA’s official driver page for NVIDIA GPUs, AMD Drivers and Support for AMD Radeon systems, and Intel Driver & Support Assistant or Intel Download Center for Intel hardware. On a Mac, use Apple menu > System Settings > General > Software Update, then choose Update, Upgrade, or Restart Now when offered. This covers Mac display software and Apple display firmware. For a non-Apple monitor, also check the manufacturer's firmware and model documentation.
7. Catch app-only artifacts
A real panel line appears over everything, including the monitor menu or self-test. App-only artifacts stay inside one browser, video window, or program.
On Windows, press Ctrl + Shift + Esc to open Task Manager. If Task Manager flickers or scrambles with the rest of the screen, continue with display-driver fixes. If Task Manager stays normal while one app shows lines or artifacts, update or uninstall that app through Start > Settings > Apps > Installed apps > the app’s More options menu > Uninstall.
For Microsoft Edge artifacts only, open Settings > System and performance > System, turn Use graphics acceleration when available off, and restart Edge. In Firefox, use Menu > Help > Troubleshoot Mode > Restart, then select Open in the Troubleshoot Mode window. If Firefox is normal in Troubleshoot Mode, check extensions, themes, and hardware acceleration.
8. Stop when the panel is the fault
End software troubleshooting when the same vertical line appears in the monitor’s own OSD test, appears with video cables disconnected, follows the monitor across multiple computers, or sits near visible drop, pressure, crack, or liquid damage. Contact the manufacturer for warranty, repair, or replacement options.
Use the manufacturer's self-test, a known-good cable, the correct input, supported display modes, driver repair, and the manufacturer's service options.
For work or school computers, driver and firmware options can be locked by an administrator. If the monitor self-test is clean, give IT the results from the self-test, cable swap, port change, display-mode check, and different-computer test so they can handle the managed driver path.
Frequently Asked Questions
Why does my monitor have one vertical line down the screen?
A single vertical line points either to the monitor panel or to the signal path. Run the monitor’s built-in self-test first. If the line appears there, use warranty, service, or replacement options. If the test is clean, check the cable, input, resolution, refresh rate, and graphics driver.
Can an HDMI cable cause vertical lines on a monitor?
Yes. Reseat the cable at both ends, remove docks or adapters from the path, then test with one known-good HDMI cable. If the replacement cable clears the line, replace the original cable.
Do vertical lines mean my monitor is broken?
They mean the monitor is broken when the lines appear in the monitor’s own self-test, remain with video cables disconnected, follow the monitor across multiple computers, or sit near visible physical damage.
Can software fix vertical lines on a monitor?
Software can help when the monitor's built-in test is clean and the problem comes from the computer's settings, driver, or app. If the lines appear in the monitor's own test, use the manufacturer's service or replacement path.