Your Chromebook joins nothing, drops the network, or says it is connected while websites still will not load. Start with the Wi-Fi switch and the saved network profile, then move to public sign-in pages, DNS, extensions, restarts, and resets. The fixes below follow the current ChromeOS menus and keep the destructive steps for last.
Turn Wi-Fi on and rejoin the network
This fixes an offline Chromebook when Wi-Fi is off or the wrong network is selected. Select the time at the bottom right of the screen, then select Not Connected. If ChromeOS shows a network name there, select that name instead.
Turn on Wi-Fi, then choose the Wi-Fi network you want to use. For a secure network, type the Wi-Fi password. Select Connect.
Open Settings for hidden or public networks
The Settings app gives you the full Wi-Fi view when the quick menu does not show enough. Select the time, open Settings, then go to Network and Wi-Fi.
For an open public network, select the network and choose Connect. For a password-protected network, enter the password and choose Connect.
If the network is hidden, open Add connection, choose Add Wi-Fi, enter the network information, and select Connect.
If this method fails, forget the saved network next and rejoin it with the current password.
Forget the saved Wi-Fi profile
A Chromebook keeps saved network details, and old details break login after a password change, router change, or synced bad profile.
Sign in, select the time, then open Settings, Network, Wi-Fi, and Known networks. Find the network that will not connect, select More, then choose Forget.
Connect to the same network again and enter the current Wi-Fi password. If you use more than one Chromebook, open Settings, Privacy and security, Sync and Google services, and Manage what you sync; use Wi-Fi networks only when you want saved Wi-Fi profiles shared across your Chromebooks.
Sync everything already includes Wi-Fi networks; to control the setting on its own, choose Customize sync and turn Wi-Fi networks on or off under Sync data. Sync needs the same primary account on each Chromebook and covers only secure, password-protected consumer or household networks, and an administrator can turn sync off.
Trigger the public Wi-Fi sign-in page
The most common cause on hotel, school, airport, and cafe Wi-Fi is a captive portal page that has not loaded.
After joining the public network, open Chrome and visit a website that starts with http:// instead of https://. That forces the sign-in or terms page to appear before internet access starts.
If the page still does not appear and your administrator allows private windows, press Ctrl + Shift + n, then try an http:// page there.
If a Chrome extension blocks the portal, open Chrome, select More, More tools, and Extensions, then turn off the extension that filters, proxies, or redirects traffic.
Fix DNS or proxy errors after Wi-Fi connects
When Wi-Fi connects but websites still fail, the network has already accepted the Chromebook: a secure network took the password, and an open network never asked for one. The next places to check are name servers, proxy settings, and software that controls network traffic.
For DNS errors, make sure the Chromebook is connected to Wi-Fi, select the time, select the Wi-Fi network, then choose your wireless network name from the drop-down menu. Open Network, go to Name servers, and select Google name servers. To use another DNS provider, choose Custom name servers and enter its DNS server address.
For proxy issues, select the time, open Settings, choose the network you are using in the Network section, select the network name again, then open Proxy and change the proxy settings.
Google documents authenticated proxies two ways, so expect mixed results. Chromebook Help says proxies that need to be authenticated do not work with Chromebooks. Chrome Enterprise documentation says ChromeOS supports authenticated proxies for browser traffic only, and not for non-user traffic or traffic from Android apps or virtual machines, because your sign-in credentials are cached for Chrome browsing and are not available to ChromeOS system services, OS updates, or Google Play.
In practice, pages you open in Chrome may load while updates, Play, and Android app traffic still fail until an administrator sets up a proxy bypass. Work or school devices can also block proxy changes.
If this method fails, remove the extension or app that controls VPN, proxy, or filtering behavior before using a reset.
Remove extensions or apps that interfere
This fixes connection failures caused by Chrome extensions, VPN tools, proxy tools, content filters, or apps that change how traffic leaves the Chromebook. Open Chrome and select More, then select More tools. Open Extensions and turn off the extension you suspect.
To delete it, select Remove next to the extension. Select Remove again.
To remove a Chromebook app, select Launcher. Right-click the app, then choose Uninstall or Remove from Chrome. Select Uninstall.
Restart the Chromebook and router
The most common cause after the settings look right is a temporary hang in ChromeOS, the router, or the modem path behind it.
Restart the Chromebook first. Select the time, choose Power, then select Restart.
If the Chromebook cannot restart normally, shut it down. Select the time, choose Power, then select Shut down. You can also press and hold the Power key for 3 seconds, or hold the Power button until the menu appears and choose Power off. Press Power again to turn it back on.
When other devices also fail or the Wi-Fi network disappears, restart the modem, router, and mesh extenders. Unplug the router power, wait about 30 seconds, plug it back in, and wait a few minutes until the light is steady again. Restart mesh extenders after the router is back online.
Run Diagnostics and update ChromeOS
Use Diagnostics when you need to separate a Chromebook problem from a network problem. Google documents Diagnostics as available only on ChromeOS version 90 and up, so on an older build rely on the restart, update, and reset steps instead.
- 1.Select the time, open Settings, choose About ChromeOS, then open Diagnostics.
- 2.In Connectivity, review the Wi-Fi, Cellular, Ethernet, and Google Services results.
- 3.Select IP Configuration when you need the Chromebook's IP details.
- 4.Select Save test details before contacting support.
- 5.Try Ethernet, mobile data, or an Android phone hotspot when you need a temporary internet path.
- 6.After any connection works, go to Settings, About ChromeOS, and Check for updates, then select Restart when prompted.
Reset ChromeOS after smaller fixes fail
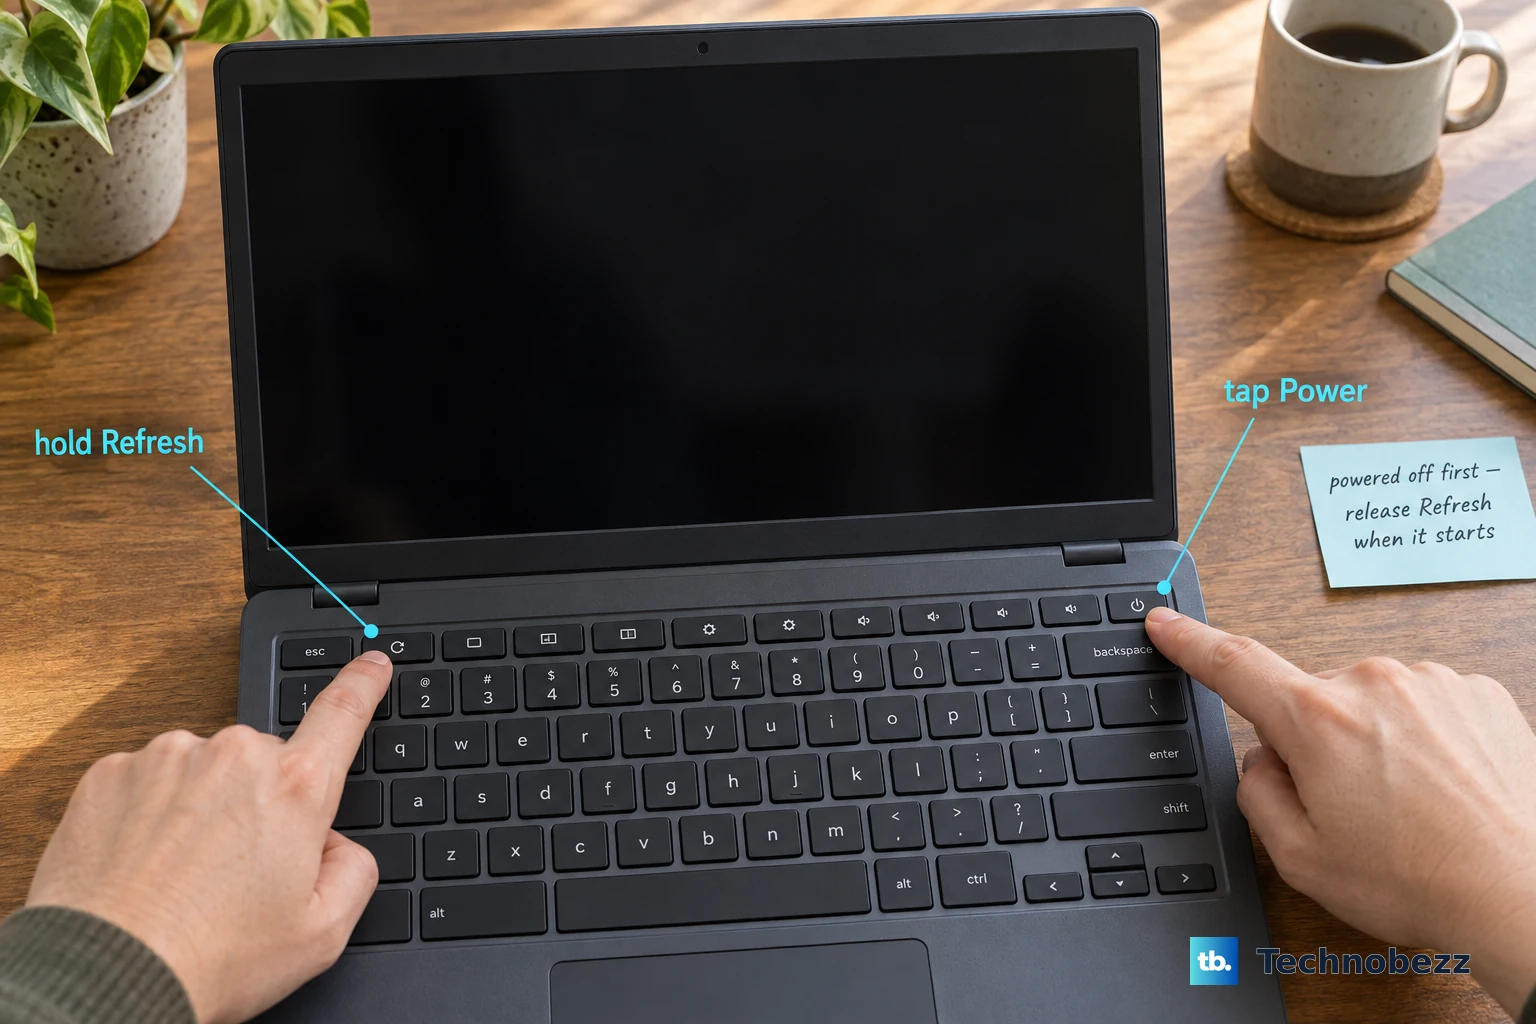
A hard reset restarts Chromebook hardware when Wi-Fi still refuses to work. Turn off the Chromebook, press and hold Refresh, tap Power, and release Refresh when it starts. Use this only after other fixes because it can delete some files in Downloads.
Safety reset is less destructive than Powerwash. Select the time, open Settings, go to System preferences, and under Reset, select Safety reset. After confirming, review network and input settings and turn back on only the extensions you need.
Powerwash is the last software reset for a personal Chromebook because it erases local device data and settings. Sign out, press and hold Ctrl + Alt + Shift + r, select Restart, then choose Powerwash and Continue. After setup, test Wi-Fi before reinstalling extra apps and extensions.
For a school or work Chromebook, contact the administrator if settings are managed or the network still will not join. Ask them to confirm the Wi-Fi profile, password, certificates, automatic connection, device access rules, and, for address-restricted networks, the Chromebook's Information panel details.
If this method fails, use ChromeOS recovery or hardware support. Recovery permanently erases local hard-drive data, so reserve it for serious system problems that remain after restart and reset steps.
Frequently Asked Questions
Why does my Chromebook say connected but have no internet?
A public sign-in page, DNS setting, proxy setting, extension, router problem, or upstream modem issue is blocking traffic after Wi-Fi authentication succeeds.
Will Powerwash fix Chromebook Wi-Fi problems?
Powerwash can fix software or profile problems, but it erases local device data and settings. Use it after Wi-Fi settings, saved networks, extensions, Diagnostics, restarts, Safety reset, and hard reset.
How do I find my Chromebook Wi-Fi MAC address?
Sign in, select the time, select the Wi-Fi network, then select Information. The MAC address is labeled Wi-Fi, and the panel also shows IP and IPv6 addresses.
Can a Chromebook connect to a hidden Wi-Fi network?
Yes. Open Settings, go to Network and Wi-Fi, select Add connection, choose Add Wi-Fi, enter the hidden network details, and connect.