You press the Mac screenshot keys and no file appears, or a browser, meeting app, or recorder cannot see your screen. The fix starts with the shortcut and save location, then moves to permissions, storage, app behavior, and macOS updates. Use the steps below in order to get screenshots and screen recordings working again with Apple’s current macOS paths.
1. Check the screenshot shortcut that should work
First confirm that Apple’s current shortcuts respond. This separates a broken capture tool from a wrong or reassigned key combination.
Press Shift-Command-3 to capture the entire screen.
Press Shift-Command-4, drag over the area you want, then release to capture a selected portion.
Press Shift-Command-4, press Space bar, then click the highlighted window or menu bar.
Open the menu you want to capture, press Shift-Command-4, then drag over the menu items.
Press Shift-Command-5 to open Screenshot.
On a MacBook Pro with Touch Bar, press Shift-Command-6 to capture the Touch Bar.
If Shift-Command-5 opens the toolbar, the system screenshot tool is responding. Move next to the save and shortcut settings instead of repeating the same capture keys.
2. Restore shortcuts in System Settings
Open Apple menu > System Settings > Keyboard.
Click Keyboard Shortcuts.
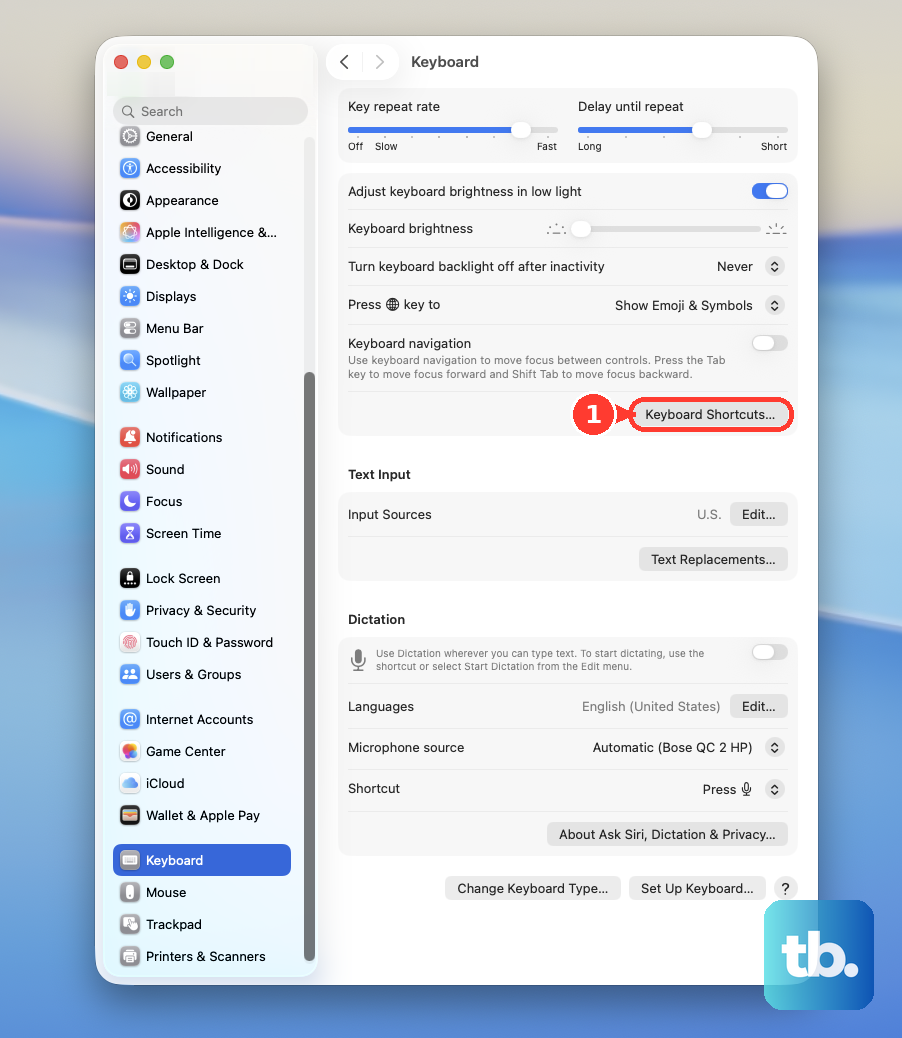
Open Screenshots.
Turn on the screenshot shortcuts and remove unwanted reassigned key combinations.
Press Shift-Command-5 again to test Screenshot.
Changed keyboard shortcuts make screenshots feel broken even when macOS is ready to capture. Put the screenshot shortcuts back in the Mac keyboard settings before testing again.
3. Use Screenshot when the keys are confusing
The Screenshot toolbar is the current built-in Mac capture interface on macOS Mojave 10.14 or later.
Press Shift-Command-5, or open Screenshot from Applications > Utilities.
Click Capture Entire Screen, Capture Selected Window, Capture Selected Portion, Record Entire Screen, Record Selected Window, or Record Selected Portion.
Click Capture or Record. For a window capture, click the window.
To stop a screen recording, click the Stop Recording button in the menu bar or press Command-Control-Esc.
Record Selected Window is listed by Apple for macOS Tahoe 26 or later. For recording through QuickTime Player, open QuickTime Player > File > New Screen Recording; it opens the same Screenshot recording tools.
4. Find where the screenshot actually saved
A missing Desktop file often means the screenshot saved somewhere else, copied to the Clipboard, or waited behind the floating thumbnail. Press Shift-Command-5, click Options, and under Save to, choose a preset location or click Other Location and select the folder where screenshots should save.
If you pressed Control with the screenshot shortcut, open the target app and use Paste. Control sends the screenshot to the Clipboard instead of creating a file. To copy the whole screen intentionally, press Control-Shift-Command-3.
In Options, click Show Floating Thumbnail to remove the checkmark when the thumbnail delay gets in the way. When Show Floating Thumbnail is enabled, swipe the thumbnail right to save immediately, drag it into a document, email, note, or Finder window, or click it to mark up and share.
5. Grant screen recording access to the app
When the Mac screenshot shortcut works but a browser, meeting app, screen recorder, website, or remote-support app cannot capture the screen, the privacy permission is the likely blocker.
Open Apple menu > System Settings > Privacy & Security.
Click Screen & System Audio Recording.
Turn recording access on for the affected app.
To add an app, click the Add button below the list, choose the app, then grant access.
Quit and reopen the app, then retry the screen share, recording, or capture.
Use the current Screen & System Audio Recording path. Older System Preferences instructions point to the old privacy layout and are not the current macOS route.
6. Capture from Preview instead
Open Preview.
Choose File > Take Screenshot > From Entire Screen, From Selection, or From Window.
For From Selection, drag across the area to capture.
For From Window, click the window.
Preview gives you another Apple-built screenshot path when the keyboard shortcut or toolbar is not the route you want. The capture opens in Preview as Untitled, so save it from Preview if you want to keep it as a file.
7. Clear app storage and macOS blockers
Once shortcuts, save location, and permissions are correct, repair the Mac conditions that stop captures or recordings from completing.
Quit the affected screenshot, meeting, browser, or screen-recording app, then open it again. If it will not quit, use Force Quit, then retry capture.
Restart from Apple menu > Restart, then test Shift-Command-5.
Check available space at Apple menu > System Settings > General > Storage. Click All Volumes for more detail.
Free space by deleting files in Downloads, removing media you stream or redownload, deleting old iPhone or iPad backups, uninstalling apps you no longer use, and choosing Finder > Empty Trash.
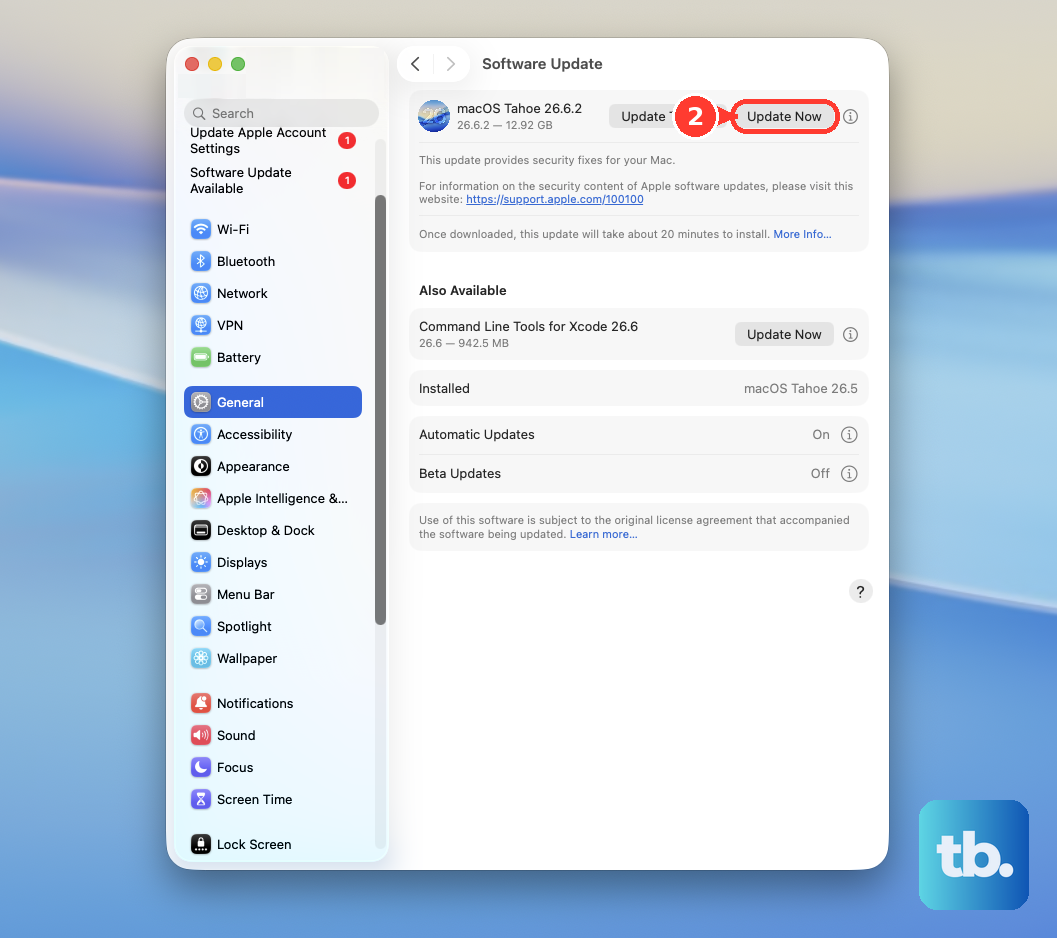
Update macOS from Apple menu > System Settings > General > Software Update. Click the available update, upgrade, or Restart Now button and follow the prompts.
Screenshots save as .png files, and screen recordings save as .mov files. On a supported Mac running macOS Tahoe 26 or later, setting Capture Format to HDR saves screenshots as HEIF and recordings with the HEVC codec instead. Use Apple’s macOS update page for update and upgrade paths instead of third-party download portals.
8. Stop troubleshooting blocked content
If normal Desktop and Finder screenshots work but one app, window, or protected video refuses to capture, the Mac screenshot system is not the problem. Apple identifies apps such as DVD Player and Apple TV as examples where window capture can be blocked.
On a work or school Mac, open System Settings > Privacy & Security > Screen & System Audio Recording. If the setting is locked or the same app is repeatedly denied, contact the administrator. Managed Macs use configuration profiles that control screen capture permissions.
Do not use legacy fixes as the main repair path. On current macOS, open Screenshot with Shift-Command-5 instead of looking for Grab. Do not use NVRAM or PRAM resets as a screenshot fix; Apple lists that startup key combination for Intel-based Macs only, and not as a verified screenshot repair.
Frequently Asked Questions
Why is my Mac screenshot not showing on the Desktop?
Open Screenshot with Shift-Command-5, click Options, and check Save to. If you used Control with the shortcut, paste from the Clipboard instead of looking for a file.
How do I fix Chrome, Zoom, or another app that cannot record my Mac screen?
Go to Apple menu > System Settings > Privacy & Security > Screen & System Audio Recording, turn access on for the app, then quit and reopen it.
What format does Mac use for screenshots and screen recordings?
Apple says Mac screenshots save as .png files and screen recordings save as .mov files. On supported Macs running macOS Tahoe 26 or later, choosing HDR in Capture Format saves screenshots as HEIF and recordings with the HEVC codec.
Is Grab still the right screenshot app on Mac?
No. On current macOS, use Screenshot. Open it with Shift-Command-5 or from Applications > Utilities.