

To add Bcc in Outlook, open a new message, turn on the Bcc line and type the hidden recipient's address before you select Send. In classic Outlook for Windows the switch is on the message window's Options tab, and on our PC it sat under the ... button at Show Fields > Bcc. In Outlook on the web, select Bcc at the right end of the To line.
People in To and Cc do not see the Bcc names. In our test the To recipient's copy showed only its own To line, while the sender's Sent Items copy listed the Bcc name in the header.
Pick the section for the Outlook you have open. Classic Outlook for Windows is the desktop app with File, Home, Send / Receive, View and Help tabs, and on our PC it also showed a Try the new Outlook switch at the top right. New Outlook for Windows, Outlook on the web, Outlook for Mac and the phone apps each put Bcc somewhere slightly different.
The short version
- Classic Outlook: in the message window, open Options, then ... > Show Fields > Bcc if Bcc has no button of its own.
- Keyboard: Alt + P, then 0, 0, B turned Bcc on for us. Alt + P, then B alone did nothing.
- Outlook on the web: select Bcc at the right end of the To line.
- Who sees it: your Sent Items copy shows the Bcc names. The To recipient's copy showed no Bcc line.
- Keep it showing: classic Outlook remembers the switch, and the web has Always show Bcc. Neither fills in an address for you.
Where Bcc is in each version of Outlook
The Outlook versions below all let you add a Bcc recipient, though some hide the field until you select it. The table lists what to select or press in each one, and the sections below walk through them with screenshots from classic Outlook and Outlook on the web.
| What to select or press | Where it works | What it does |
|---|---|---|
| Options > Bcc, or Options > ... > Show Fields > Bcc | Classic Outlook, a message in its own window | Adds the Bcc line under Cc and keeps it for new messages until you turn it off |
| Alt + P, then 0, 0, B | Classic Outlook, a message in its own window | The same switch from the keyboard, as it worked on our PC |
| Message > ... > Show Fields > Bcc | Classic Outlook, a reply in the Reading Pane | The same switch for replies and forwards that open inline |
| Bcc at the right end of To | Outlook on the web | Adds a Bcc line to this message |
| Settings > Mail > Compose > Always show Bcc | Outlook on the web | Opens every new message with an empty Bcc line |
| Options > Show fields > Show Bcc | New Outlook for Windows, per Microsoft | Adds the Bcc line, or select Bcc to the right of To |
| Bcc at the end of To | Outlook for Mac, per Microsoft | Adds the Bcc box, with a setting to show it by default |
| Show Cc and Bcc | Outlook for iPhone, per Microsoft | Adds the Cc and Bcc fields to the new message |
How to add Bcc in classic Outlook for Windows
Select New Email on the Home tab, or press Ctrl + N in your Inbox, to open a message in its own window. On our PC the first new message showed only To, Cc and Subject, with no Bcc line anywhere.
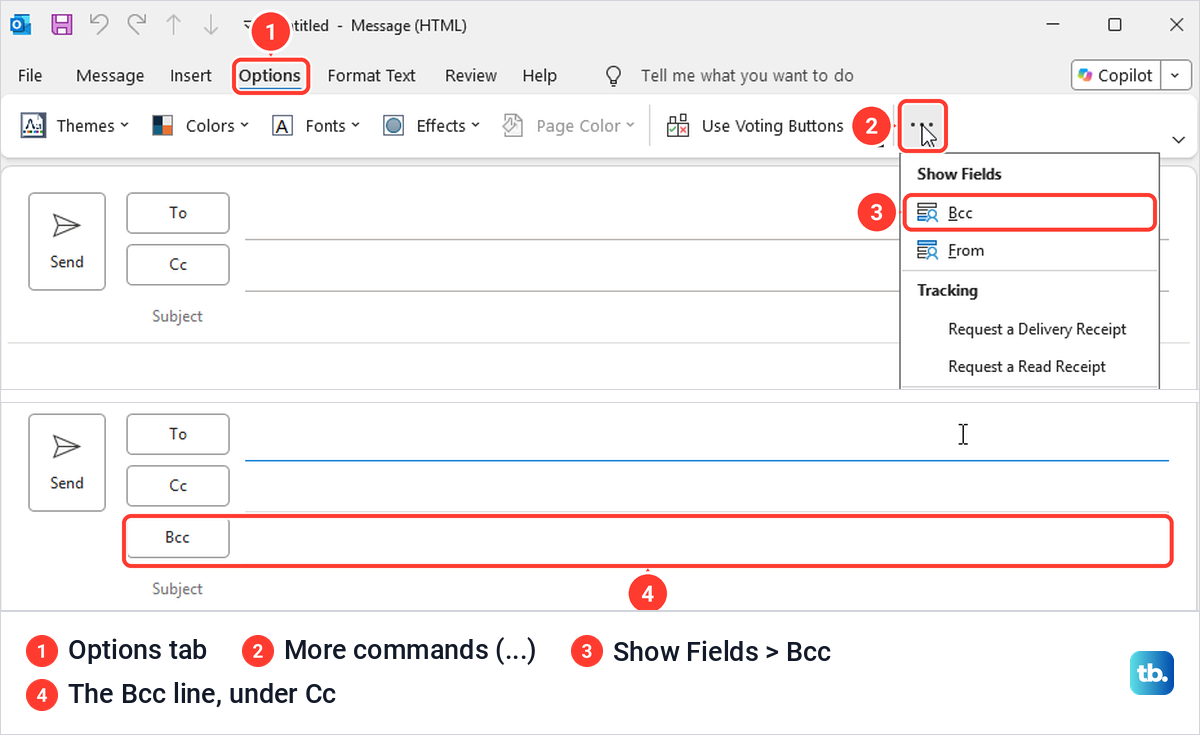
Select the Options tab in the message window. Microsoft's instructions give the path as Options > Bcc, or Options > Show Fields > Bcc. Our Options bar on the Simplified Ribbon showed Themes, Colors, Fonts, Effects, Page Color and Use Voting Buttons but no Bcc button, with Show Fields folded into the ... button at the end of the bar.
Select ..., then Bcc under Show Fields. A Bcc button and an empty line appeared under Cc straight away. If your Options tab has a Bcc button of its own, select that instead, because it is the same switch.
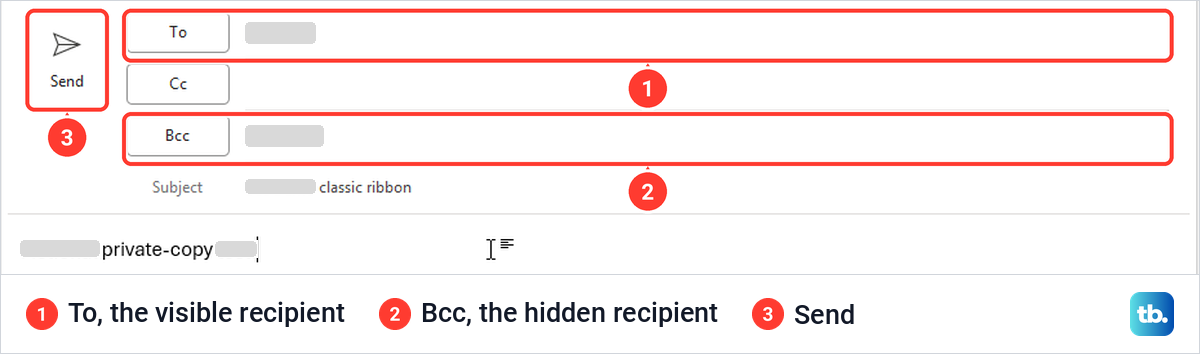
Click in the Bcc line and type the name or email address of the person who should get the hidden copy. Outlook suggests people you have emailed before as you type, and if it suggests nobody you expected, fix Outlook AutoComplete suggestions or type the full address. Add the visible recipients in To, a subject and your message, then select Send.
Our test message had a second work account in To and the sender's own address in Bcc, so we could compare what each side sees later. Check both lines before you select Send. Anything in To or Cc is visible to every recipient.
The same ... menu also holds Delay Delivery, under More Options. If the message should leave later rather than now, our guide to schedule an email in Outlook covers that option.
Turn on Bcc with the keyboard
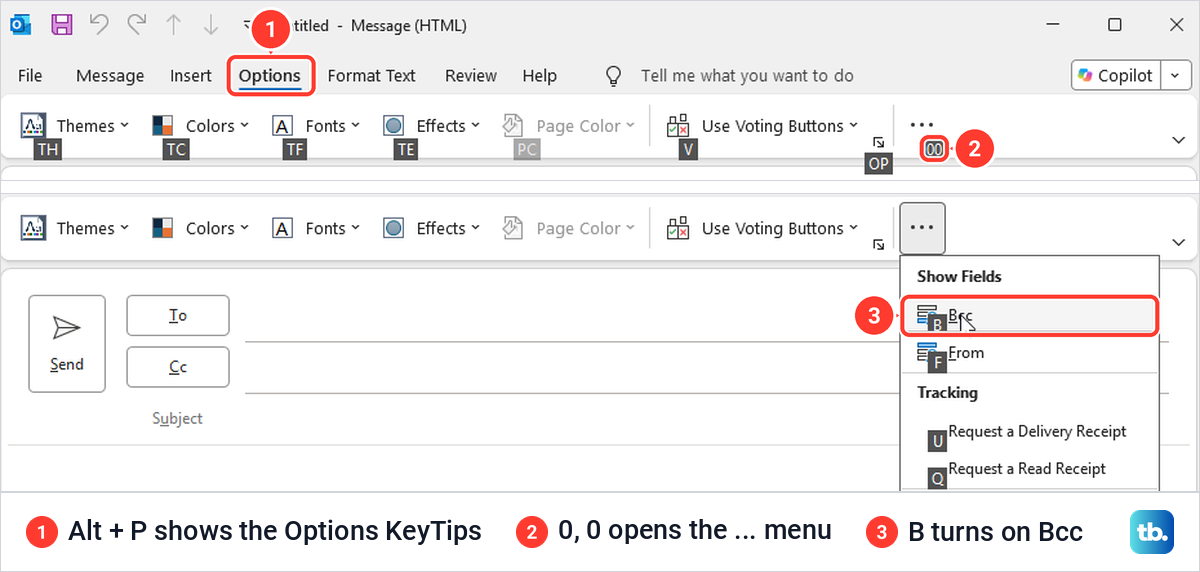
Microsoft's keyboard instructions for classic Outlook say to press Alt + P, then B, to unhide Bcc. On our PC that did nothing. Alt + P showed KeyTips for the Options tab, but none of them was B, because Bcc was tucked inside the ... menu.
What worked was Alt + P, then 0, 0 to open the ... menu, then B for Bcc. If your Options tab has a Bcc button of its own, Microsoft's shorter sequence may be all you need, so press Alt + P first and read the letters on screen.
Pick a Bcc recipient from the address book
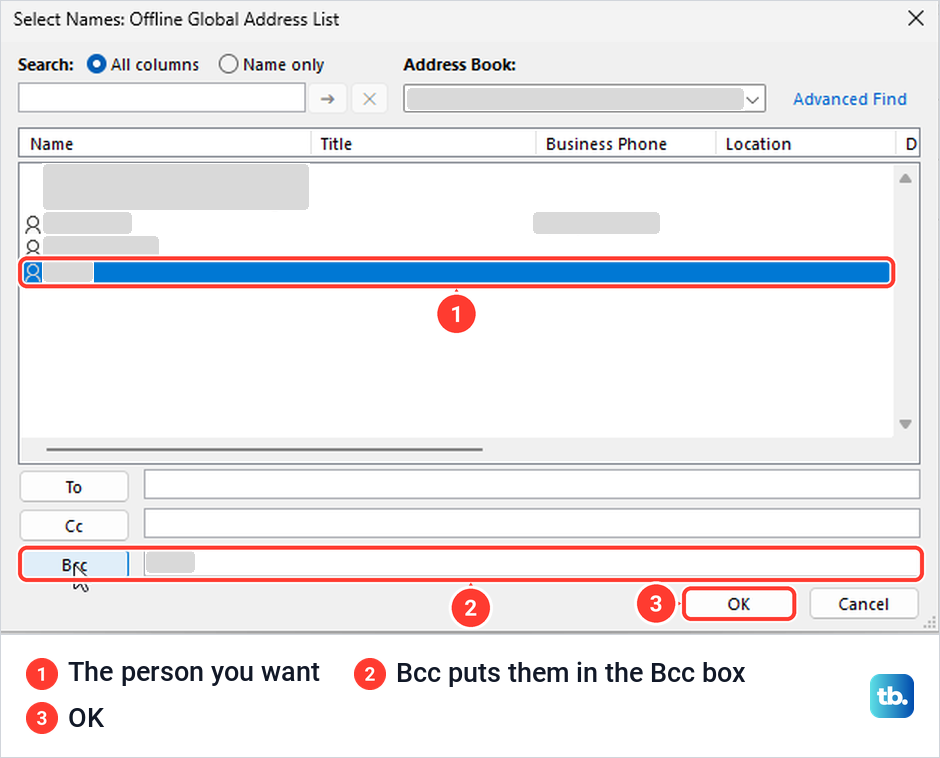
Once the Bcc line is showing, the Bcc button beside it opens the address book. On our PC it opened Select Names: Offline Global Address List, the organization's directory, with To, Cc and Bcc boxes along the bottom.
Select the person in the list, then select Bcc at the bottom of the box, and the name drops into the Bcc box beside it. Select OK and the name sits on the message's Bcc line. To pick from another list, such as your own contacts, Microsoft says to choose it in the Address Book list at the top of the box.
The same box is a quick way to Bcc a whole list of people. If you send to the same group often, create a distribution list in Outlook first and pick it here. Microsoft has one caution, though: people whose mail rules sort messages by the list's name in To or Cc will find that a Bcc copy skips those rules.
Add Bcc to a reply or forward in classic Outlook
Replies work the same way, but the switch moves. When we selected Reply in the Reading Pane, the reply opened inline with its own Message tab at the top of the window. The Bcc line was already there, because we had turned it on in a new message earlier.
If your inline reply has no Bcc line, open the Message tab, select ... at the right end of the ribbon and choose Bcc under Show Fields. Microsoft's help says to select Bcc from the ribbon here, but our ribbon had no Bcc button, only that menu entry.
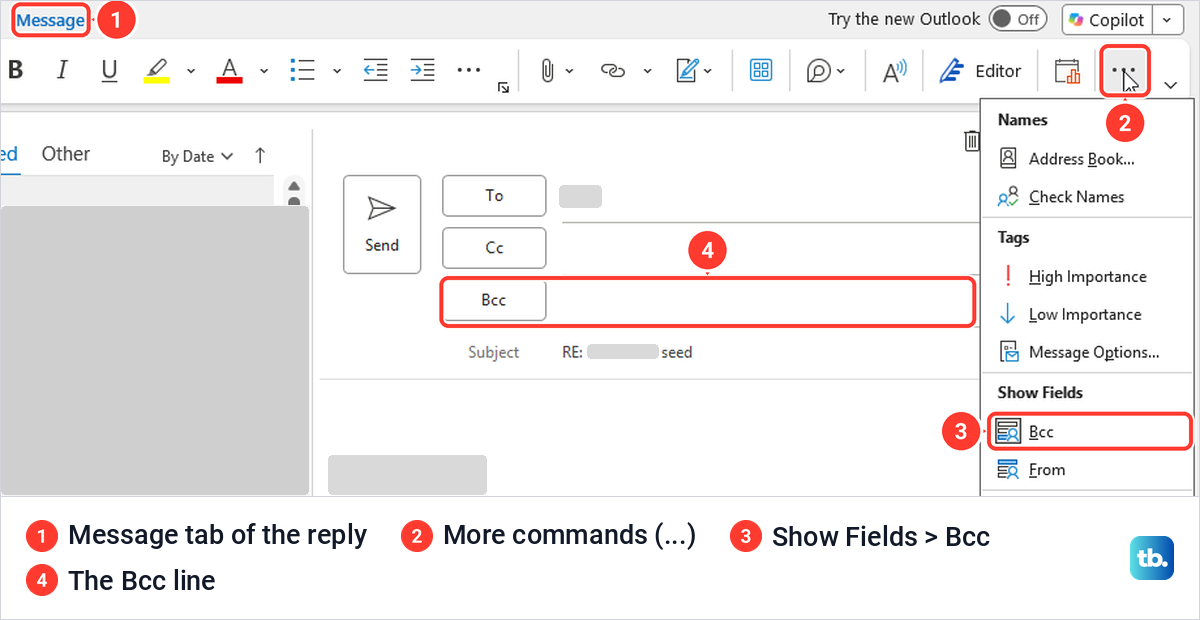
A reply or forward that opens in its own window uses the window's ribbon instead. When we opened a message in a window and selected Forward, the switch was Options > ... > Show Fields > Bcc, the same as for a new message, and the Bcc line took an address like any other.
How to add Bcc in Outlook on the web
Outlook on the web keeps Bcc one click away. Select New mail, and the To line has a small Bcc link at its right end. Selecting it added a Bcc line under Cc with the cursor already in it.
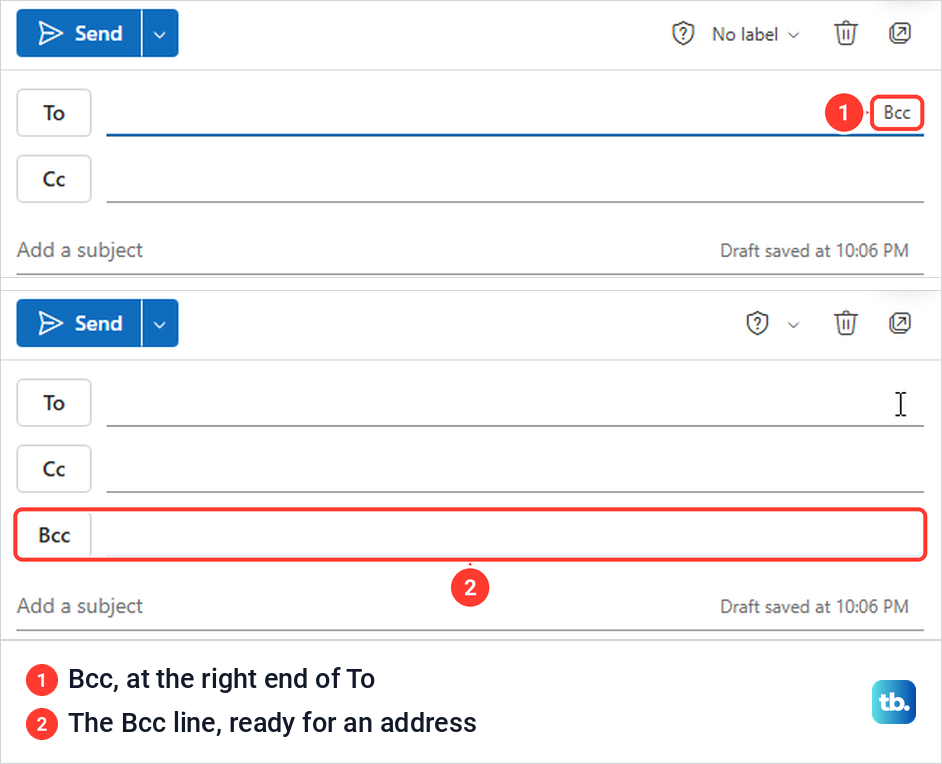
Type the hidden recipient on the Bcc line, fill in To, the subject and the message, then select Send. Our web test went the other way round from the classic one, with the main account in To and the sender's own address in Bcc. Forwarding a received message showed the same Bcc link at the end of the To line.
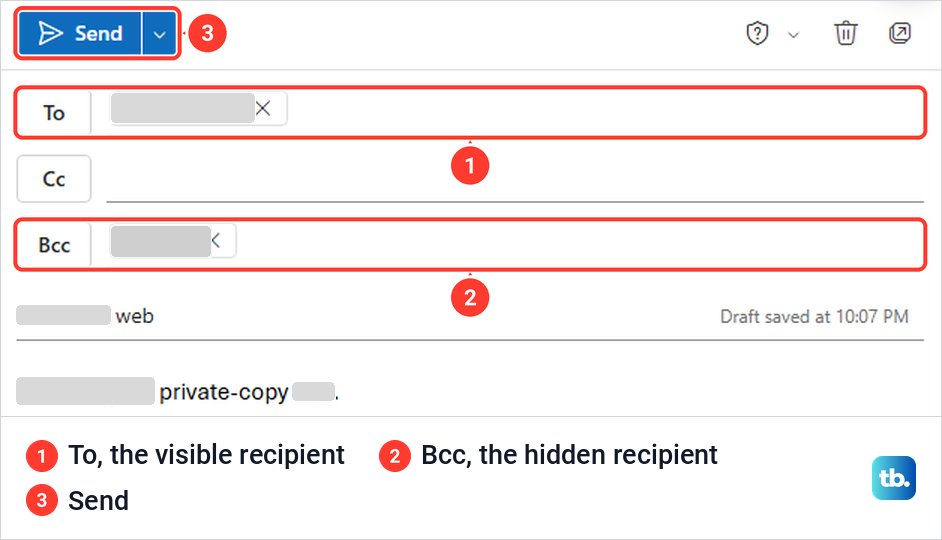
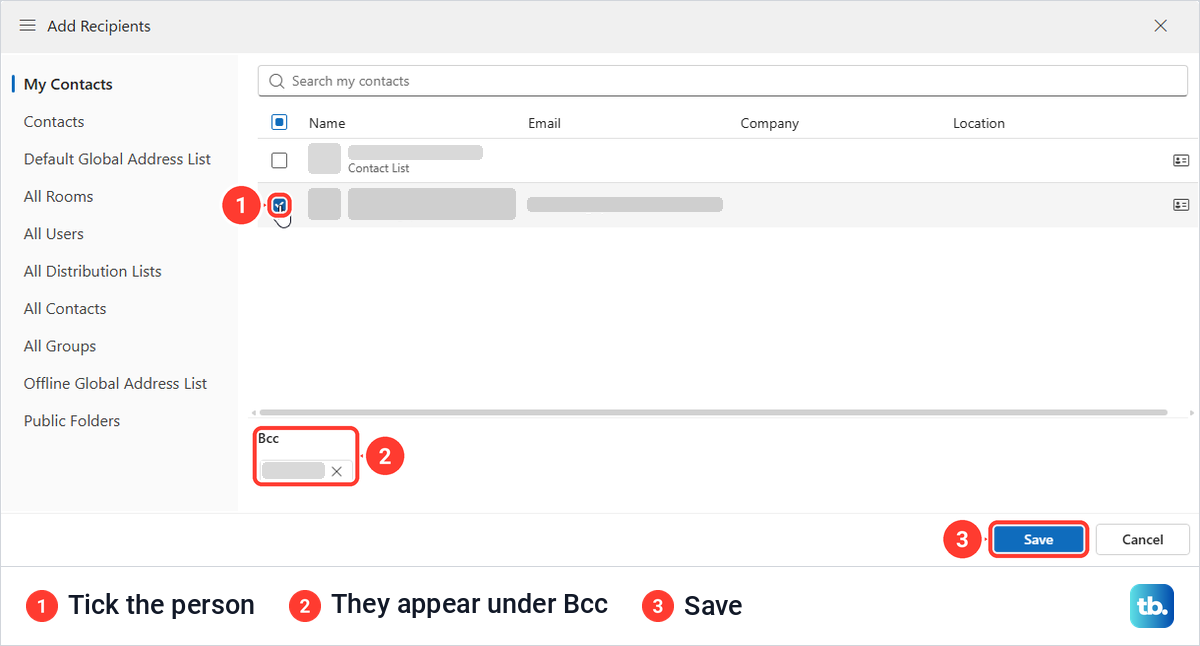
The Bcc button at the start of the line opens a picker called Add Recipients. Ours opened on My Contacts, with other lists down the left such as Contacts, Default Global Address List, All Users and All Groups. Each person had a checkbox, so tick the person, check the name appears under Bcc at the bottom, and select Save.
Keep the Bcc line showing on every message
In classic Outlook, turning Bcc on is a lasting choice. After we turned it on once, the next new message opened with the Bcc line already showing. That matches Microsoft's note that the Bcc box appears every time you create a message until it is turned off.
To hide it again, use the same switch. In the ... menu an outline box around the Bcc icon showed that it was on, and selecting it hid the Bcc line. Microsoft describes a dark button background for on and a light one for off, so if your switch is in the menu, check whether the line is there rather than looking for a color.
Outlook on the web has a setting for the same thing. Select Settings, the gear at the top right, then Mail and Compose. Under Message format, tick Always show Bcc and select Save.
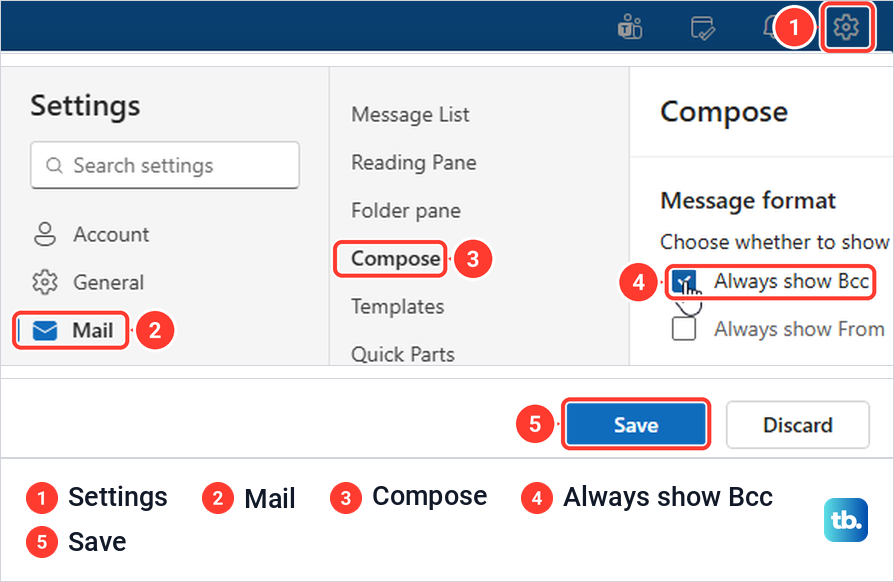
Both Always show Bcc and Always show From were off on the account we used. Once we ticked Always show Bcc and saved, New mail opened with an empty Bcc line already in place. Neither this setting nor the classic switch puts an address on that line, so you still type the hidden recipient each time.
How to add Bcc in new Outlook for Windows
New Outlook for Windows follows Microsoft's own steps. Open a new message or a reply, select Options > Show fields > Show Bcc, and add names on the Bcc line. Microsoft adds that if Bcc does not appear as a button on your message, you can select Bcc to the right of the To button.
Selecting the To, Cc or Bcc button in new Outlook opens an Add recipients window, where Microsoft says to select the plus sign beside a name and then Save. If you would rather work in the classic app this guide covers first, our guide to switch back to old Outlook shows how.
How to add Bcc in Outlook for Mac, iPhone and Android
In Outlook for Mac, Microsoft's steps are to create a new message and select Bcc at the end of the To line. To have the Bcc field on every message, open the Outlook menu, select Settings, then Composing, and turn on Show BCC field by default.
For the phone apps, Microsoft's steps come from its screen reader guides. On iPhone they name a Show Cc and Bcc button in the new message, which brings up the Cc and Bcc fields for the hidden recipient, and on Android they name a Bcc field in the new message window.
Check who can see the Bcc names
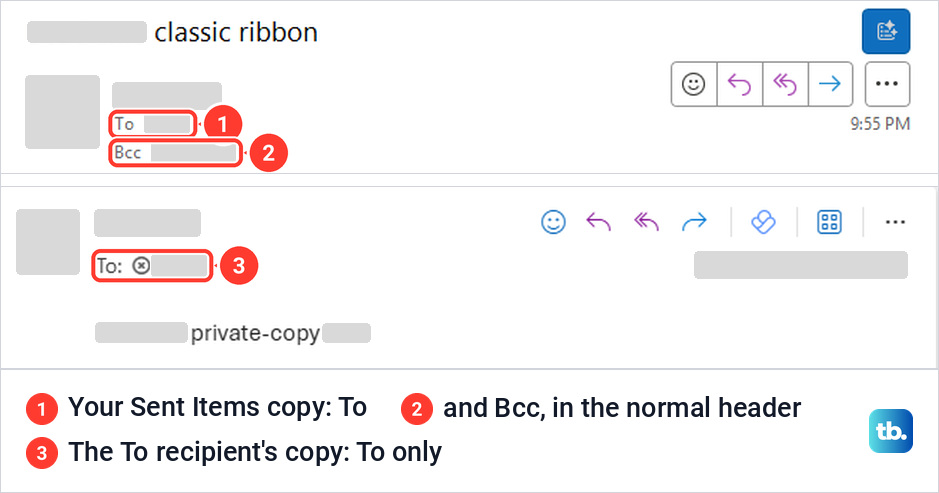
Bcc hides names from the other recipients, not from you. Microsoft says only the sender can see the names of Bcc recipients, by opening the message in Sent Items. That includes other people on the Bcc line, so Bcc recipients do not see each other's names either. Our classic Sent Items copy showed To and Bcc lines in the normal header with nothing to expand, and the web Sent Items copy did the same.
The other side matched. The To recipient's copy of our classic message, opened in Outlook on the web, showed its To line and no Bcc line at all. The To recipient of our web message saw only its own name too, this time in classic Outlook.
Microsoft goes further and says a recipient cannot even tell whether the sender added anyone on Bcc. Its own example is a job announcement sent to several people, where Bcc keeps the job seekers' identities private from each other.
Bcc only protects names that are on the Bcc line when you select Send. A name typed in To or Cc by mistake is visible to everyone from that moment, so check the lines first. If a message has already gone out with the wrong visible recipients, our guide to recall an email in Outlook explains when that can still help.
The people on Bcc still receive an ordinary message and can reply to it. A Bcc recipient who selects Reply All writes to the sender and the visible recipients, which tells everyone that person had a copy.
Fix a missing Bcc line or a Bcc message that did not arrive
If there is no Bcc line, first check which Outlook you have open, because each one puts the switch in a different place. In classic Outlook it may also have been turned off on purpose, since the same switch hides it for every new message.
If you cannot find a sent message to check its Bcc names, look at the folder pane. When we collapsed the account folder, the Sent Items folder under it disappeared, and the arrow beside the account brought it back. Sent Items also stayed visible under Favorites, so check both places.
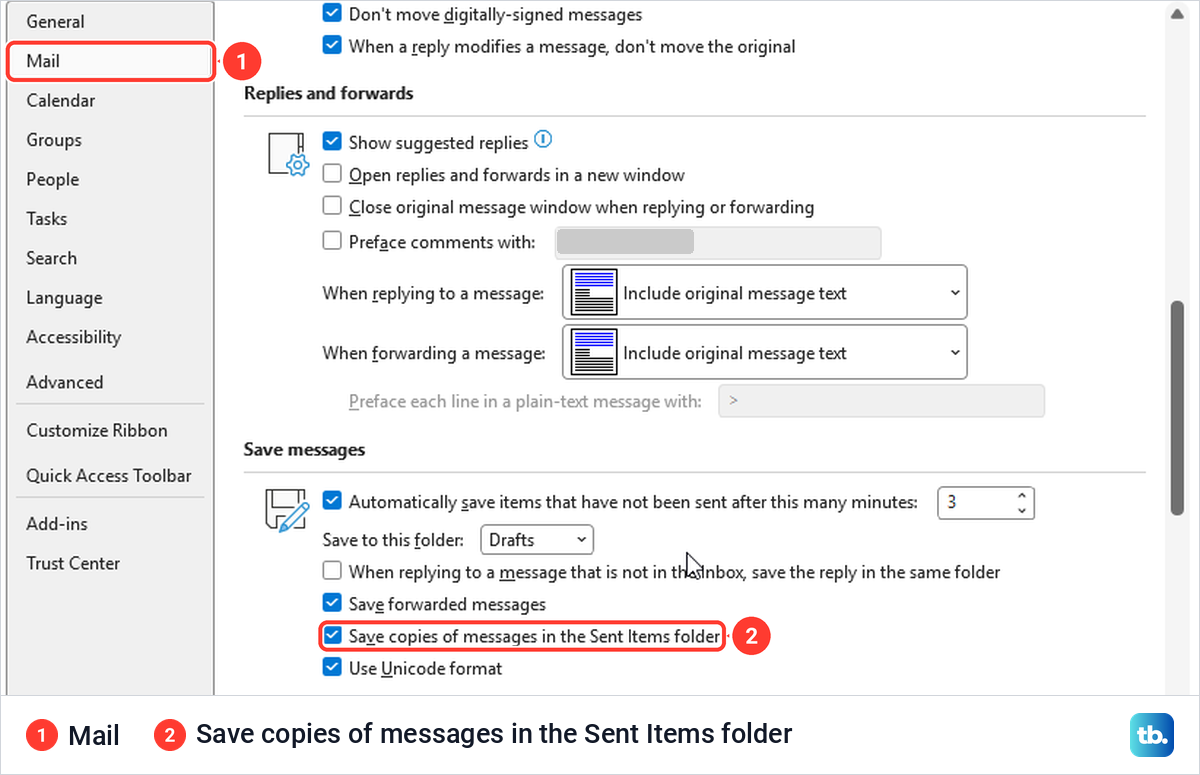
If the message is not in Sent Items at all, look in Outbox. A message sitting there has not been sent, so fix Outlook not sending emails before blaming the Bcc line. Classic Outlook also keeps copies only when Save copies of messages in the Sent Items folder is ticked under File > Options > Mail > Save messages, as it was on our PC.
If your copy is in Sent Items but the Bcc recipient says nothing arrived, ask them to check Junk Email. Microsoft warns that many junk filters flag messages that use Bcc, and suggests the recipient add you as a safe sender first. If it is not there, fix Outlook not receiving emails on their side, and if they blocked you by mistake, they can remove a blocked sender in Outlook.com.
Large mailings can hit a different limit. Microsoft says many email providers cap the number of addresses per message across To, Cc and Bcc together, gives 100 as an example, and suggests asking your provider about yours. Adding a Bcc address to every message automatically is not a compose setting either, since Microsoft documents it as an Exchange Online mail flow rule that an administrator sets up.
How we tested this guide
We tested this in classic Outlook for Microsoft 365 and Outlook on the web in Microsoft Edge on Windows 11, version 25H2, sending a Bcc message between two work accounts.
Frequently Asked Questions
Where is Bcc in classic Outlook?
It is on the Options tab of the message window, and if there is no Bcc button there, select ... and then Bcc under Show Fields, which is where it was on our PC. For a reply in the Reading Pane, use the reply's Message tab and the same ... menu.
Can people in To or Cc see who is on Bcc?
No. Microsoft says Bcc names are not visible to the other recipients, and the To recipient's copy in our test showed no Bcc line.
How do I see who I sent a Bcc to?
Open the message in your Sent Items folder. Our sent copies in classic Outlook and Outlook on the web both showed the Bcc line in the header.
Why does Bcc show on every new message?
Classic Outlook keeps the Bcc line on once you turn it on. Select Bcc again in the same Options menu to hide it, or untick Always show Bcc in the Outlook on the web settings.
Does Always show Bcc add my address automatically?
No. It only shows an empty Bcc line, and Microsoft documents automatic Bcc as an Exchange Online mail flow rule set up by an administrator.
Why did my Bcc recipient not get the email?
Check that the message is in your Sent Items rather than Outbox, and that the address is right. Then ask the recipient to look in Junk Email, because Microsoft warns that junk filters can flag messages that use Bcc.