Here’s a quick guide to What To Do If Windows 10 Not Recognizing Headphones.
Check the Basics First
Before diving into technical fixes, try these simple checks:
- Test your headphones on another device to confirm they work
- Try a different audio jack or USB port on your computer
- Check for physical damage to the headphone cable or plug
- Ensure the headphones are fully plugged in
Update Your Audio Drivers
Outdated or corrupted audio drivers are a common cause of headphone detection issues.
- 1.Press the Windows key + X and select "Device Manager"
- 2.Expand the "Sound, video and game controllers" section
- 3.Right-click your audio device and select "Update driver"
- 4.
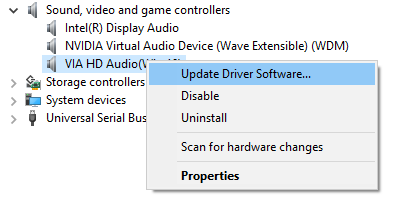 Click to expand
 - 5.Choose "Search automatically for updated driver software"
If Windows doesn't find a new driver, visit your computer manufacturer's website for the latest audio drivers.
Set Headphones as Default Playback Device
Sometimes Windows detects headphones but doesn't switch to them automatically.
- 1.Right-click the volume icon in your system tray
- 2.Select "Sounds" and go to the "Playback" tab
- 3.If you see your headphones listed, right-click them and choose "Set as Default Device"
- 4.If headphones aren't visible, right-click in the empty space and check "Show Disabled Devices" and "Show Disconnected Devices"
Change Default Sound Format
Incorrect sound format settings can prevent headphone detection.
- 1.Right-click the volume icon and select "Sounds"
- 2.Go to the "Playback" tab and double-click your default device
- 3.Navigate to the "Advanced" tab
- 4.
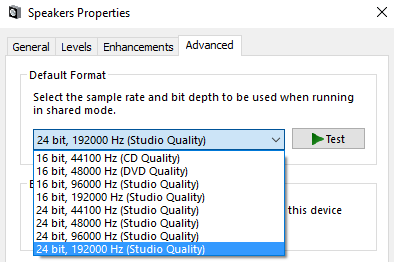 Click to expand
 - 5.Under "Default Format," try changing to a different sample rate and bit depth
- 6.Click "Apply" and test the sound
Use Windows Audio Troubleshooter
Windows includes built-in tools that can automatically detect and fix audio problems.
- 1.Go to Settings > Update & Security > Troubleshoot
- 2.Select "Additional troubleshooters"
- 3.Run the "Playing Audio" troubleshooter
- 4.Follow the on-screen instructions
Restart Audio Services
Sometimes audio services get stuck and need a restart.
- 1.Press Windows key + R, type "services.msc" and press Enter
- 2.Find "Windows Audio" in the list
- 3.Right-click it and select "Restart"
- 4.Do the same for "Windows Audio Endpoint Builder"
Reinstall Audio Drivers
If updating doesn't work, try completely reinstalling the audio drivers.
- 1.Open Device Manager
- 2.Expand "Sound, video and game controllers"
- 3.Right-click your audio device and select "Uninstall device"
- 4.Restart your computer - Windows will automatically reinstall the drivers
Check for Windows Updates
Microsoft regularly releases updates that fix audio-related issues.
- 1.Go to Settings > Update & Security > Windows Update
- 2.Click "Check for updates"
- 3.Install any available updates and restart your computer
Disable Front Panel Jack Detection (Realtek Users)
If you have Realtek audio, the front panel detection feature might be causing issues.
- 1.Open Realtek HD Audio Manager from your system tray or Control Panel
- 2.Look for connector settings or jack detection options
- 3.Disable "Enable front panel jack detection" if available
Try System Restore
If the problem started recently after a system change, System Restore might help.
- 1.Type "system restore" in the Windows search bar
- 2.Select "Create a restore point"
- 3.Click "System Restore" and choose a restore point from before the issue began
These solutions should resolve most headphone detection problems in Windows 10. Start with the simpler fixes and work your way through the list until your headphones are working properly again.