The "Unfortunately, Camera has stopped" message appears when the camera app crashes or fails to launch on an Android phone. It usually points to a software hiccup rather than broken hardware, which is good news because most cases clear up in a few minutes.
A browser based quick webcam test is the fastest way to check whether the camera works at all. It shows a live preview along with the detected resolution and frame rate.
The error often traces back to a corrupted cache, low storage, a missed update, or another app interfering with the camera. The steps below start with the quickest fixes and move toward deeper resets, so try them in order and test the camera after each one.
Force Stop and Reopen the Camera
Closing the camera from the recent apps screen is not always enough, because the app can keep running in the background. A full force stop ends every process tied to it and lets the app start fresh.
On most phones, open > Settings > Apps > Camera > Force stop, then confirm. On Samsung Galaxy phones the path is the same, listed under Apps. After the app closes, wait about 30 seconds, then reopen the camera and take a test shot.
If the error returns right away, move on to a full restart of the phone.
Restart Your Phone
A restart clears temporary system files and resets background processes that may be holding the camera hostage. It is the single most effective quick fix for one-off crashes.
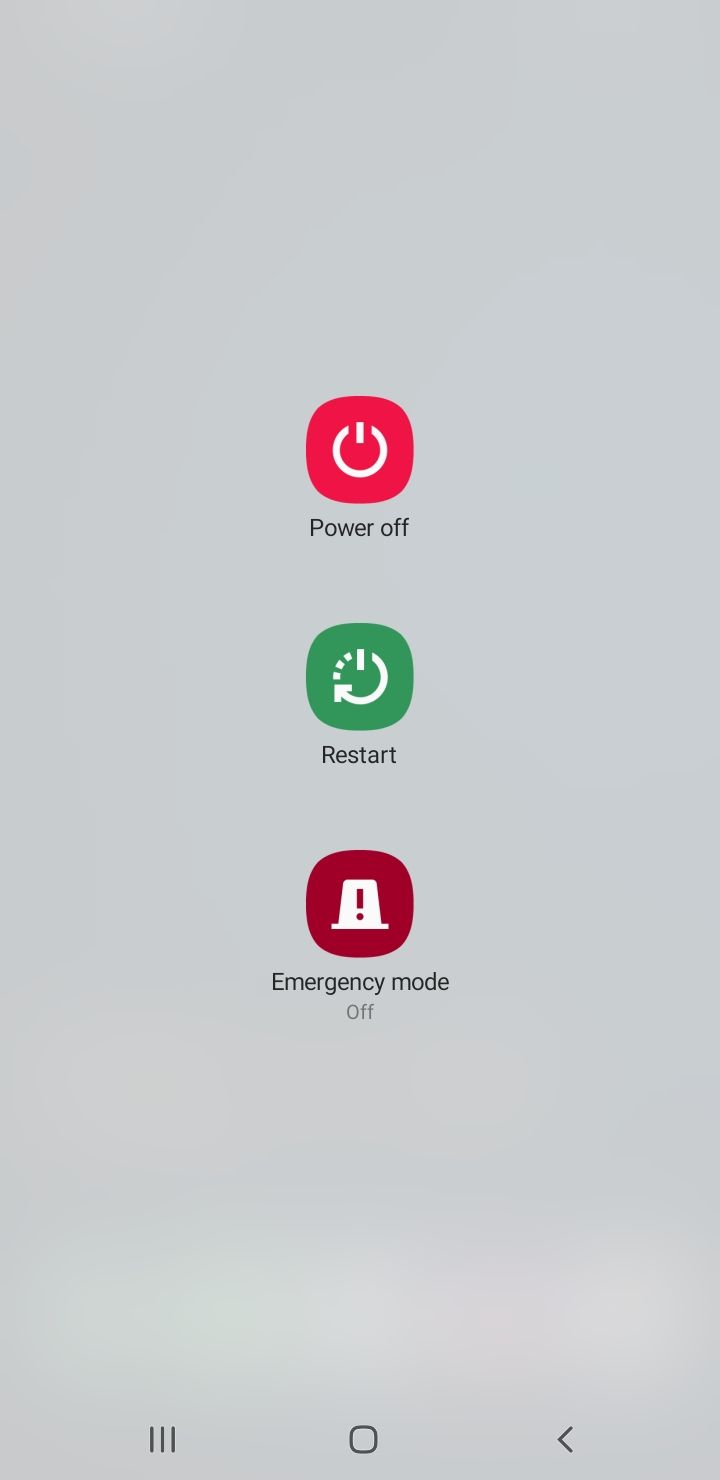
Press and hold the power button until the power menu appears, then tap Restart. If your phone has no restart option, choose Power off, wait 30 seconds to a minute, then turn it back on. Letting the device sit powered off for a moment helps clear lingering memory.
Free Up Storage Space
Low storage is one of the most common reasons the camera refuses to work, because the app needs free space to save each photo and video. When the phone is nearly full, the camera can crash the moment you try to capture.
Check your available space under > Settings > Storage. If it is running low, delete large videos, clear out screenshots, and offload photos to a cloud service such as Google Photos or Google Drive.
If you use a memory card and the camera saves to it, a failing or unreadable card can also trigger the error. Try setting the camera to save to internal storage to test whether the card is the culprit.
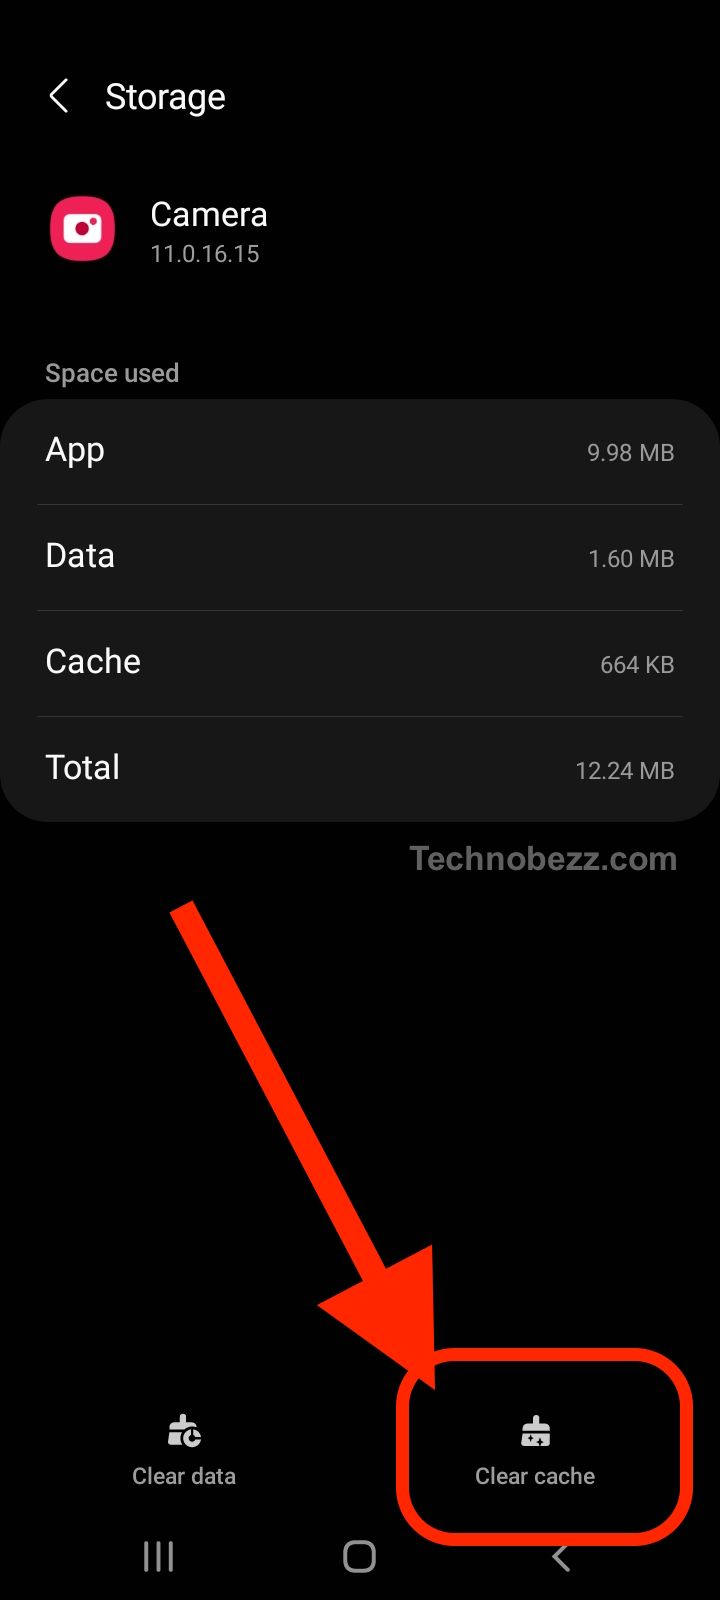
Clear the Camera Cache and Data
The camera app stores temporary files in its cache to open faster. When those files become corrupted, the app can crash on launch, and clearing them forces it to rebuild a clean set.
On a stock Android or Pixel phone, go to > Settings > Apps > See all apps > Camera > Storage and cache > Clear cache. On Samsung Galaxy phones, the path is > Settings > Apps > Camera > Storage > Clear cache.
Reopen the camera after clearing the cache. If it still fails, return to the same screen and tap Clear data (called Clear storage on some phones). This resets the camera to its default settings but does not delete your saved photos.
Check the Camera App Permissions
The camera needs permission to access the camera hardware, and on many phones it also needs storage permission to save files. If a permission was switched off, the app can crash or refuse to open.
Open > Settings > Apps > Camera > Permissions and make sure Camera is set to Allow. Confirm that any Files, Storage, or Microphone permissions the app lists are enabled too.
You can also review this by permission type under > Settings > Security and privacy > Privacy > Permission manager > Camera to see which apps currently have access.
Update the Camera App and Android
Software updates frequently include fixes for camera bugs, so an outdated app or operating system can keep the error alive. Updating closes those gaps.
Open the Google Play Store, tap your profile icon, choose Manage apps and device, and install any pending update for your camera app. If your camera is built into the system, check the maker's app store as well.
For the operating system, go to > Settings > System > Software update (or System update) and tap Check for update. Install anything available and restart afterward.
Clear the Gallery App Cache
The gallery or photos app works closely with the camera, and a corrupted gallery cache can sometimes spill over and crash the camera. Clearing it is a quick, low-risk step.
Use the same path as before, but select your gallery or photos app instead of the camera: > Settings > Apps > Gallery > Storage and cache > Clear cache. Reopen the camera afterward to test.
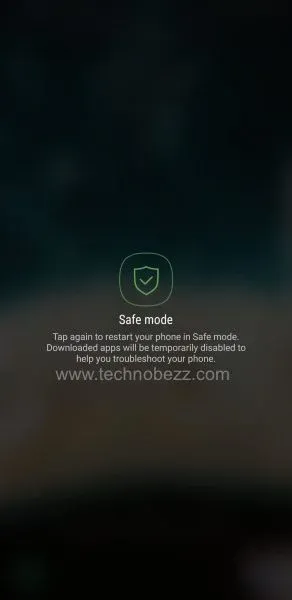
Boot Into Safe Mode
Safe Mode temporarily disables every app you installed yourself, leaving only the apps that came with the phone. It is the fastest way to learn whether a third-party app is breaking the camera.
Press and hold the power button, then touch and hold Power off until a Safe Mode prompt appears, and tap OK to restart. The words "Safe mode" will show in a corner of the screen.
Open the camera while in Safe Mode. If it works normally, an app you installed is the cause. Restart to leave Safe Mode, then uninstall recently added apps one at a time, testing the camera after each removal.
Wipe the Cache Partition
The cache partition holds temporary system files that sit separate from any single app. Wiping it can clear stubborn problems without touching your personal data or photos.
Power off the phone, then enter recovery mode using the button combination for your model. On many Samsung Galaxy phones you hold Volume Up and the Power (or Side) key while the phone is connected to a computer by USB, releasing when the logo appears. Use the volume keys to highlight Wipe cache partition, press the power key to select it, confirm Yes, then choose Reboot system now.
Note that this option has been removed from recovery on some of the newest phones, so do not worry if you cannot find it on a recent model. In that case, rely on the cache-clearing steps above instead.
Try a Different Camera App
If the built-in camera still fails after every step, a third-party camera app can confirm whether the problem is the stock app or the camera hardware. Several free options are available in the Google Play Store.
If a third-party app captures photos with no error, the issue lives in the stock camera software, and a factory reset may be the next step. If every camera app fails the same way, the hardware could be at fault.
Factory Reset as a Last Resort
A factory reset returns the phone to its original software state and clears deep software conflicts that nothing else has fixed. It erases everything on the device, so this is strictly a last resort.
Back up your photos, contacts, and files first, then go to > Settings > System > Reset options > Erase all data (factory reset) and confirm. After the reset, test the camera before reinstalling your apps so you can spot whether a particular app brings the error back.
If the camera still fails after a factory reset, the fault is most likely hardware, and the phone should be checked by an authorized service center.
Frequently Asked Questions
Will clearing camera data delete my photos?
No. Clearing the camera cache or data only removes temporary files and resets the app's settings to default. Your saved photos and videos stay in your gallery or photos app and on any memory card.
Why does my camera keep crashing right after I open it?
An instant crash usually points to a corrupted cache, low storage, or a missing permission. Force stop the app, clear its cache, free up space, and confirm camera permission is allowed before trying deeper fixes.
Is the Unfortunately Camera has stopped error a hardware problem?
Most of the time it is software related and clears with the steps above. If the error persists after a factory reset, or if no camera app works at all, the camera hardware may be faulty and should be inspected.
How do I know if another app is causing the error?
Boot into Safe Mode, which disables every app you installed. If the camera works in Safe Mode, a third-party app is the cause, so uninstall recently added apps one by one until the camera works again.
Why can I not find Wipe cache partition on my phone?
Some newer phones no longer include the wipe cache partition option in recovery mode. If yours is missing it, clear the camera and gallery caches from Settings instead, which addresses the same kind of corrupted-file problem.
First published October 16, 2025. Last updated June 4, 2026.