
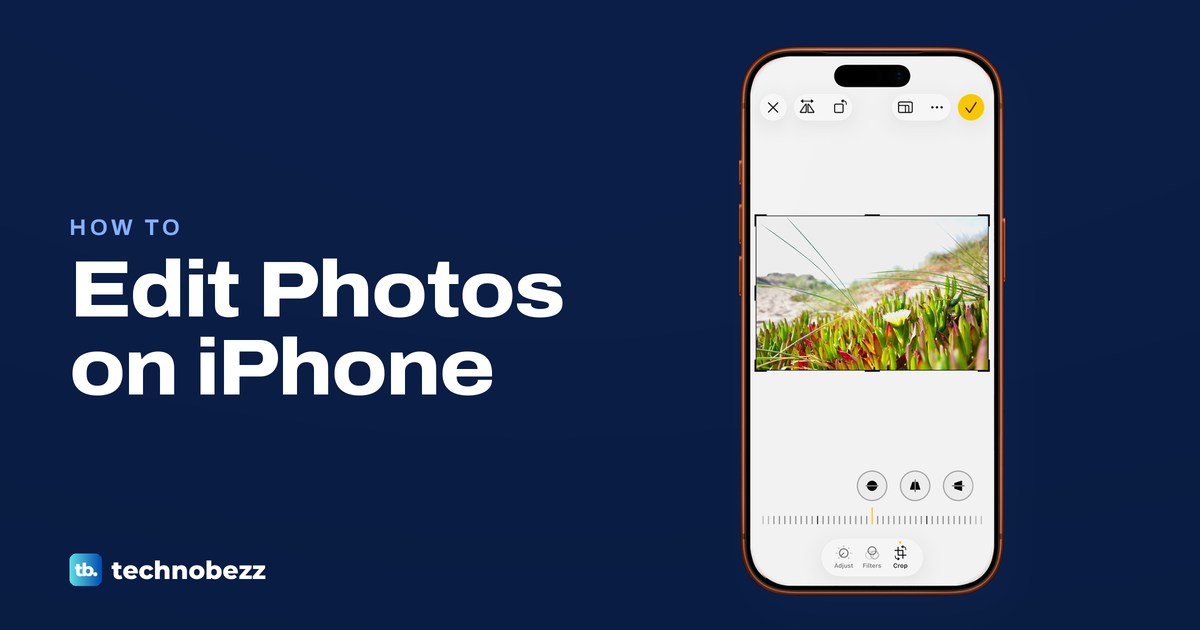
To edit a photo on iPhone, open it in the Photos app and tap the Edit button, the icon with three sliders at the bottom of the screen. Use Adjust for light and color, Filters (or Styles, when shown) for a ready-made look and Crop to reframe, straighten, rotate or flip the picture. Tap Done, the check mark at the top right, to save. You can go back to the photo as it was taken at any time with Revert to Original.
We edited, copied, pasted and reverted sample photos in Photos on iOS 26.5, and looked at the Photos lists on our iPhone 17 Pro with iOS 26.6. Two things are not in Apple's guide: on iOS 26.5 Markup sat in the editor's More menu, and the two ways to revert a photo don't behave the same.
The short version
- Start: open Photos, tap a picture, then tap Edit (three sliders).
- Light and color: Adjust has the sliders, and the Auto wand makes a one-tap fix.
- Framing: Crop has the corner handles, Aspect Ratio presets, Straighten, Rotate and Flip.
- Markup and Copy Edits: both sit in the editor's More menu (three dots).
- Undo: Cancel throws away unsaved changes, and Revert to Original removes saved ones.
Photo editing tools at a glance
Photos keeps every editing tool behind the same Edit button, but the tabs you see depend on the photo and your iPhone. On iOS 26.5 our sample photos showed three tabs, Adjust, Filters and Crop. Apple's guide adds Styles for photos taken with a Photographic Style, Portrait for portrait photos and Clean Up on iPhones with Apple Intelligence.
| What you want to change | Where to find it | What it does |
|---|---|---|
| Brightness, contrast or color | Edit > Adjust | Sliders such as Exposure, Brilliance, Highlights, Saturation and Warmth |
| A quick overall fix | Edit > Adjust > Auto wand | Sets several light sliders at once |
| The whole look | Edit > Filters, or Styles on supported photos | Applies a preset look with an intensity slider |
| Framing or shape | Edit > Crop | Corner handles and Aspect Ratio presets such as Square and Wallpaper |
| Angle or mirror image | Edit > Crop | Straighten, Vertical, Horizontal, Rotate and Flip |
| A distracting object | Edit > Clean Up (Edit > Tools on iOS 27), where available | Removes what you tap, brush or circle |
| Drawings or text | Edit > More > Markup | Pens, a marker, an eraser, colors and an Add button |
| The same edits on other photos | More > Copy Edits, then Paste Edits | Applies one photo's edits to others |
| Changes you haven't saved | Edit > Cancel > Discard Changes | Throws away everything since you tapped Edit |
| Changes you already saved | More > Revert to Original | Returns the photo to how it was taken |
Photos keeps the original when you edit, which is why Revert to Original can bring it back after you save, even on a photo you pasted edits onto. Apple notes one case that works differently: a video saved as a new clip can't be reverted, although the original clip stays in your library.
Open a photo and tap Edit
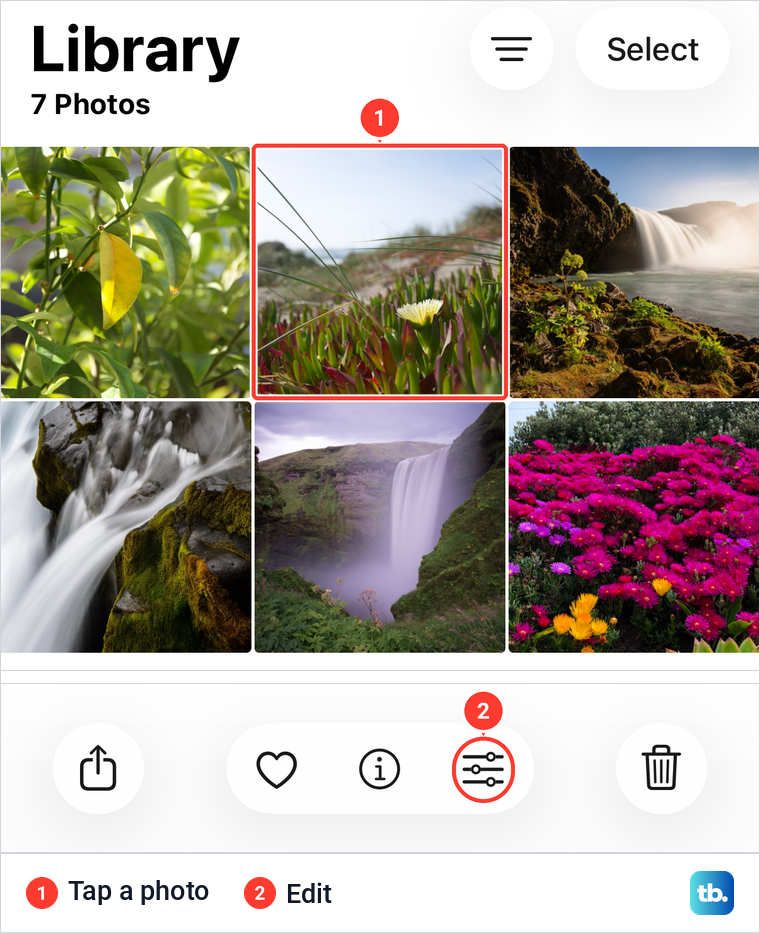
Open the Photos app, tap Library and tap the photo you want to change so it fills the screen. The bar at the bottom then shows Share, Favorite, Info, Edit and Delete. On iOS 26.5 the Edit button is the icon with three sliders, just left of the trash can.
The editor opens on the Adjust tab. Along the top you get Cancel (an X) at the left, the Undo and Redo arrows beside it, a More button with three dots and Done, a check mark, at the right. The tabs sit in a bar at the bottom, with the controls for the chosen tab just above them.
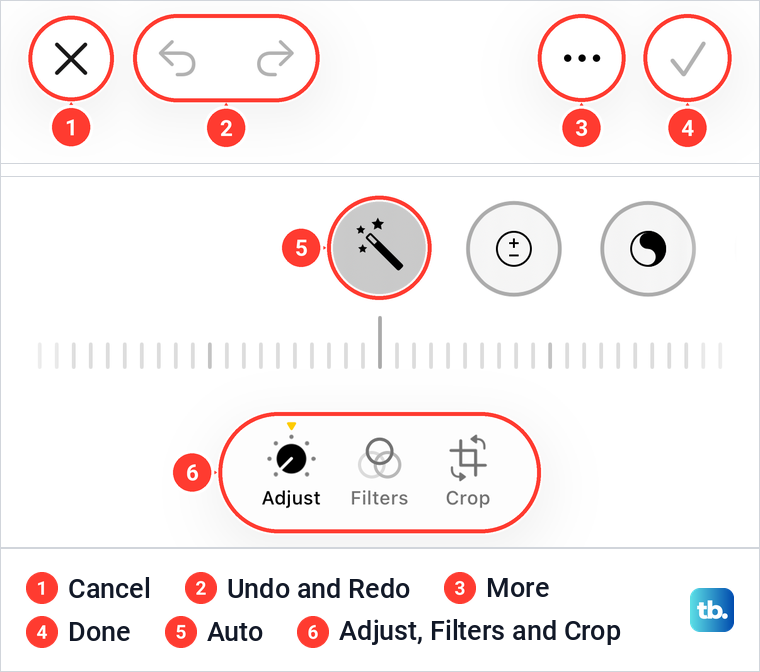
Done stayed grey until we changed something, then turned yellow. Some older guides tell you to tap Done at the bottom left, but on iOS 26.5 both Done and Cancel sit at the top of the screen. Done applies the edit to the same photo in your Library, which then offers Revert to Original in its More menu.
Fix light and color with Adjust
Adjust holds the light and color sliders. Swipe along the row of round buttons above the slider to move between them, tap one, then drag the slider underneath. On iOS 26.5 the row started with Auto, Exposure and Brilliance and included, among others, Highlights, Shadows, Brightness, Saturation, Warmth, Sharpness, Noise Reduction and finally Vignette.
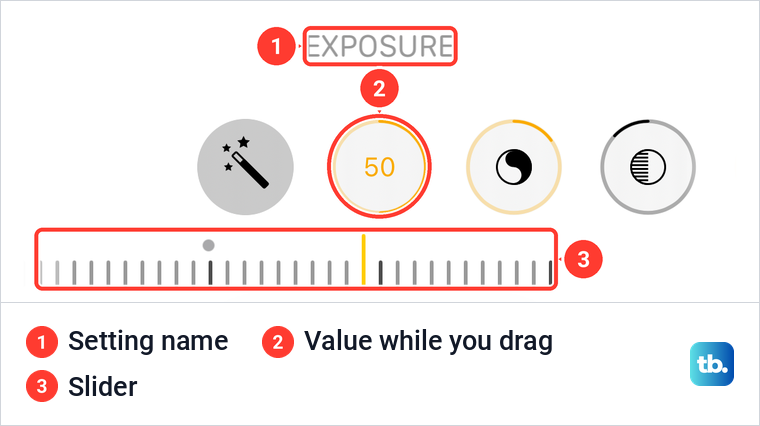
When we dragged Exposure, its name appeared above the row and the value replaced the icon inside the button, here 50. The colored ring around each button shows how far that setting has moved, including changes made by Auto, so you can see at a glance which settings have changed. Apple says tapping a button compares that setting with the original.
Adjust can brighten a dark photo or warm up a cold one, but Sharpness can only do so much for a blurry shot. For the next picture, our camera settings for sharper iPhone photos help more than any slider.
Let Auto make the first pass
The magic wand at the start of the Adjust row is Auto, which Apple says enhances light and color automatically. Tap it once. On iOS 26.5 the wand turned dark, Undo became active and Done turned yellow, which tells you the photo has changed.
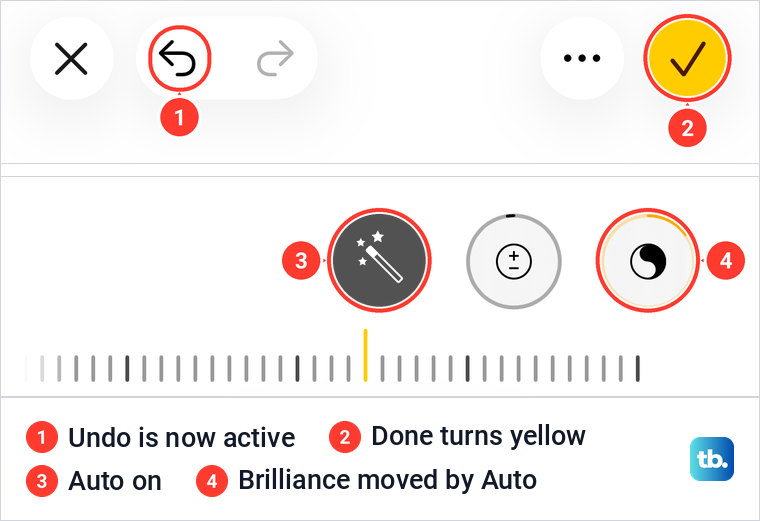
Auto is more than one slider. When we tapped it on a sample photo, it set itself to 24% and moved four others at the same time: Highlights to -13%, Shadows to 10%, Brightness to 8% and Exposure to -2%. Treat Auto as a starting point, then fine-tune the slider that bothers you, or tap Undo to go back.
Add a filter or change the Photographic Style
Tap Filters to try a preset look. A strip of thumbnails shows your photo in each filter, and the name of the one in the middle appears above it. When we chose Vivid on iOS 26.5, an intensity slider appeared under the strip, set to 100%, so you can tone the filter down instead of taking it all or nothing.
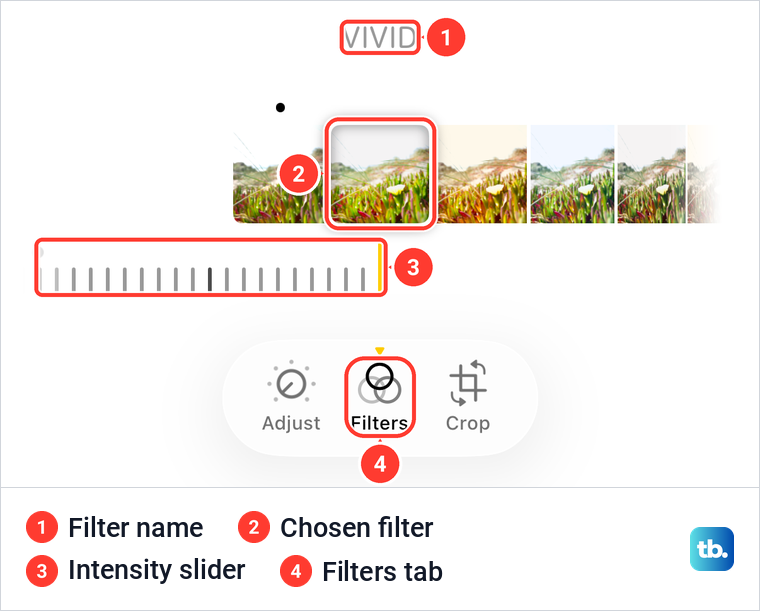
Apple says you can tap Original to remove a filter that was applied when the photo was taken, and tap the photo to compare it with the original. Newer iPhones may show Styles instead of Filters. Apple's guide says that on iPhone 16 models or later you use Photographic Styles instead of filters, and that filters stay available if you haven't turned on Photographic Styles.
To change the style of a photo taken with a Photographic Style, Apple's steps are to open it, tap Edit, tap Styles and swipe left or right through the choices. A Styles Chooser square sets tone and color, and a slider below it sets intensity; Apple's iOS 27 guide adds a Customize button that you tap first. Apple notes that this needs photos captured with High Efficiency, which you turn on in Settings > Camera > Formats.
Crop a photo on iPhone
Tap Crop and the photo appears inside a box with handles at the corners and edges. Drag a corner inward to cut away the parts you don't want, or pinch the photo to zoom it inside the box. Flip, Rotate and Aspect Ratio sit in the top bar, and the straightening controls sit above the slider.
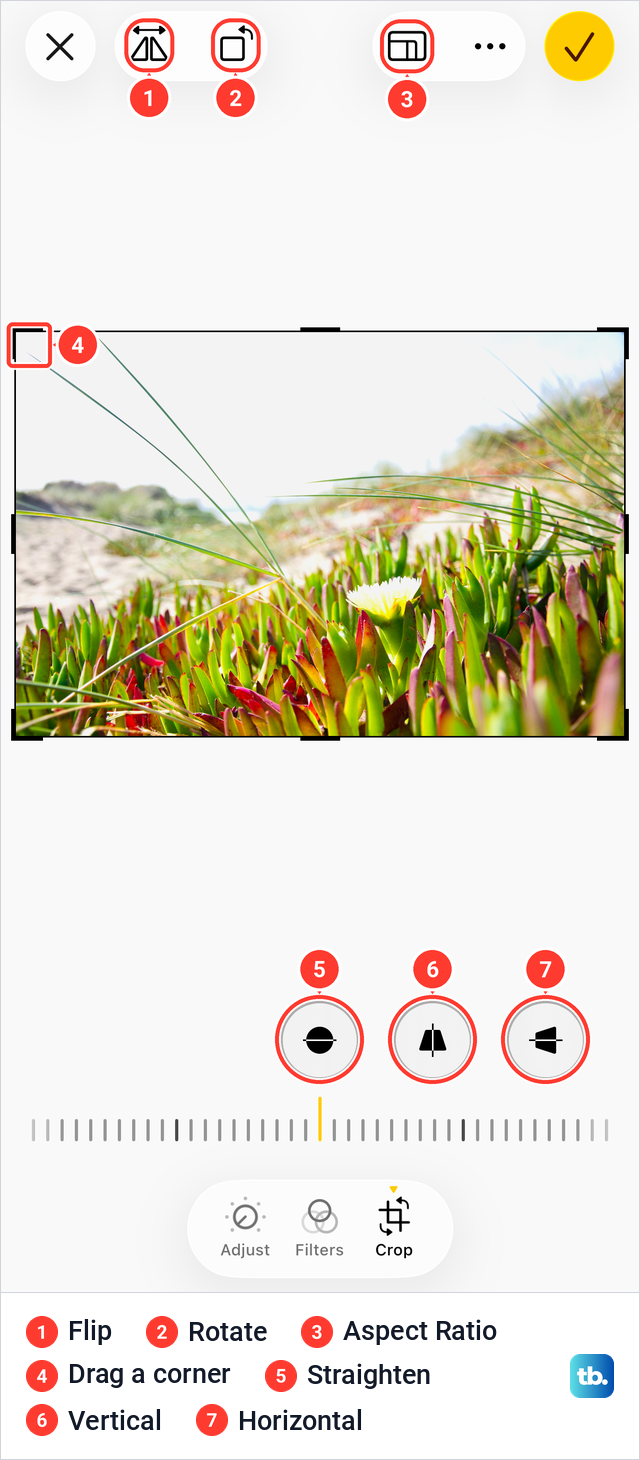
Apple says that when you drag a corner, the crop tool keeps the photo's original shape. For a different shape, tap Aspect Ratio. On iOS 26.5 the preset row read Original, Freeform, Square and Wallpaper, with a portrait and a landscape button above it, and Apple lists 9:16 and 5:7 among the other options.
Choosing a preset locks the shape. After we picked Square, a small padlock appeared in the top-right corner of the box. Tapping the padlock unlocked it and the preset row jumped to Freeform, which is the fix when a crop box will only move as a whole and won't change shape.
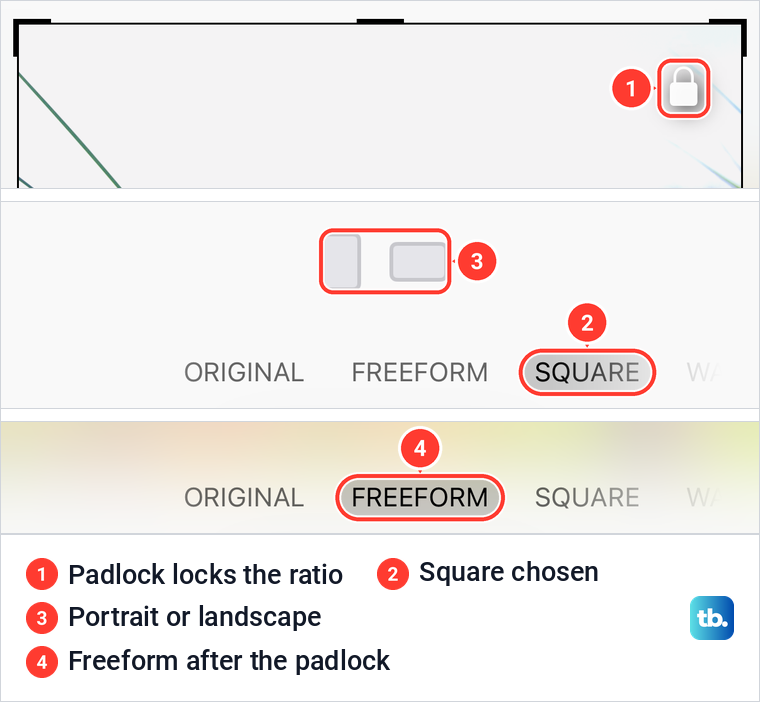
The Wallpaper preset gave a tall box shaped like the iPhone screen, which suits a photo you plan to use as a background. A yellow Reset label appears above the photo once you change the crop. For every preset and the zoom shortcut, our separate guide shows how to crop a picture on iPhone step by step.
Apple also describes that shortcut. While you are viewing a photo, pinch it to zoom in, and when it looks the way you want it cropped, tap Crop in the top-right corner, adjust it and tap Done. If that button doesn't appear, open Edit and use the Crop tab instead.
Straighten, rotate and flip a photo
The three round buttons above the slider in the Crop view are Straighten, Vertical and Horizontal. Straighten tilts the picture to level a crooked horizon, and Apple says Vertical and Horizontal tilt it to fix perspective, which helps with a building that seems to lean. Tap one and drag the slider, and the button then shows the angle, here 25 on iOS 26.5.
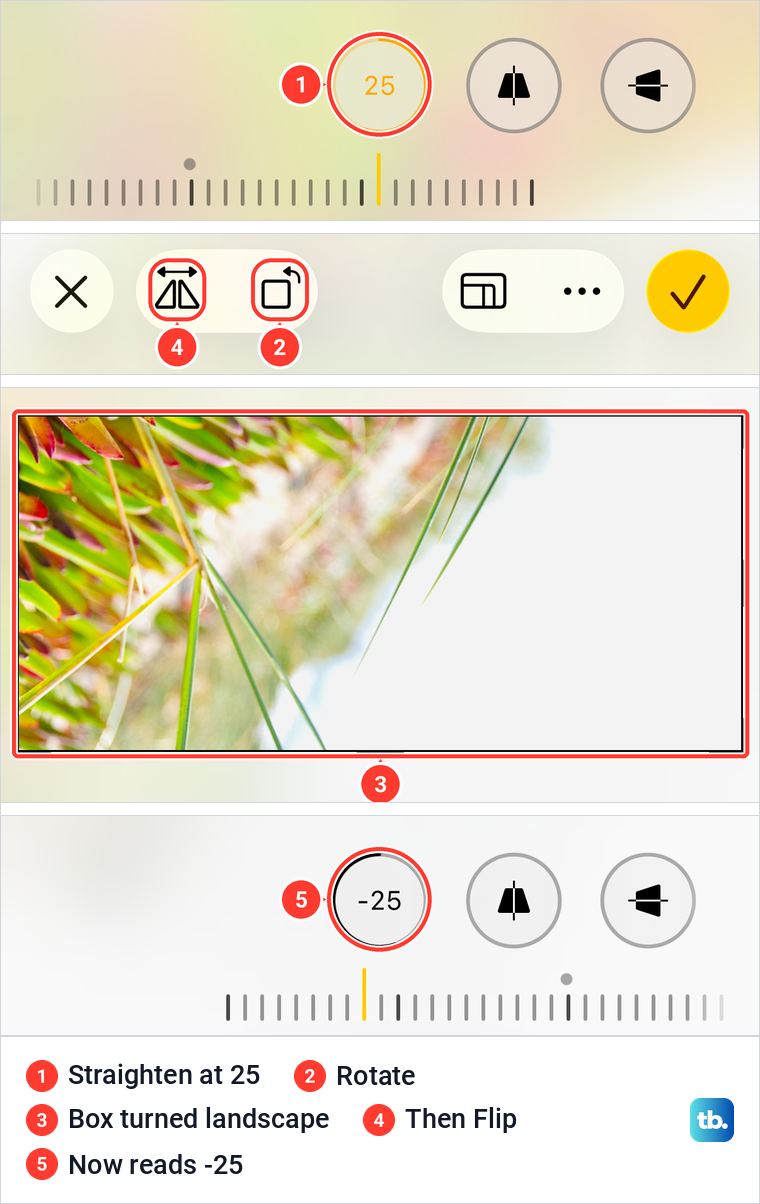
Rotate turns the photo 90 degrees at a time and Flip mirrors it horizontally, as Apple describes. On our sample, with the tall box left over from the Wallpaper preset still on screen, one tap of Rotate turned it on its side, counterclockwise. After Flip, the Straighten value read -25 instead of 25, because the tilt was mirrored along with the picture.
Remove distractions with Clean Up
Clean Up removes unwanted objects, such as a stranger or a sign in the background, using Apple Intelligence. Apple's steps are to open the photo, tap Edit, tap Clean Up, then tap, brush or circle what you want to remove and tap Done. Apple says some items may be highlighted automatically after you tap Clean Up, so you can remove them with a single tap.
Apple's iOS 27 guide words the route differently: tap Edit, then Tools, then Clean Up. The same Tools menu also holds Extend, which widens a photo beyond its original frame, and Reframe, which adjusts its perspective.
Clean Up appears only on iPhones that support Apple Intelligence, and Apple says it isn't available in all languages or regions. For iOS 27, Apple lists an Apple Intelligence-enabled iPhone 15 Pro, iPhone 15 Pro Max or iPhone 16 model or later. Apple's Clean Up requirements page adds that it doesn't currently work on devices bought in mainland China.
Check the result before you tap Done. Apple warns that brushing over a person's face may blur it with a pixelated effect, and that the results of Apple Intelligence may vary. If a removal goes wrong, tap Undo or Cancel, just as with any other edit.
Draw or add text with Markup
Markup lets you draw on a photo, highlight part of it or add text and shapes. Apple's guide, for iOS 26 and iOS 27 alike, says to tap Edit and then the Markup button, but on iOS 26.5 there was no Markup button or tab in the editor. We found it in the editor's More menu, the three dots at the top, between Appearance and Extensions.
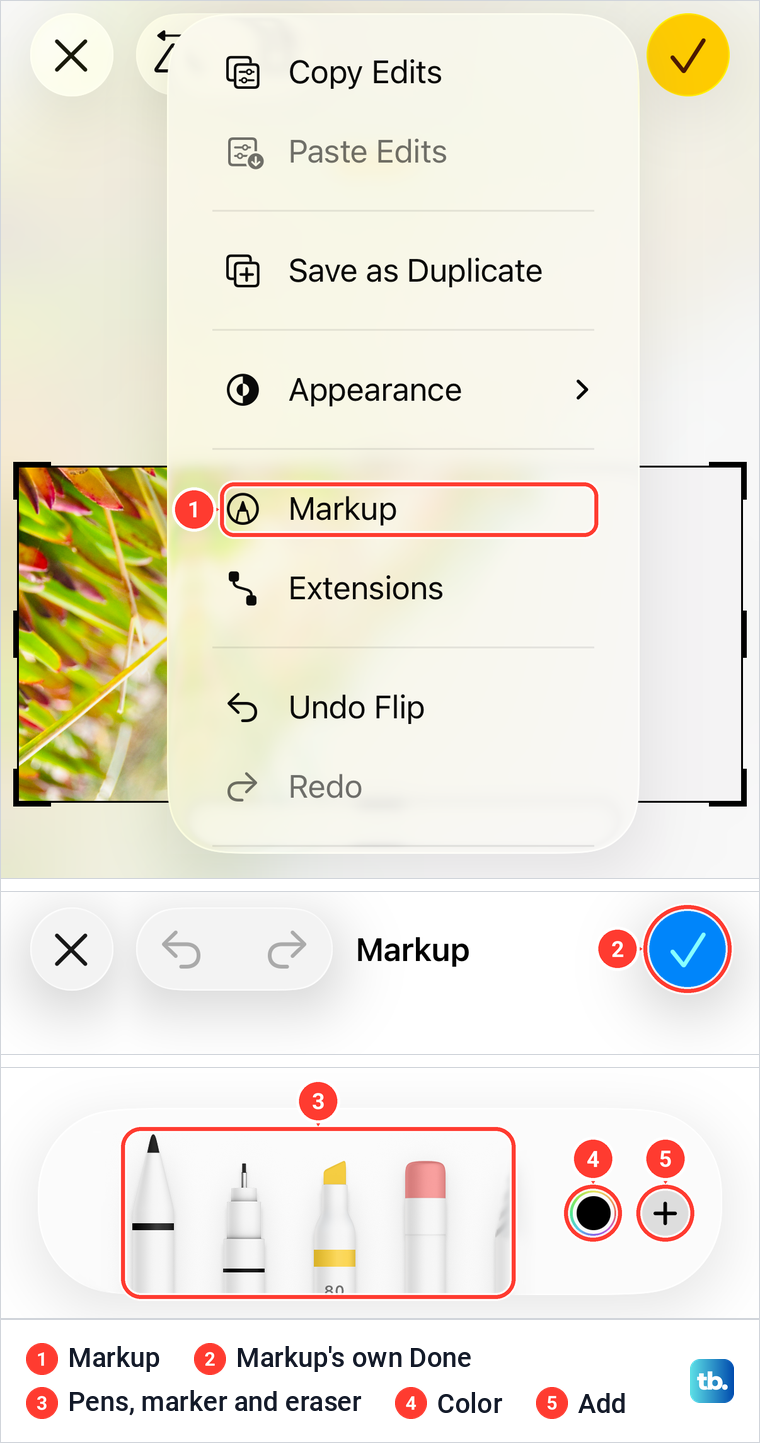
Markup opens with its own Cancel, Undo and Redo, a blue Done button and a tray of tools at the bottom. On iOS 26.5 the tray held Pen, Monoline, Marker, Eraser and Lasso, then a color picker and a plus button. Apple says the plus button, Add Annotations, adds stickers, captions, text, shapes or a signature, and that you tap Done to save your edits. Markup's blue Done is a separate button from the editor's Done at the top right.
Stickers are on Apple's list for the plus button. If you want one cut from your own photo, our guide shows how to make your own iPhone stickers first.
Copy edits to other photos
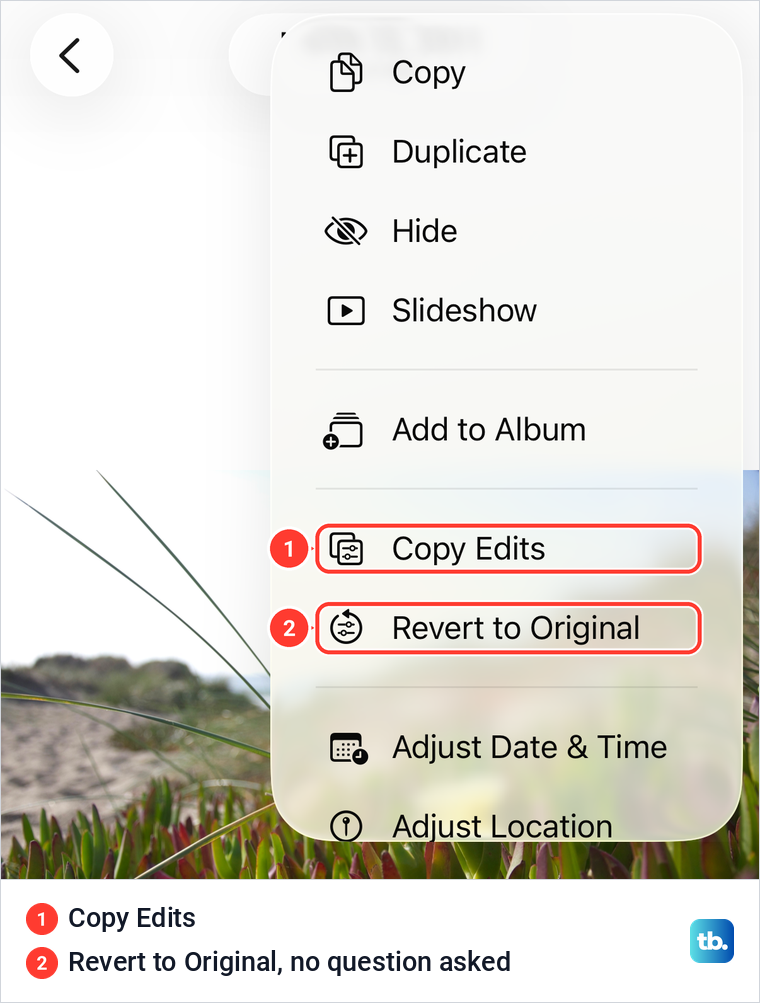
You can copy a photo's edits to other photos instead of repeating the work. After you save an edit, open the photo, tap More (three dots) at the top right and tap Copy Edits. On iOS 26.5 the viewer's More menu showed Copy Edits only after the photo had been edited and saved, together with Revert to Original. The editor's own More menu also lists Copy Edits while you work.
For our Exposure edit, the Copy Edits sheet showed a single Adjust switch plus an Adaptive switch described as "Automatically match the exposure and color of this image when pasting edits." Apple's guide says Photos adjusts white balance and exposure so pasted photos match more closely, but Adaptive was off when our sheet opened, so turn it on if you want that. Turn off anything you don't want to carry over, then tap Copy.
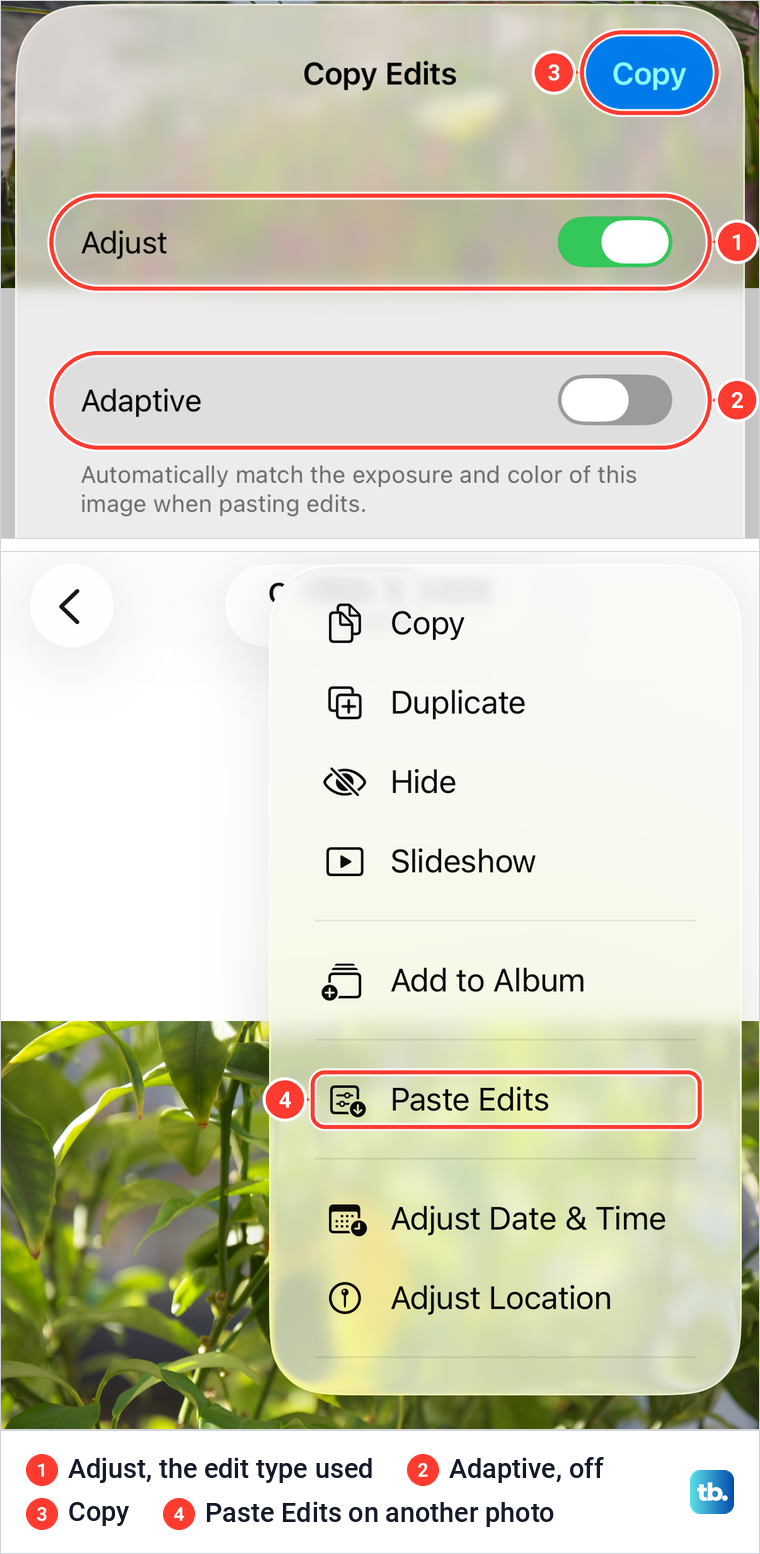
Go back to your Library and open another photo, or tap Select and pick several. Tap More, then Paste Edits. When we pasted onto a second sample, its More menu then offered Copy Edits and Revert to Original as well, so a pasted edit can be undone like any other.
Undo an edit or go back to the original
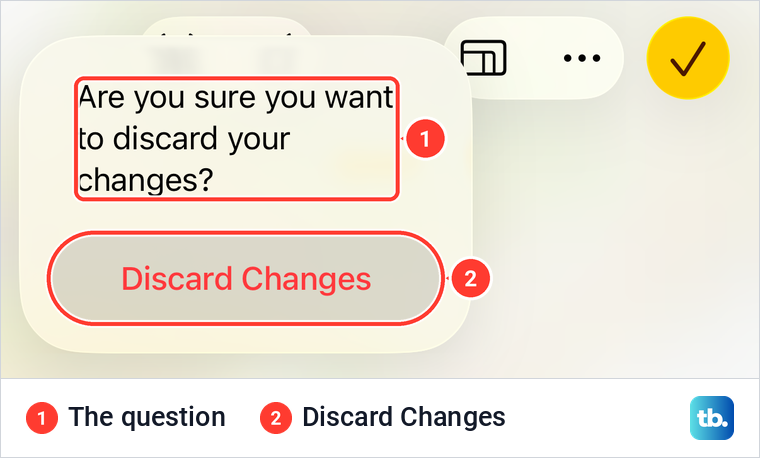
While you edit, the Undo and Redo arrows at the top step back and forward through your changes, and Apple says you can tap the photo to compare it with the original. To drop everything since you tapped Edit, tap Cancel. iOS asked "Are you sure you want to discard your changes?" and threw our edits away when we tapped Discard Changes.
After you tap Done the edit is saved, but you can still remove it. iOS 26.5 offers two routes, and they don't behave the same way. The quick one is in the photo viewer: open the photo, tap More and tap Revert to Original. On our sample it reverted straight away, with no confirmation.
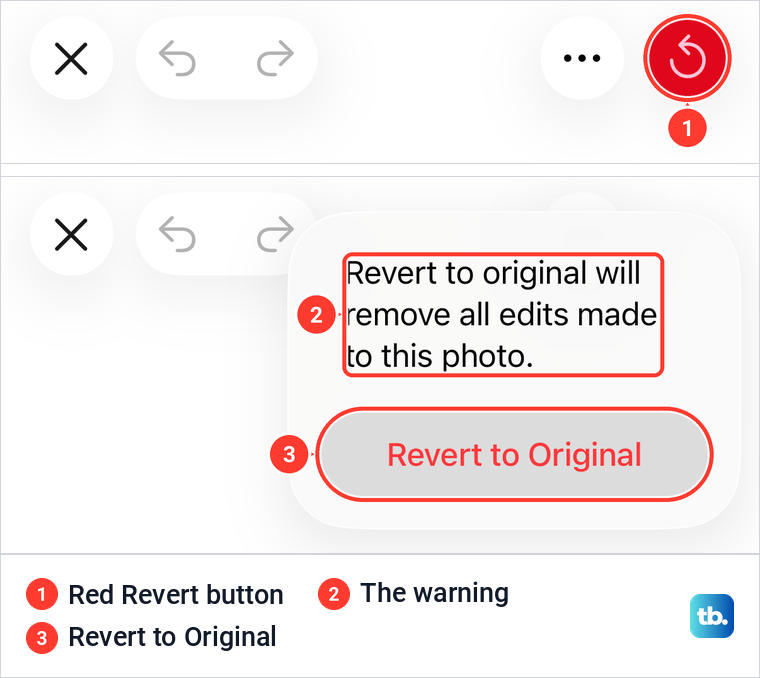
The second route is inside the editor. Open the edited photo and tap Edit, and the Done button is replaced by a red Revert button with a round arrow. Tapping it showed the warning "Revert to original will remove all edits made to this photo." The photo went back to normal only after we tapped Revert to Original under it.
Both routes remove all saved edits at once, so you can't keep some changes and drop others this way. Revert only undoes edits, it doesn't bring back pictures. If the photo itself is missing, follow the steps to recover a deleted iPhone photo instead.
Edit a Live Photo or trim a video
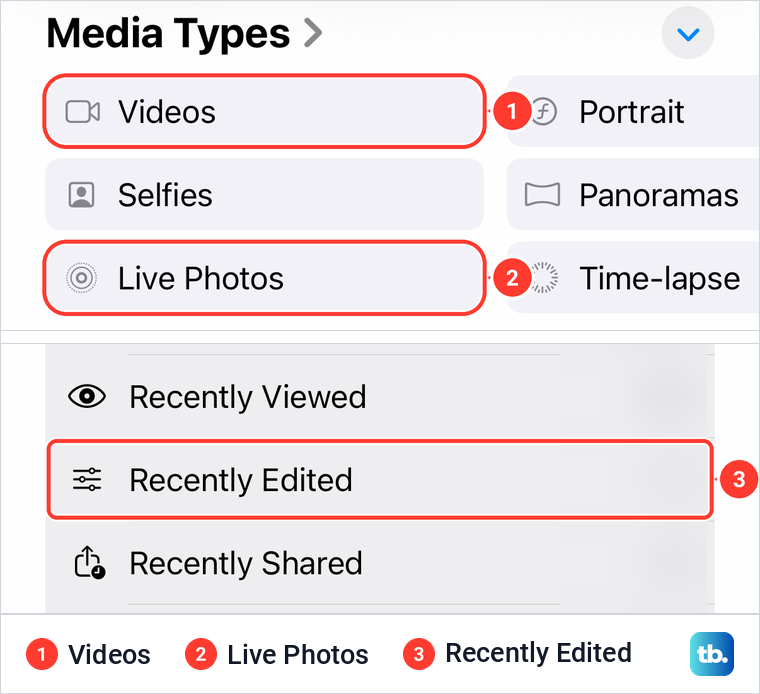
Live Photos and videos use the same Edit button, with extra controls. To find them, open Photos, tap Collections and scroll to Media Types, where our iPhone 17 Pro with iOS 26.6 listed Videos and Live Photos as separate albums. Its Utilities section also has a Recently Edited album, handy when you want to find a photo you changed earlier.
Apple's steps for a Live Photo are to open it, tap Edit and tap the Live Photo button. Move the white frame along the frame viewer and tap Make Key Photo to choose the still that represents it, or drag either end of the frame viewer to trim the motion. Apple says the Live button turns it into a still photo and the Mute button silences it.
Apple warns that a Live Photo taken on an iPhone 15 model or later with a portrait effect loses that effect if you change the key photo. Effects such as Loop, Bounce and Long Exposure are in a separate menu, which you open by tapping Live in the top-left corner while viewing the photo.
To shorten a video, Apple's steps are to open it, tap Edit, drag either end of the frame viewer below the video to the new start and end, and tap Done. You then choose Save Video to keep only the trimmed version or Save Video as New Clip to keep both. Choose Save Video as New Clip if you want to keep the original video too, but Apple notes that the new clip itself can't be reverted to the original.
Trimming works on one clip at a time. To join several clips into one, see how to combine videos on your iPhone.
Where your edited photo ends up
Edits stay with the photo in your Library. Apple says that when you use iCloud Photos, edits are saved across all your devices, so you should see the changed version on your other devices or on the web. Our guide shows how to access your iCloud Photos on iPhone and the web, and if an edit never arrives, work through the steps for fixing iCloud when it is not syncing.
Sharing is a separate step from editing. When we opened the share sheet for one photo on iOS 26.5, it listed Export Unmodified Original among the usual options, a reminder that Photos still holds the unedited file. If another app shows your photo without its edits, check which version you sent it.
For a copy on a computer, see how to transfer photos from iPhone to PC. If a marked-up photo needs to go into a document, you can also save an iPhone photo as a PDF.
How we tested this guide
We tested this in the Photos app on iOS 26.5, trying the editing tools on sample photos, then reverting the changes.
Frequently Asked Questions
How do I edit a photo on iPhone without another app?
Open Photos, tap the photo, tap Edit (three sliders) and use Adjust, Filters or Crop. Tap Done to save, or tap Cancel and then Discard Changes to leave the photo as it was.
Why can't I change the shape of the crop box?
The shape is probably locked. A preset such as Square puts a padlock on the box, so tap the padlock or choose Freeform, then drag a corner.
Why don't I see Filters or Clean Up?
On iPhone 16 models and later, Apple says Photographic Styles take the place of filters unless you haven't turned Styles on. Clean Up needs an iPhone that supports Apple Intelligence, in a language and region where it is offered.
How do I undo an edit after tapping Done?
Open the photo, tap More and tap Revert to Original, which on iOS 26.5 worked at once with no confirmation. You can also tap Edit, tap the red Revert button and confirm with Revert to Original.
Can I copy edits to several photos at once?
Yes. Tap More and Copy Edits on the edited photo, choose what to copy, then select the other photos and tap More and Paste Edits.
Where is Markup in the iOS 26 Photos editor?
On iOS 26.5 it sat in the editor's More menu, the three dots at the top, not on a tab. Tap Edit, then More, then Markup.