You press the power button, then wait. The desktop finally loads, but the spinning circle keeps you stuck while apps crawl to life and the disk light stays solid for minutes. When a Windows 11 PC takes ages to become usable, it is almost always doing too much at once during boot. You can find and switch off most of the causes yourself.
The fixes below start with the safest, fastest steps and only move to deeper changes if those do not help. Most of them work the same way on Windows 10.
Start With a Clean Restart and Fewer Open Apps
Before changing any settings, give the system a fresh start. A restart clears built-up state and is the simplest thing to try before deeper troubleshooting.
Select Start > Power > Restart. When the desktop returns, open only the apps you actually need.
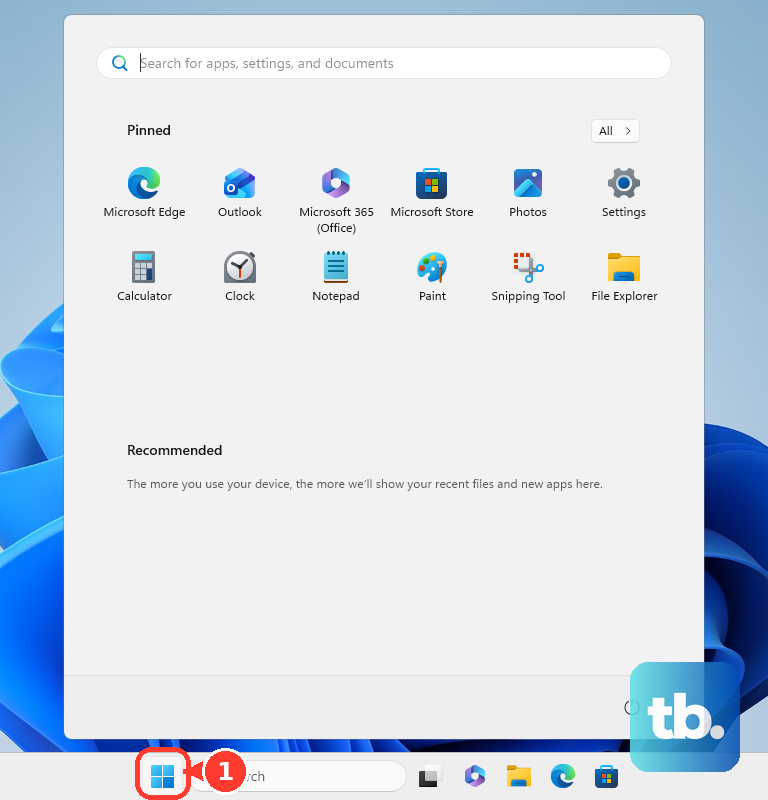
Programs you leave running but are not using make Windows juggle background work during and after boot. Closing what you do not need and then restarting often makes a noticeable difference on its own.
Use this as the baseline for judging every later fix.
Let Windows Update Catch Up
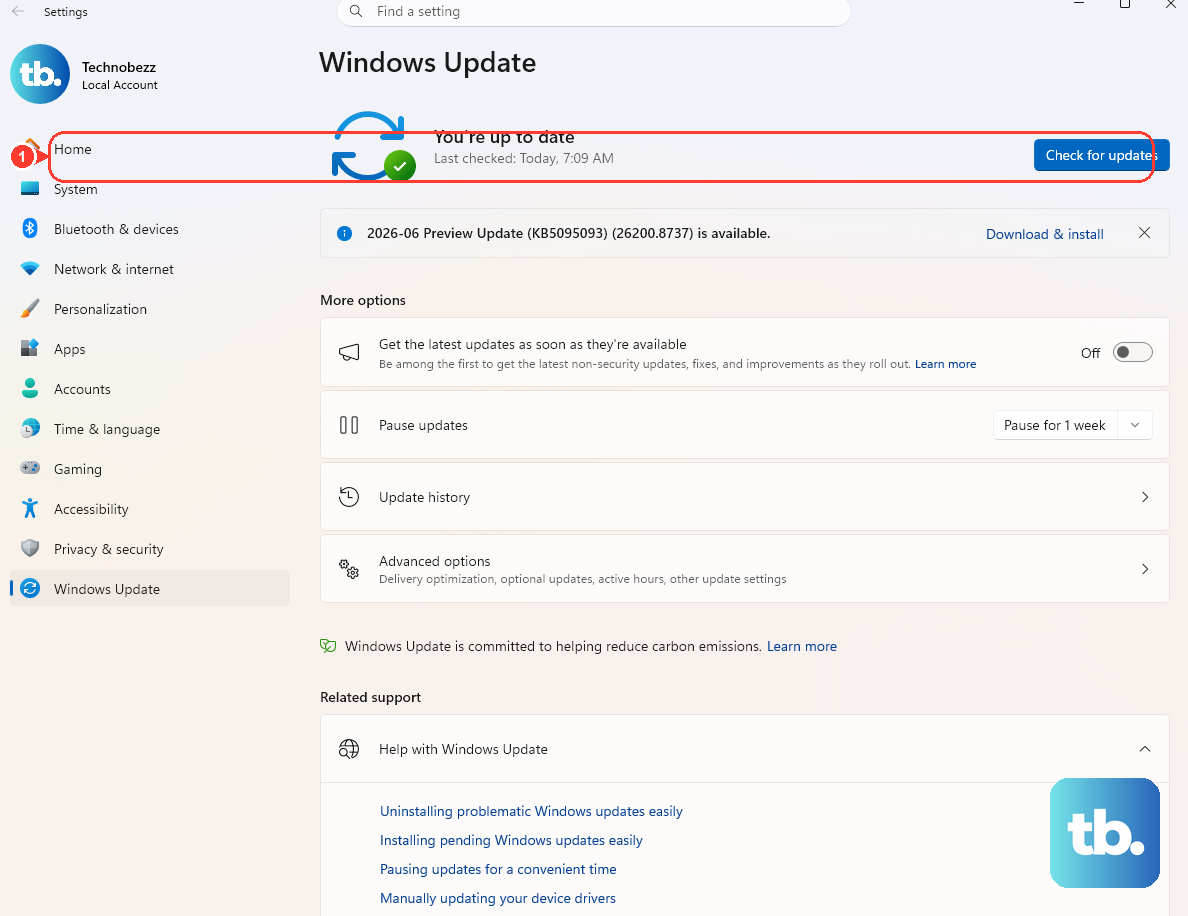
Windows updates often include fixes and performance improvements, so an out-of-date system can boot more slowly than it should. Installing pending updates is one of the lowest-risk things you can do.
On Windows 11, go to Start > Settings > Windows Update > Check for updates.
Once the status shows You're up to date, open Advanced options > Optional updates to get driver updates.
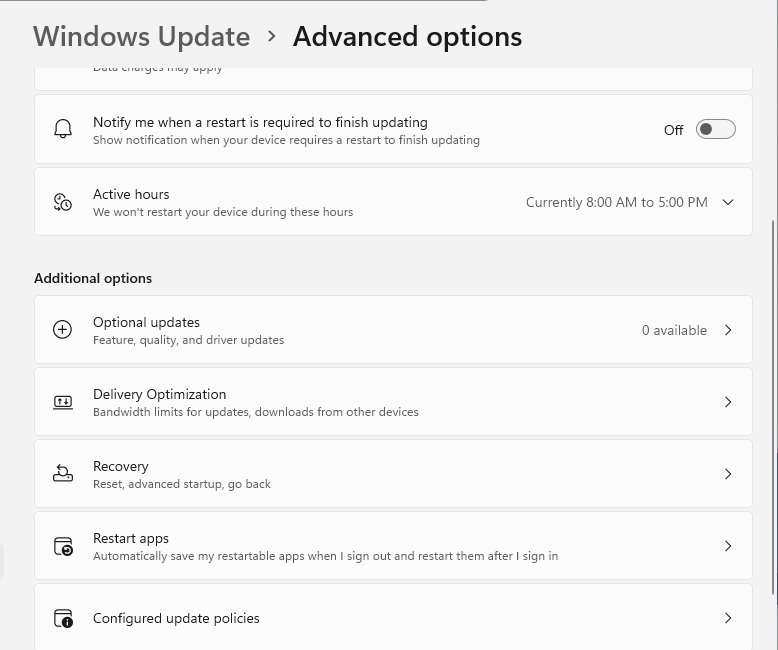
On Windows 10, go to Start > Settings > Update & Security > Windows Update > Check for updates, then select View optional updates for drivers.
Driver updates matter because storage and graphics drivers directly affect how quickly your PC reaches the desktop. Install them, restart, and check whether boot time improves.
Cut Down the Apps That Launch at Boot
This is usually where the biggest startup gains are. Many programs quietly add themselves to startup, and they all compete for the disk and CPU as soon as you sign in.
Press Ctrl + Shift + Esc to open Task Manager.
Select Startup apps from the left-hand menu.
Right-click an app you do not need at boot, then select Disable.
Task Manager rates each app's startup impact, which shows you what to target first. Disable the High impact items you do not actively use, and leave anything you rely on at sign-in alone.
You can also manage these in Settings > Apps > Startup by switching individual apps Off.
Find Out What Is Actually Using Your Disk, CPU, and Memory
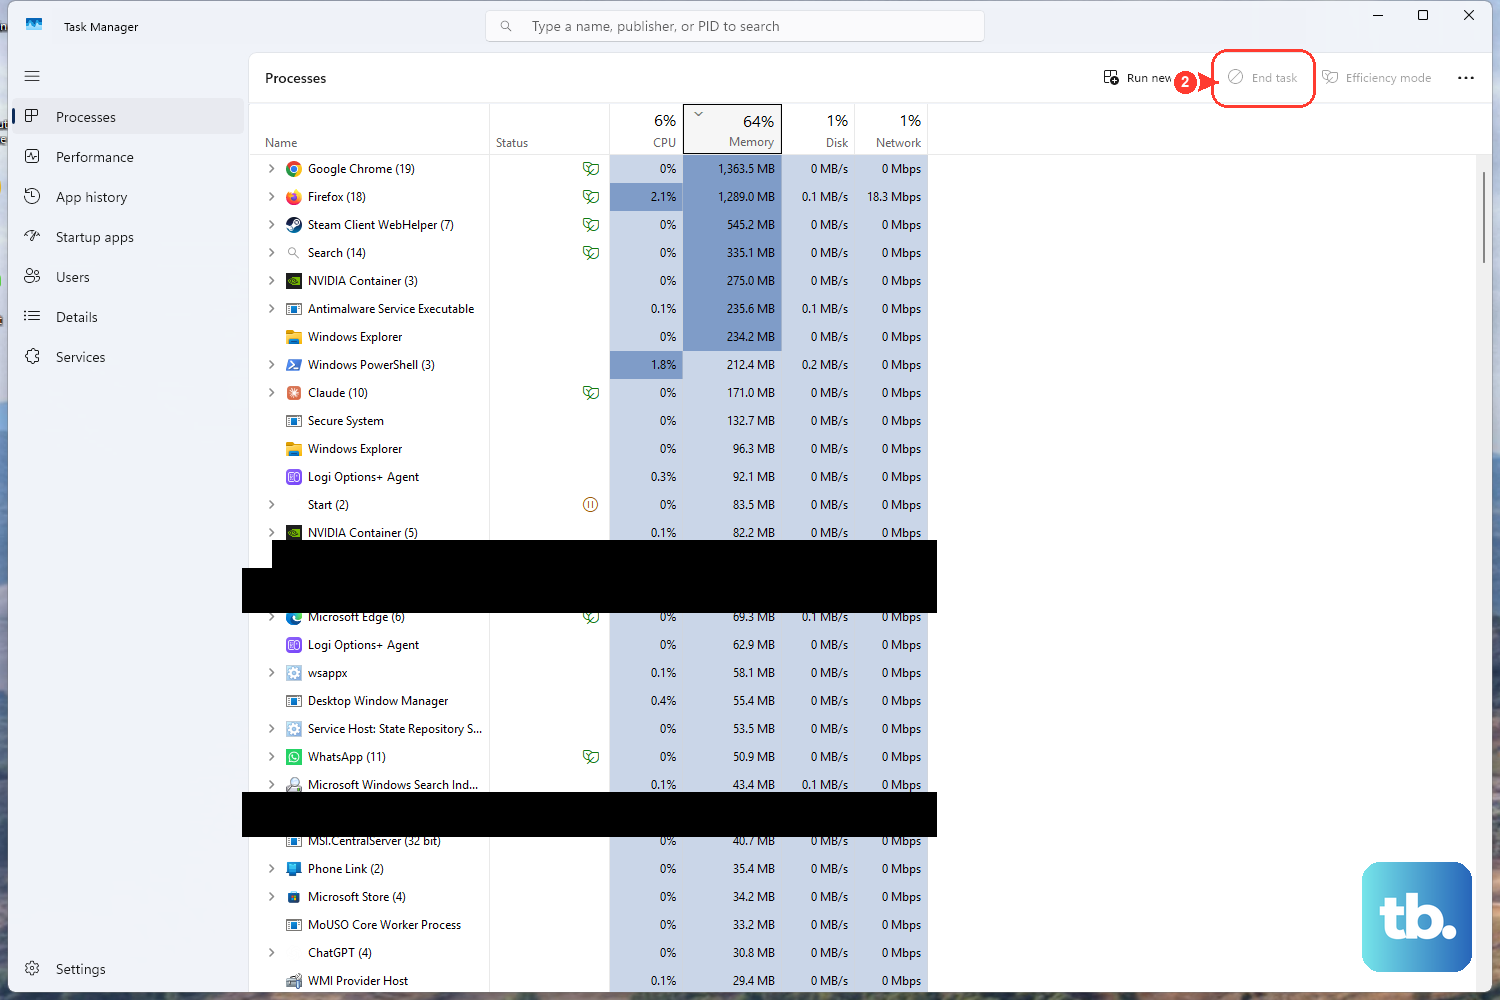
If your PC still drags after you sign in, find the specific culprit before you change more settings. Press Ctrl + Shift + Esc to open Task Manager, then open Processes to see what is using resources right now.
Check the Performance and Startup apps pages too, so you can see disk, CPU, and memory usage in context.
If an app you do not need sits at the top of the list, right-click it and select End task.
Once you know which process is behind 100% disk, high CPU, or high memory, you can tell which of the later fixes will actually help.
Rule Out Malware With Windows Security
Malware can slow a PC and push disk or CPU usage up, so run a scan early. Windows includes Microsoft Defender Antivirus in the Windows Security app, so you do not need to install anything.
Go to Start > Settings > Privacy & security > Windows Security > Virus & threat protection.
Select Quick scan for a fast check.
For a deeper check, select Scan options, then choose Full scan, Custom scan, or Microsoft Defender Antivirus (offline scan).
The offline scan restarts the PC and scans before Windows fully loads, which makes it harder for persistent malware to hide. When it finishes, the results appear under Protection history.
Free Up Space on the System Drive
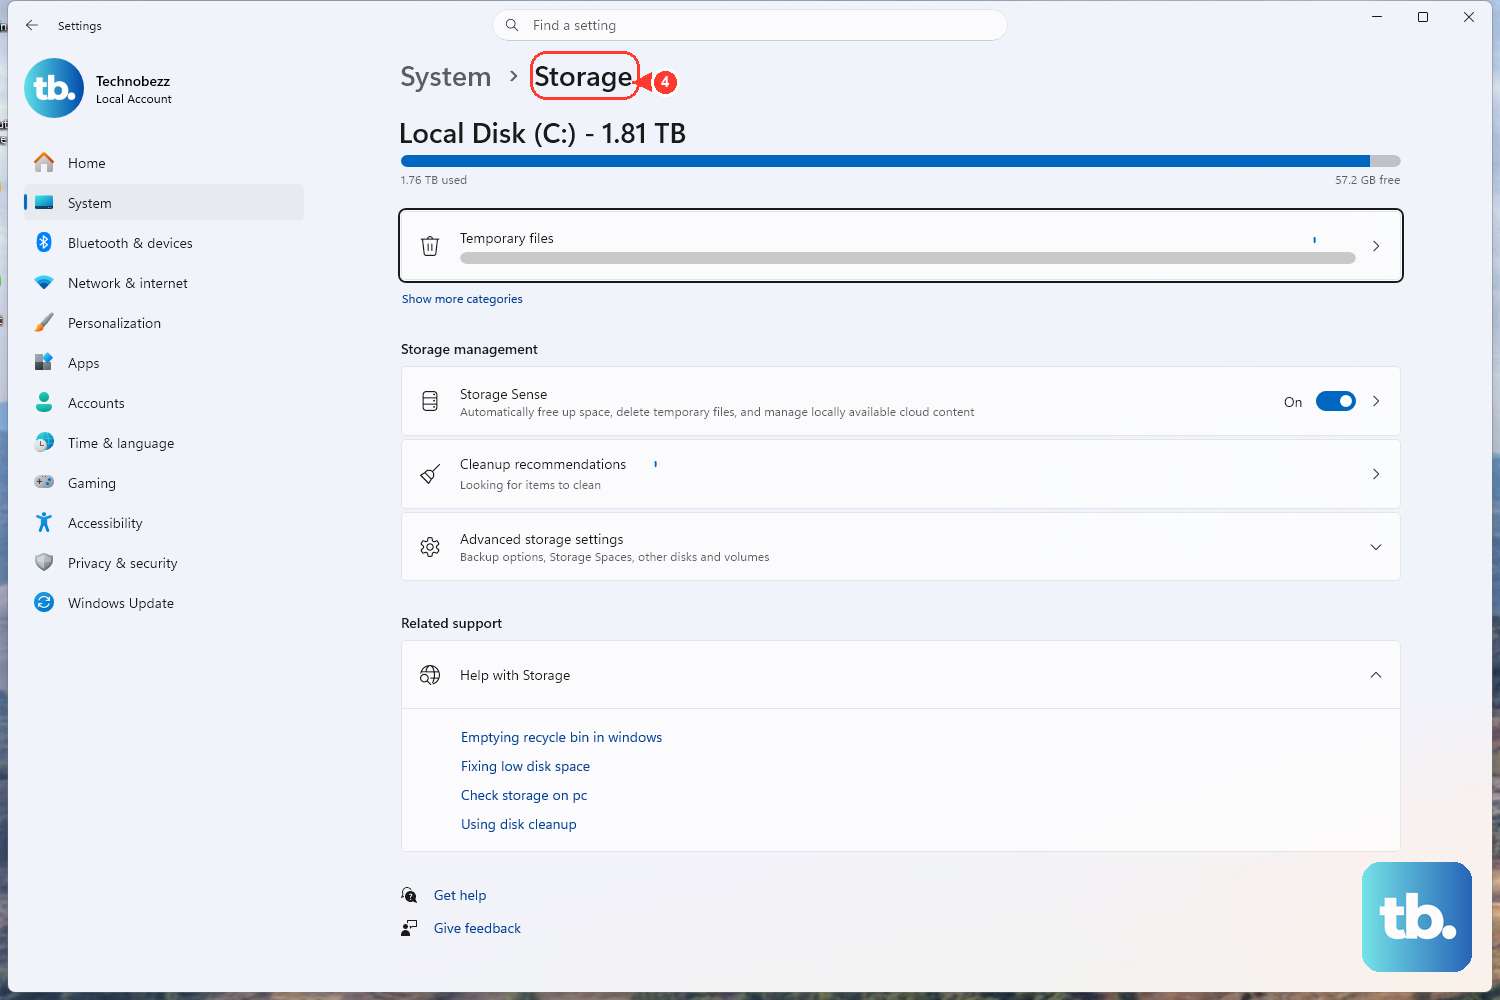
A nearly full system drive hurts performance, including how quickly the PC starts. Clearing temporary files gives Windows room to work.
Go to Start > Settings > System > Storage > Storage Sense, then select Run Storage Sense now.
To clear files by hand, go back to Storage, open Temporary files, select what to delete, and then select Remove files. The cleanup recommendations on the same page can free up more space.
If you prefer the classic tool, type "Disk Cleanup" in the Start search box and open it from the results.
Try to keep plenty of free space on the drive instead of filling it to the limit. This matters most on a PC that has filled up slowly over months of use.
Dial Back Visual Effects and Choose a Faster Power Mode
Windows spends resources on animations and visual effects that you can give up for speed. Type "Adjust the appearance and performance of Windows" in the Start search box, open it, and on the Visual Effects tab select Adjust for best performance.
Power settings matter too. In Windows 11, go to Start > Settings > System > Power & battery and set the Power mode dropdown to Best performance.
A higher-performance mode uses more power, so a laptop's battery drains faster.
Optimize Your Drives
Windows can reorganize your drives to help the PC run more smoothly and boot faster. Type "Defragment and Optimize Drives" in the Start search box and open it.
Select the drive you want to work on.
Select Optimize.
Windows already does this automatically on a schedule, so you rarely need to do it by hand. On an SSD, the tool runs a trim instead of classic defragmentation, which is the right behavior for that type of drive.
Tame the Windows Search Indexer If It Is the Culprit
If Task Manager shows that the Windows Search service (short name wsearch) is driving disk or CPU usage, several steps can calm it down. Start with the least disruptive ones.
First, rebuild the index. On Windows 11, go to Settings > Privacy & security > Searching Windows > Advanced indexing options > Advanced > Rebuild. On Windows 10, go to Settings > Search > Searching Windows > Advanced Search Indexer Settings > Advanced > Rebuild.
A rebuild can take up to 24 hours. Leave the PC on and plugged in so it can finish.
To lighten the load, exclude folders that do not need indexing from the Searching Windows page by selecting Add an excluded folder.
If indexing is stuck or paused, restart the Windows Search service from the Services page in Task Manager or from Services.msc.
On Windows 10, the index database is a file called Windows.edb. If it has grown too large, you can defragment it by running these commands, in order, in a Command Prompt opened as administrator:
- 1.
Sc config wsearch start=disabled - 2.
Net stop wsearch - 3.
EsentUtl.exe /d %AllUsersProfile%\Microsoft\Search\Data\Applications\Windows\Windows.edb - 4.
Sc config wsearch start=delayed-auto - 5.
Net start wsearch
These commands stop the service, defragment its database, set the service back to a delayed start, and turn it on again. Do not leave the service disabled. Windows 11 keeps its index in a file called Windows.db, so on Windows 11, stick to rebuilding the index and excluding folders.
Also watch for anti-virus and "optimize your PC" apps, because some of them disable the Windows Search service.
If search has stopped working, one of those apps may be the reason. Keep the service running.
Isolate a Background Conflict With a Clean Boot
If slow startup continues and you suspect background software is conflicting with Windows, try a clean boot. It starts Windows with only essential drivers and startup programs, which helps confirm whether something you installed is the cause. Sign in with an administrator account first.
Type msconfig in the Search box and open System Configuration.
On the Services tab, select Hide all Microsoft services, select Disable all, and then select Apply.
On the Startup tab, select Open Task Manager, then disable every enabled item. Make a note of what you turned off.
Close Task Manager, select OK, and restart.
If the PC boots quickly this way, a non-Microsoft service or startup item is to blame. Turn them back on in small groups until the slowdown returns to find the one causing it.
To go back to normal, open System Configuration and select Normal startup on the General tab. On the Services tab, clear Hide all Microsoft services and select Enable all. Turn your startup items back on, then restart.
Run a Built-In Troubleshooter
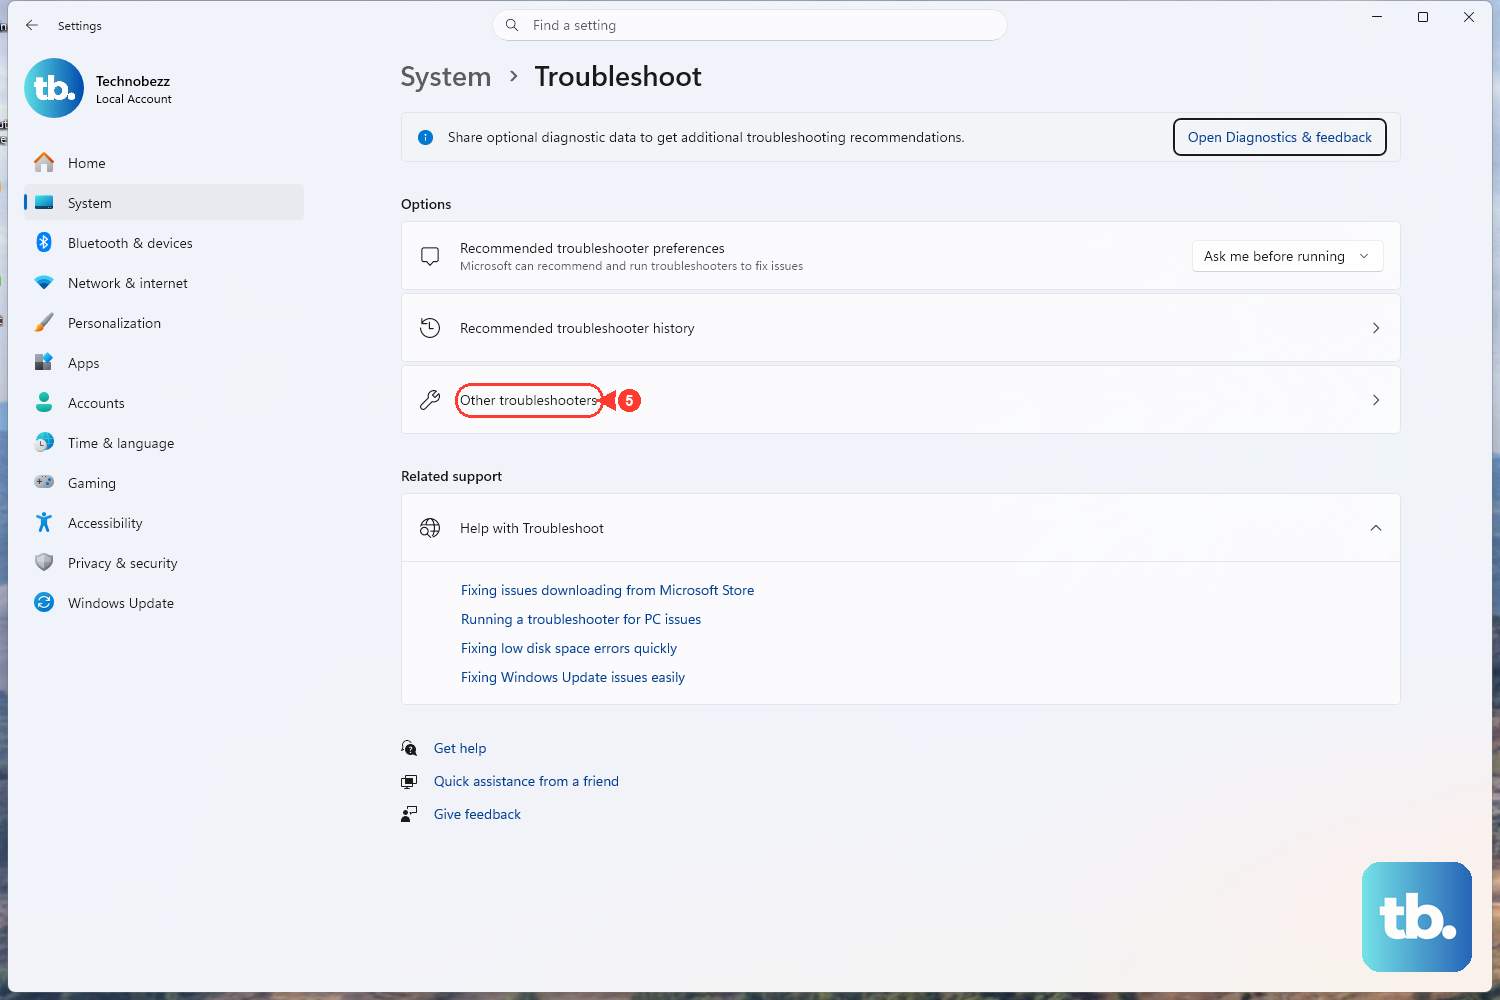
Windows has guided troubleshooters that can find some problems automatically. Go to Start > Settings > System > Troubleshoot > Other troubleshooters and select Run next to the one that matches your problem. On current Windows 11 versions, these open in the Get Help app.
Microsoft has retired the older troubleshooters that ran on the Microsoft Support Diagnostic Tool (MSDT). Several were removed with no replacement, including Power, Search and Indexing, and System Maintenance. For a slow boot, the Task Manager and clean boot steps above usually tell you more. Windows 11 version 22H2 and earlier, and Windows 10, were not affected by the retirement and still have the legacy troubleshooters.
Frequently Asked Questions
Which fix should I try first for a slow Windows 11 startup?
Start with the simplest step: select Start > Power > Restart and reopen only the apps you need. Then disable High impact startup apps in Task Manager (Ctrl + Shift + Esc > Startup apps), because startup programs are among the most common causes of slow boot times.
How do I see what is causing high disk or CPU usage at startup?
Open Task Manager with Ctrl + Shift + Esc and check the Processes, Performance, and Startup apps pages. They show which app or service is using disk, CPU, or memory, so you can target the right fix instead of guessing.
Is it safe to disable startup apps?
Yes. Disabling a startup app only stops it from launching automatically when Windows starts, and you can still open it normally afterward. Use the Startup apps page in Task Manager or Settings > Apps > Startup, and turn anything you miss back on.
What does a clean boot do, and is it reversible?
A clean boot starts Windows with only essential drivers and startup programs so you can track down a background software conflict. You can fully undo it. Open System Configuration (msconfig) and select Normal startup on the General tab. On the Services tab, clear Hide all Microsoft services and select Enable all, then turn your startup items back on and restart.
Should I worry if Windows Search keeps showing high disk usage?
While Windows is building or rebuilding the index, which can take up to 24 hours, search may use more resources than usual. If it does not settle down, rebuild the index (Settings > Privacy & security > Searching Windows > Advanced indexing options > Advanced > Rebuild) and exclude folders you never search. On Windows 10 you can also defragment the index database. Do not disable the Windows Search service permanently, because that stops search from working.