You want to add a second layer of protection to your Microsoft account so that a stolen password alone can't let anyone in. Two-step verification (also called multi-factor authentication) asks for two different proofs of identity: your password, plus a code or approval from your security info. Once it's on, any sign-in on a device that isn't trusted triggers that second prompt.
This works for your personal Microsoft account, the email, phone, or Skype name you use for Outlook.com, Microsoft 365, Xbox, Windows, and OneDrive. The whole setup happens at account.microsoft.com, and the fastest route is a desktop browser paired with the Microsoft Authenticator app on your phone.
Before you flip the switch, know one thing: Microsoft strongly recommends having three pieces of security info on the account first, just in case you lose access to one. That matters because turning two-step verification back off later requires at least two contact methods for recovery. We'll set that up as we go.
Add Your Security Info First
You need at least one working piece of security info before setup will complete, and ideally three. Security info can be an email address you can access, an authenticator app, or a passkey.
Sign in to account.microsoft.com/security. Select Manage how I sign in. Then choose Add a new way to sign in or verify and pick a method.
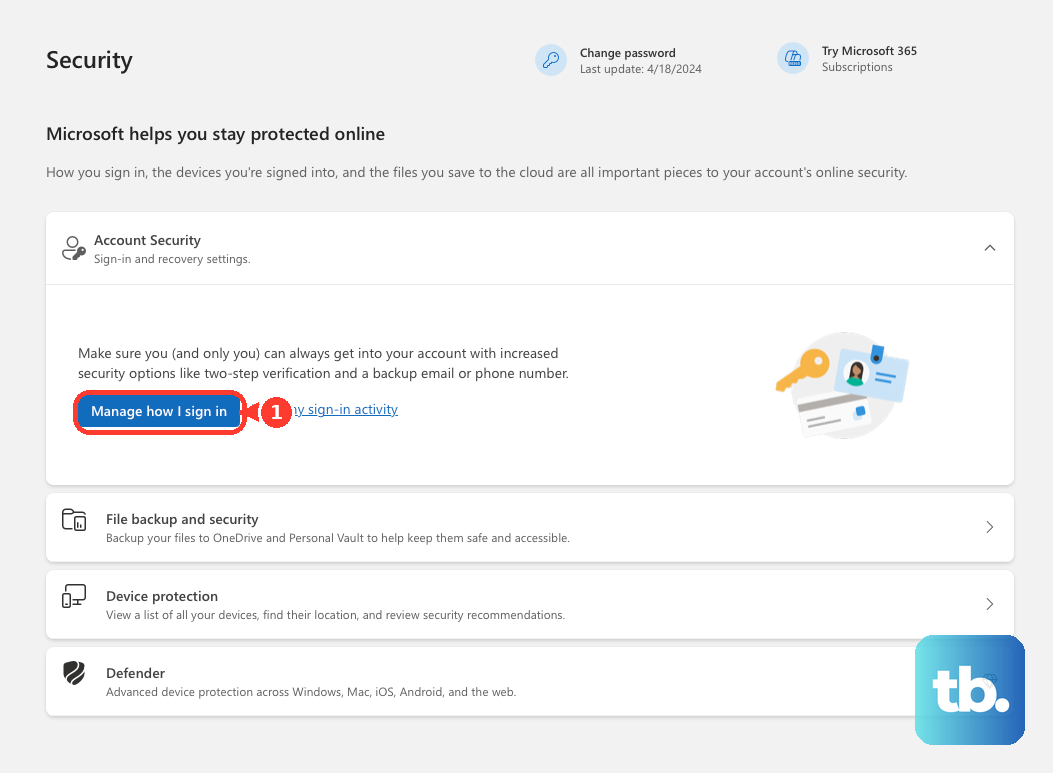
For a personal account you'll see options for Face, Fingerprint, PIN, or Security Key (a passkey), an email address that receives security codes, and an authenticator app like Microsoft Authenticator. If you choose email, enter the address (it doesn't have to be your own, you just need to be able to open it). Then type the security code sent to it and select Next to confirm. You can add up to 10 different verification methods.
A quick heads-up on what to skip: Microsoft is phasing out SMS as an authentication and recovery method for personal accounts, and you can no longer add a phone number as a new method. VOIP numbers are also rejected outright. Lean on an authenticator app, email, or passkey instead.
Turn On Two-Step Verification
With your security info in place, the switch is two clicks away. This is the primary, official flow.
Go to account.microsoft.com/security and sign in. Select Manage how I sign in to show the ways you can prove who you are. Under Additional security and Two-step verification, choose Turn on. Follow the on-screen instructions.
As part of setup you'll be given a QR code to scan with your device, which confirms you physically have it.
If your account still shows the older interface, the same area lives under Security basics > Advanced security options, with a Turn on control for Two-step verification followed by Next. You can also reach this settings page directly at account.live.com/proofs/manage. All three paths land in the same place.
Set Up the Microsoft Authenticator App
The authenticator app is the recommended verification method: it generates a fresh code every 30 seconds and works without SMS. Install Microsoft Authenticator on your iPhone or Android phone first, and make sure its camera is available.
On a computer, go to account.microsoft.com/security and sign in. Select Manage how I sign in. In the Two-step verification section, choose On, then follow the prompts. A QR code appears.
On the phone, open the Microsoft Authenticator app. Tap the plus / Add icon. Choose Personal account. Tap Scan a QR Code.
Point the camera at the code on your computer screen. If the camera can't scan, click I can't scan the bar code on the PC. Tap Enter code manually in the app, then type the code shown.
The app then starts generating verification codes that refresh every 30 seconds. Because codes expire that fast, enter the current one quickly; an old code will fail.
Generate a Recovery Code
Do this immediately after enabling two-step verification. A recovery code is your last-resort way back in if you lose your password and your security info at the same time.
Go to account.live.com/proofs/manage/additional and sign in. Scroll down to the Recovery code section. Select Generate a new code. Print the code and keep it somewhere safe, not on a device you use to sign in to the account.
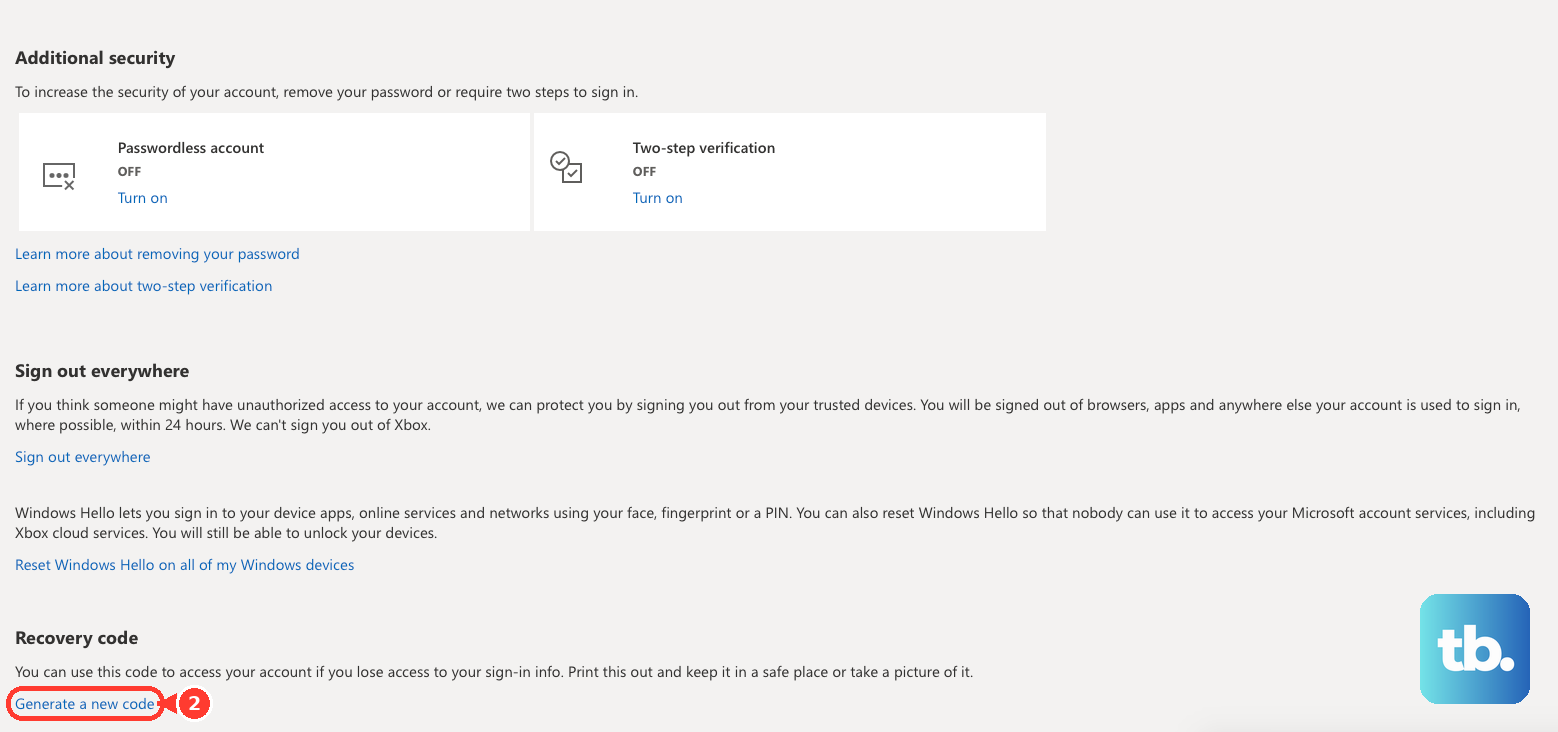
Treat this code carefully. As soon as you generate a new one, any previous code stops working, and you cannot retrieve or download an existing code later. The only copy is the one you save now.
Add a Passkey for Phishing-Resistant Sign-In
A passkey lets you verify with your face, fingerprint, PIN, or a security key, and Microsoft describes passkeys as secure, phishing-resistant replacements for your password. It counts as another piece of security info.
Go to account.live.com/proofs/manage and sign in. Select Add a new way to sign in or verify. Next, select Face, Fingerprint, PIN, or Security Key.
Choose where to save the passkey: a Windows device (Windows Hello), a phone or tablet (iPhone, iPad, or Android, which may need a QR scan or Microsoft Authenticator), a physical security key, or a password manager such as Microsoft Password Manager, Google Password Manager, or Apple iCloud Keychain. Complete the save with biometric or PIN verification at the chosen location.
Two edge cases to expect: the Windows Hello option may not appear if you've already saved a passkey to a synced credential manager, and saving a passkey to a phone may require Bluetooth pairing.
Reach the Settings from Outlook.com Instead
If you live in Outlook.com, you can get to the same controls without typing the account URL.
Sign in at Outlook.com, then select the gear icon. Select Options > Account details (you may be asked to sign in again). On the account.live.com page, select Security & Privacy.
Select More Security Settings and scroll down. Select Set up two-step verification. Confirm your identity via email, phone, or the Microsoft account app.
Handle Older Apps with an App Password
Some older apps and devices can't process a security code at sign-in. For those, you create an app-specific password, which is only available once two-step verification is on.
In the Outlook app's case, open Security & Privacy > More Security Settings. Scroll down and create a new password. Use that generated password to sign in to the app. Each app password is used in place of your normal password plus code for that single app.
If a Verification Code Doesn't Arrive
Codes can stall for ordinary reasons. Work through these before assuming something's broken.
Check your junk email folder for a message from a Microsoft account. Try switching between Wi-Fi and cellular data on your phone, or connect to a different Wi-Fi network if you can. Wait, because sometimes a single day is enough to clear a temporary block.
Don't make lots of repeated attempts, because that can reset any time lock and make the wait longer. If you're blocked receiving a code one way, fall back to an alternate email connected to the account. Or use Microsoft's sign-in helper troubleshooter.
Frequently Asked Questions
Why does Microsoft want me to have three pieces of security info?
If you lose access to one method, the spares keep you from getting locked out. It's also practical: turning two-step verification back off requires at least two contact methods on the account for password recovery, so trimming down to one can block you from disabling it.
Can I still use my phone number for codes?
Plan against it. Microsoft is phasing out SMS as an authentication and recovery method for personal accounts, and you can no longer add a phone number as a new method. VOIP numbers can't be added at all. Use an authenticator app, an email address, or a passkey instead.
What happens if I lose both my password and my security info?
With two-step verification on, regaining access can take up to 30 days, and in some cases you could be permanently locked out. That's exactly why you should generate and safely store a recovery code right after enabling it, and keep three verification methods on the account.
Will I have to enter a code every single time I sign in?
No. Once two-step verification is on, you get a code or approval prompt on devices that aren't trusted. Trusted devices skip the prompt on later sign-ins.
Can I get my old recovery code back if I misplace it?
No. You cannot retrieve or download an existing recovery code later, and generating a new one immediately invalidates any previous code. Keep the printed copy off any device you use to sign in.
My account looks different from these steps. Am I in the wrong place?
Probably not. The current support pages say Manage how I sign in, but you may still see the older Advanced security options label, or reach the same settings at account.live.com/proofs/manage. They all lead to the same controls. Note that work or school accounts use a separate flow at mysignins.microsoft.com; don't mix that with the personal account.microsoft.com flow.