To operate a MacBook Air, open the lid, complete Setup Assistant, then use the trackpad to select items, the Dock to open apps, and Finder to manage files. Press Command + Space to find an app or file, and open the Apple menu > System Settings to adjust your Mac.
The settings paths below use macOS 27 on compatible Apple silicon MacBook Air models. If your Mac runs an earlier release, some labels differ; charging connections also depend on your model.
The short version
- First setup: Follow Setup Assistant to connect to Wi-Fi and create your Mac login.
- Basic controls: Click to select, click with two fingers for extra options, and scroll with two fingers.
- Apps and files: Open apps from the Dock or Spotlight, and browse your folders in Finder.
- Everyday protection: Keep macOS updated and set up Time Machine to back up your files.
| Place | What you use it for | How to open it |
|---|---|---|
| Dock | Opening apps | Click an app’s icon |
| Spotlight | Finding apps and files | Press Command + Space |
| Finder | Browsing and organizing files | Click Finder in the Dock |
| System Settings | Changing your Mac’s settings | Open the Apple menu > System Settings |
| Control Center | Adjusting sound, brightness, and connections | Click Control Center in the menu bar |
| App Store | Installing and updating apps | Find App Store using Spotlight |
Turn on your MacBook Air and finish setup
Connect your charging cable to a compatible power adapter and an outlet, then connect it to the Mac. On an M5 MacBook Air, you can use MagSafe 3 or either Thunderbolt USB-C port; connections vary on older models. The MagSafe indicator is amber while charging and green when charged.
Open the lid to start the Mac, or press the Touch ID/power button. Follow Setup Assistant to choose your language and region, connect to Wi-Fi, and select a setup method. Create your local user account and password, then complete the Apple Account, accessibility, Siri, and Touch ID options.
Your local login password signs you into the Mac, while your Apple Account gives you access to services such as iCloud. After a restart, enter your local password before using Touch ID.
To set up with a nearby iPhone or iPad, choose Set up with iPhone or iPad, then click Continue. Unlock the device, tap Continue, authenticate, and scan the pattern on the Mac, or choose Authenticate Manually. Create your local Mac password and finish setup. This option requires macOS 15.4 or later and iOS or iPadOS 18.4 or later, with Wi-Fi and Bluetooth enabled.
To transfer information from another Mac or a Time Machine backup, use Migration Assistant during setup. You can also open it later by pressing Command + Space, typing Migration Assistant, and pressing Return. Choose From a Mac, Time Machine, or startup disk, select your source, and follow the transfer prompts.
Get comfortable with the trackpad and keyboard
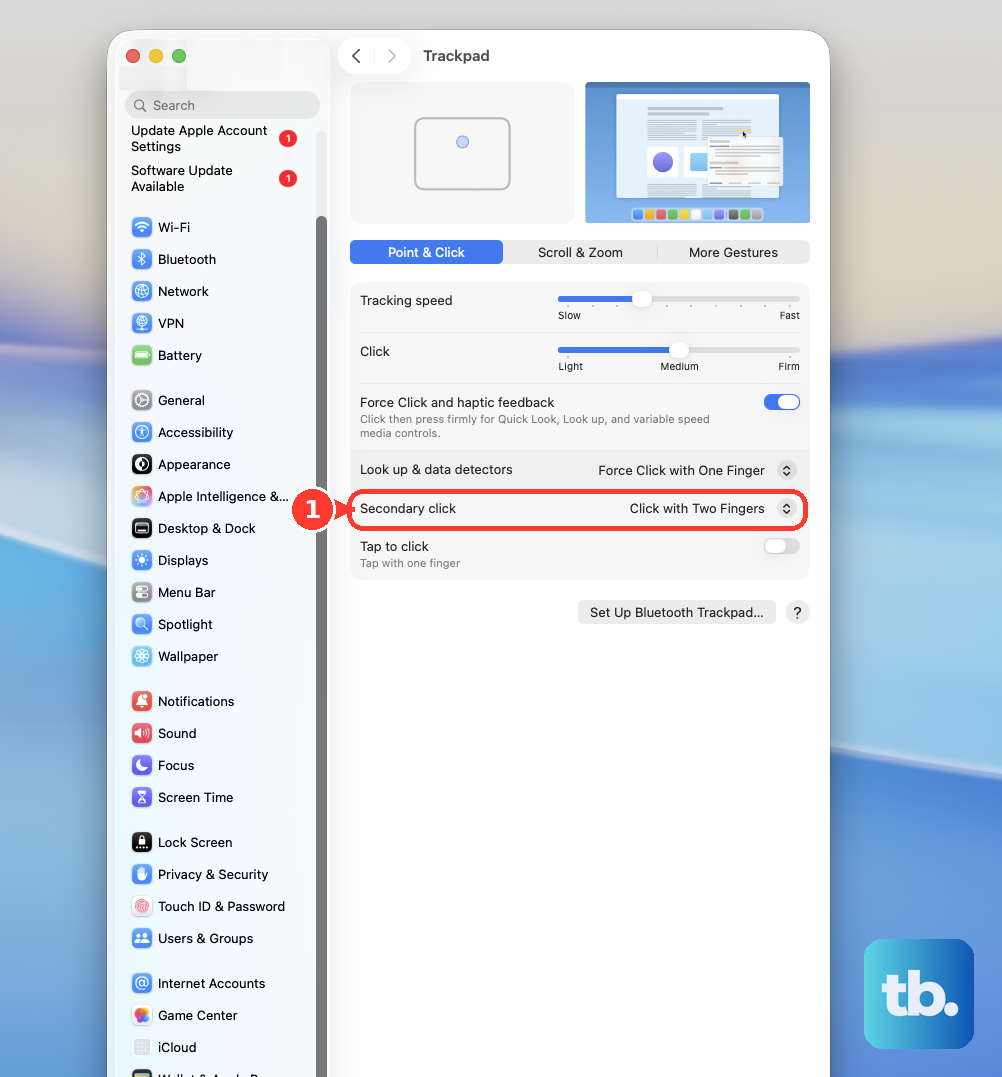
Click the trackpad to select an item, and click with two fingers to open extra options, such as a file’s shortcut menu. Move two fingers across the trackpad to scroll, or pinch them together and apart to zoom. These gestures depend on your trackpad settings.
Open the Apple menu > System Settings > Trackpad to adjust those controls. Under Point & Click, configure Tap to click, Secondary click, and tracking speed. Under Scroll & Zoom, change Natural scrolling if the scrolling direction feels unfamiliar.
For everyday editing, press Command + C to copy, Command + V to paste, and Command + Z to undo. Use Command + A to select everything and Command + S to save in apps that support those commands. Press Command + Tab to switch between apps.
On the current MacBook Air keyboard, F1 and F2 adjust display brightness, while F11 and F12 adjust volume. For keyboard lighting, open System Settings > Keyboard and adjust Keyboard brightness. Older keyboards can have different function-key labels.
Connect to the internet and use Safari
Open the Wi-Fi menu, select your network, and enter its password or complete its sign-in page. For a wired connection, connect your router’s Ethernet cable through a compatible USB-C Ethernet adapter. MacBook Air does not have a built-in Ethernet port.
Open Safari from the Dock, enter a website address or search in the Smart Search field, and press Return. Press Command + T to open another tab or Command + N for a new window. Bookmark a page with Command + D, or choose Share > Add to Reading List to keep it for later reading.
To use your existing email account in Mail, open Mail > Add Account. Select your provider, click Continue, and enter your account credentials. Choose the account features you want to enable and finish the prompts.
Open apps and change everyday settings
Click an app’s icon in the Dock to open it, or press Command + Space, type its name, and press Return. You can also open Apps from the Dock or double-click an app in Finder > Applications. On macOS 26 and later, the app launcher is called Apps.
Drag an app into the Dock to keep its shortcut there, and drag it out to remove that shortcut. Removing a Dock shortcut does not uninstall the app. To change the Dock’s size, position, or hiding behavior, open System Settings > Desktop & Dock.
Click Control Center in the menu bar for brightness, sound, Wi-Fi, and Bluetooth controls. For a setting you cannot find there, open System Settings and use its search field. To quiet notifications temporarily, choose Control Center > Focus > Do Not Disturb.
Install apps by opening App Store, searching for an app, and clicking Get or its price. Complete the installation and Apple Account authentication prompts. For an app downloaded from its developer’s official site, open its disk image or installer package in Downloads and follow the instructions; some installers ask you to drag the app into Applications.
When you no longer need an app, quit it and use its own uninstaller if it provides one. Otherwise, you can remove an app through Finder by opening Applications, moving the app to Trash, and authenticating if requested. Choose Finder > Empty Trash to finish, remembering that this permanently removes everything in Trash. Protected system apps cannot be removed this way, and uninstalling an app does not cancel its subscriptions.
Save and organize your files
Click Finder in the Dock, then select Documents, Downloads, Desktop, or iCloud Drive in its sidebar. Choose icon, list, column, or gallery view to suit what you are browsing. If a location is missing, open Finder > Settings > Sidebar to change which locations appear.
Open TextEdit and create a document by choosing File > New. Choose File > Save, enter a name, pick a location, and click Save. Use that location to return to the document in Finder.
Within Finder, press Shift + Command + N to create a folder. To copy a file, select it, press Command + C, open the destination, and press Command + V. To move it instead, use Option + Command + V at the destination.
Select a file and press Space to preview it with Quick Look. Press Space or Esc to close the preview. Before unplugging removable storage, select its disk in Finder and press Command + E to eject it.
Move unwanted files to Trash by dragging them there or pressing Command + Delete. Before emptying Trash, restore an item by selecting it inside Trash and choosing File > Put Back. Choose Finder > Empty Trash only when you are ready to permanently remove its contents.
Arrange windows and take screenshots
Drag a window’s title bar to move it, and drag an edge to resize it. The red button closes the window, the yellow button minimizes it, and the green button offers full-screen or arrangement options. Closing a window does not necessarily quit its app.
To arrange two apps beside each other, hover over a window’s green button and choose an arrangement under Move & Resize or Fill & Arrange. You can also use two apps in Split View by choosing Full Screen > Left of Screen or Right of Screen, then selecting the second app. Split View requires apps that support it.
Press F3 or Control + Up Arrow to view open windows in Mission Control. To take a screenshot on your Mac, press Shift + Command + 3 for the screen or Shift + Command + 4 to drag a selection.
Press Shift + Command + 5 for graphical screenshot and recording controls, then choose a capture or recording tool. Open Options to choose a save location, timer, or microphone where available. Click Capture for the entire screen or a selected portion, move the pointer to a window and click it to capture that window, or click Record to start a recording. To finish recording, click Stop Recording in the menu bar.
Protect your login and back up your data
To add fingerprint unlocking, open System Settings, click the Touch ID settings in the sidebar, and click Add Fingerprint. Authenticate and follow the fingerprint prompts, then enable the appropriate Use Touch ID options. Set the password delay after sleep under System Settings > Lock Screen > Require password after screen saver begins or display is turned off.
Keep macOS current by opening the Apple menu > System Settings > General > Software Update. Let it check, then select the available update, upgrade, or restart button. Back up your Mac before a major upgrade.
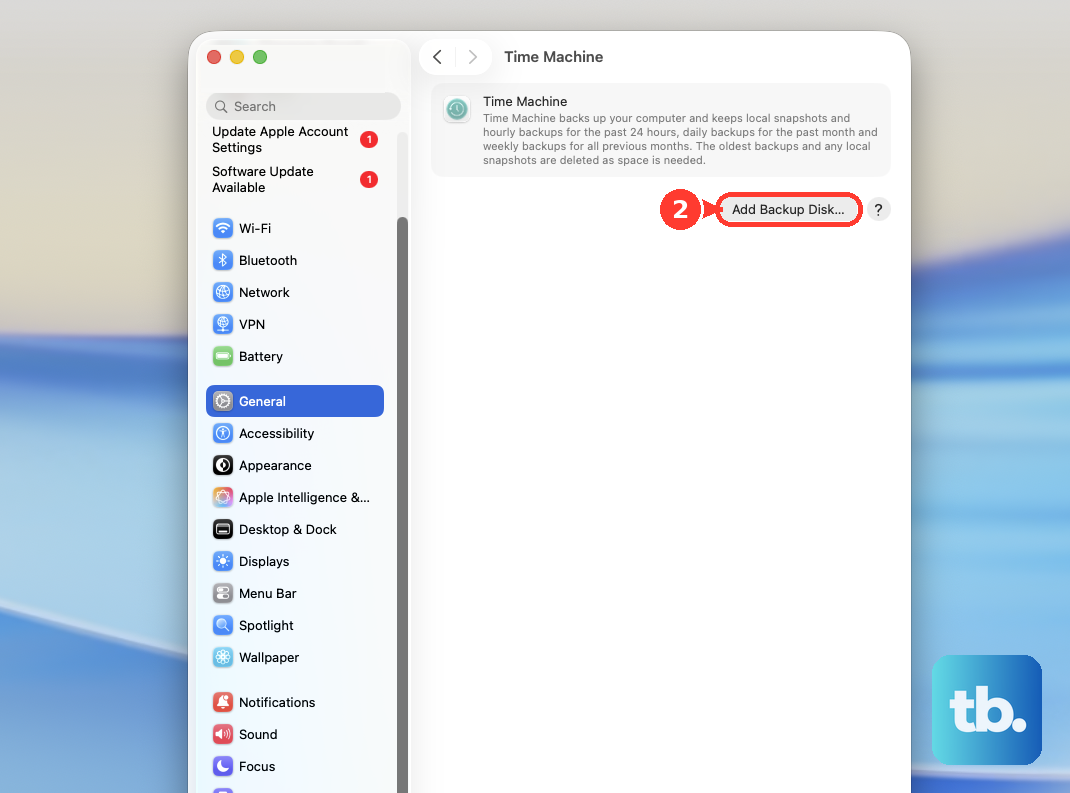
For a Time Machine backup, connect a suitable external backup disk and open System Settings > General > Time Machine. Choose Add Backup Disk, select the disk, and click Set Up Disk. Follow the encryption and erase prompts carefully because setup can erase the selected destination. Backups then run automatically.
You can synchronize files through System Settings > your name > iCloud > Drive by enabling Sync this Mac and clicking Done. Enable Desktop & Documents Folders to synchronize those folders too, provided your iCloud storage has room. Access the synchronized files in Finder under iCloud Drive. iCloud synchronization does not replace a complete Mac backup.
Finish a session or restart your Mac
Quit an app through its named menu > Quit, or press Command + Q. When you are taking a break, close the lid or choose the Apple menu > Sleep. Open the lid, press a key, or click the trackpad to wake the Mac.
To restart your MacBook Air normally, choose the Apple menu > Restart and confirm. To turn it off, choose Shut Down from the same menu and confirm. Before confirming either action, deselect Reopen windows when logging back in if you do not want the previous windows restored.
Fix a frozen app or an unresponsive Mac
If an app stops responding, first try its normal quit command. When that fails, force quit the frozen app by pressing Option + Command + Esc, selecting it, and clicking Force Quit. For an unresponsive Finder, select Finder and click Relaunch.
If quitting apps and restarting normally both fail, hold the Touch ID/power button for up to 10 seconds until the Mac turns off. Press and release it to turn the Mac on again. A forced shutdown can lose unsaved work, so use it only after the normal options fail.
Frequently Asked Questions
How do you transfer files from a Windows PC to a MacBook Air?
Install Apple’s Windows Migration Assistant version matching your Mac’s macOS release on a PC running Windows 10 or later. On the Mac, open Migration Assistant, choose From a Windows PC, and click Continue. Enter the Mac’s displayed code in the PC assistant, select the information to transfer, and follow the account-creation prompts.
How do you connect Bluetooth headphones to a MacBook Air?
Put the headphones in pairing mode, then open System Settings > Bluetooth, select them, and click Connect. Complete any confirmation prompts. To select them for playback, open System Settings > Sound > Output and choose the headphones.
Can you operate a MacBook Air using only the keyboard?
You can navigate the interface by enabling System Settings > Accessibility > Keyboard > Full Keyboard Access. Use Tab and Shift + Tab to move focus, and Space to activate the focused control. Use the arrow keys within groups and press Tab + H for help.
How do you print or save a document as a PDF?
Choose File > Print, select your printer and options, then click Print. An AirPrint printer normally needs to be reachable on the same network. To create a PDF instead, choose the print dialog’s PDF menu > Save as PDF, enter a filename and destination, and click Save.
How do you check what is taking up storage?
Open System Settings > General > Storage to review storage categories and cleanup options. Open a file category with its information button, then select an unwanted file and choose Delete or Show in Finder. You cannot directly delete System Data from that category because macOS manages it.
How do you use the MacBook Air camera?
Open FaceTime, Photo Booth, or another camera app, and the camera activates when needed. For third-party app access, open System Settings > Privacy & Security > Camera and enable the app’s switch. For a website, use Safari > Settings > Websites > Camera.