
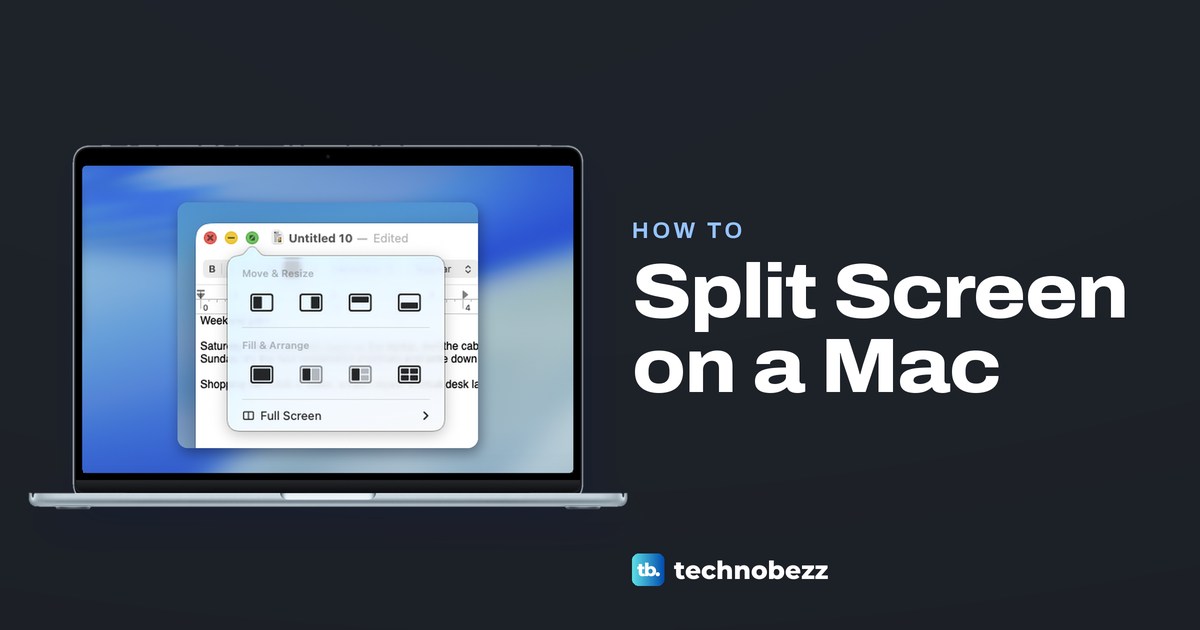
To split screen on a Mac or MacBook with macOS Sequoia 15 or later, hold the pointer over the green button in the top-left corner of a window, choose Full Screen, then Left of Screen or Right of Screen, and click the second window on the other side. That is Split View, two apps sharing the whole screen in a space of their own. On macOS Sonoma 14 or Ventura 13, the menu item is called Tile Window to Left of Screen instead.
To keep the menu bar and Dock, drag a window to the left or right edge instead, and macOS tiles it to that half. Desktop tiling needs macOS Sequoia 15 or later, while Split View is older. We set up both on our MacBook Air with macOS Tahoe 26.5.
The short version
- Split View: on macOS Sequoia or later, hold the pointer over the green button, choose Full Screen, then Left of Screen, and click a second window.
- From the menu bar: choose Window > Full Screen Tile > Left of Screen, the route we used on macOS Tahoe.
- Without full screen: on macOS Sequoia 15 or later, drag a window to the left or right edge of the screen.
- Two windows in one press: Fn + Control + Shift + Left Arrow.
- Leave Split View: press Control + Command + F, or choose Exit Full Screen from the green button.
- An app refuses: Apple's rules for Split View need a window that can be resized.
Split View, tiling or Stage Manager at a glance
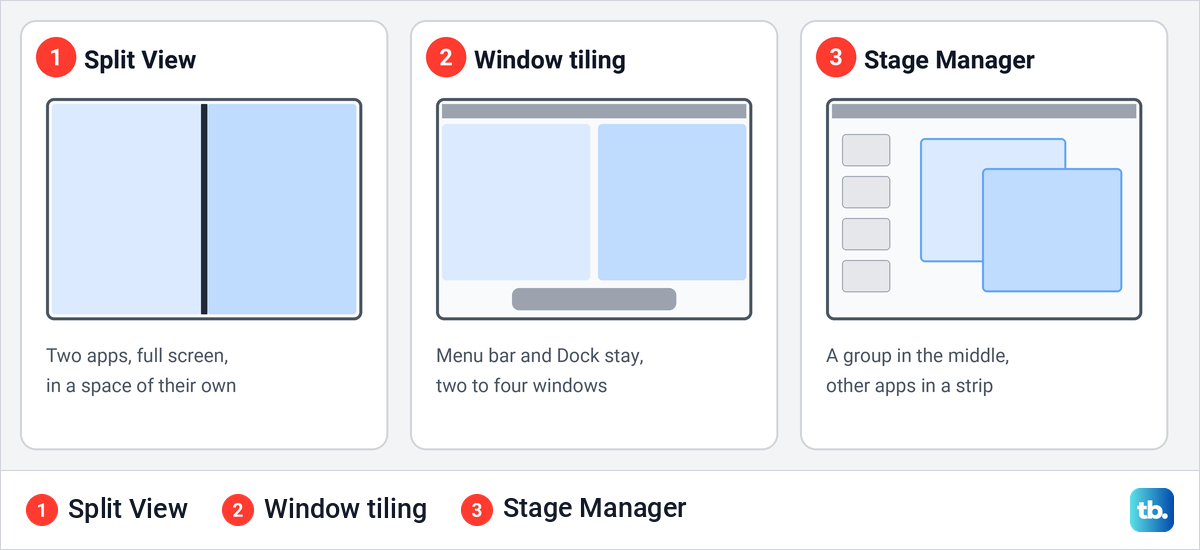
macOS has three built-in ways to put apps side by side, and they behave differently. Split View turns two apps into one full-screen space, tiling arranges windows on your normal desktop, and Stage Manager keeps a group of apps in the middle with the rest in a strip.
| Do this | What you get | macOS |
|---|---|---|
| Hold the pointer over the green button, choose Full Screen > Left of Screen, click a second window | Split View, two apps filling the screen with the menu bar and Dock hidden | Sequoia 15 or later (older versions use another menu name) |
| Window > Full Screen Tile > Left of Screen | The same Split View, started from the menu bar | Sequoia 15 or later |
| Control + Up Arrow, then drag a window onto a full-screen app in the Spaces bar | Split View with an app that is already full screen | Big Sur 11 or later |
| Drag a window to the left or right edge of the screen | A half-screen tile, with the menu bar and Dock still showing | Sequoia 15 or later |
| Fn + Control + Shift + Left Arrow | The active window on the left half, the next one on the right | Sequoia 15 or later |
| Green button > Fill & Arrange | Two, three or four windows arranged in one click | Sequoia 15 or later |
| Hold Option, point at the green button, choose Move Window to Left Side of Screen | One window on half the desktop | Ventura 13 and Sonoma 14 |
| Control Center > Stage Manager | A group of apps in the middle, other apps in a strip on the left | Ventura 13 or later |
| Control + Command + F | The active app leaves full screen and Split View | All recent versions, if the app supports it |
Split View is the one to pick when you want nothing else on screen. Tiling is better when you still need the Dock, the menu bar or a third window, and Stage Manager suits sets of apps you switch between as a group.
Split the screen with Split View
Open both apps first, because the other half of the screen offers windows that are already open. Start them from the Dock, or open apps with Spotlight by pressing Command + Space and typing the name.
Then hold the pointer over the green button in the top-left corner of the first window, without clicking it. On our Mac a menu opened with three parts, Move & Resize, Fill & Arrange and Full Screen, and Apple's steps say to choose Full Screen > Left of Screen or Right of Screen from there.
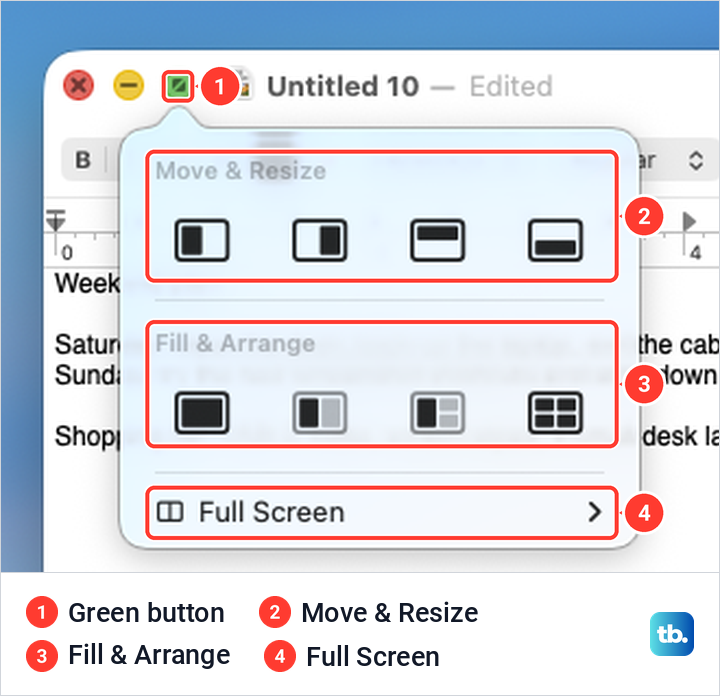
A plain click on the green button does something else. It makes that one app full screen on its own, which our guide to using full screen mode on a Mac covers. The first two parts of the menu tile windows on the desktop instead, and they come up further down.
The menu bar has the same command, and it is the route we took on our MacBook Air with macOS Tahoe 26.5. Click the first window, choose Window in the menu bar, hold the pointer over Full Screen Tile and choose Left of Screen or Right of Screen. The same menu showed Fill and Center with their keyboard shortcuts beside them.
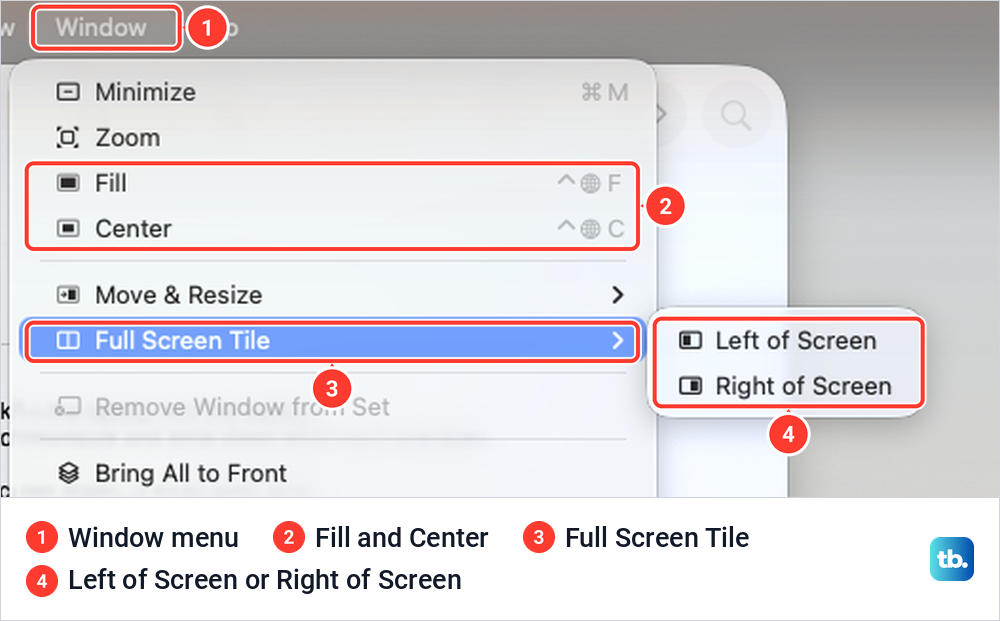
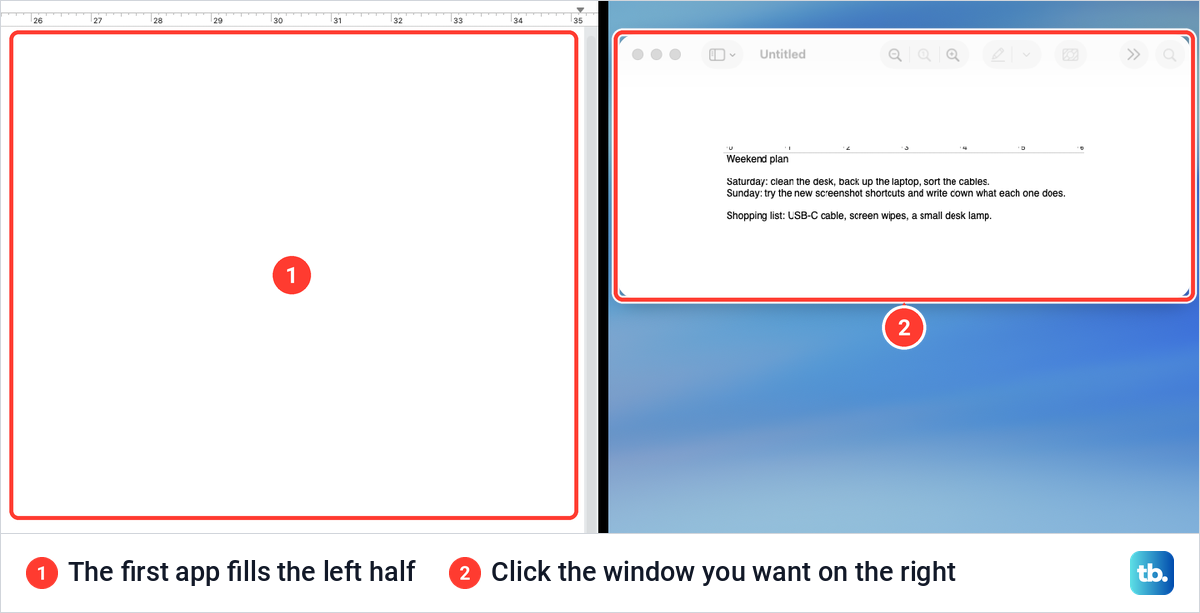
When we chose Left of Screen in TextEdit, TextEdit filled the left half of the screen, and the menu bar was gone from the top. The right half showed our other open window, a Preview document, over the desktop picture. Clicking it completed the pair, and Apple says each Split View is created in a new desktop space.
Resize, swap or replace an app in Split View
Inside Split View, the menu bar and Dock stay hidden until you need them. Apple says to move the pointer to the top of the screen to show the menu bar, or to where the Dock sits to show the Dock. If you have turned off hiding the menu bar in full screen, it stays on screen.
The two halves do not have to be equal. Drag the separator bar in the middle left or right to make one side bigger, and double-click it to go back to the original sizes. To swap sides, drag a window by its title and toolbar to the other half, as Apple's steps describe.
To put a different app on one side, click that side's window, hold the pointer over its green button and choose Replace Tiled Window, then click the window you want instead. Apple says clicking the desktop cancels the swap and keeps the current window. If one side freezes and stops responding, force quit the frozen app to get it off the screen.
Add an app to Split View from Mission Control
If one app is already full screen, you can add a partner to it from Mission Control. Press Control + Up Arrow, swipe up with three or four fingers, or press the Mission Control key. Apple's steps then have you drag a window onto the full-screen app's thumbnail in the Spaces bar along the top, and click the Split View thumbnail that results.
You can also drag one app thumbnail onto another in the Spaces bar. Each Split View stays there as its own space, and Apple says you can move between spaces with Control + Left Arrow or Control + Right Arrow, or by swiping left or right with three or four fingers. On a Magic Mouse, swipe with two fingers.
How to leave Split View
There are four ways out. The quickest is Control + Command + F, which Apple lists as the shortcut to use or stop using an app in full screen. On our Mac it took the active window out of Split View at once.
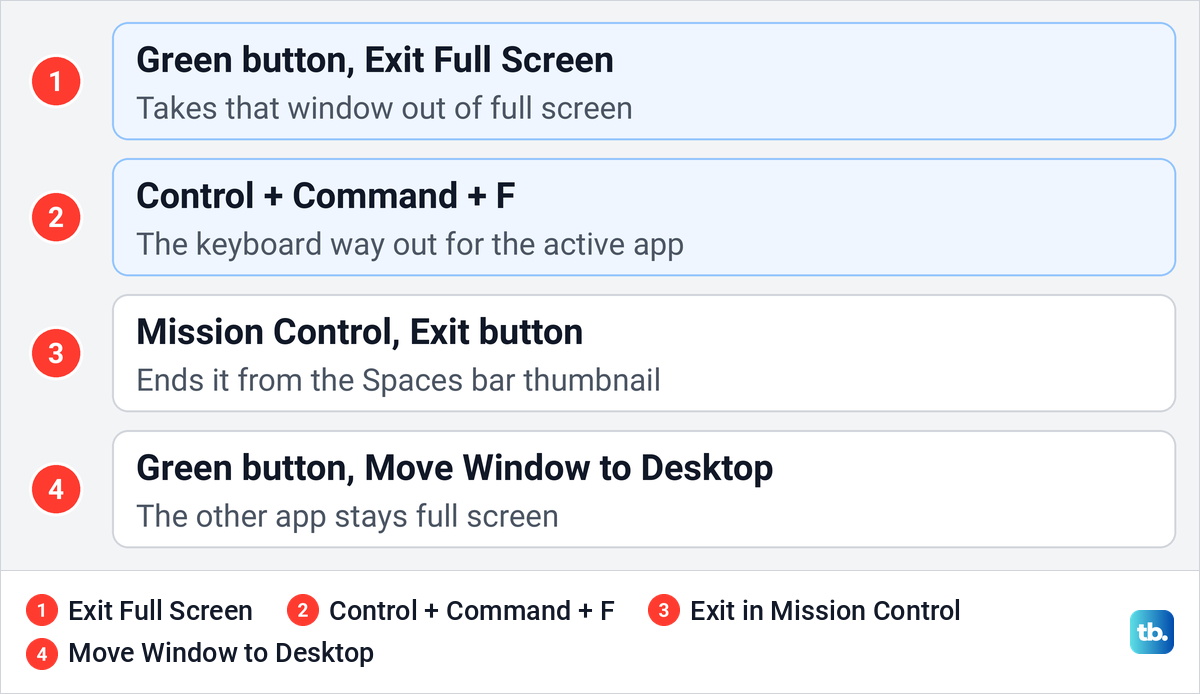
With the mouse, move the pointer to the top of the screen, hold it over the green button of either window and choose Exit Full Screen. In Mission Control, Apple says you can point at the Split View thumbnail in the Spaces bar and click the Exit button that appears. None of Apple's steps for leaving full screen use the Esc key, so reach for the shortcut above instead.
The fourth way keeps one app full screen. Hold the pointer over the green button of the app you want back on the desktop and choose Move Window to Desktop. Apple says the other app then stays full screen in its own space, and you get back to it from the Spaces bar in Mission Control. Apple's guide shows every full-screen app as a thumbnail in that bar, so look there whenever an app has gone from view.
Tile two windows side by side without full screen
Window tiling keeps you on the normal desktop, with the menu bar and Dock where they were. It arrived in macOS Sequoia 15 and is in every version since. Drag a window by its title bar to the left or right edge of the screen, let go when the highlighted area appears, and the window snaps into that half.
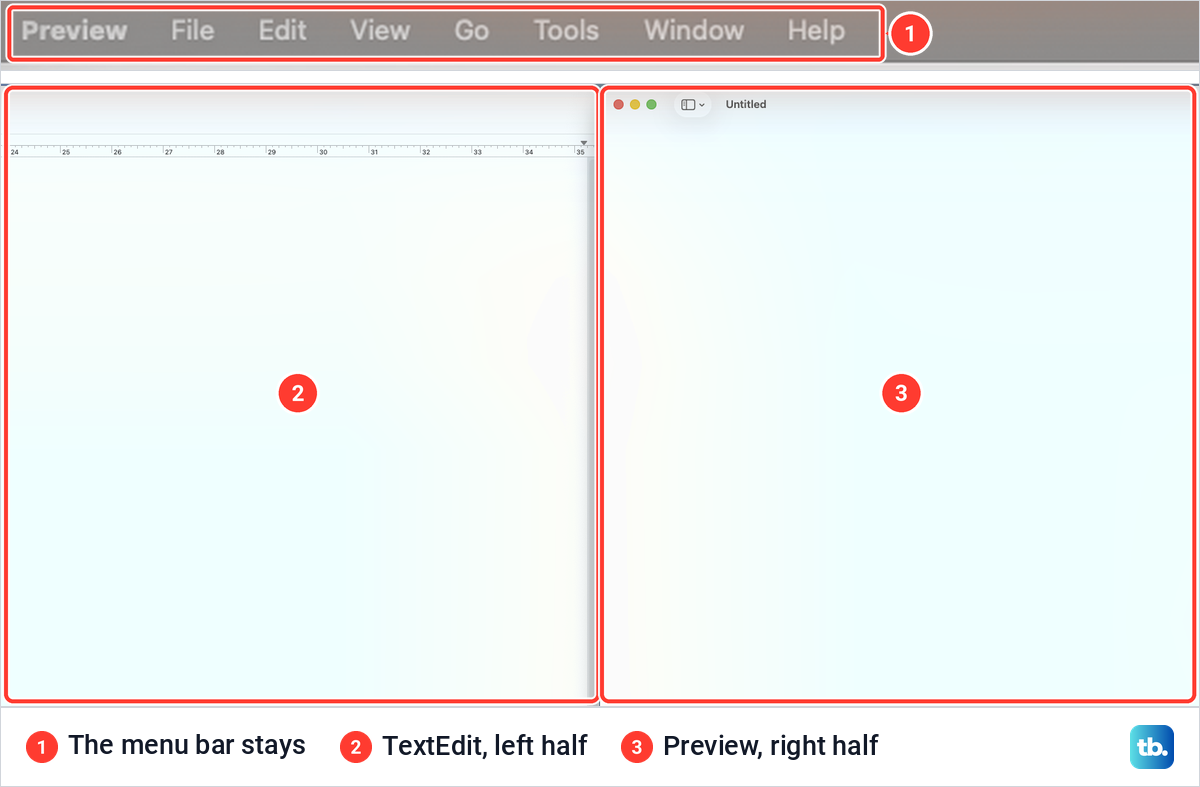
On our MacBook Air with macOS Tahoe 26.5, dragging TextEdit's title bar to the left edge filled the left half, and dragging a Preview window to the right edge filled the right half. The menu bar stayed in place above both, which is the first difference you notice after Split View.
Apple's tiling page also lists the corners, for a window a quarter of the screen in size, and the menu bar, where a dropped window fills the desktop. Hold Option while you drag and the window tiles faster. Drag a window all the way through the top edge, though, and Mission Control opens instead.
If that top-edge drag gets in your way, Apple's fix is to turn off Drag windows to top of screen to enter Mission Control in Desktop & Dock settings. If dragging does nothing anywhere on your Mac, not just near the edges, start with our guide to restore drag and drop on a Mac.
Arrange three or four windows with Fill and Arrange
The green button handles more than two windows. On our Mac its Fill & Arrange row showed four layouts: one window filling the desktop, two side by side, one half with two quarters, and four quarters. Apple says holding Option while the menu is open shows more layouts, including one that centers the window.
Click the window you want in the biggest spot first, then pick the layout. Apple's layouts put the active window in the first position and fill the others with the next windows in line. The row above, Move & Resize, moves only the active window, to the left, right, top or bottom half.
The same layouts sit in the menu bar under Window > Move & Resize, grouped as Halves, Quarters and Arrange. To make one window fill the screen without going full screen, choose Fill on the Window menu or press Fn + Control + F, the same move we cover in how to maximize a window using your keyboard.
Apple adds that a double-click on a window's title bar can fill the screen too, once the title bar double-click setting in Desktop & Dock is set to Fill. On our Mac that setting, Window title bar double-click action, was on Zoom, so check it first if a double-click does something else.
Keyboard shortcuts for split screen on a Mac
Every tiling shortcut starts with Fn + Control. On newer Apple keyboards the Fn key is also the Globe key, and System Settings on our Mac printed it as a globe symbol next to the Control symbol. Add an arrow key to move the active window to that half of the desktop.
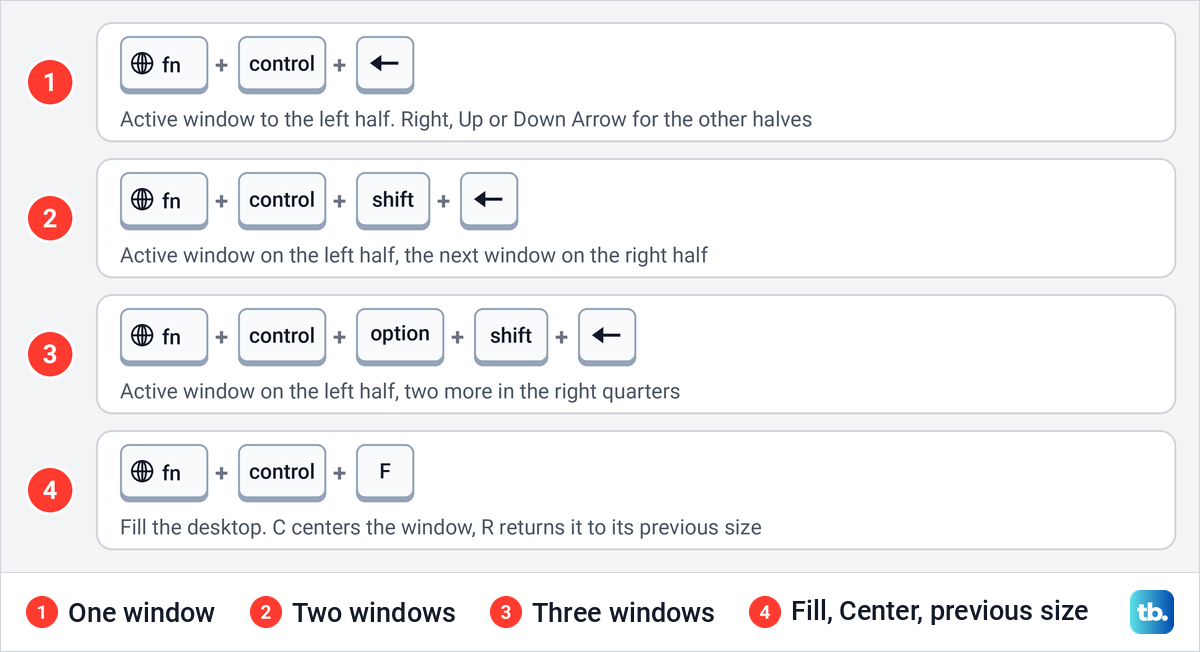
Add Shift to arrange two windows at once, so Fn + Control + Shift + Left Arrow puts the active window on the left half and the next window on the right half. Add Option as well for three windows, one half and two quarters. Fn + Control + F fills the desktop, with C to center the window and R to return it to its size before tiling.
You can see and change these keys in System Settings > Keyboard > Keyboard Shortcuts > Windows. On our Mac that list showed Fill, Center, Return to Previous Size and the four halves, each with a tick box, plus Quarters, Arrange and Full Screen Tile groups. The pane says to double-click a key combination and type the new keys to change it.
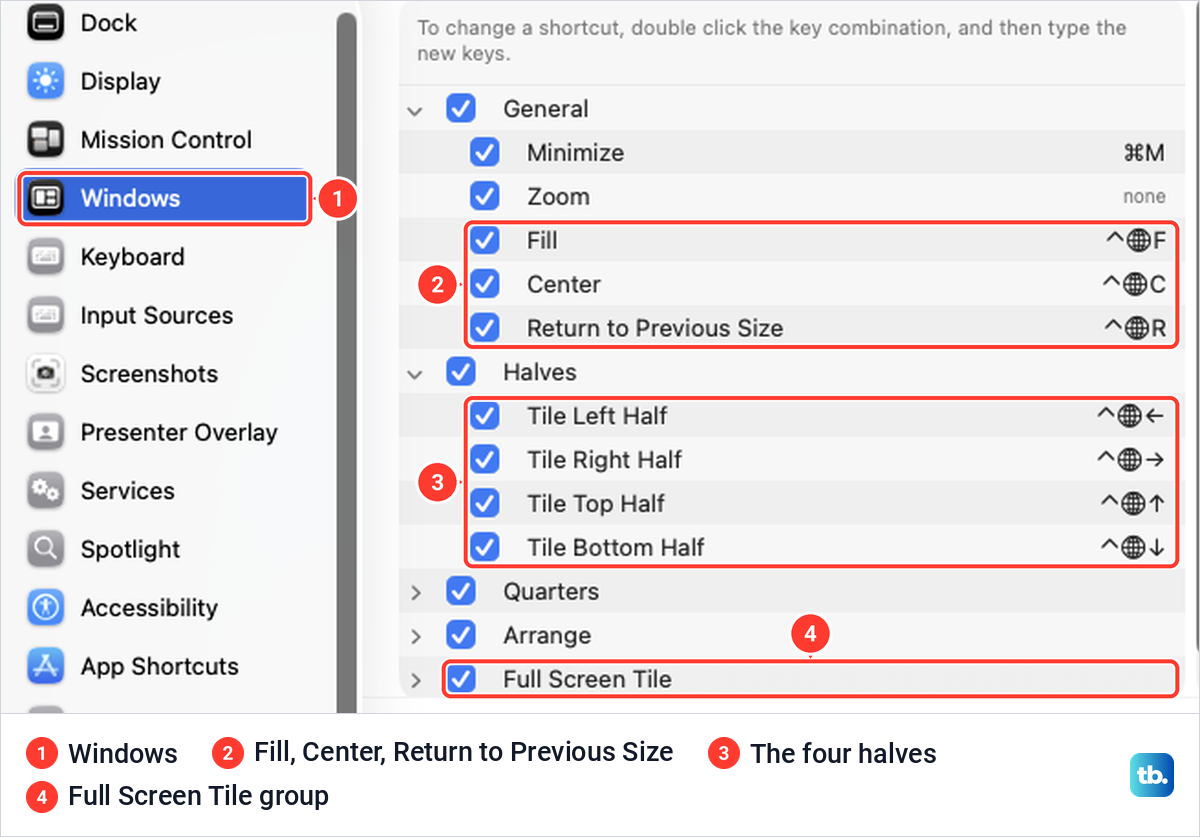
Split View itself has no shortcut in Apple's table, where Left of Screen and Right of Screen show none. Apple's instructions for app shortcuts let you add one to an existing menu command, and Window > Full Screen Tile > Left of Screen is one.
Select App Shortcuts in the same pane, click the add button and choose All Applications from the Application menu. In the Menu title field, type Window->Full Screen Tile->Left of Screen, with -> between menu levels. Then click in the Keyboard shortcut field, press a key combination that nothing else uses and click Done.
If an Fn shortcut does nothing in one app, use the same layout from the Window menu, since users report that some apps treat Fn with an arrow key as a shortcut of their own. If no shortcut works in any app, start with our Mac keyboard and touchpad fixes.
Turn tiling on or off and remove the gaps
The tiling switches live in System Settings > Desktop & Dock, under Windows near the bottom of the page. On macOS Tahoe 26.5 there are four: Drag windows to left or right edge of screen to tile, Drag windows to menu bar to fill screen, Hold ⌥ key while dragging windows to tile and Tiled windows have margins. On macOS Sequoia 15, Apple names the first one Drag windows to screen edges to tile.
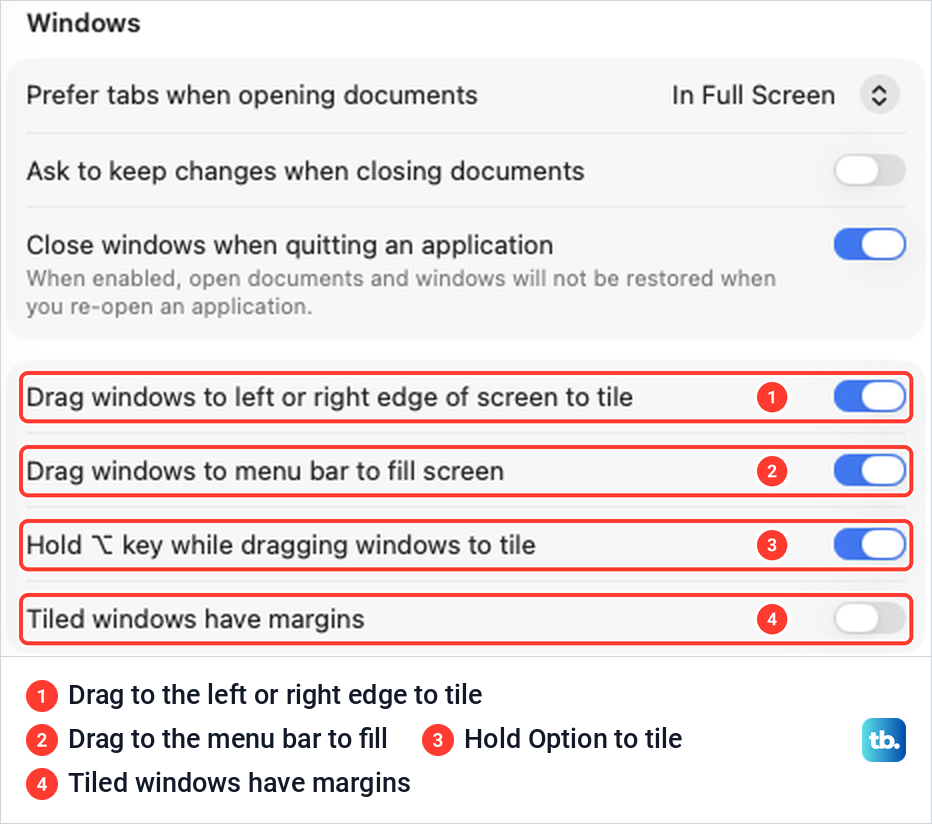
The gaps around tiled windows come from Tiled windows have margins, which Apple describes as leaving some space around each tiled window. It was off on our Mac, and our two tiles met in the middle with no gap. Turn it on for a little space between windows, or off for edge-to-edge tiles.
To stop windows snapping when you drag them, turn off the first three switches. The keyboard shortcuts are a separate list, in Keyboard Shortcuts > Windows, with a tick box beside each one.
Use Stage Manager for groups of apps
Stage Manager is a different idea. Apple describes it as keeping the app you are working with in the center while your recent apps line up along the left side of the screen, and you can group several apps so they open together. It is the better pick when you switch between sets of apps rather than working in two at once.
Turn it on from Control Center in the menu bar, or with the Stage Manager switch in System Settings > Desktop & Dock, under Desktop & Stage Manager. On our Mac the switch was off, with the description that it "arranges your recent windows into a single strip for reduced clutter and quick access" under it.
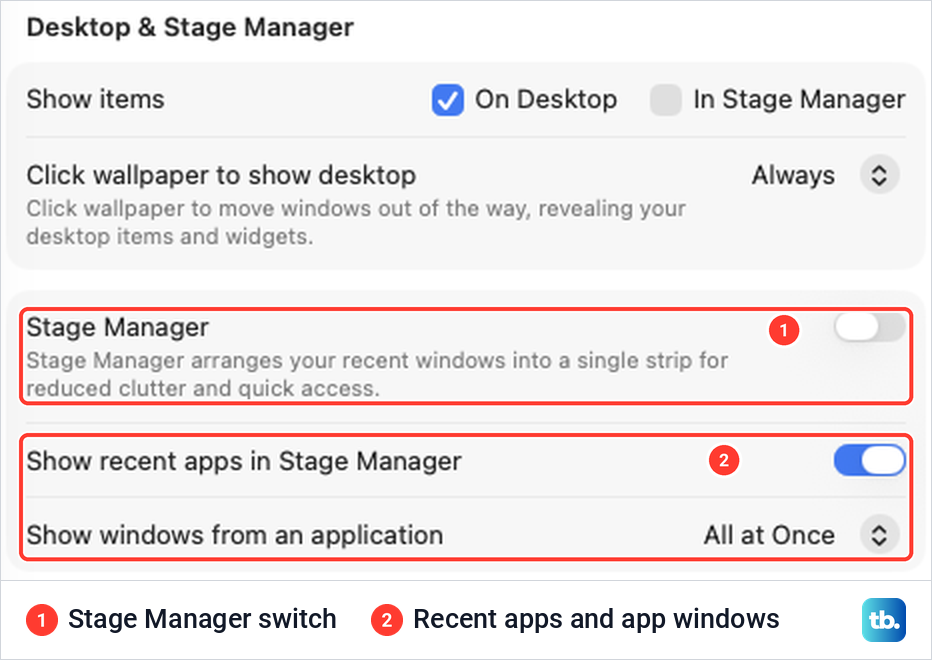
To group apps, drag an app from the strip on the left into the middle of the screen, and drag it back to the strip to take it out of the group. If the switch is dimmed, Apple says to turn on Displays have separate Spaces in the Mission Control part of Desktop & Dock. For the strip, desktop items and the other options, see how to use Stage Manager on a Mac.
Split screen on a second display
Split View works on an external display too, with one condition. Apple says Displays have separate Spaces must be on, in System Settings > Desktop & Dock under Mission Control, to use Split View on your other displays.
Split screen on an older Mac
Split View has been on the Mac since OS X El Capitan, but the menu names have changed along the way. On macOS Sonoma 14 and Ventura 13, Apple's instructions say to point at the green button and choose Tile Window to Left of Screen or Tile Window to Right of Screen, then click the second app. From macOS Sequoia 15 the same choice sits under Full Screen.
Desktop tiling is not there before Sequoia, but Ventura and Sonoma have a built-in half-screen option. Hold Option, point at the green button and choose Move Window to Left Side of Screen or Move Window to Right Side of Screen, and the window fills that half with the menu bar and Dock still showing. To put it back, hold Option over the green button again and choose Revert.
Window tiling needs a Mac that runs macOS Sequoia. Apple's list starts at the MacBook Air (Retina, 13-inch, 2020), the MacBook Pro (15-inch, 2018) and the 13-inch 2018 model with four Thunderbolt 3 ports, the Mac mini (2018), the iMac (Retina 4K, 21.5-inch, 2019), the iMac Pro (2017), the Mac Pro (2019) and the Mac Studio (2022).
Why an app will not split or tile
When an app will not join Split View, the reason is usually the window itself. Apple's developer documentation says a window can take part as long as it can be resized and is a normal app window, not a floating tool panel or a sheet, the kind of dialog attached to another window. An app can also opt out, and macOS may refuse a window that needs more room than its half of the screen.
Some apps support full screen only in part. Apple lists Control + Command + F as working "if supported by the app", and its window guide notes that some windows cannot be moved at all. If such a window already fits within one half of the screen, tile the other app into the free half. Otherwise, use a different window that can be resized.
If dragging to the edge does nothing, check the tiling switches in Desktop & Dock, since tiling has to be on and needs macOS Sequoia 15 or later. If the green button's menu looks different from our picture, let go of Option, because holding it swaps in extra layouts. On a second display, Split View also needs Displays have separate Spaces.
How we tested this guide
We tested this on a MacBook Air with macOS Tahoe 26.5, entering Split View from the Window menu and tiling two windows.
Frequently Asked Questions
How do I get out of split screen on a Mac?
Press Control + Command + F, which took our window out of Split View at once. You can also hold the pointer over the green button and choose Exit Full Screen, or click the Exit button on the Split View thumbnail in Mission Control.
Can I split the screen on a Mac without full screen?
Yes. On macOS Sequoia 15 or later, drag a window to the left or right edge of the screen, or press Fn + Control + Shift + Left Arrow, and the menu bar and Dock stay visible. On Ventura or Sonoma, hold Option over the green button and choose Move Window to Left Side of Screen.
What is the keyboard shortcut for split screen on a Mac?
Fn + Control + Shift + Left Arrow puts the active window on the left half and the next window on the right half of the desktop. Split View has no shortcut of its own in Apple's list, but Apple's app shortcut settings let you add one for Window > Full Screen Tile > Left of Screen.
Can I split my Mac screen into three or four windows?
Split View holds two apps. For three or four windows, use the Fill & Arrange layouts on the green button or Window > Move & Resize, which tile them on the desktop in macOS Sequoia 15 or later.
Why can't I put an app in Split View?
Apple's rules need a normal app window that can be resized, not a floating tool panel or a dialog attached to another window, and an app can opt out. On a second display, also turn on Displays have separate Spaces in Desktop & Dock.
How do I remove the gaps between tiled windows?
Turn off Tiled windows have margins in System Settings > Desktop & Dock, under Windows. With it off on our Mac, two tiled windows met with no gap.
Does split screen work on a MacBook Air?
Yes. We set up Split View and desktop tiling on our MacBook Air with macOS Tahoe 26.5, and tiling needs macOS Sequoia 15 or later, which Apple lists for MacBook Air models from the 2020 Retina model on.