A message just landed in your Outlook inbox pretending to be your bank, your IT team, or a service you use, and it wants your password. You want it gone, and you want Microsoft to know about it so the next one gets caught.
Reporting a phishing email in Outlook takes seconds once you know where the button lives. The catch is that the button looks different (and sometimes does not exist) depending on which Outlook you are using: new Outlook for Windows, Outlook on the web, the mobile apps, or the older classic desktop clients.
This guide covers every surface, quickest path first, using the steps Microsoft documents. Pick the section that matches your Outlook and you will be done in well under a minute.
First, Know the Difference Between Phishing, Junk, and Not Junk
Outlook gives you three reporting actions, and they do different things. Choosing the right one matters because the outcomes are not the same.
Report phishing is for a malicious message impersonating a brand, person, or service to steal your credentials. A phishing report deletes the message and sends a copy to Microsoft.
Report junk is for spam: unwanted but non-malicious marketing or newsletters. A junk report moves the message to the Junk Email folder and automatically adds the sender to your Blocked Senders list.
Report not junk is for a legitimate message that was wrongly filtered into Junk (a false positive). It moves the message back to your Inbox and helps the filters learn.
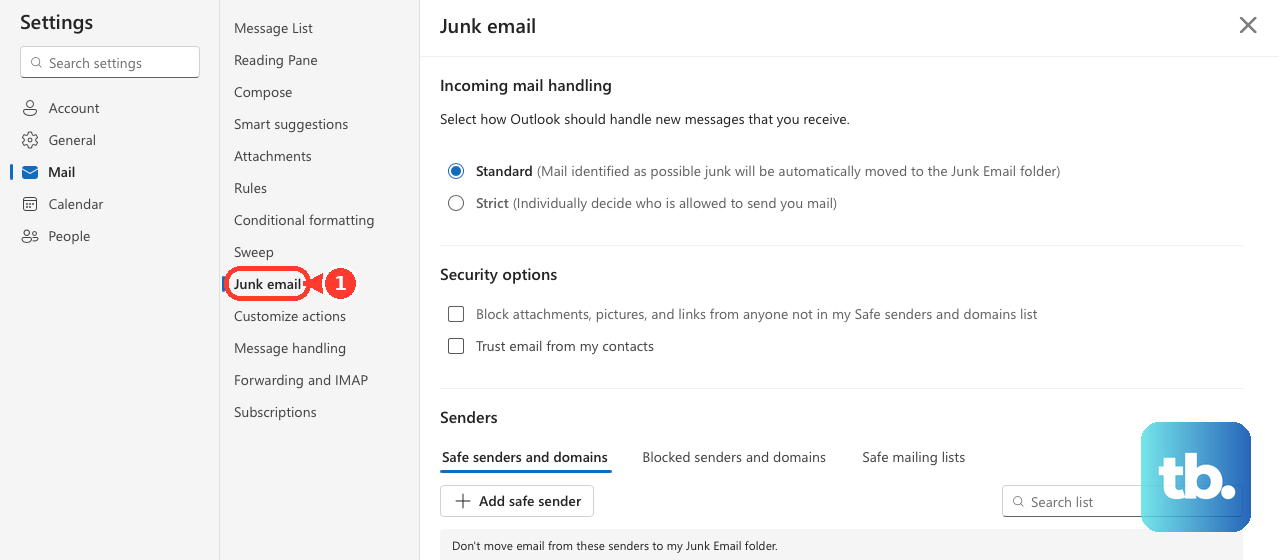
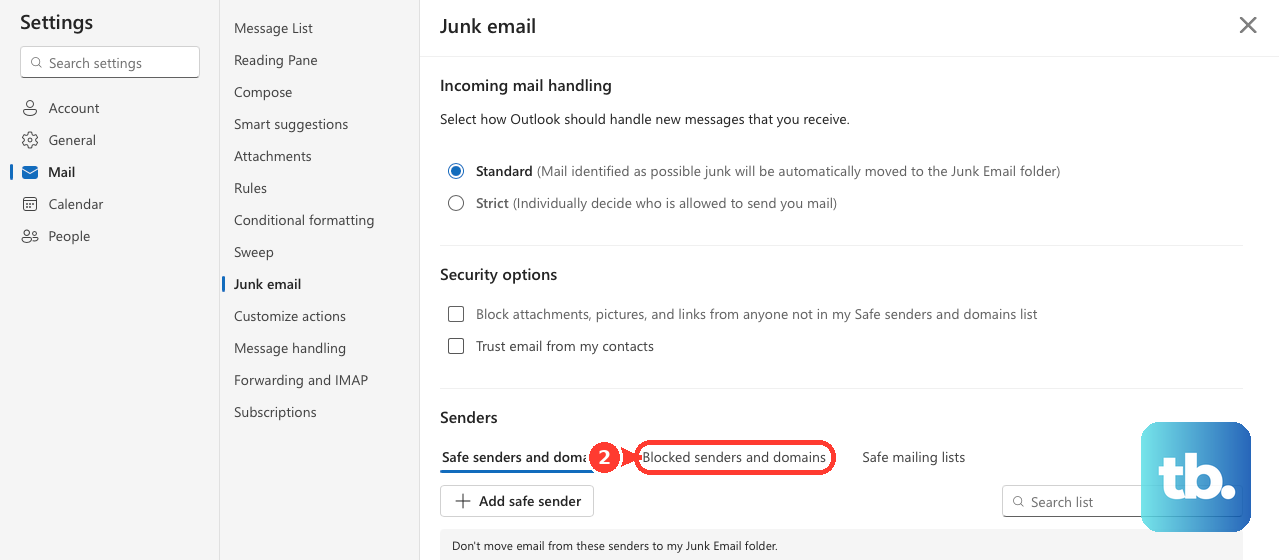
One thing to understand up front: reporting a message as phishing reports the sender but does not block them. A reported sender is not blocked from sending you more messages. To actually block them, add the sender to your blocked senders list under Settings > Mail > Junk email.
Report Phishing in New Outlook for Windows
This is the fastest path if you are on the new Outlook for Windows. The Report control is a split button, so where you click matters.
In the message list, select the message (or several messages) you want to report. You can also have it open in the reading pane.
Select Report from the toolbar.
From the dropdown, choose Report phishing. To report spam instead, choose Report junk.
If a confirmation popup appears, confirm to send the report.
A shortcut worth knowing: clicking the main Report button without opening the dropdown reports the message as phishing by default. Use the dropdown arrow only when you want junk or not junk instead.
The result for phishing is that the message is deleted from your mailbox and a copy goes to Microsoft (and to your organization's reporting mailbox if your admin configured one). For junk, the message moves to Junk Email and the sender is added to Blocked Senders.
Report Phishing in Outlook on the Web or Outlook.com
The browser version works the same whether you are on a work or school account (outlook.office.com) or a personal account (outlook.com). Microsoft documents the same steps for both.
Sign in to Outlook in your browser.
In the message list, select the message or messages you want to report.
Above the reading pane, select Report > Report phishing. To report spam, select Report > Report junk.
These same options appear on both the Classic Ribbon and the Simplified Ribbon, so the layout of your toolbar will not change the steps. Again, marking as phishing reports the sender but does not block them; add them under Settings > Mail > Junk email if you want them blocked.
Report Phishing in Outlook for iOS and Android
The mobile apps have built-in reporting in recent versions. Make sure your app is updated first, since this requires Outlook for iOS 4.2511 or later, or Outlook for Android 4.2446 or later.
Open the suspicious email in the Outlook app.
Tap the three-dot menu at the top right of the message.
Tap Report Junk from the menu.
Choose Phishing for credential theft, impersonation, or malicious links (or Junk for spam, or Block Sender to block the sender).
The reported message is submitted to Microsoft. If you do not see a three-dot menu, update the app to a current version, since older builds do not include the built-in Report option.
Move a Legitimate Message Out of Junk (Report Not Junk)
If Outlook filtered a real message into Junk by mistake, tell it so. This both rescues the message and trains the filter.
Open the Junk Email folder.
Select one or more messages that are actually legitimate.
Select Report, then choose Not junk from the dropdown.
The messages move out of Junk Email back to your Inbox. Note one folder rule: you report junk from the Inbox or any folder except the Junk Email folder, you report phishing from any folder, and you report not junk from inside the Junk Email folder.
Add the Report Add-in for Classic Outlook for Windows or Mac
Current builds of the classic desktop clients now include the built-in Report button (classic Outlook for Windows in Current Channel Version 16.0.17827.15010 or later, and classic Outlook for Mac 16.89 or later) when user reporting is turned on. Only older builds lack it; on those, install Microsoft's free add-in.
On the Home tab of the ribbon, select All Apps.
In Outlook for Windows Version 2303 (Build 16215.10000) and later, the All Apps button replaced the older Get Add-ins button, so earlier versions will show Get Add-ins instead.
If the Simplified Ribbon is on, select the ellipsis (...) first, then All Apps.
Search for Report Message (publisher Microsoft Corporation), or search Report Phishing for the slimmer phishing-only add-in.
Add the add-in and accept any permissions it requests. A Report option then becomes available for reporting messages.
To report, select the suspicious message, use the add-in's report command, and choose phishing or junk.
Two things to keep in mind. These add-ins are now in maintenance mode and Microsoft recommends moving to the built-in Report button where it is available. The add-ins also require Nested App Authentication (NAA); if your client does not support it, update the client or use the built-in button instead.
Forward as an Attachment When No Report Button Exists
If you have no Report button and cannot install the add-in, you can forward the message to Microsoft or your IT team manually. The key detail is forwarding it as an attachment so the original message headers are preserved.
Do not click any links or open any attachments in the suspicious message.
Select the message, open More actions (the three-dot menu), and choose Forward as attachment.
If that option is unavailable, save the email as a .msg or .eml file and attach it to a new message manually.
Address the new message to the reporting destination, send it, then delete the original.
For a work or school account, send it to your organization's published security or reporting mailbox if one exists, because your IT team can purge the message from other mailboxes too. For a personal account, the built-in Report button or the add-in is the more reliable route, since a public consumer reporting address is not consistently documented and reports sent by email can bounce.
Why the Report Button Is Missing (and How an Admin Fixes It)
On new Outlook or the web, a missing Report button is usually an admin setting, not a bug. The built-in button appears in supported clients only when user reporting is turned on and the built-in Microsoft Report button is selected (not a non-Microsoft add-in).
If you administer Microsoft 365, here is the configuration:
Go to the Microsoft Defender portal User reported settings, turn on Monitor reported messages in Outlook, and select the built-in Microsoft Report button.
Choose where reported messages are sent: to Microsoft, to a reporting mailbox, or both.
Review what users reported on the User reported tab of the Submissions page in the Defender portal.
Two more admin notes. Reporting also depends on a recent build, so older Outlook versions may simply need an update. And on a shared or delegate mailbox, reporting via the built-in button requires Send As permission; without it, the message is only removed from the folder and is not sent to the reporting mailbox.
Frequently Asked Questions
Does reporting an email as phishing block the sender?
No. A reported sender is not blocked from sending you more messages. To block them, add the sender to your blocked senders list under Settings > Mail > Junk email. A junk report, by contrast, does automatically add the sender to your Blocked Senders list.
What is the difference in outcome between reporting junk and reporting phishing?
A junk report moves the message to the Junk Email folder and auto-blocks the sender. A phishing report deletes the message entirely. So phishing removes the email from view, while junk keeps it (in Junk) and blocks the sender.
I clicked Report and it reported phishing, but I wanted junk. Why?
Report is a split button. Clicking the main button without opening the dropdown reports the message as phishing by default. Use the dropdown arrow to choose Report junk or Not junk instead.
Can I report several messages or a whole conversation at once?
Yes. When you report multiple messages or an email thread with the built-in Report button, each message is submitted as its own separate report, with its own sender, subject, and timestamp.
Should I use the Unsubscribe option that sometimes appears?
Only for senders you actually recognize. The newer Report junk flow can offer Unsubscribe for legitimate-but-unwanted senders. For unknown or spam senders, unsubscribe links can confirm your address is active, so block or report those instead.
I am on classic Outlook for Windows or Mac and there is no Report button. Is something broken?
Probably not. Current builds of classic Outlook for Windows (Current Channel 16.0.17827.15010 or later) and classic Outlook for Mac (16.89 or later) do include a built-in Report button, but it only appears when user reporting is turned on. If yours is an older build or reporting is turned off, install the free Microsoft Report Message or Report Phishing add-in, or use the forward-as-attachment fallback. The built-in button also exists in new Outlook for Windows, Outlook on the web, and the updated mobile apps.