


To add a checkbox in Excel, select the cell or cells where the boxes should go and choose Insert > Checkbox. Each selected cell gets one empty box, and you tick it with a click, or select several boxes and press Spacebar. A ticked box holds TRUE and an empty one holds FALSE, so a formula can read your checklist.
That is the quickest way to insert a checkbox in Excel for Microsoft 365, and the same command worked for us in Excel for the web. If you want a tick box that floats over the sheet with its own caption, use the older Form Control check box on the Developer tab instead. Both kinds are covered below, along with the reasons the button can be missing or greyed out.
The short version
- Add boxes: select the cells, then choose Insert > Checkbox.
- Tick them: click a box, or select several and press Spacebar.
- Use the result: a ticked cell is TRUE and an empty one is FALSE, so formulas can read it.
- Box with a caption: use Developer > Insert > Form Controls > Check Box and set a Cell link.
- In a browser: Excel for the web showed the same Insert command for us, but it cannot run Form Control check boxes.
Ways to add a checkbox in Excel
| What you want | Where to go | Where the TRUE or FALSE ends up |
|---|---|---|
| A box inside one cell | Select the cell, then Insert > Checkbox | In that cell |
| A box beside every task in a list | Select the whole empty range, then Insert > Checkbox | In each selected cell, separately |
| Tick several boxes at once | Select them and press Spacebar | Ticked cells hold TRUE, cleared ones FALSE |
| Remove the boxes but keep the values | Home > Clear > Clear Formats | The cell keeps TRUE or FALSE as a plain value |
| A floating box with a caption | Developer > Insert > Form Controls > Check Box | In the Cell link you choose in Format Control |
| A checklist in a browser | Excel for the web, Insert > Checkbox in the Controls group, where it is shown | In each selected cell |
The in-cell box is the one to use for a to-do list, a packing list or an attendance sheet. The Form Control is an object that sits on top of the grid, so it can carry a label of its own and can be placed anywhere, but it needs more setup and it does not work in a browser.
Insert a checkbox in a cell from the Insert tab
Our practice sheet is a short checklist with three tasks in column A, a Done column in B and a Status column in C. C2 holds the formula =IF(B2,"Checked","Unchecked"), so we could see the box's value change. The Developer tab was not on the ribbon when we started, and the in-cell checkbox did not need it.
Select the empty cells that should hold the boxes, B2 to B4 here. Open the Insert tab and select Checkbox, the only button in the Controls group. Its tooltip on our PC read Add a checkbox to a cell to display and edit TRUE and FALSE values.
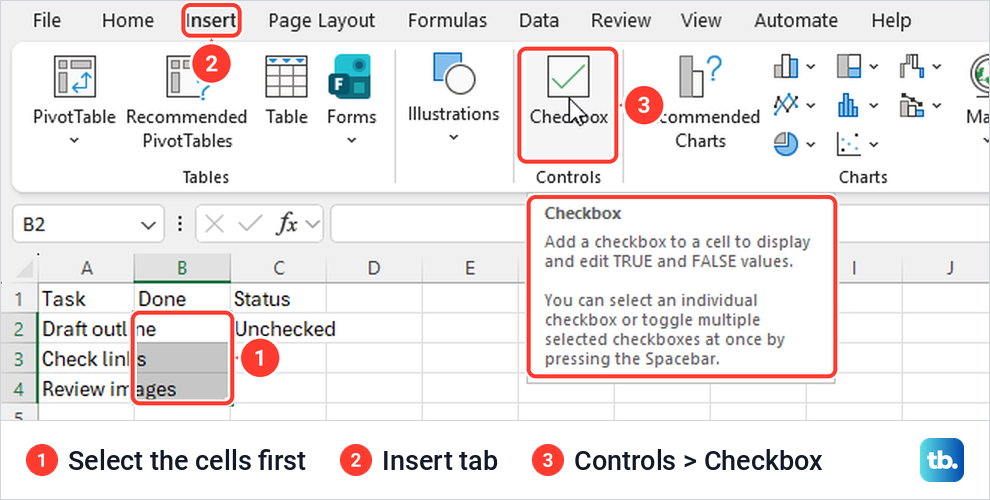
Excel put one empty box in the middle of each selected cell, with no caption beside it. With B2 selected, the formula bar showed FALSE, which is the value an unticked box holds. The task names stay in their own column, so if you want a caption, type it in the next cell rather than in the box's cell. Each box has its own value, so ticking one does not tick its neighbours.
Tick boxes and use their TRUE or FALSE value
Click a box once to tick it, and click again to clear it. When we clicked the box in B2, it showed a tick, the formula bar showed TRUE and the status in C2 switched from Unchecked to Checked straight away.
To tick several boxes at once, select their cells and press Spacebar. We selected B3 and B4 and pressed it once, and both boxes were ticked together. It saves a click per row on a long checklist, and our roundup of more Excel keyboard shortcuts helps with the rest of the sheet.
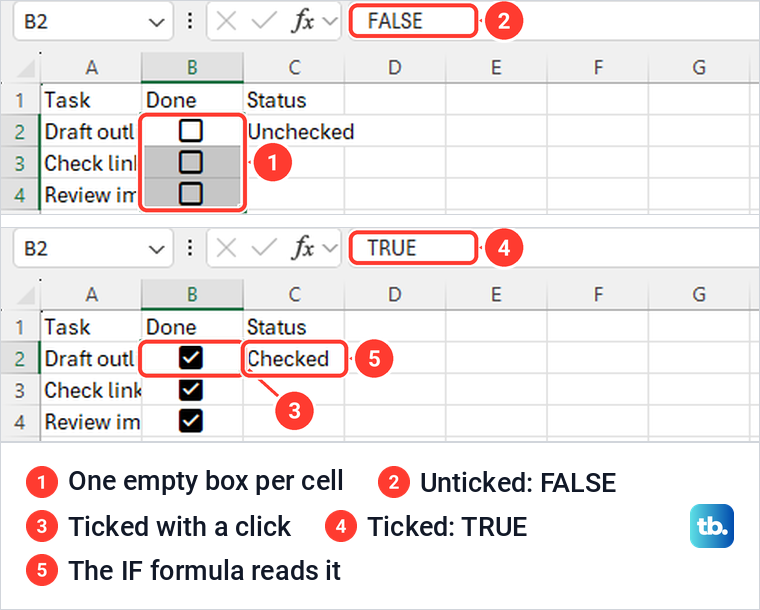
Because the box is a TRUE or FALSE value, any formula that points at its cell gets that value. Microsoft puts it plainly, saying TRUE or FALSE will be passed along to the formula. Our =IF(B2,"Checked","Unchecked") needed no comparison inside the IF, since B2 is already TRUE or FALSE.
If you want the status to say something else, or to show a date or a sum instead, learn how to use an IF statement in Excel and swap in your own text. If the status text stays the same after the box changes, check how to fix Excel formulas that are not working.
The same TRUE and FALSE values can drive a conditional formatting rule, for example one that greys out finished rows. If your finished tasks do not change their look, see how to fix conditional formatting in Excel.
Remove a checkbox or keep its value
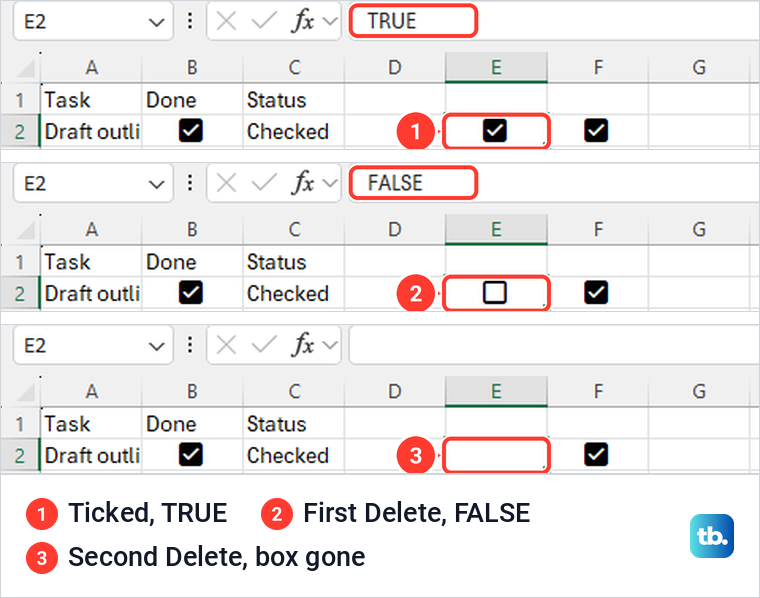
Pressing Delete on a ticked box does not remove it the first time. On our sheet, the first press cleared the tick and left an empty box with FALSE in the formula bar, and only the second press removed the box and left an empty cell.
Microsoft describes the same rule for a selection of boxes. If every selected box is unticked, Delete removes them in one go, and if any is ticked, the first press unticks them and the next one removes them.
To get rid of the boxes but keep the answers, use Home > Clear > Clear Formats, the eraser button in the Editing group. When we did this on a ticked box in F2, the box disappeared and the cell showed the word TRUE. That is handy when you send a finished checklist to someone who only needs the results.
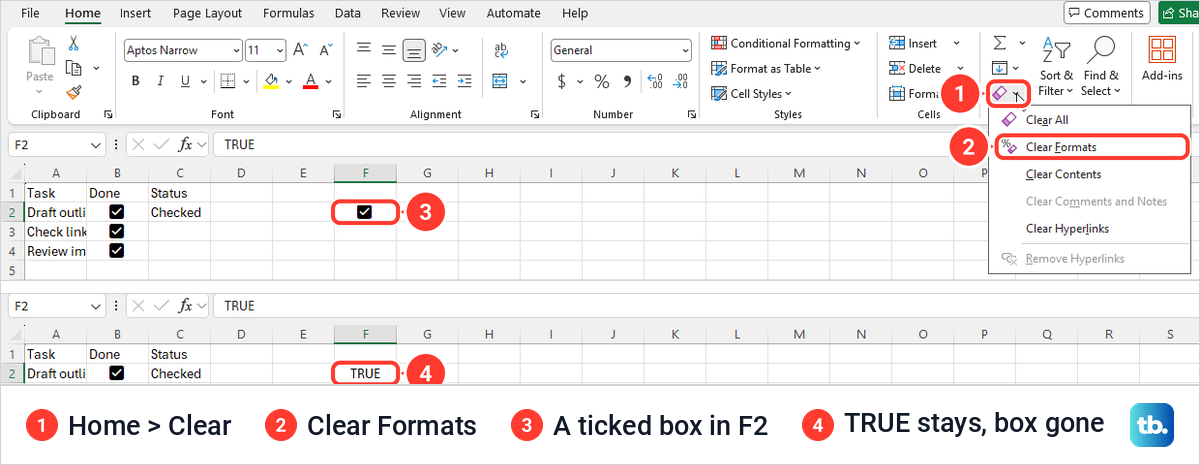
Clear Formats removes all the other formatting in the selection too, such as fills and number formats. Select only the checkbox cells first if the rest of the sheet is formatted.
Show the Developer tab for Form Control check boxes
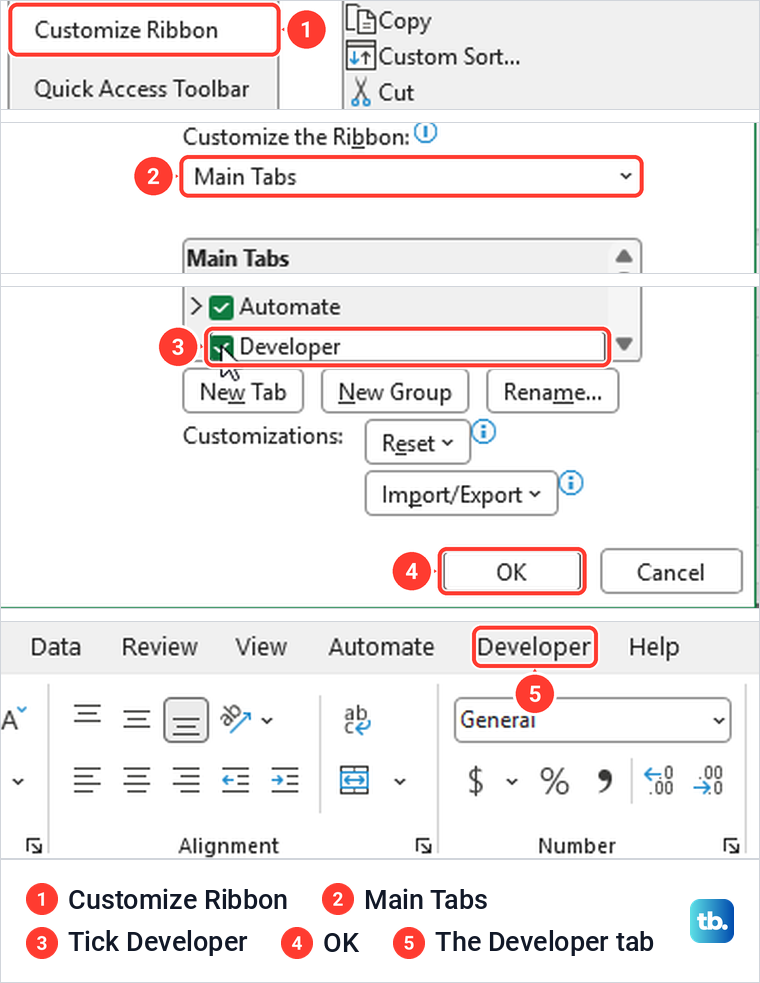
The older check box is a Form Control, and it lives on the Developer tab. Excel does not show that tab by default, and you only need it for this kind of box, not for Insert > Checkbox.
Select File > Options and choose Customize Ribbon. With Main Tabs showing in the list on the right, tick Developer and select OK. On our PC the Developer tab appeared between Automate and Help, ready for the next step.
Add a Form Control check box with a caption
Open Developer > Insert. On our PC the gallery listed Form Controls only, and the check box icon's tooltip read Check Box (Form Control). Select it, then click on the sheet where the box should sit.
Excel placed a floating box with the caption Check Box 1, and the Name Box showed the same name. This box is an object that floats over the grid, not a cell value, so it gives you no TRUE or FALSE until you link it to a cell.
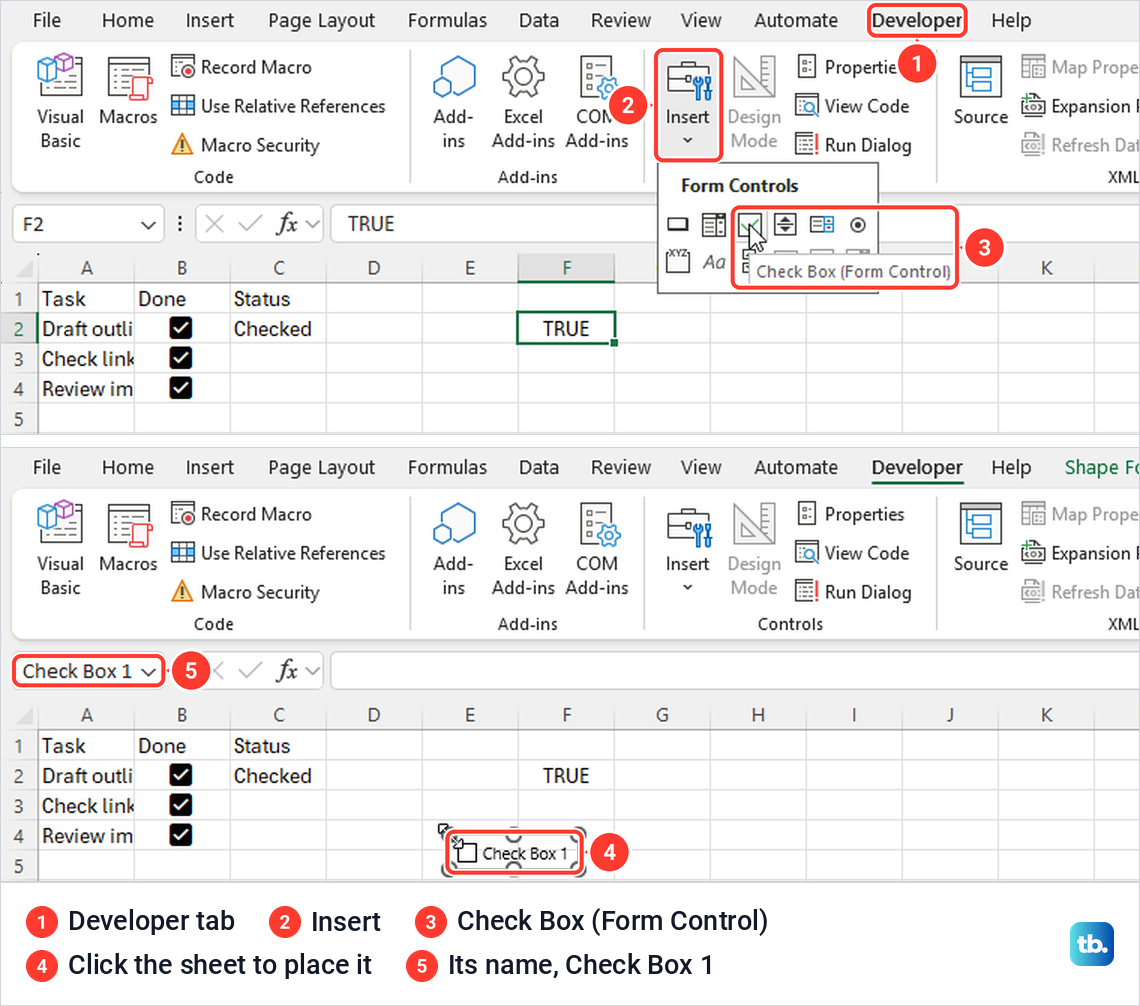
To change the caption, right-click the box and choose Edit Text, then type over the default text and click a cell to finish. Microsoft notes that you can add only one Form Control check box at a time, so a list of tasks means one box per task.
Link a Form Control check box to a cell
Right-click the box and select Format Control. The dialog opened on its Control tab for us, with three starting values (Unchecked, Checked and Mixed), a Cell link box and a 3-D shading option.
In Cell link, enter the cell that should hold the result. We linked our box to F4, shown as $F$4 in the dialog, and selected OK. Ticking the box then wrote TRUE in F4, and clearing it wrote FALSE.
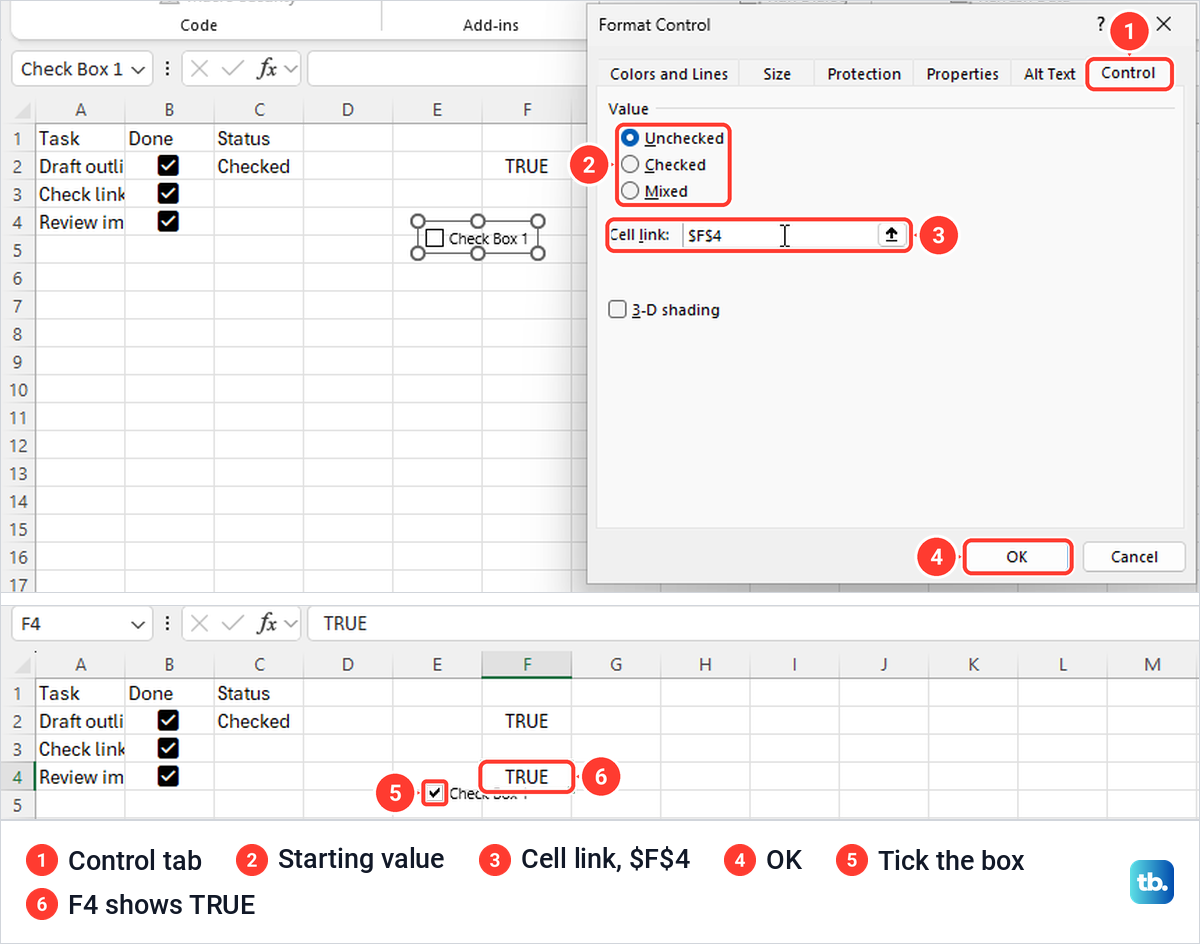
The linked cell is an ordinary cell, so a formula can read it exactly as it reads an in-cell box. That makes the Form Control useful when the box has to sit apart from its data, for example on a dashboard, with the TRUE or FALSE kept in a column further along.
Copy a Form Control without sharing its link
Microsoft suggests a shortcut for adding several boxes, which is to right-click the first one and use Copy and then Paste. That works, but check each copy before you use it.
When we copied our linked box and pasted it, the copy got a new name, Check Box 2, yet it kept the caption Check Box 1 and the same link to $F$4. So both boxes were tied to the same cell. Changing the copy's caption with Edit Text, to Review complete in our case, is a separate job from changing its link.
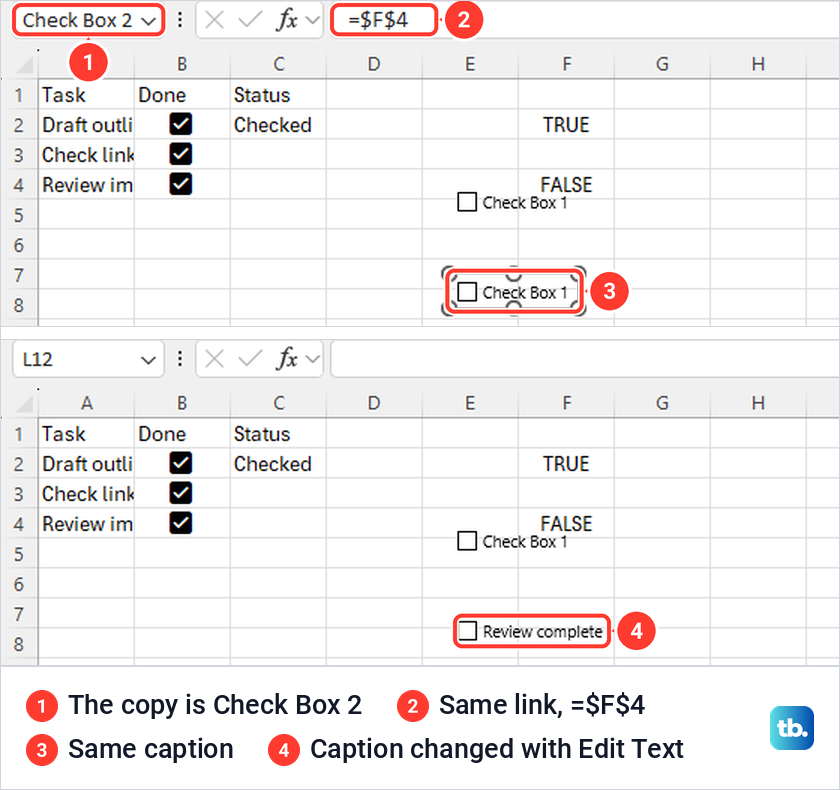
After every paste, open Format Control on the copy and point Cell link at a new cell. To delete a Form Control, Microsoft says to right-click it and press Delete. If boxes overlap and are hard to grab, Microsoft points to Home > Find & Select > Selection Pane, which helps you find and select each object.
Add a checkbox in Excel for the web
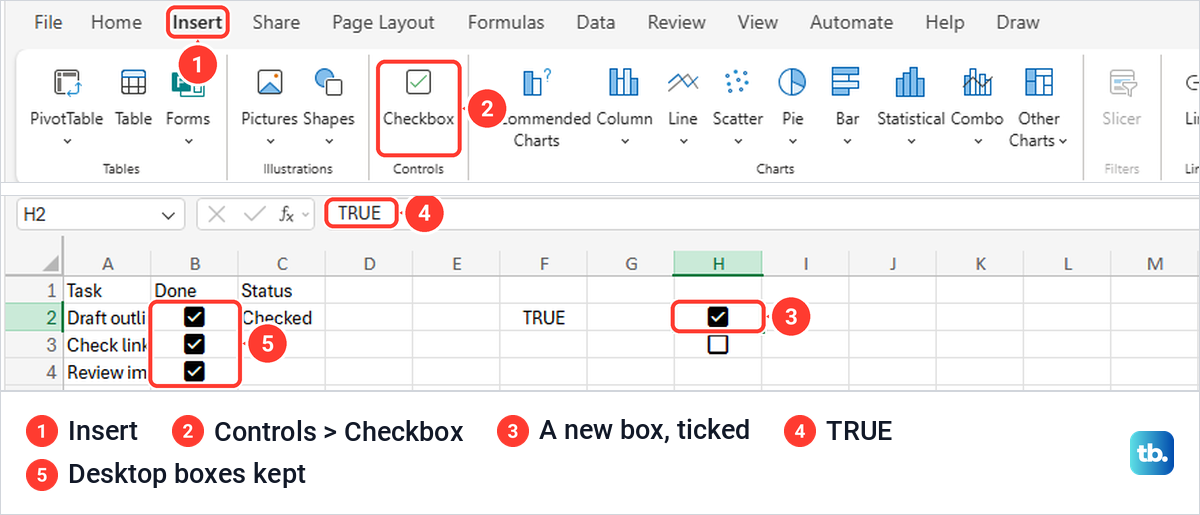
Microsoft's checkbox help page lists only the Windows and Mac apps, but the in-cell checkbox was there for us in the browser too. In Excel for the web in Microsoft Edge, the Insert tab had a Controls group with a Checkbox button, and it added a box to each selected cell.
Clicking a new box in H2 ticked it and the formula bar showed TRUE, just as on the desktop. In our web session, the boxes we had made in desktop Excel were still boxes in the browser, ticks included. If your browser shows no Checkbox button, make and use the checklist in desktop Excel.
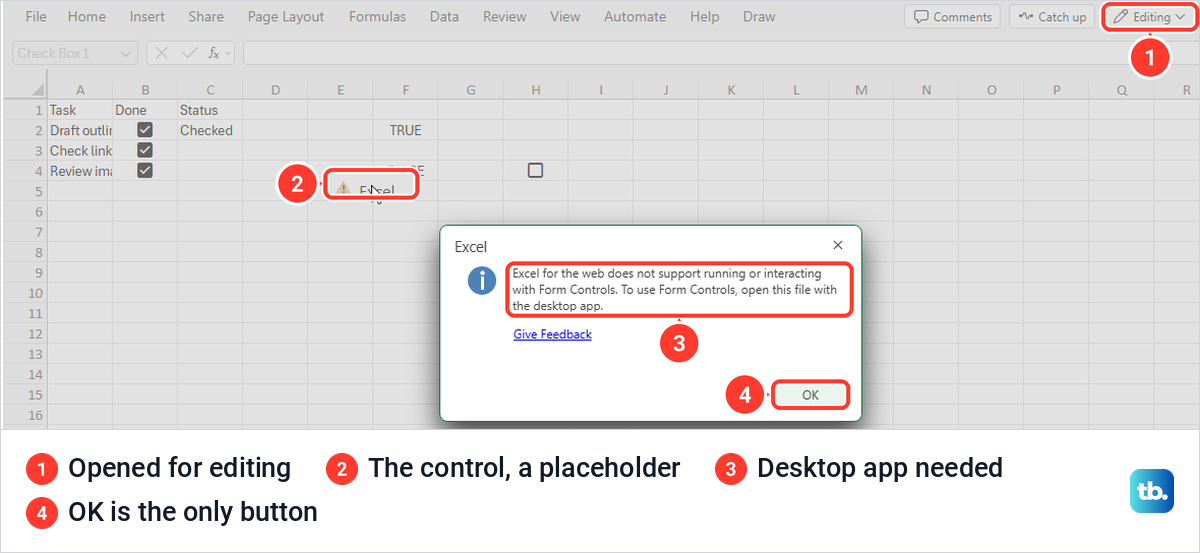
Form Control check boxes are a different story. Microsoft says you cannot use check box controls in Excel for the web. When we opened a copy of our workbook with the linked Form Control, it opened for editing with no warning, and the control showed only as a placeholder marked Excel.
Clicking the placeholder brought up a message saying Excel for the web does not support running or interacting with Form Controls, and that you should open the file with the desktop app. The message had only an OK button, with no shortcut to the desktop app.
Microsoft also warns about a different message. If you see a message titled Edit in the browser? or Unsupported features and choose to edit the workbook in the browser anyway, it says objects such as check boxes are lost immediately. Decline that prompt and open the workbook in the desktop app if you need to keep its Form Controls.
Add a checkbox in Excel on a Mac
Excel for Microsoft 365 for Mac has the same in-cell checkbox. Select the cell or range and choose Insert > Checkbox, then click a box or press Spacebar to tick it.
For a Form Control on a Mac, Microsoft says to open the Excel menu, select Preferences, select View under Authoring, and tick Developer tab under In Ribbon, Show. To reach Format Control there, hold Control and select the control.
Why the Checkbox button is missing or greyed out
If Checkbox is not on the Insert tab at all, check which Excel you have under File > Account, where desktop Excel names your product under Product Information. Microsoft's in-cell checkbox help lists Excel for Microsoft 365 on Windows and Mac, while its Form Controls help also covers Excel 2024, 2021, 2019 and 2016. In a version without it, use the Form Control check box from the Developer tab instead.
If a button is there but greyed out, look at what Excel is doing. While we were typing in a cell, the whole Developer tab was greyed and its Insert button did nothing, and pressing Esc to leave the cell brought it back. Microsoft gives the same fix for form commands in cell data entry mode.
For the in-cell Checkbox button, the cause we found was a protected sheet. On our protected sheet, Insert > Checkbox was greyed along with most of the Insert tab, and clicking it showed no message at all. Selecting Review > Unprotect Sheet brought the button back, and the next box went straight in.
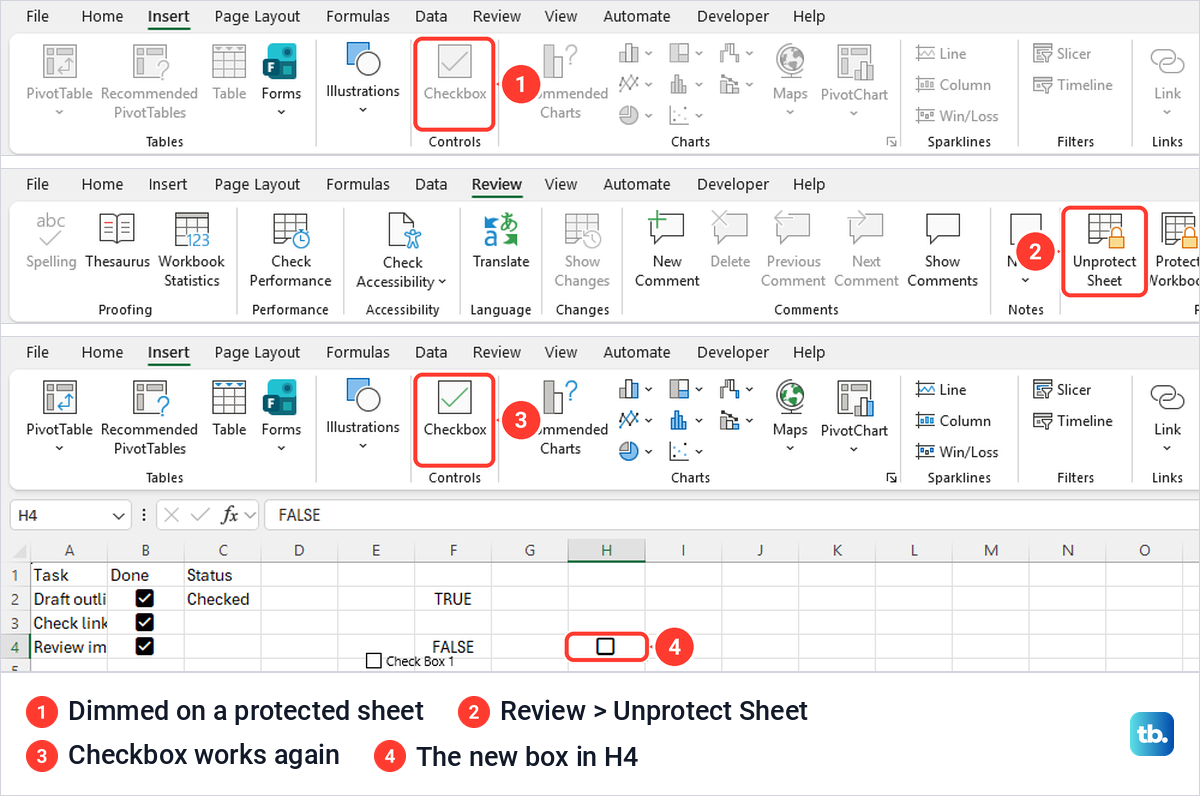
Our sheet had no password, so Excel did not ask for one. If yours has one, enter it when Excel asks, or see how to unprotect an Excel worksheet with the password you set.
If you protected it yourself to lock cells in Excel, unprotect it while you add the boxes, then protect it again. If other people need to tick the boxes, Microsoft's way to leave cells editable is to select them, open Format Cells with Ctrl + 1 and clear Locked on the Protection tab before you protect the sheet.
You may also read about ActiveX check boxes. Microsoft says Microsoft 365 and Office 2024 disable ActiveX controls by default and that the Mac and web versions do not support them, so the in-cell box or a Form Control is the better choice for a new checklist.
A checkbox only answers yes or no. If a task needs choices such as Pending, In progress and Done, create a drop down list in Excel instead. Word has its own check boxes for forms and lists, and our guide shows how to add check boxes in Word.
How we tested this guide
We tested this in Excel for Microsoft 365 on Windows 11, version 25H2, and in Excel for the web in Microsoft Edge, ticking boxes on a three-task checklist.
Frequently Asked Questions
Why is there no Checkbox button on Excel's Insert tab?
Microsoft lists the in-cell checkbox only for Excel for Microsoft 365 on Windows and Mac, not for versions such as Excel 2021 or 2019. In those, use the Form Control check box on the Developer tab. If Insert > Checkbox is greyed out, the sheet may be protected, so unprotect it. If the Form Control button on the Developer tab is greyed out, press Esc to leave the cell you are typing in.
Can I add a checkbox in Excel for the web?
In-cell boxes worked for us. Excel for the web had Insert > Checkbox in its Controls group, and the boxes held TRUE and FALSE as on the desktop. Form Control check boxes cannot be used in the browser, so open those workbooks in desktop Excel.
Do I need the Developer tab to add a checkbox?
Not for the in-cell checkbox, which is on the Insert tab. You only need Developer for the older Form Control check box, and you can turn it on under File > Options > Customize Ribbon.
Why did Delete untick my box instead of removing it?
That is how in-cell boxes work. The first Delete on a ticked box clears the tick and leaves FALSE, and a second Delete removes the box.
How do I make a checkbox change another cell?
Point a formula at the box's cell, such as =IF(B2,"Checked","Unchecked"), and the formula follows the tick. For a Form Control, set a Cell link in Format Control, and that cell shows TRUE or FALSE.
Why do my copied check boxes all change the same cell?
When we pasted a copy of a linked Form Control, it kept the original's Cell link and its caption. Open Format Control on each copy and give it a cell of its own.