

To create a group in Outlook for email, make a contact group. In classic Outlook for Windows, open People, select the arrow beside New Contact, choose Contact Group, name it, add members and select Save & Close. If your team needs a shared inbox, calendar and files instead, create a Microsoft 365 Group from the Group item in the same menu.
A contact group is what most people mean by an email group in Outlook, and Outlook on the web calls the same thing a contact list. We made contact groups, a contact list and two Microsoft 365 Groups in Outlook for Microsoft 365 on Windows 11, version 25H2, and in Outlook on the web. Several buttons sat somewhere other than where Microsoft's help pages put them, so the steps below follow what was on screen.
The short version
- For repeat emails: make a contact group in classic Outlook, or a contact list in Outlook on the web.
- Classic Outlook: People > New Contact arrow > Contact Group, or press Ctrl + Shift + L in People.
- Outlook on the web: People > New contact arrow > New contact list, or press Shift + L in People.
- For a shared inbox and calendar: create a Microsoft 365 Group from the arrow beside New Email or New mail with a work or school account, or use Groups in Outlook.com with a personal account.
- Group missing from the To picker: switch the Address Book list to Contacts.
Choose the kind of Outlook group you need
Outlook uses the word group for two different things. A contact group, called a contact list in Outlook on the web and new Outlook, is a saved set of email addresses that only you use, so you can type one name in To instead of ten. A Microsoft 365 Group is a shared space with its own email address, conversations, calendar and files that every member can open.
| What you need | Create this | Where to start | What you get |
|---|---|---|---|
| Email the same people often, in classic Outlook | Contact group | People > New Contact arrow > Contact Group | A saved entry in your contacts that you can put in To |
| Email the same people often, in Outlook on the web | Contact list | People > New contact arrow > New contact list | A private list under Your contact lists |
| Give a team a shared address, calendar and files | Microsoft 365 Group | Mail > New Email arrow > Group in classic Outlook, or Mail > New mail arrow > Group on the web | A group under Groups in the Mail folder pane |
| Share messages, files and a calendar with a personal account | Outlook.com group | Outlook.com > Groups > New Group | A group with its own messages, files and calendar |
| Give the whole organization one managed address | Distribution list | Microsoft 365 admin center | A list your administrator creates and manages |
Microsoft says its Microsoft 365 Group steps for classic Outlook and Outlook on the web are only available to people using a work or school account with a qualifying Microsoft 365 subscription. Personal Outlook.com accounts have their own Groups, covered further down. If the whole organization needs one managed address, an administrator makes that in the Microsoft 365 admin center. Our guide to create a distribution list in Outlook covers the personal contact list in more detail.
Create a contact group in classic Outlook
Select People in the bar on the left of the Outlook window. Microsoft's help page tells you to select New Contact Group on the ribbon, but our Simplified Ribbon had no such button. The command was inside the New Contact split button: select the small arrow on its right and choose Contact Group, a few lines below the plain Group item, which makes a Microsoft 365 Group instead.
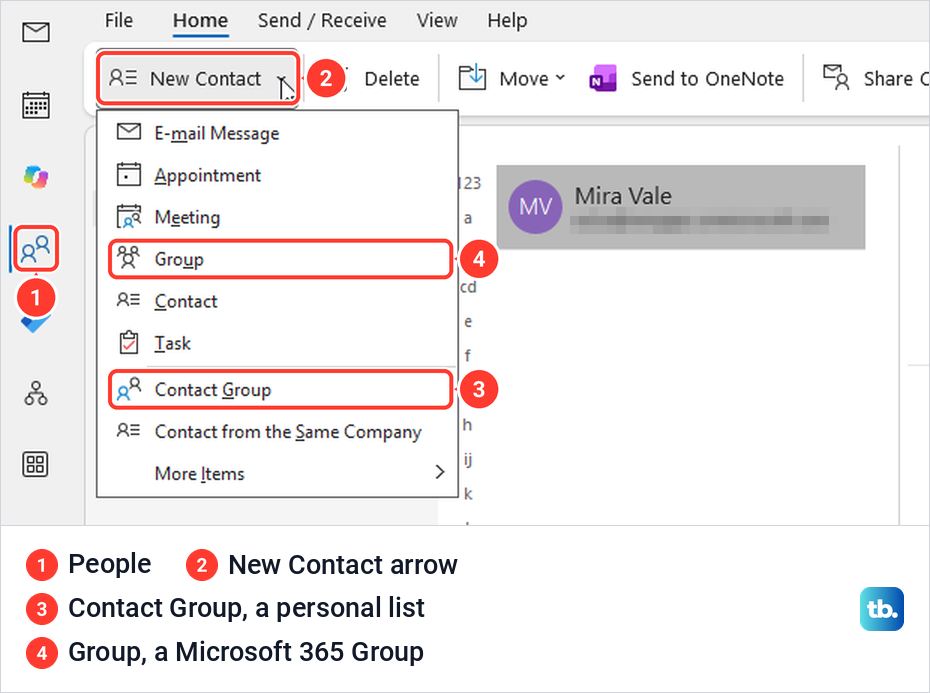
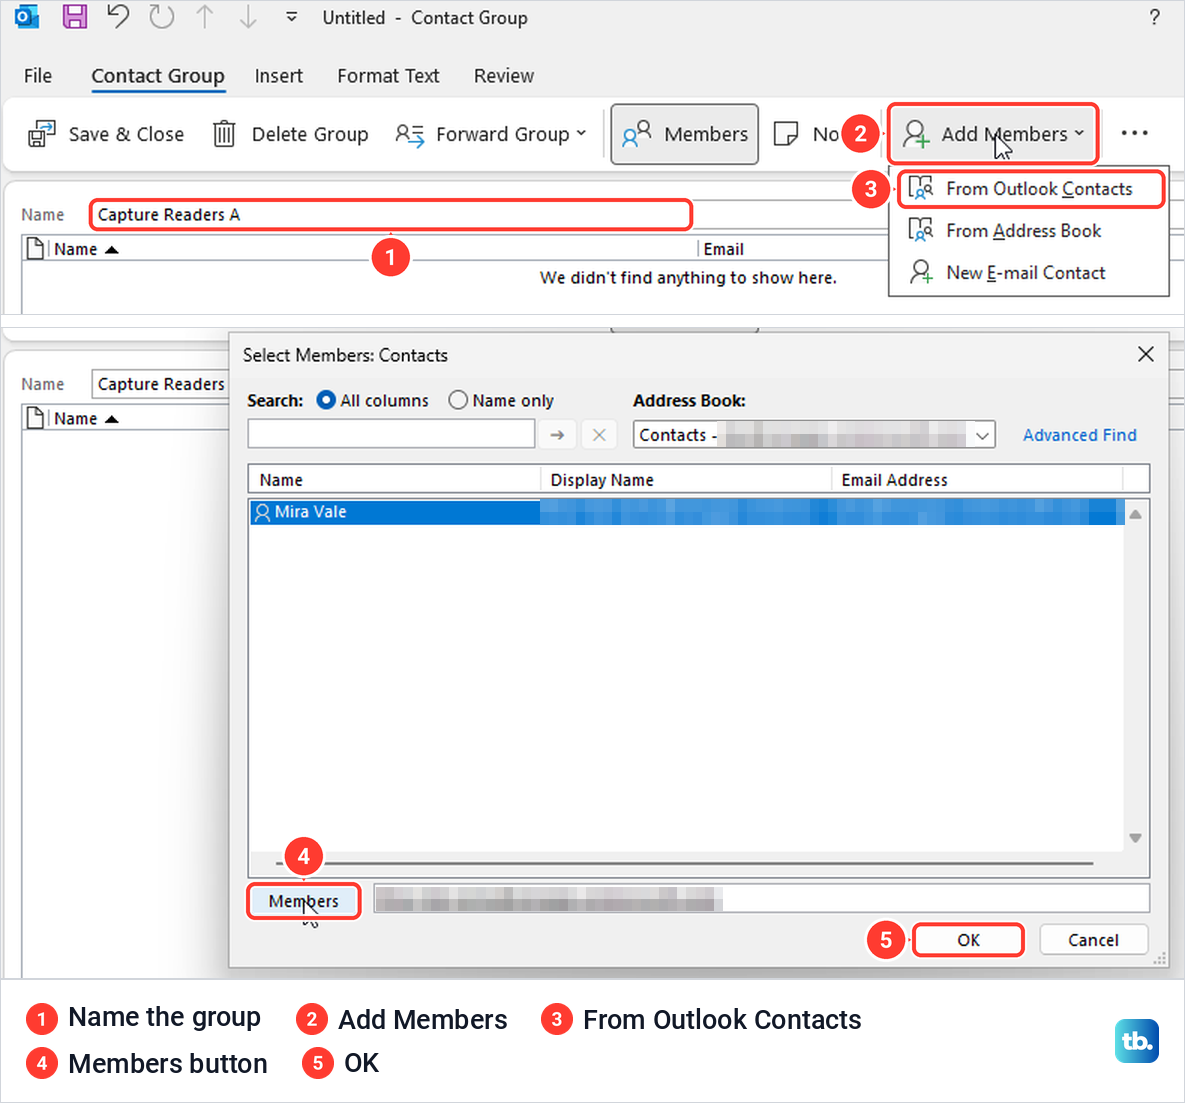
If your ribbon does show a separate New Contact Group button, as Microsoft describes, it opens the same window. That window, titled Untitled - Contact Group, has Save & Close, Members, Notes and Add Members on its ribbon. Type a name in the Name box, then select Add Members, which offers From Outlook Contacts, From Address Book and New E-mail Contact.
Choose From Outlook Contacts to pick people you have saved. In the Select Members: Contacts window, select a person, select the Members button so the name appears in the box beside it, and select OK. To pick several people at once, Microsoft says to hold down Ctrl as you select them.
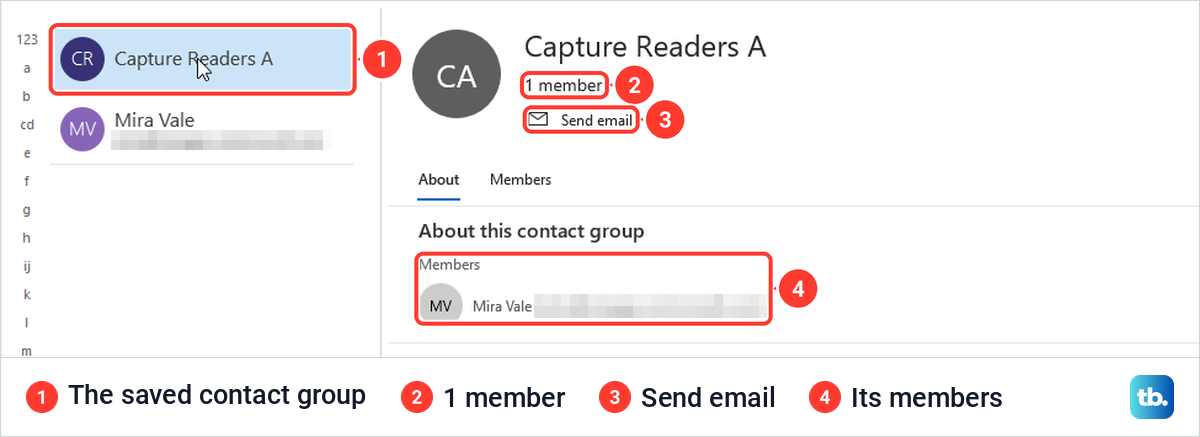
Back in the group window, each member is listed with their address. Select Save & Close, and the contact group joins your contacts in People, with a card that shows how many members it has and a Send email button. To change it later, Microsoft says to double-click the group in your contacts to open it again.
Use the keyboard shortcut
In People, pressing Ctrl + Shift + L opened a new, untitled contact group window straight away on our PC. The group we built from it saved in Contacts like the others. Microsoft's classic Outlook shortcut list gives the same keys for creating a contact group.
Add people who are not in your contacts
From Address Book opens your organization's directory, shown on our PC as Select Members: Offline Global Address List, so you can add colleagues without saving them as contacts first. New E-mail Contact opens an Add New Member box with a display name and an email address. Its Add to Contacts box is ticked by default, which also saves that person to your contacts.
You do not need all three sources. Each one adds to the same member list, and the group we built with New E-mail Contact alone saved and listed its member just like the first one.
Send an email to your contact group
Open a new message and select the To button. On our PC, the Select Names window opened on the Offline Global Address List, the organization directory, where personal contact groups do not appear. Change the Address Book list to Contacts, and your contact groups show in bold above your saved people.
Select the group, select To and then OK. The group sits in the To line with a small plus box in front of its name, which expands it into its members. You can also type the group's name straight into To, and Microsoft says Outlook will show possible matches from the address book.
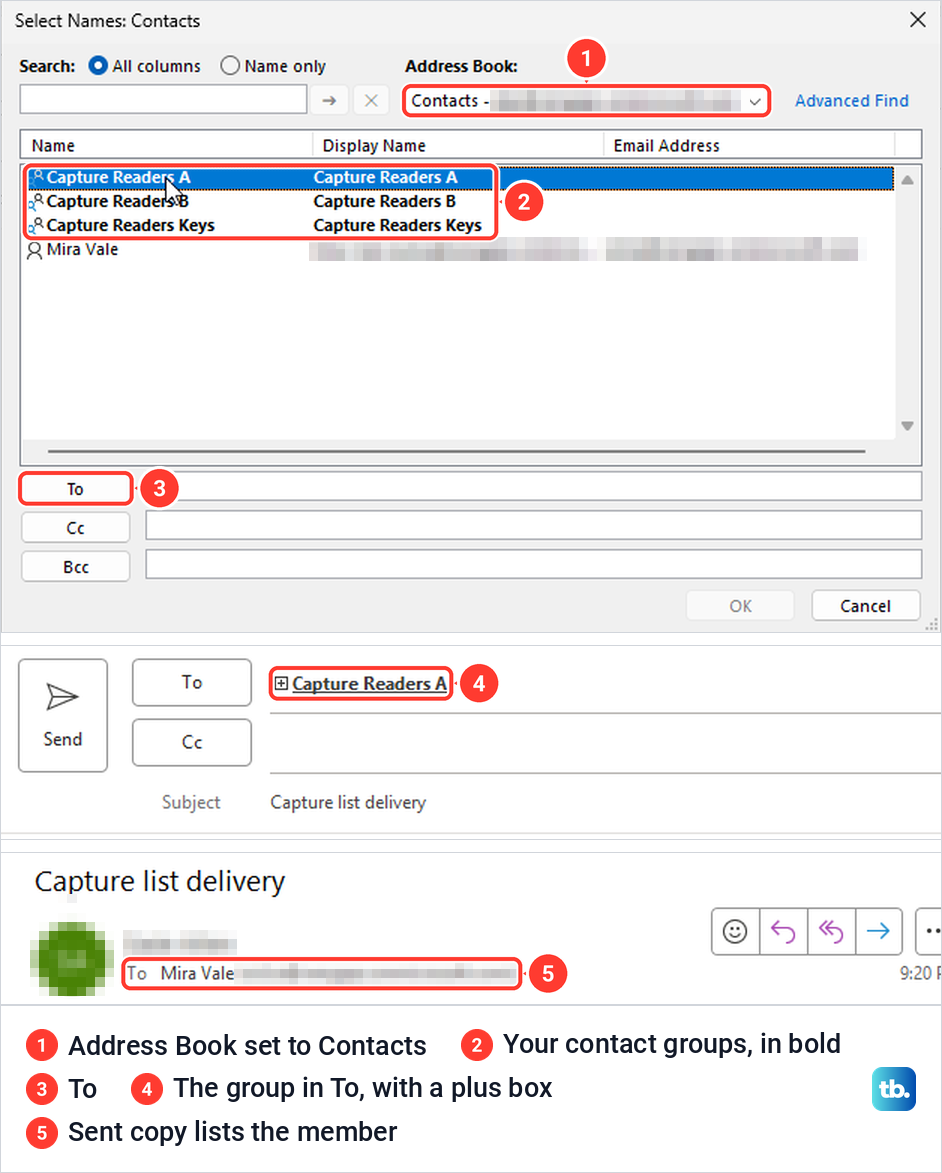
In our test, the group name did not travel with the message. When we sent to a one-member group, the copy in Sent Items listed the member's name in To, not the group's name, and the person who received it saw only their own address. Everyone in To or Cc can see the other recipients, so put the group in Bcc if members should not see each other's addresses.
Create a Microsoft 365 Group in classic Outlook
Microsoft's help page says to select Groups in the app bar or Home > New Group. Our classic Outlook had neither: the app bar showed Mail, Calendar, Copilot, People, To Do, Org Explorer and More apps, and the Home ribbon had no New Group button. Two menus did work, and both opened the same Create Group window.
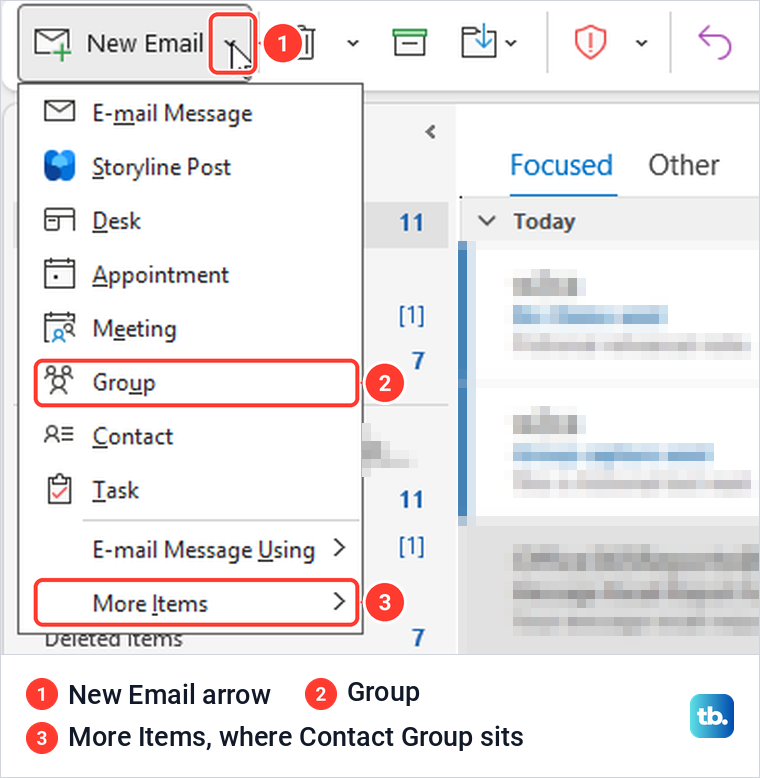
In Mail, select the arrow beside New Email and choose Group. In People, the arrow beside New Contact has the same Group item. The New Email menu also keeps the personal kind under More Items > Contact Group, so you can make either one without leaving Mail.
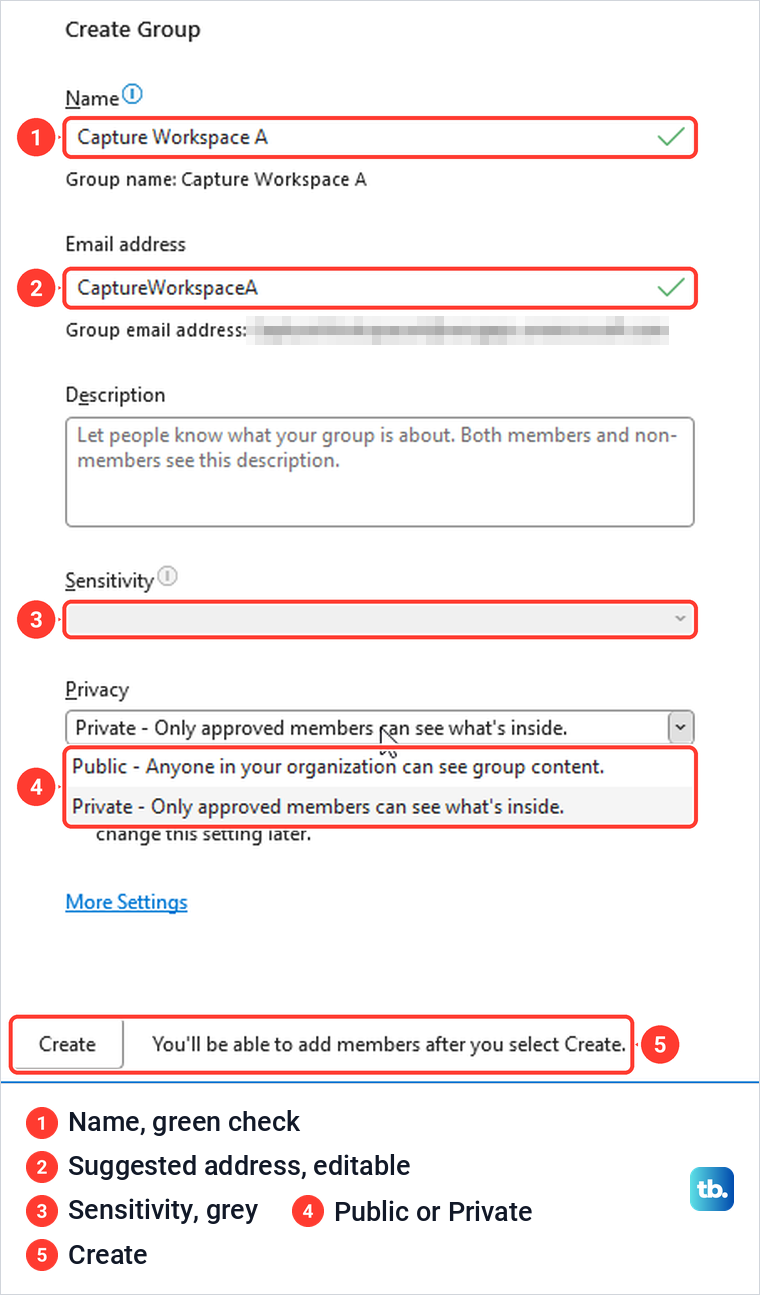
Type a Name first. Outlook filled the Email address box from it on its own, with a green check when the address was free, and showed the full group address underneath. You can edit the address before you create the group.
Add a Description if you like, which Microsoft says goes into the welcome email when people join. Keep it free of anything sensitive, because the form itself says both members and non-members see the description.
The Sensitivity box was grey and empty on our form. Microsoft's page describes a Classification field at this point whose options depend on what your organization has set up, so leave it alone unless your workplace uses it. The box Send all group email and events to members' inboxes is ticked by default, and the form says members can change it later.
Set Privacy before you select Create. A new Group is Private by default. In classic Outlook the two choices read "Private - Only approved members can see what's inside." and "Public - Anyone in your organization can see group content." Microsoft adds that anyone in your organization can join a Public group, while joining a Private group needs approval.
Choose Public only for content the whole organization may read, such as a group for company announcements. If what you really want is to check when a colleague is free, you do not need a Group, because you can view someone else's calendar in Outlook instead.
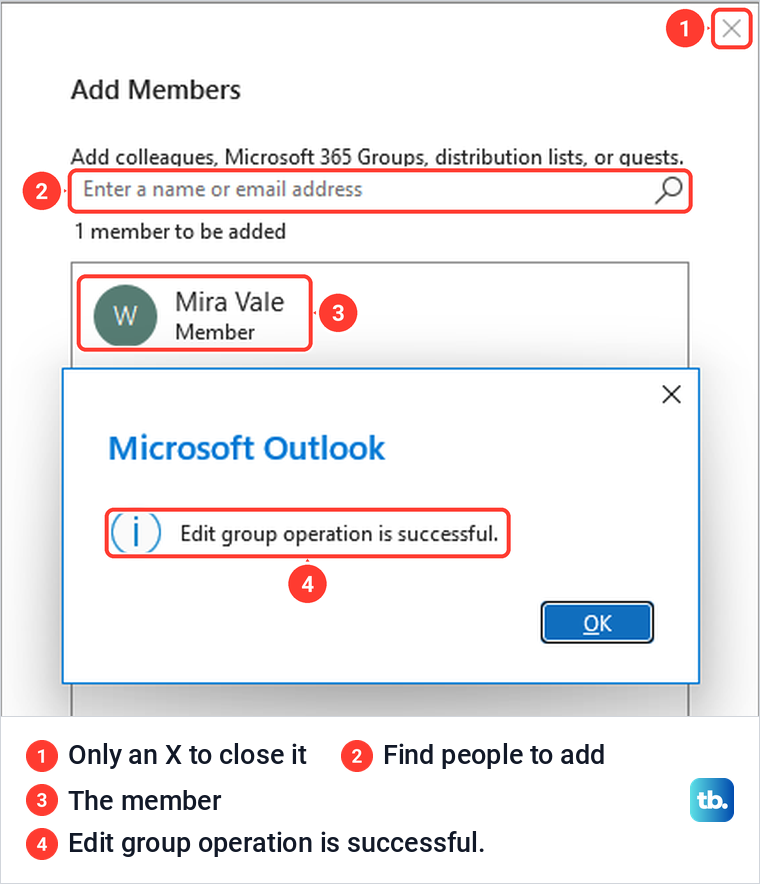
When the form is ready, select Create. An Add Members window opened next, with a search box for colleagues, Microsoft 365 Groups, distribution lists or guests. Microsoft says you can choose Not now here, but classic Outlook showed no such button, only an X in the corner to close the window.
The group was already listed under Groups in the Mail folder pane while this window was open, and Microsoft says you can add members later. We searched for a colleague, selected Add Members, and Outlook answered with "Edit group operation is successful." The person we added then got a welcome email from the new group, though it took about 25 minutes to arrive.
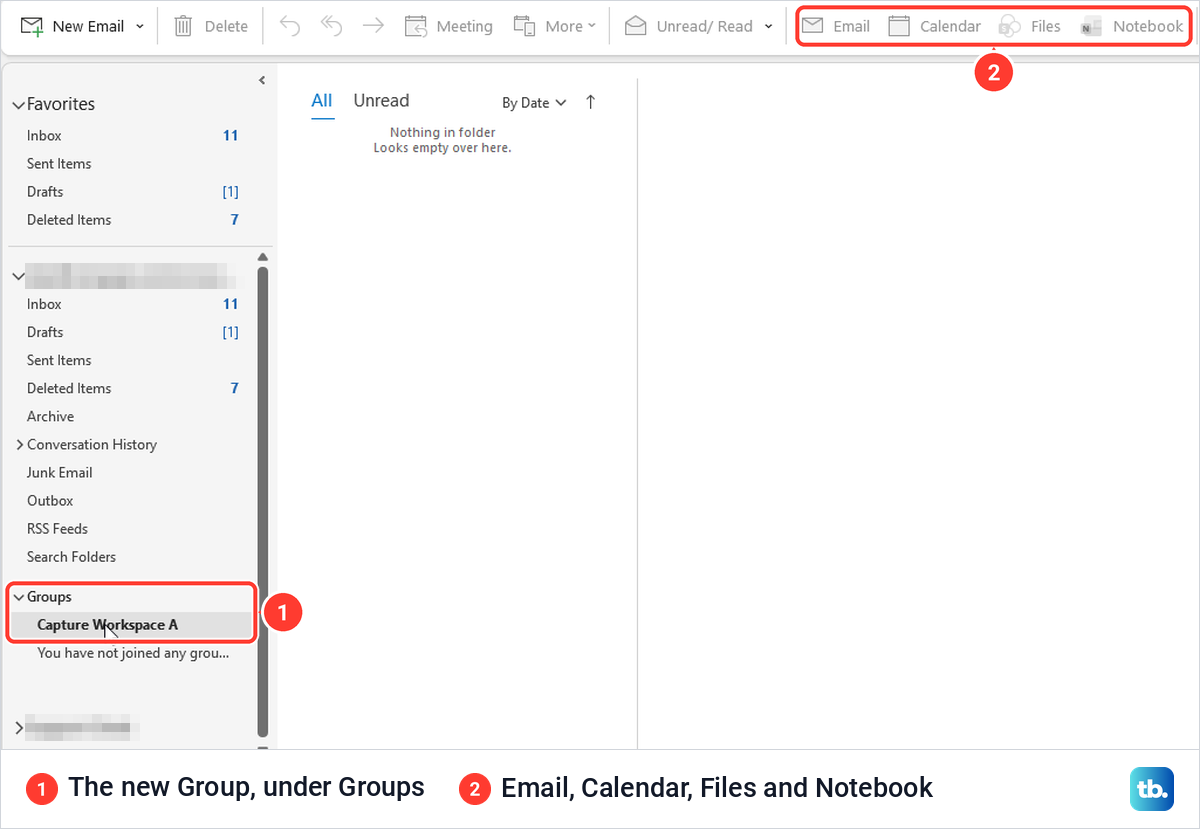
The new Group appears under Groups near the bottom of the Mail folder pane, not in the app bar. Select it and the ribbon switches to the Group's own tools, Email, Calendar, Files and Notebook. If all your team needs is one calendar, you can create a shared calendar in Outlook without making a Group at all.
Fix an unavailable Group address
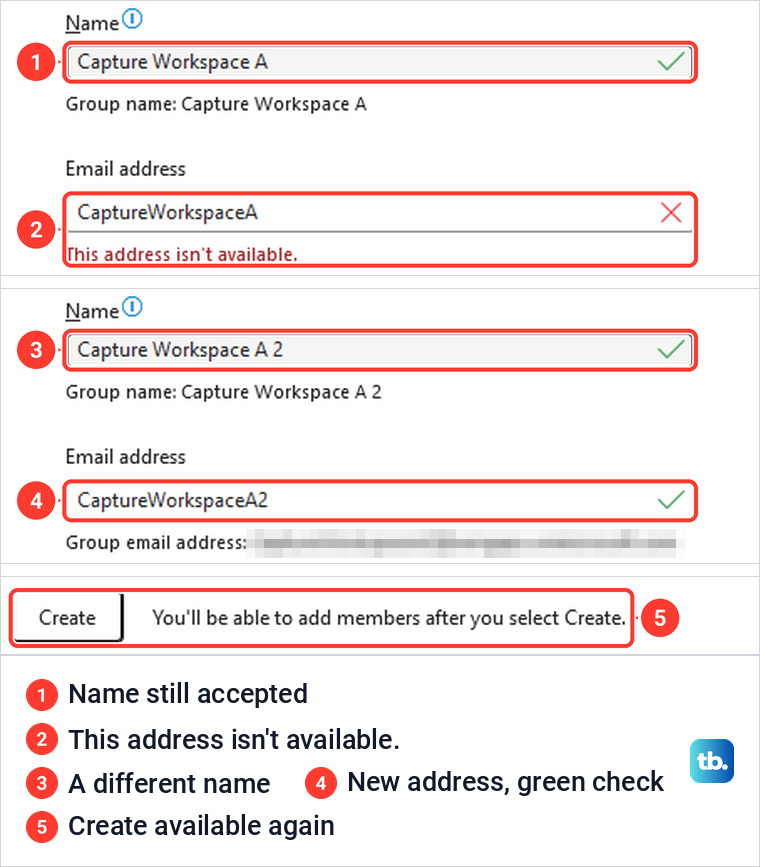
A name that is already taken did not show where we expected. Microsoft says a used name shows "Not available", but when we reused a Group name, the Name box kept its green check and the Email address box got a red X with "This address isn't available." Create stayed grey while the address was taken.
Changing the name fixed both at once. We added a 2 to the end of the name, Outlook rewrote the address to match with a green check, and Create came back. The More Settings link on the same form held only the language for group notifications.
Make a contact list in Outlook on the web
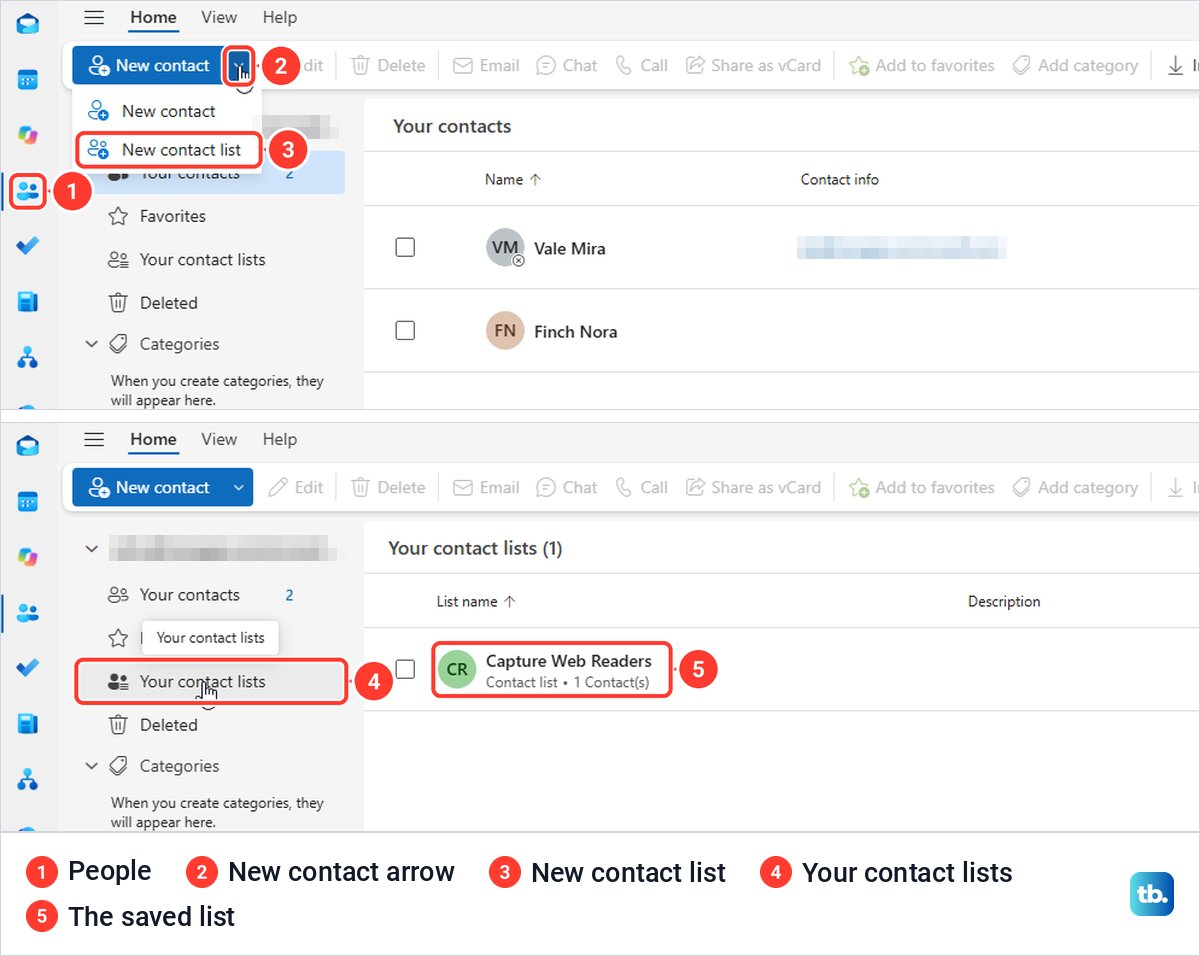
Outlook on the web keeps personal lists in People. Select People in the app bar, select the arrow beside New contact, and choose New contact list. Pressing Shift + L in People opened the same form for us.
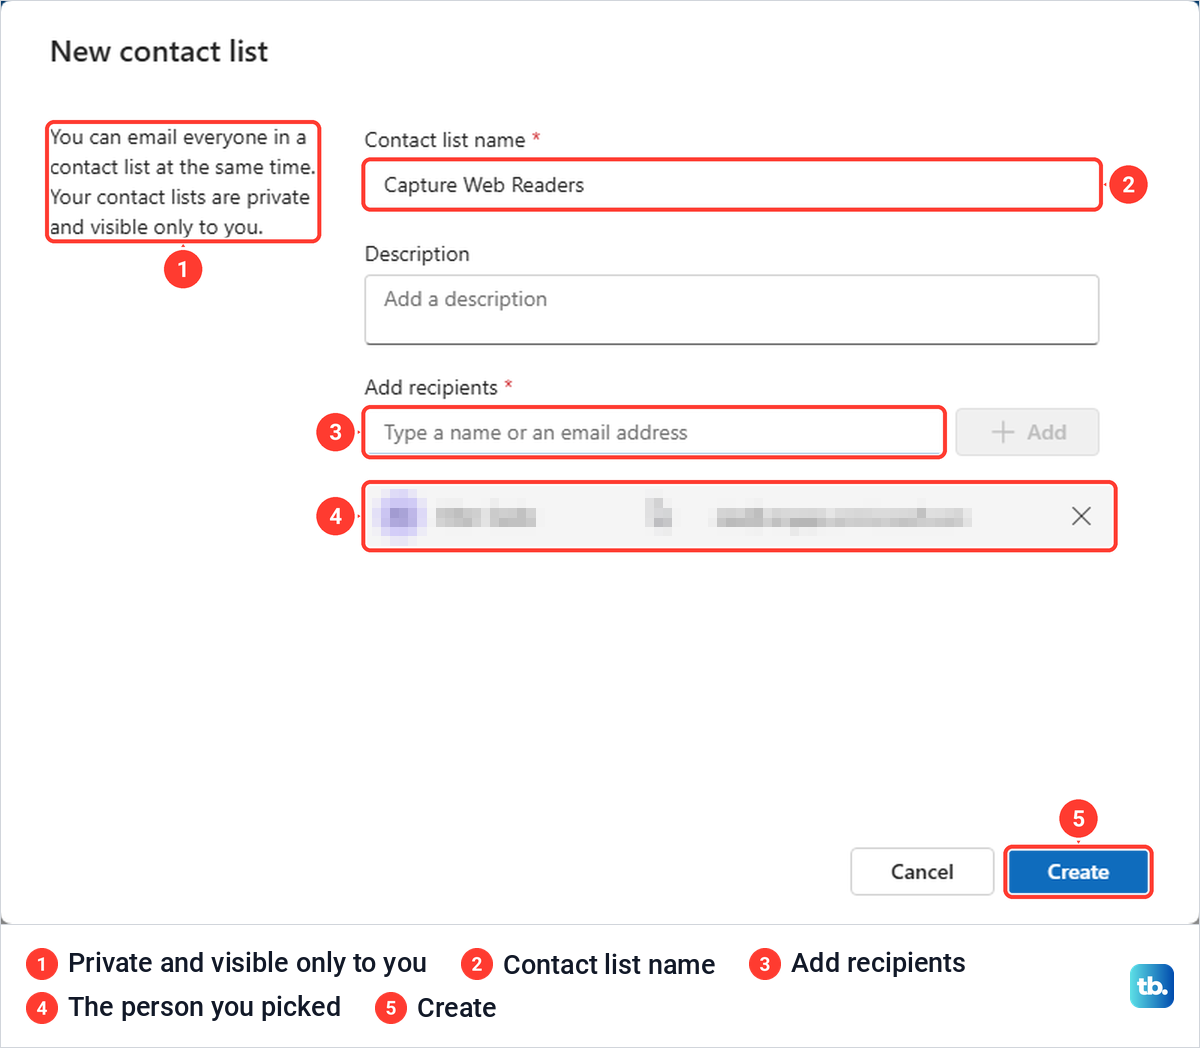
The form puts it plainly: "You can email everyone in a contact list at the same time" and "Your contact lists are private and visible only to you." Give the list a name, add a description if you want, and start typing in Add recipients. Picking a suggested person added them to the list at once, without a separate press of the Add button.
Select Create, and the list appears under Your contact lists in the folder pane, labelled Contact list with its number of contacts. To email everyone on it, Microsoft says to enter the list's name in the To line of a new message.
Why Add to list did not start a new list
Microsoft's contact list page gives a second route: select a contact, choose Add to list from the ribbon or the right-click menu, then New contact list. On the account we used, the ribbon had no Add to list at all, in either ribbon layout. Right-clicking a contact did show Add to list, but it opened a Find a contact list box that only searched lists we already had, and a new name returned "We didn't find any matches."
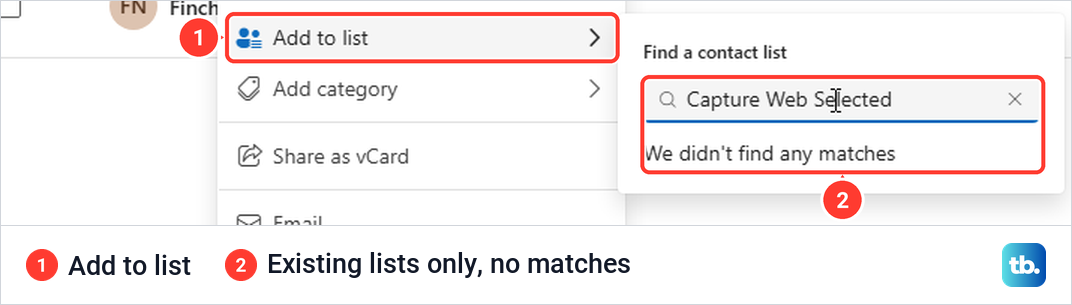
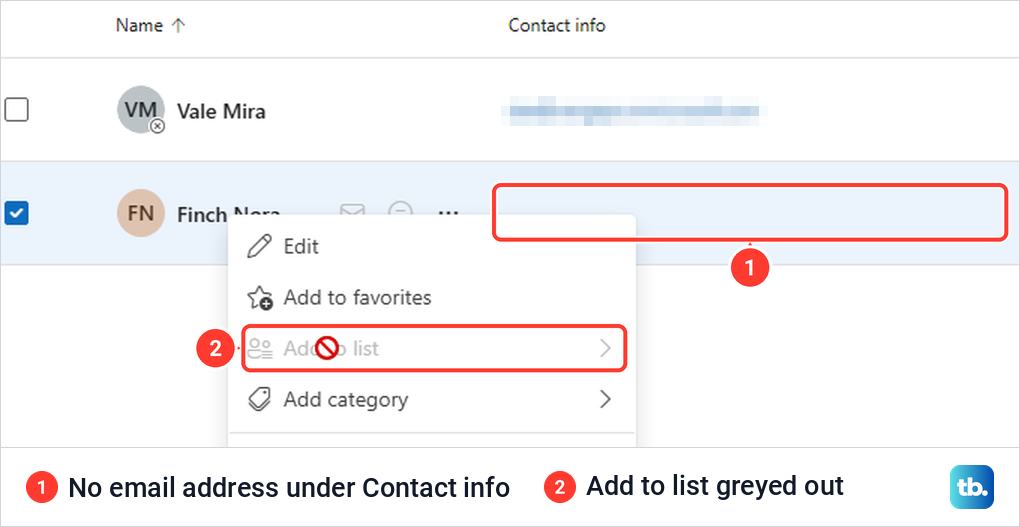
So use Add to list to put someone into a list that already exists, and the New contact arrow to start a new one. A contact also needs an email address. For a contact we saved without one, Add to list was greyed out in the right-click menu, with no message to say why.
Create a Microsoft 365 Group in Outlook on the web
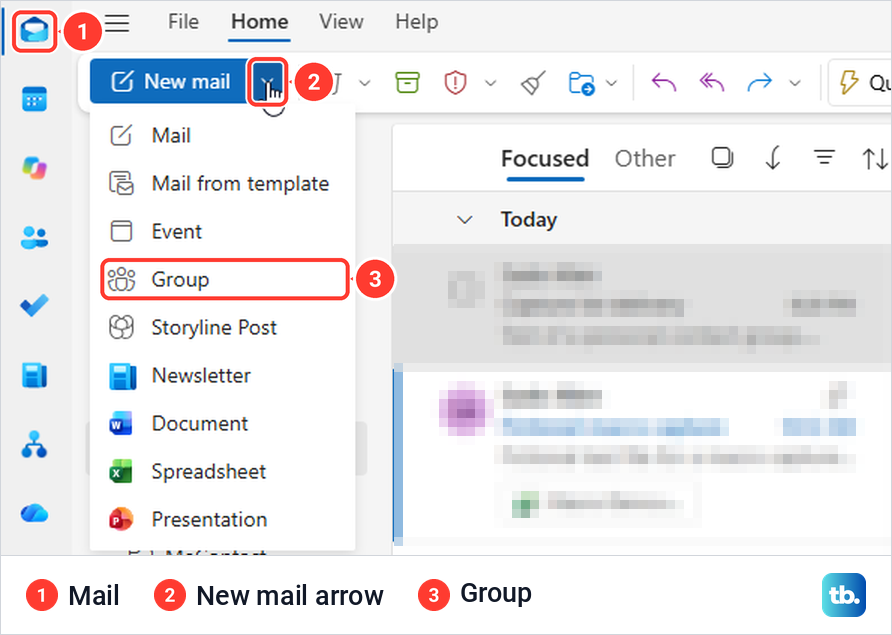
Microsoft says to select Groups in the app bar and then New Group. Our app bar had no Groups icon, even though this account was already a member of the group we made in classic Outlook. The route that worked was in Mail: select the arrow beside New mail and choose Group, between Event and Storyline Post.
The New group form starts with only a Name, a Description and a Default settings summary. As soon as you type a name, an Email address box appears below it, filled from the name in lower case, with the full group address underneath. You can change that address before you create the group.
Privacy is not on the first screen. Before you select Create, select Edit next to Default settings to see the Privacy list, set to Private by default, plus the language for group notifications and a box that sends all group conversations and events to members' inboxes.
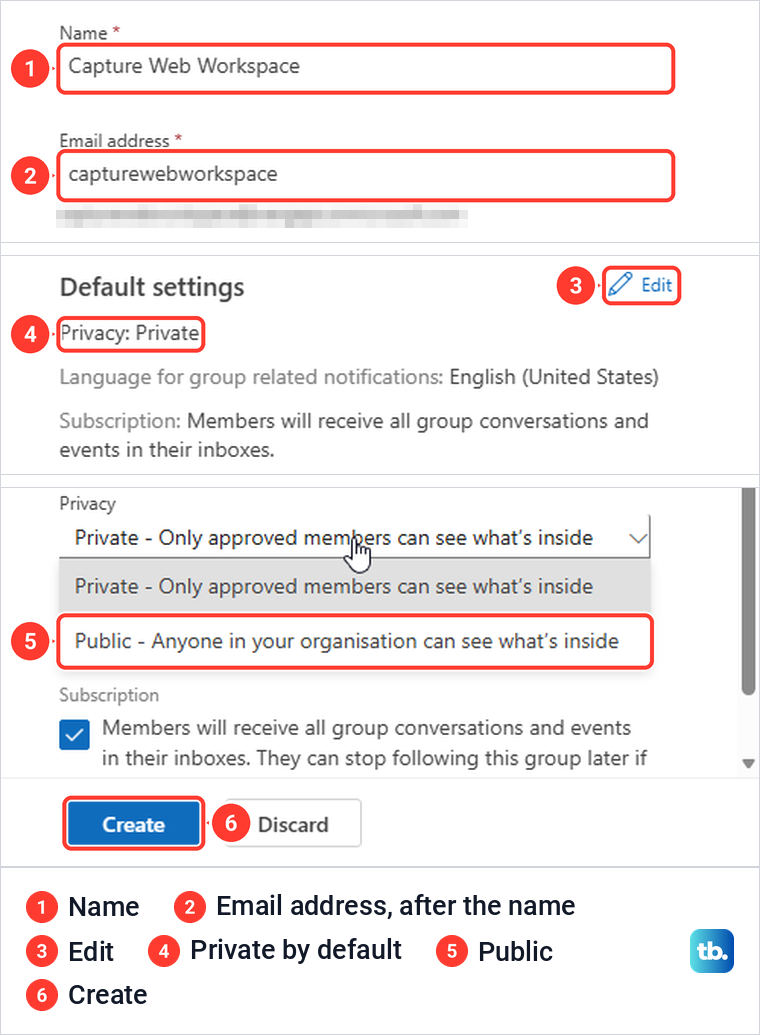
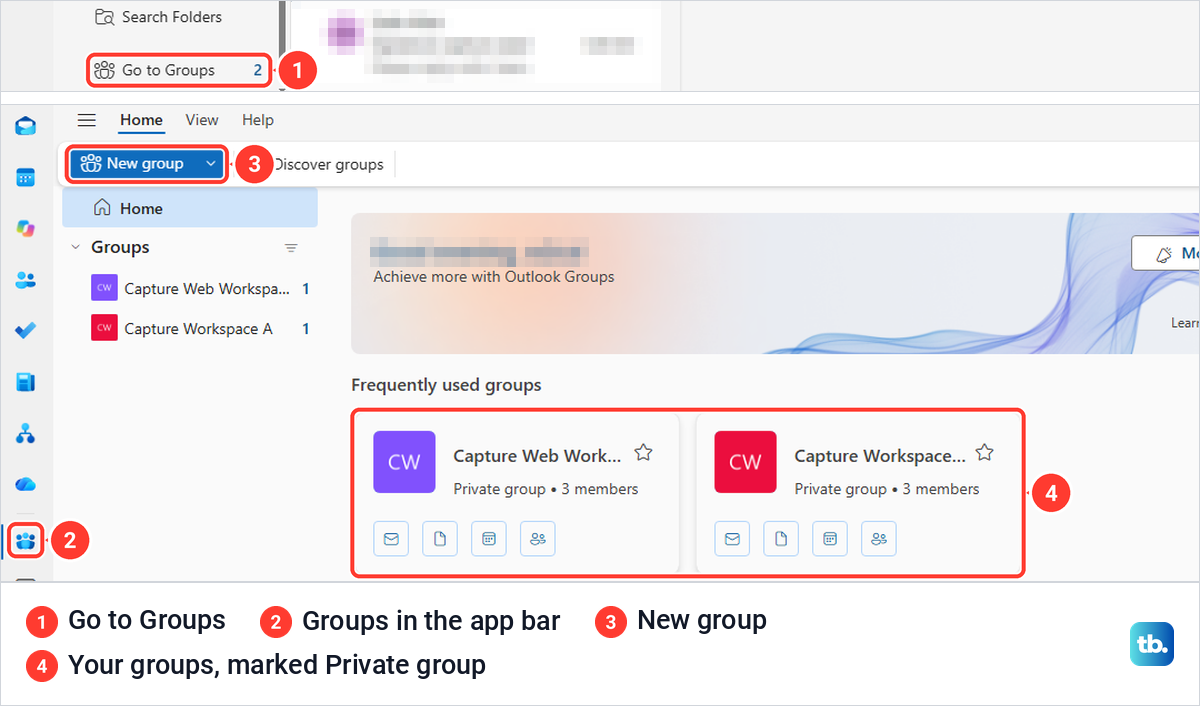
Select Create. The next screen said "Your group has been created" and offered Add and Not now, so on the web you can skip members and add them later. After we had created a group on the web, the app bar showed a Groups icon, and a Go to Groups link sat at the bottom of the Mail folder pane.
Go to Groups opens a Groups page with New group and Discover groups on the ribbon and a card for each group you belong to. Both of our groups showed there as Private group, including the one we made in classic Outlook.
Create a contact list or Group in new Outlook and Outlook.com
Microsoft says many features in new Outlook for Windows work the same or similarly to Outlook on the web. For a contact list, its steps are to select People, select a contact, choose Add to list from the ribbon or by right-clicking, then select New contact list. Its shortcut list gives Ctrl + L for creating a contact list in new Outlook.
If Add to list only offers lists you already have, as it did on the web for us, look for the arrow beside New contact, which is where the web version kept New contact list. Microsoft also notes that new Outlook calls these contact lists, while classic Outlook called them contact groups.
For a Microsoft 365 Group, Microsoft says to select Groups in the app bar or Go to Groups in the folder list, then New Group on the ribbon and New Group again in its menu. Enter a name and description, select Create, then add members or choose Not now. If you would rather use the classic Contact Group window shown above, here is how to switch back to old Outlook.
With a personal Outlook.com account, Microsoft's Group steps are to sign in to Outlook.com, select Groups in the app bar, then New Group on the ribbon and New Group again in its menu. Enter a name and description, select Create, then add members or choose Not now. Microsoft's contact list steps for Outlook.com are the same as its steps for Outlook on the web.
Create a list on a Mac or a Group on your phone
In Outlook for Mac, Microsoft's steps are to select People in the side bar, select the Contacts folder under the account you want, hover over New Contact and select New Contact List. Type a name, type each email address under Add members and select Add, then select Save.
Microsoft adds a note for POP and IMAP accounts: create the list in the Contacts folder under On My Computer. If New Contact List is greyed out there, its fix is to turn on Show On my Computer folders under Outlook > Settings > Display > Sidebar.
On an iPhone or Android phone, Microsoft's Outlook mobile steps make a Microsoft 365 Group, not a contact list, and need a qualifying work or school account. Tap the Home icon, tap the Microsoft 365 account to use, tap Home again, then tap Groups and Add New Group.
Enter a group name, and Microsoft says the address fills in by itself and is checked for availability. Tap Next, decide whether to turn on Follow in inbox, choose Public or Private, tap Next again, add members if you want and tap Create. If Add New Group is missing, Microsoft says group creation might not be enabled for you and to talk to your IT department.
When the group option or a member is missing
Start with the menus, not the settings. In our classic Outlook both kinds of group were inside split buttons, behind the small arrows beside New Contact and New Email, and on the web they were behind the arrows beside New contact and New mail. A missing Groups icon or New Group button did not mean groups were blocked.
Check which Outlook you have open, because classic Outlook, new Outlook and Outlook on the web put these commands in different places. If the menus in classic or new Outlook look nothing like the ones above, update Outlook on your device and look again.
If no menu offers Group at all on a work or school account, Microsoft gives two reasons: the account is not tied to a Microsoft 365 subscription, or your IT department has not enabled Microsoft 365 Groups for your organization, and it says to contact them for assistance. With a personal account, use the Outlook.com Group steps above instead. A personal contact group still covers repeat emails in the meantime.
If a contact group exists but its name never comes up as you type in To, use the To button and switch the Address Book to Contacts as shown above. If that does not help, see how to fix Outlook AutoComplete not working. If Outlook accepts the group in To but the message sits in the Outbox, the steps for Outlook not sending emails apply.
How we tested this guide
We tested this in Outlook for Microsoft 365 on Windows 11, version 25H2, and Outlook on the web in Microsoft Edge, building contact groups and Microsoft 365 Groups.
Frequently Asked Questions
Is a contact group the same as a Microsoft 365 Group?
No. A contact group is a private list of addresses you use to send email, while a Microsoft 365 Group is a shared space with its own address, conversations, calendar and files for every member. Use the first for repeat emails and the second when people need to work together.
Where is New Contact Group in classic Outlook?
On the Simplified Ribbon we used, it had no button of its own. In People, select the arrow beside New Contact and choose Contact Group, or press Ctrl + Shift + L.
Why can I not find my contact group when I select To?
The Select Names window can open on your organization's directory, which does not hold personal groups. Change the Address Book list to Contacts, and your contact groups appear in bold.
Why is Add to list greyed out for a contact?
On the account we used, it was greyed out for a contact saved without an email address. Add an address to the contact, then try again.
Why is there no Groups button in my Outlook?
Classic Outlook listed our groups in the Mail folder pane rather than the app bar, and Outlook on the web showed no Groups icon until we had created a group there, even though the account already belonged to one. Use the Group item under the New Email or New mail arrow, and if it is missing on a work or school account, ask your IT department. With a personal account, Microsoft's Outlook.com steps start from Groups in the app bar.
Can other people see my contact list?
The saved list, no. Outlook on the web says your contact lists are private and visible only to you. The message is different: everyone in To or Cc can see the other recipients, so put the list in Bcc to hide their addresses.
Do people know when I add them to a Microsoft 365 Group?
In our tests, yes. Each person we added to a new group received a welcome email from it within half an hour, and Microsoft says the group's description is included in that welcome email.