Your C: drive is full, Windows is nagging you about low disk space, or an update refuses to install because there is not enough room. You want that space back, and you want to know exactly which buttons to press.
Good news: Windows 11 has several built-in tools for this, and most of them take only a couple of minutes. The trick is knowing which one to reach for, and in what order, because some clear gigabytes in seconds while others need a little setup.
This guide walks through every verified method, quickest and most common first. Start at the top and stop once you have recovered enough space. The early steps are safe and reversible; the few irreversible ones are flagged clearly so you know before you commit.
Run Cleanup Recommendations First
This is the fastest native method in Windows 11 and usually the highest-value one. It surfaces the biggest, safest wins in one screen.
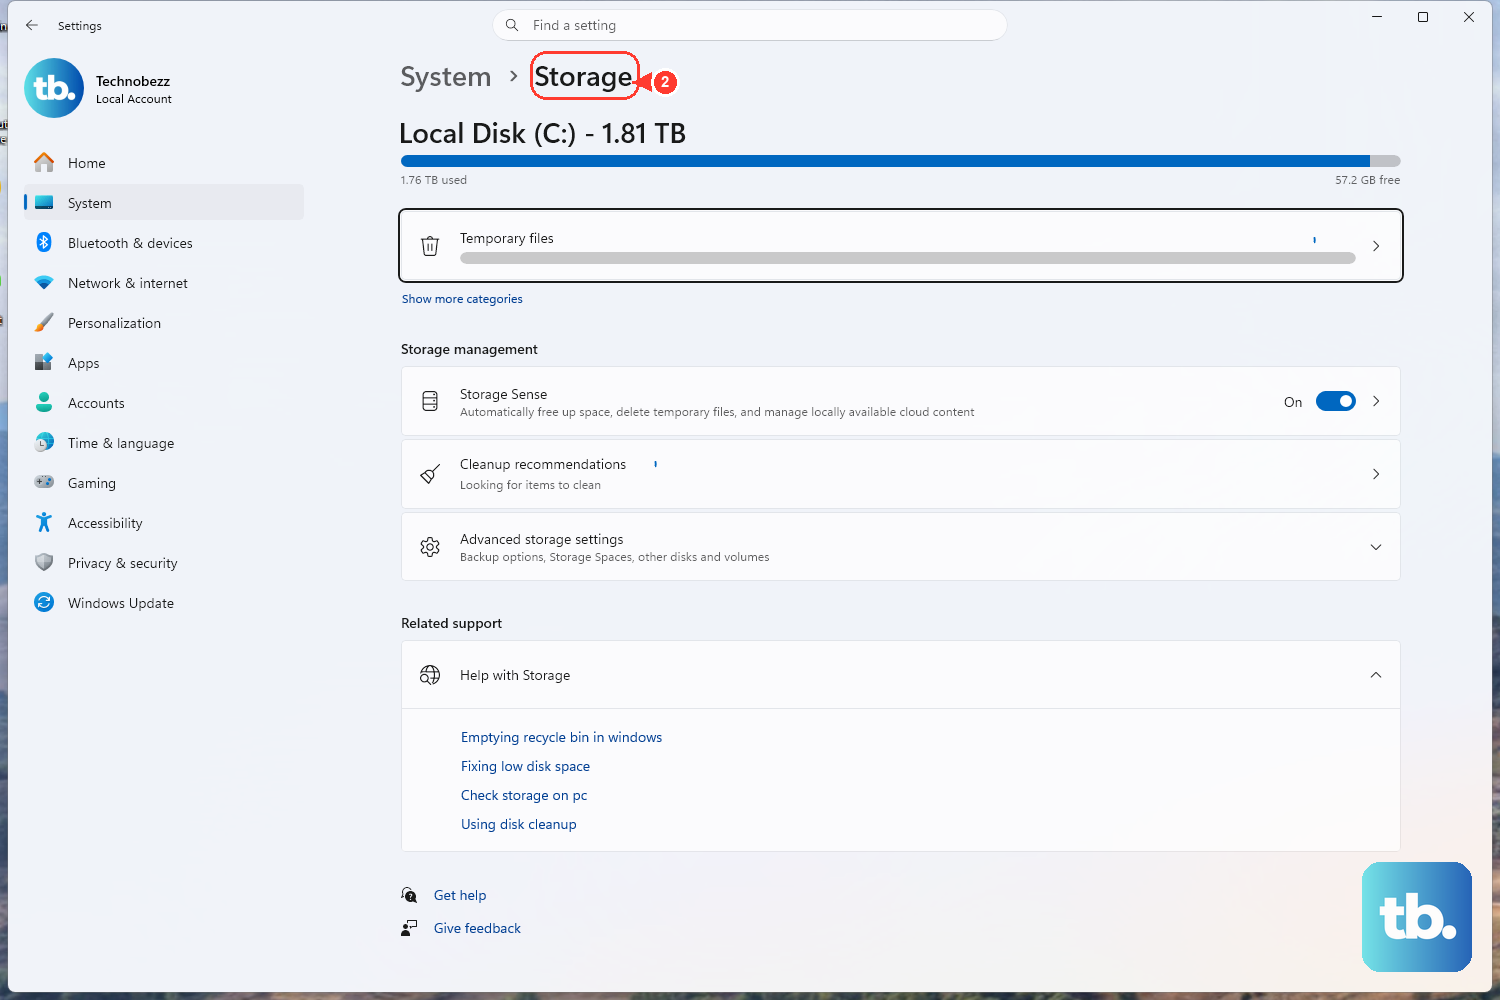
- 1.Go to Start > Settings > System > Storage.
- 2.Select Cleanup recommendations.
- 3.Review the categories: Temporary files, Large or unused files, Files synced to the cloud, and Unused apps.
- 4.Expand a category and tick the checkboxes for items you want to remove. Windows shows how much space each item frees.
- 5.Select the Clean up button for that section.
If it has been fewer than 10 days since you upgraded Windows, your previous installation will also appear here as a system file you can delete. That can reclaim several gigabytes, but deleting it is irreversible and removes your ability to roll back to the earlier version. After that window Windows removes it for you automatically.
Clear Temporary Files Manually
If you want finer control than Cleanup recommendations gives you, clear temporary files directly.
- 1.Go to Start > Settings > System > Storage.
- 2.Select Temporary files. Windows scans briefly, then lists categories with their sizes.
- 3.Tick the boxes for the categories you want to clear. These can include items like Windows Update Cleanup, Delivery Optimization Files, Recycle Bin, Thumbnails, and temporary files; the exact list varies by build and system.
- 4.Select the Remove files button.
Be aware of a recent change. After the KB5074105 update, this scan runs in a non-elevated context, so it may no longer detect or offer certain admin-restricted items such as Windows Update files and device drivers. To clear those, use the classic Disk Cleanup tool described further down.
Empty the Recycle Bin
Deleting files in File Explorer does not actually reclaim space. The files sit in the Recycle Bin until you empty it. If you have been deleting things and not seeing your free space grow, this is almost always why.
Right-click the Recycle Bin and select Empty Recycle Bin. Storage Sense (covered below) also clears it on a schedule once enabled.
Find and Move Large Personal Files
Videos, music, and photos are usually the heaviest items on a system drive. Track down the largest ones and move them off C:.
- 1.Open File Explorer and select This PC.
- 2.Open Videos, Music, Pictures, or Downloads.
- 3.Switch to View > Details and sort by Size to surface the largest files.
- 4.Delete the ones you no longer need, or Cut them and Paste onto an external USB drive or SD card.
- 5.Empty the Recycle Bin afterward, otherwise the space is not reclaimed.
Uninstall Apps You No Longer Use
Unused programs quietly hold onto disk space. There are three ways to remove them, depending on the app.
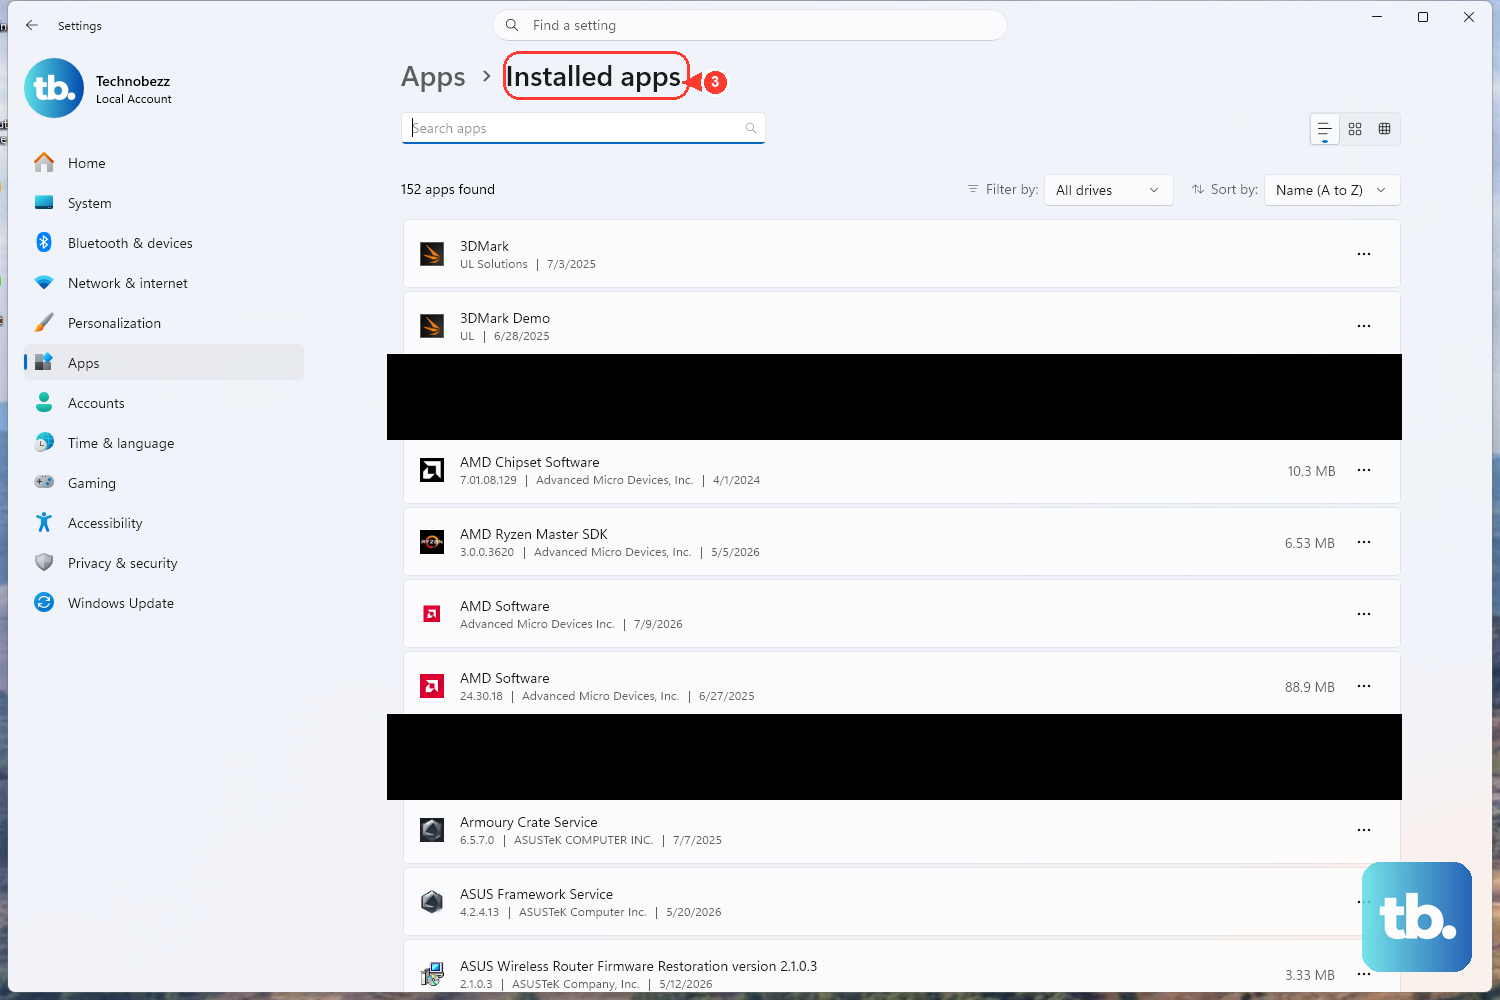
- Settings: Start > Settings > Apps > Installed apps, find the app, select More (the three-dot menu) > Uninstall.
- Start menu: open Start, locate the app, right-click it, then select Uninstall.
- Control Panel: for apps that cannot be removed via Settings, open Control Panel > Programs > Programs and Features, right-click the program, and select Uninstall (or Uninstall/Change).
Some apps cannot be uninstalled from the Settings app, which is exactly when the Control Panel route helps.
Turn On Storage Sense for Automatic Cleanup
Storage Sense automates the routine cleanups so your drive does not creep back to full.
- 1.Go to Start > Settings > System > Storage.
- 2.Set the Storage Sense toggle to On.
With default settings it runs when the device is low on disk space, clears unnecessary temporary files, and empties the Recycle Bin after a period. By default it does not touch your Downloads folder or OneDrive files unless you configure it to, and it works on the system drive (usually C:) only.
Configure the Storage Sense Schedule
By default Storage Sense only runs during low free disk space. For regular automatic cleanup, change the cadence.
- 1.Go to Start > Settings > System > Storage > Storage Sense.
- 2.Use the sections for Cleanup of temporary files, Automatic User content cleanup, Locally available cloud content, and Cleanup schedules.
- 3.Set the run cadence to one of During low free disk space, Every day, Every week, or Every month.
- 4.Set how long items stay in the Recycle Bin before deletion and how long unopened files stay in Downloads before deletion (Microsoft documents these as a 0 to 365 day threshold).
- 5.Set how long before unopened OneDrive content becomes online-only (the Windows 11 22H2 default is 30 days).
Use the Classic Disk Cleanup for System Files
The classic Disk Cleanup tool (cleanmgr) is still present in Windows 11 and runs elevated, so it can remove items the Settings scan now skips, such as Windows Update files. In current Windows 11 versions, opening it from a drive's Properties may redirect you to the Settings app, so it is simplest to launch the tool directly.
- 1.Open it by typing disk cleanup in the taskbar search box and selecting it from the results, or press Windows key + R, type cleanmgr.exe, and press Enter.
- 2.Select the drive to clean (for example C:) and select OK.
- 3.Tick the file categories to remove, such as Downloaded Program Files, Temporary Internet Files, Thumbnails, Recycle Bin, and Temporary files.
- 4.Select the Clean up system files button to expand additional categories.
- 5.After it rescans, options such as Windows Update Cleanup, Previous Windows installation(s), and System error memory dump files appear.
- 6.Select OK, then confirm with Delete Files.
Deleting previous Windows versions here cannot be undone, the same caveat as the Cleanup recommendations route.
Free Up Local Space with OneDrive Files On-Demand
If you sync OneDrive, your cloud files may be stored locally and eating disk space. Files On-Demand keeps them in the cloud while leaving them visible in File Explorer.
- 1.Make sure you are signed into OneDrive.
- 2.Select the OneDrive cloud icon in the notification area, then the OneDrive Help & Settings icon > Settings > Sync and back up tab > Advanced settings, and toggle on Files On-Demand.
- 3.In File Explorer, right-click a file or folder and select Free up space to convert it to online-only. The file stays in the cloud.
The status icons tell you what is local: a blue cloud means online-only (no local space used), a green outline circle with a white check means downloaded and locally available, and a solid green circle with a white check means Always keep on this device. Files marked Always keep on this device are exempt from Storage Sense and will not convert automatically. On Windows 11 22H2 and later, cloud files become online-only on their own if not opened for more than 30 days.
Redirect Where New Content Is Saved
To stop the system drive filling up again, send new files to a different drive.
- 1.Go to Start > Settings > System > Storage > Advanced storage settings.
- 2.Select Where new content is saved.
- 3.For each content type (apps, documents, music, photos and videos), choose an alternate drive.
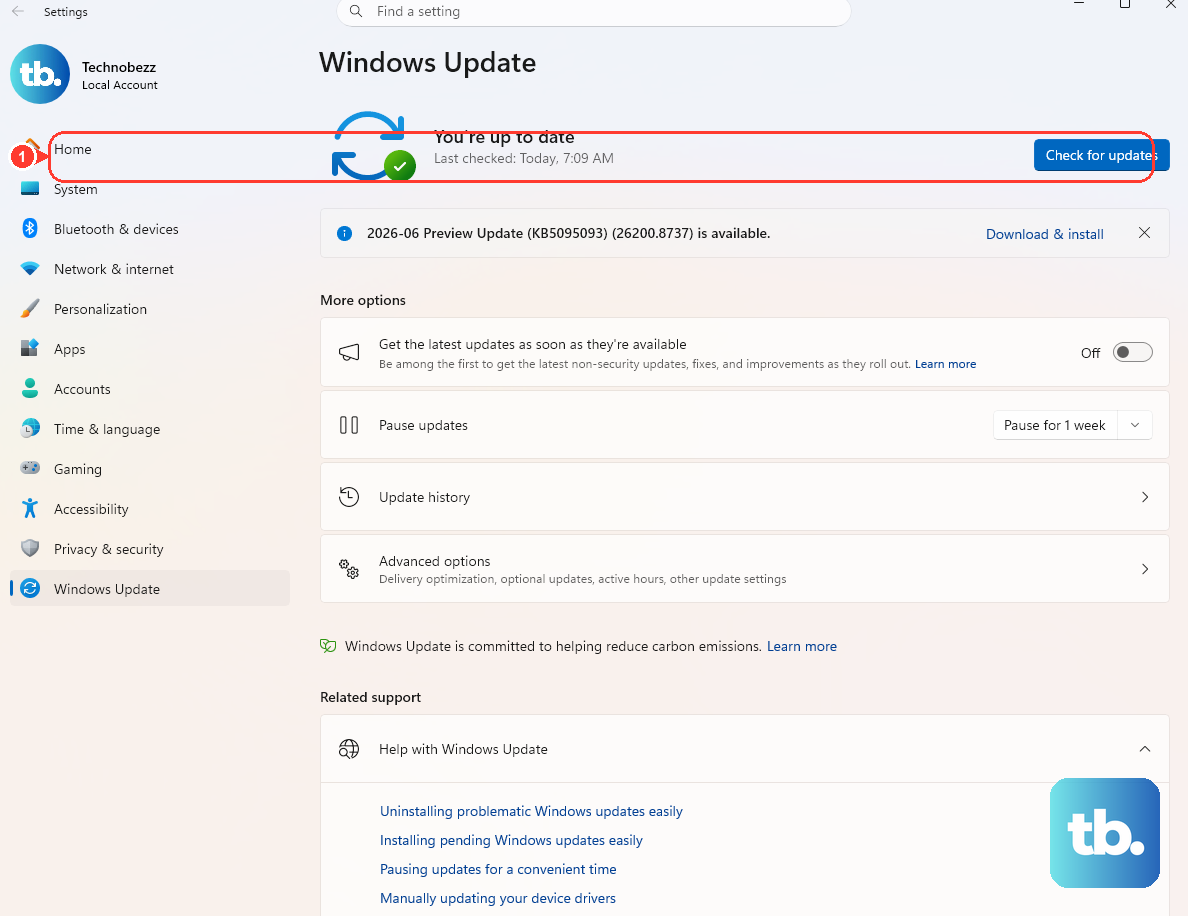
Use External Storage to Install a Stuck Update
Feature updates typically need 6 GB to 11 GB or more of free space, and quality updates need 2 GB to 3 GB or more. If your drive is too full, Windows shows a notification stating how much more space is needed.
- 1.First, free internal space using Cleanup recommendations and Storage Sense via Start > Settings > System > Storage.
- 2.Connect an external USB drive with at least 10 GB free.
- 3.In Windows Update, select the option to fix the issue. This launches a tool that uses the external storage to complete the update.
Rule Out Malware
If disk space keeps vanishing for no clear reason, malware can be the cause. Run a Windows Security antivirus scan to rule it out.
Frequently Asked Questions
Why does my free space not increase after I delete files? Deleting files in File Explorer only moves them to the Recycle Bin. The space is not reclaimed until you empty the Recycle Bin, so always empty it after a delete.
Is it safe to delete the previous Windows installation (Windows.old)? It safely recovers several gigabytes, but it is irreversible: deleting it removes your ability to roll back to the earlier Windows version. It only appears as a deletable item for fewer than 10 days after an upgrade, after which Windows removes it automatically.
Why does opening Storage settings now ask for admin access? After the KB5074105 update, Windows displays a User Account Control prompt when you open Storage settings. Microsoft's stated reason is to help ensure that only authorized users can access system files.
Why can't the Settings Temporary files tool remove Windows Update files anymore? After KB5074105, that scan runs non-elevated, so it no longer offers certain admin-restricted items like Windows Update files and drivers. Use the classic Disk Cleanup (cleanmgr), which still runs elevated and can remove them.
Does Storage Sense clean my other drives too? No. Storage Sense works on the system drive (usually C:) only. Manage other drives manually via Start > Settings > System > Storage > Advanced storage settings > Storage used on other drives.
Will Storage Sense delete my Downloads or OneDrive files automatically? Not by default. It does not touch your Downloads folder or OneDrive files unless you explicitly enable those cleanups in the Storage Sense settings, and files marked Always keep on this device are always exempt.


