That whirring, jet-engine noise coming from your PC usually means the fan is fighting to cool a system that is working harder than it should. Sometimes a single runaway process is pinning your processor; other times the vents are clogged with dust and the hardware is genuinely overheating. The good news is that most causes are fixable in a few minutes, and you can work through them safely from easiest to most hands-on. Here are seven ways to quiet a loud, constantly running fan on Windows 10 and Windows 11.
Restart, then watch Task Manager to find what is loading your system
A constantly running, loud fan almost always means the CPU is under sustained load. Start by closing the apps and browser tabs you are not using, then give the machine a clean slate: select Start > Power > Restart, and after it reboots, open only the apps you actually need.
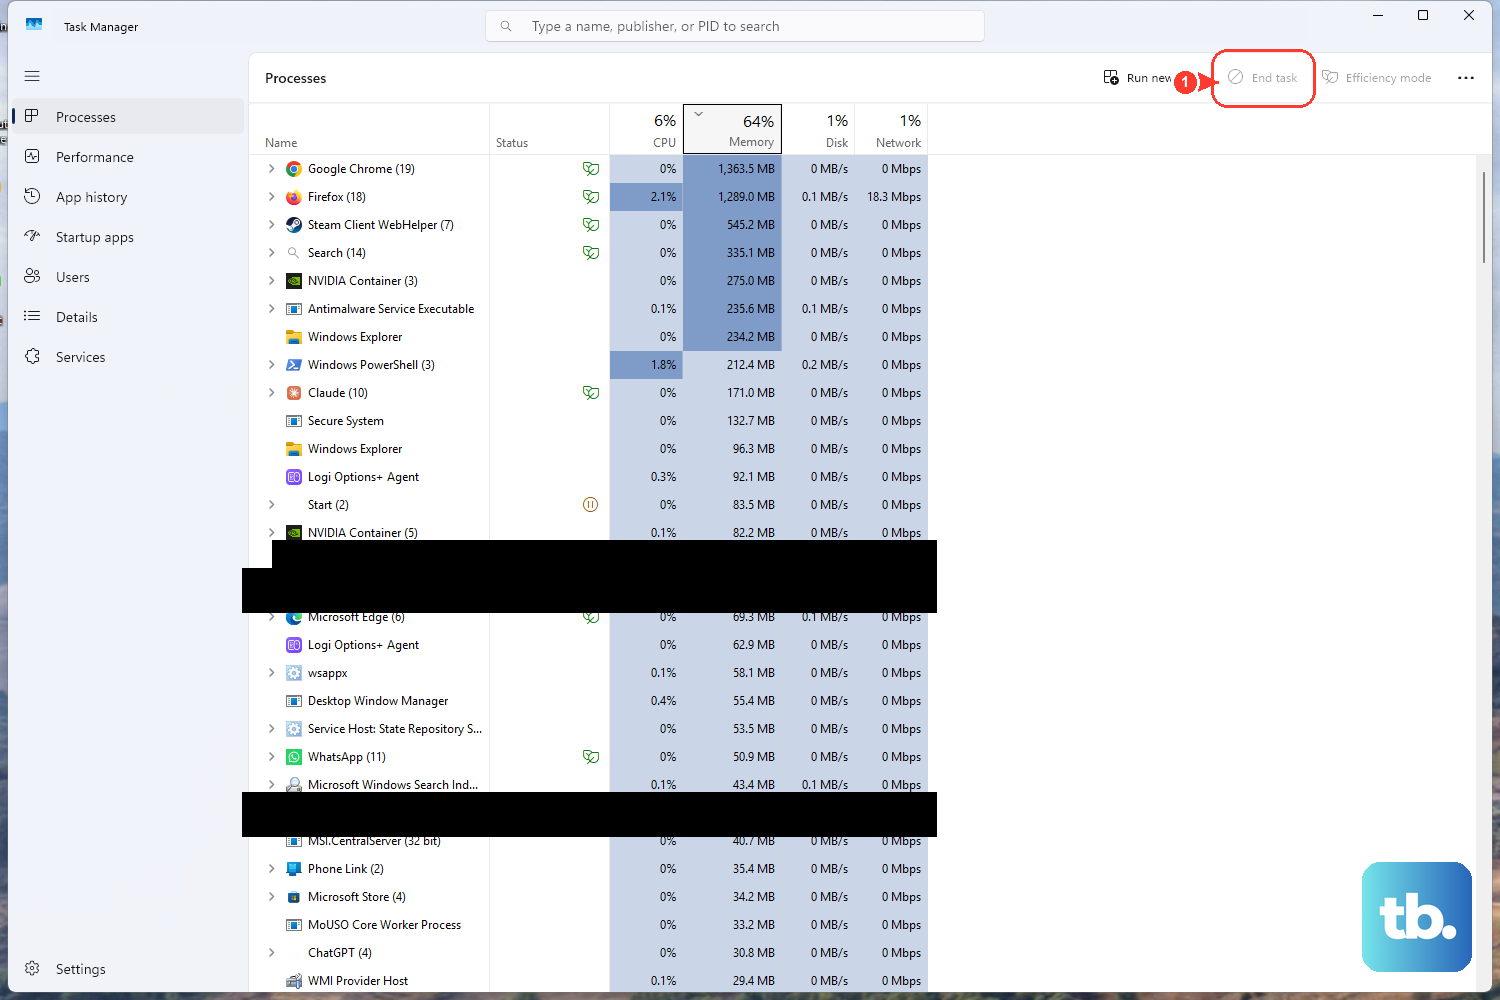
Now find the culprit. Press Ctrl + Shift + Esc to open Task Manager directly (you can also press Ctrl + Alt + Delete and then select Task Manager). On the Processes tab, click the CPU, Memory, and Disk column headers one at a time to sort by each, and see which process sits at the top.
If you spot something heavy that you do not need, right-click it and select End task. Even a small but steady background load can keep the fans spinning faster than necessary, so look for anything stuck high and clear it out.
Scan for malware that is pinning your processor
Malware frequently maxes out the CPU at 100 percent in the background, which forces the fan to run nonstop. Built-in Windows Security can catch most of it without any extra software.
- 1.Open Windows Security: go to Start > Settings > Privacy & security > Windows Security > Virus & threat protection (Windows 10 and 11).
- 2.Select Quick scan. This checks the places malware most often hides.
- 3.If you want a deeper check, choose Scan options > Full scan to scan every file and program on the drive.
A full scan takes longer, but it is worth running once if your fan only calms down when the PC is idle yet spikes the moment it boots.
Install Windows updates, and clear a stuck one
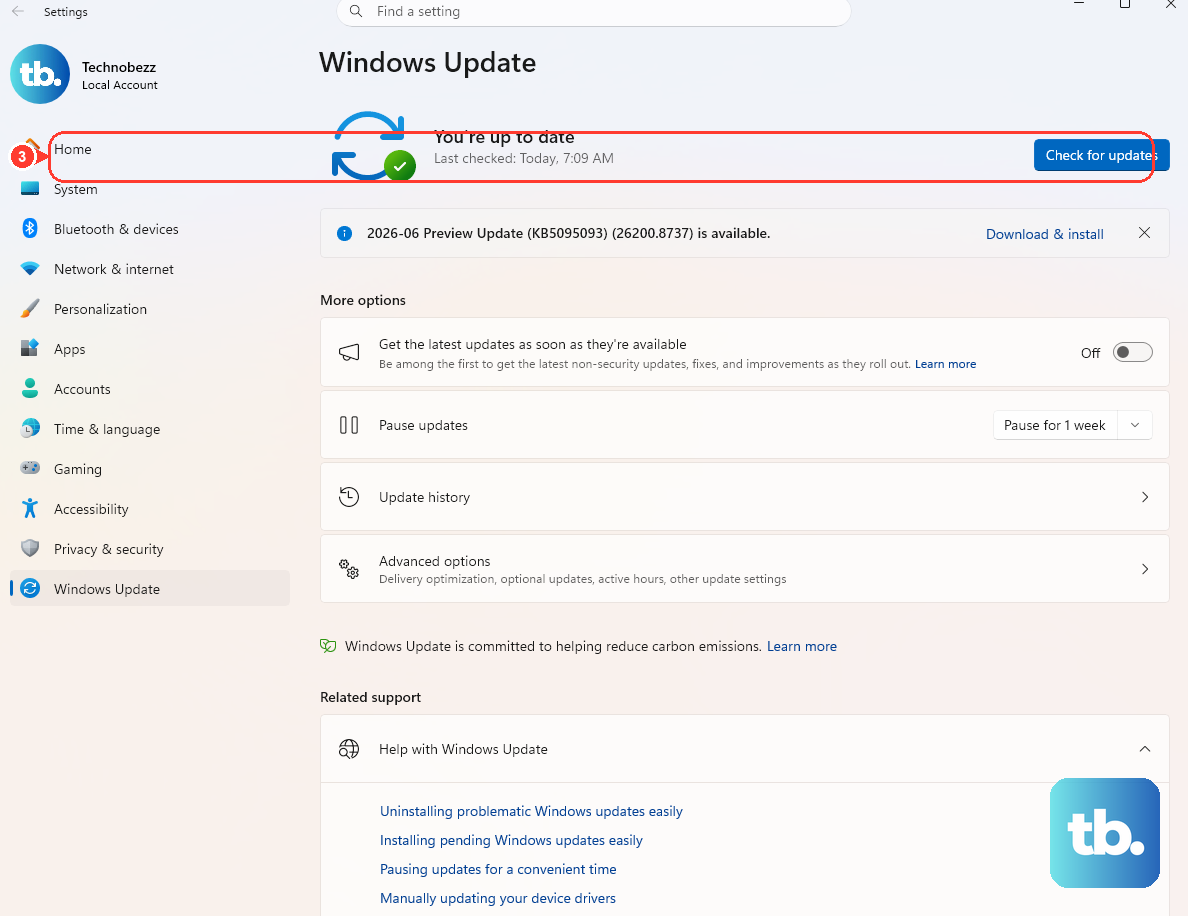
A background Windows Update can drive the CPU high and keep the fan loud until it finishes, so the first move is simply to let it complete. Then install everything pending: go to Start > Settings > Windows Update > Check for updates and install anything available.
If updates are stuck or looping, the noise can persist for far longer than it should. On Windows 11, the documented fix is to run the Windows Update troubleshooter from the Get Help app, or go to Settings > System > Troubleshoot > Other troubleshooters and select Run next to Windows Update, then restart.
Keeping the system current also pulls in the latest drivers, which can resolve thermal and performance quirks on their own.
Trim startup apps and free up disk space
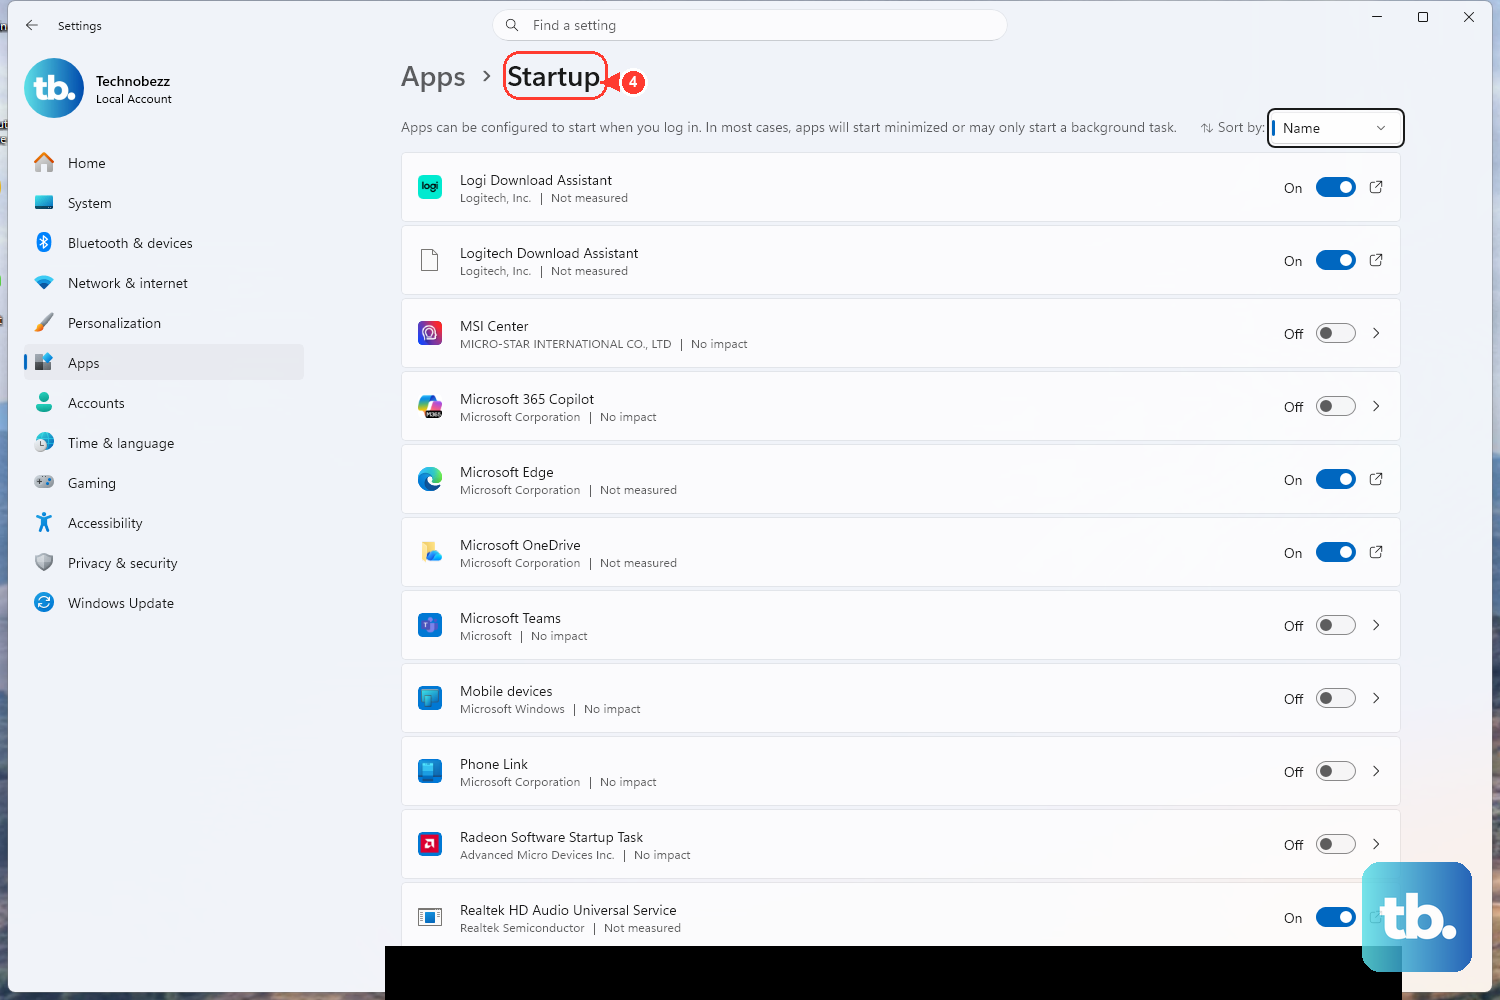
Apps that launch at startup keep running quietly in the background and pile onto the load that keeps the fan spinning. Cutting them back lowers the baseline your system has to maintain.
- 1.Open Task Manager with
Ctrl + Shift + Esc. - 2.Go to the Startup apps tab.
- 3.Select apps you do not need launching at startup and disable them.
Windows performance guidance also recommends turning off background apps and unnecessary notifications to cut down on background activity. The fewer things competing for the processor, the less work the cooling system has to do.
A nearly full drive can force constant disk activity that keeps the system busy, and that activity shows up as heat and fan noise. The easiest way to clear room is Storage Sense: go to Start > Settings > System > Storage, then review the cleanup recommendations and remove what you do not need. You can also use Disk Cleanup. Type disk cleanup in the taskbar search box, open it, choose the drive, select the file types to remove, then click OK. To reclaim even more, choose Clean up system files.
Tame Windows Search indexing if SearchIndexer is the cause
If Task Manager shows the Windows Search or SearchIndexer process driving your disk or CPU, the right approach is to reduce what it indexes and rebuild a misbehaving index, not to kill the service. Microsoft explicitly warns against "Optimize your PC" tools that disable the Windows Search service: "We recommend that you don't run such applications if you want to use Search."
First, exclude folders you do not need indexed. On Windows 11, go to Settings > Privacy & security > Searching Windows > Add an excluded folder. On Windows 10, go to Settings > Search > Searching Windows > Add an excluded folder.
If the index itself is corrupted, rebuild it. On Windows 11, go to Settings > Privacy & security > Searching Windows > Advanced indexing options > Advanced > Rebuild. On Windows 10, go to Settings > Search > Searching Windows > Advanced Search Indexer Settings > Advanced > Rebuild. A full rebuild can take a while, so leave the PC on until it finishes.
For a stubborn index, there is a documented administrator Command Prompt sequence that defragments and reclaims space in the search index database. This sequence briefly stops the search service, cleans the database, and then re-enables and restarts the service, so it is not a permanent disable. Back up anything you are working on first, open Command Prompt as an administrator, and run these commands in this exact order:
- 1.
Sc config wsearch start=disabled - 2.
Net stop wsearch - 3.
EsentUtl.exe /d %AllUsersProfile%\Microsoft\Search\Data\Applications\Windows\Windows.edb - 4.
Sc config wsearch start=delayed-auto - 5.
Net start wsearch
The final two commands set the service back to start automatically (start=delayed-auto) and start it again, so search keeps working once the database is cleaned up.
Set the power mode and lighten visual effects
Power and performance settings directly affect how hard the system, and therefore the fan, has to work. Dialing them down is one of the safest ways to bring the noise under control.
To lower power draw and heat, go to Start > Settings > System > Power & battery, then under Power mode choose Best power efficiency (Windows 10 and 11). On HP machines specifically, HP recommends selecting Best power efficiency from the Power mode list to help a constantly spinning fan settle down.
You can also lighten the load by reducing visual effects. Open Start, type Adjust the appearance and performance of Windows, open it, and on the Visual Effects tab choose Adjust for best performance. Fewer animations mean less work for the graphics and processor.
Clear the vents, update firmware, and use your maker's fan software
If the software side is calm but the fan is still roaring, the machine is likely overheating because airflow is blocked. Dust and debris build up in the vents over time and force the fans to work harder to move air.
Use canned air for laptops, or carefully clear the rear and side vents on desktops, to remove the buildup. While you are at it, visually inspect that no wires or debris are touching the fan blades, since contact can make the noise worse and impede spinning.
Placement matters too. Keep at least 15.25 cm (6 in) of clearance around each vent, set a laptop on a hard, level surface like a desk, and avoid cloth surfaces such as a lap, bed, or couch cushion. Soft surfaces block the intake and cause overheating that keeps the fan at full speed.
Outdated firmware or drivers can also leave fans running at full speed even when the system is otherwise idle. For HP computers, HP advises checking for a BIOS update, and on select HP models using HP CoolSense or HP Command Center, which automatically adjust performance and fan speed to keep the computer cool. Always download firmware and fan-control software from your computer maker's own support site, since these tools and BIOS files are model-specific. Finally, keep Windows itself current for the latest drivers via Settings > Windows Update, including any optional driver updates offered there.
Frequently Asked Questions
Why does my computer fan run constantly even when I am not doing anything?
A background process is usually keeping the CPU busy, or the vents are blocked and the system is overheating. Press Ctrl + Shift + Esc to open Task Manager and sort by CPU to find any process stuck high. If nothing stands out in software, check the vents for dust and make sure airflow is not blocked.
Can malware make my fan loud?
Yes. Malware often pins the CPU at 100 percent in the background, which forces the fan to run nonstop. Run a scan from Start > Settings > Privacy & security > Windows Security > Virus & threat protection, starting with a Quick scan and following up with a Full scan if you want a deeper check.
Should I disable Windows Search to stop the fan noise?
No. Microsoft warns against tools that disable the Windows Search service and recommends against running them if you want to use Search. Instead, exclude folders you do not need indexed, or rebuild the index from the Searching Windows settings. The documented command sequence that defragments the index database also re-enables the service at the end, so it is never a permanent disable.
How much space should I leave around my computer's vents?
Keep at least 15.25 cm (6 in) of clearance around each vent so air can move freely. Place a laptop on a hard, level surface like a desk and avoid cloth surfaces such as a lap, bed, or couch cushion, which block the intake and cause overheating.
Will changing the power mode actually quiet the fan?
It can help, because power settings affect how hard the system and fan work. Go to Start > Settings > System > Power & battery and choose Best power efficiency under Power mode on Windows 10 and 11. HP recommends this same setting to help a constantly spinning fan settle.


