Tuesday brings a fresh set of NYT Pips puzzles. Today's lineup features a 16-domino grid across all three difficulty levels, with a heavy concentration of exact-number zones and equal-condition restraints. The navy (=) and green (=) zones appear multiple times, creating tight constraints that ripple across the board. We've got hints, step-by-step walkthroughs, and full solutions for Easy, Medium, and Hard difficulty levels.
How to Play Pips
Pips is a domino placement puzzle where you fill a grid of color-coded zones. Each zone has a condition you must satisfy using the pip values on your dominoes. The twist: you must use every domino and meet every condition to win.
Zone Conditions:
- = All pips in this zone must equal the same number
- Not Equal All pips must be different numbers
- > Pips must be greater than the listed number
- < Pips must be less than the listed number
- Exact Number Pips must total that exact value
- No Color Free space, any domino value works
Click or tap dominoes to rotate them. Each puzzle has one or more valid solutions.
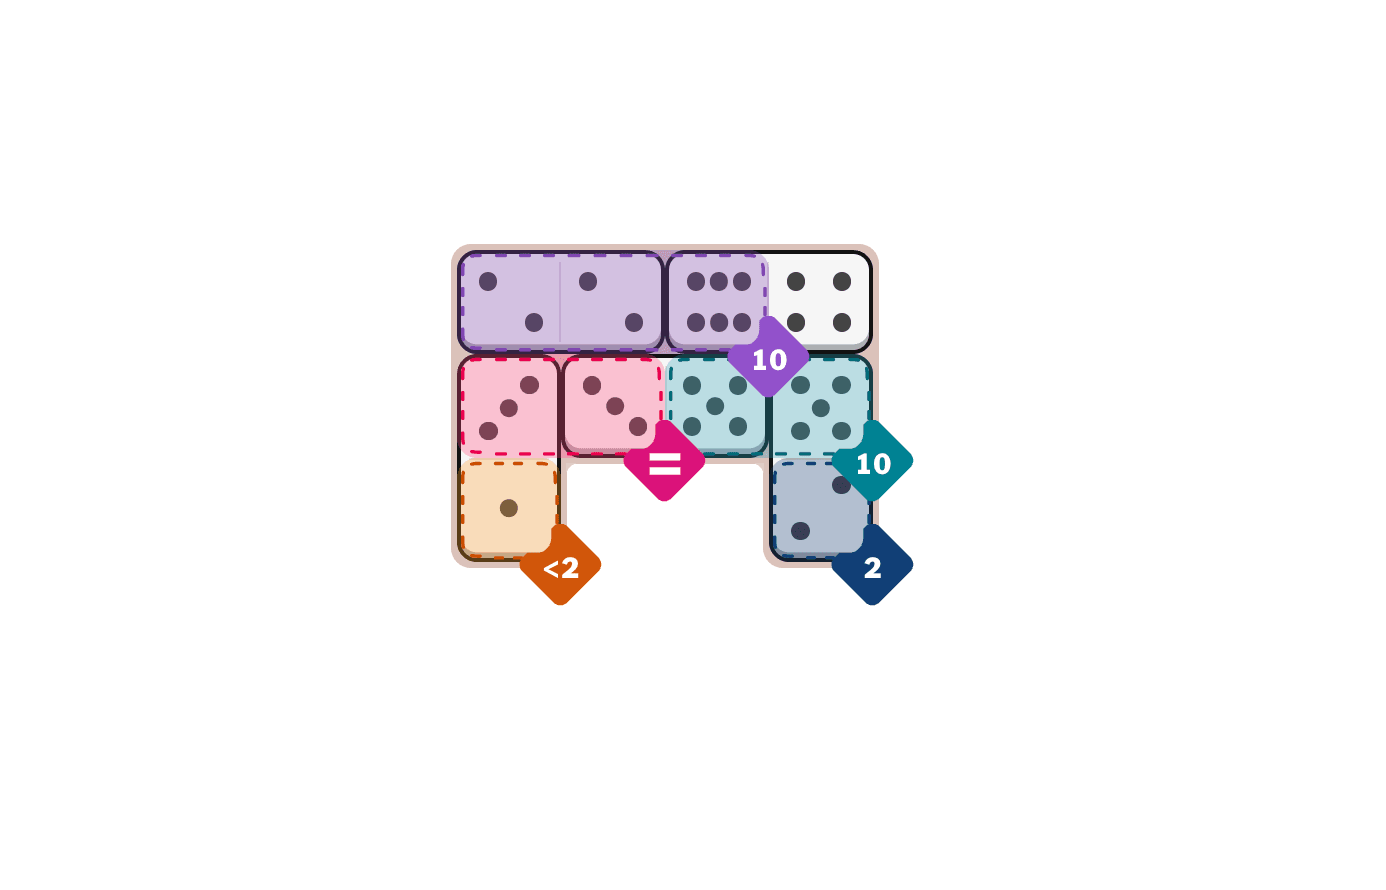
Today's Easy Pips
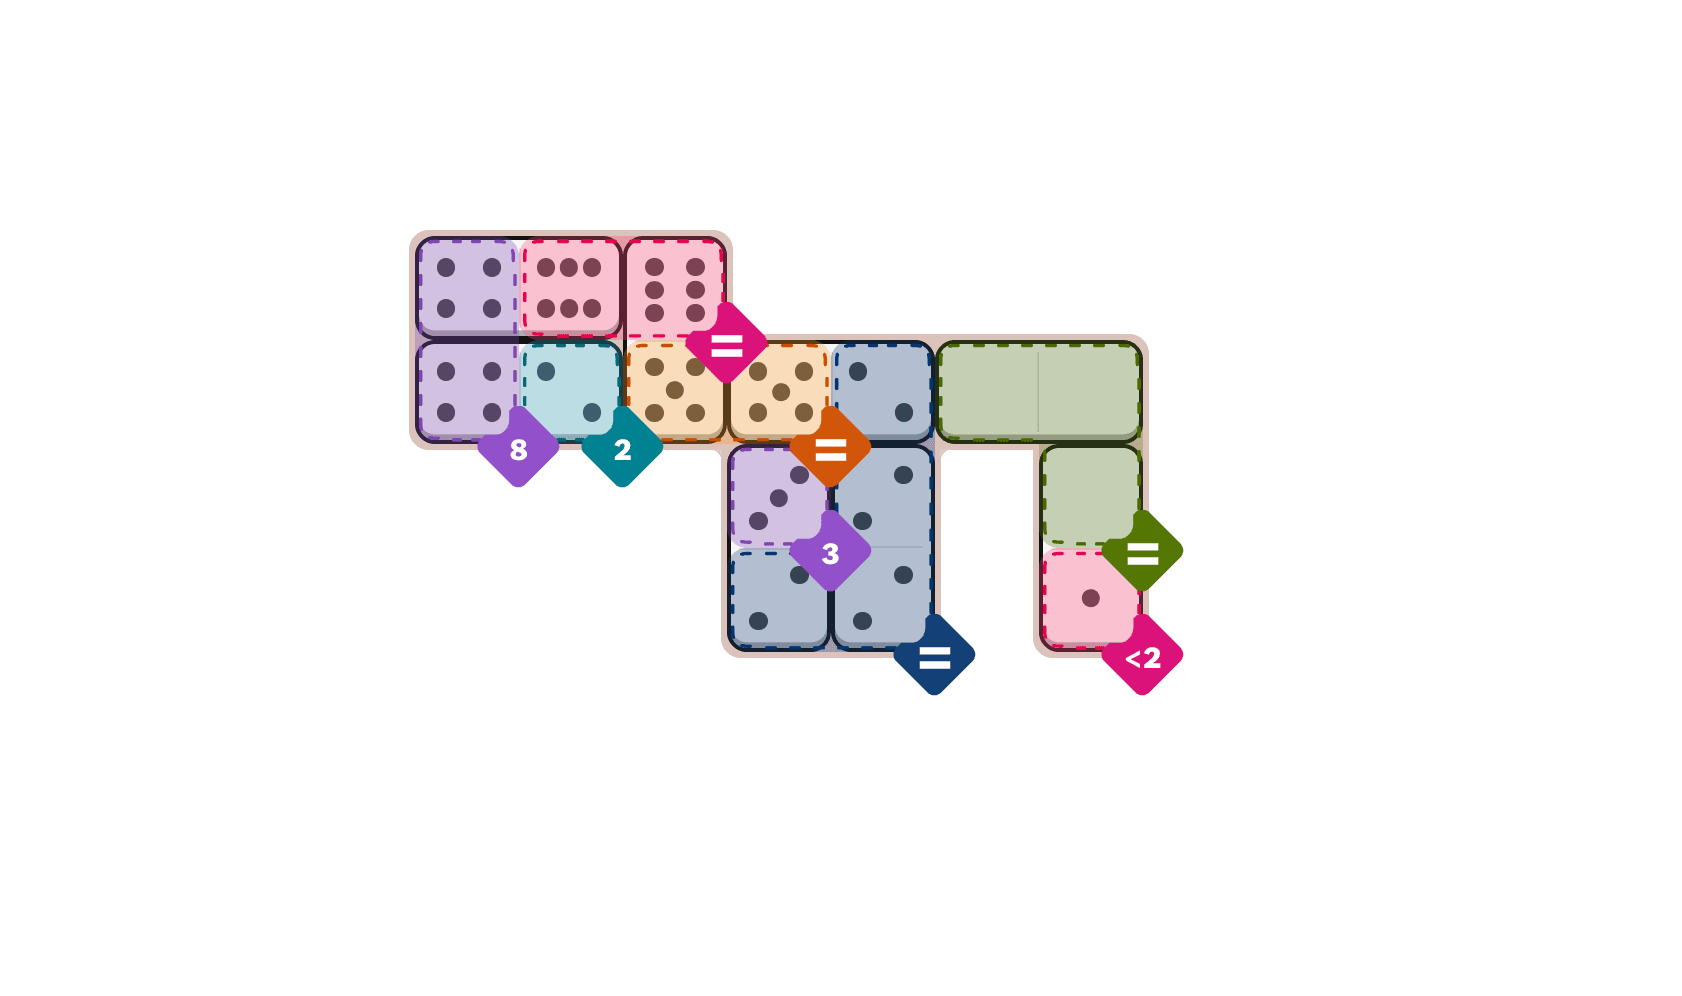
Today's Medium Pips
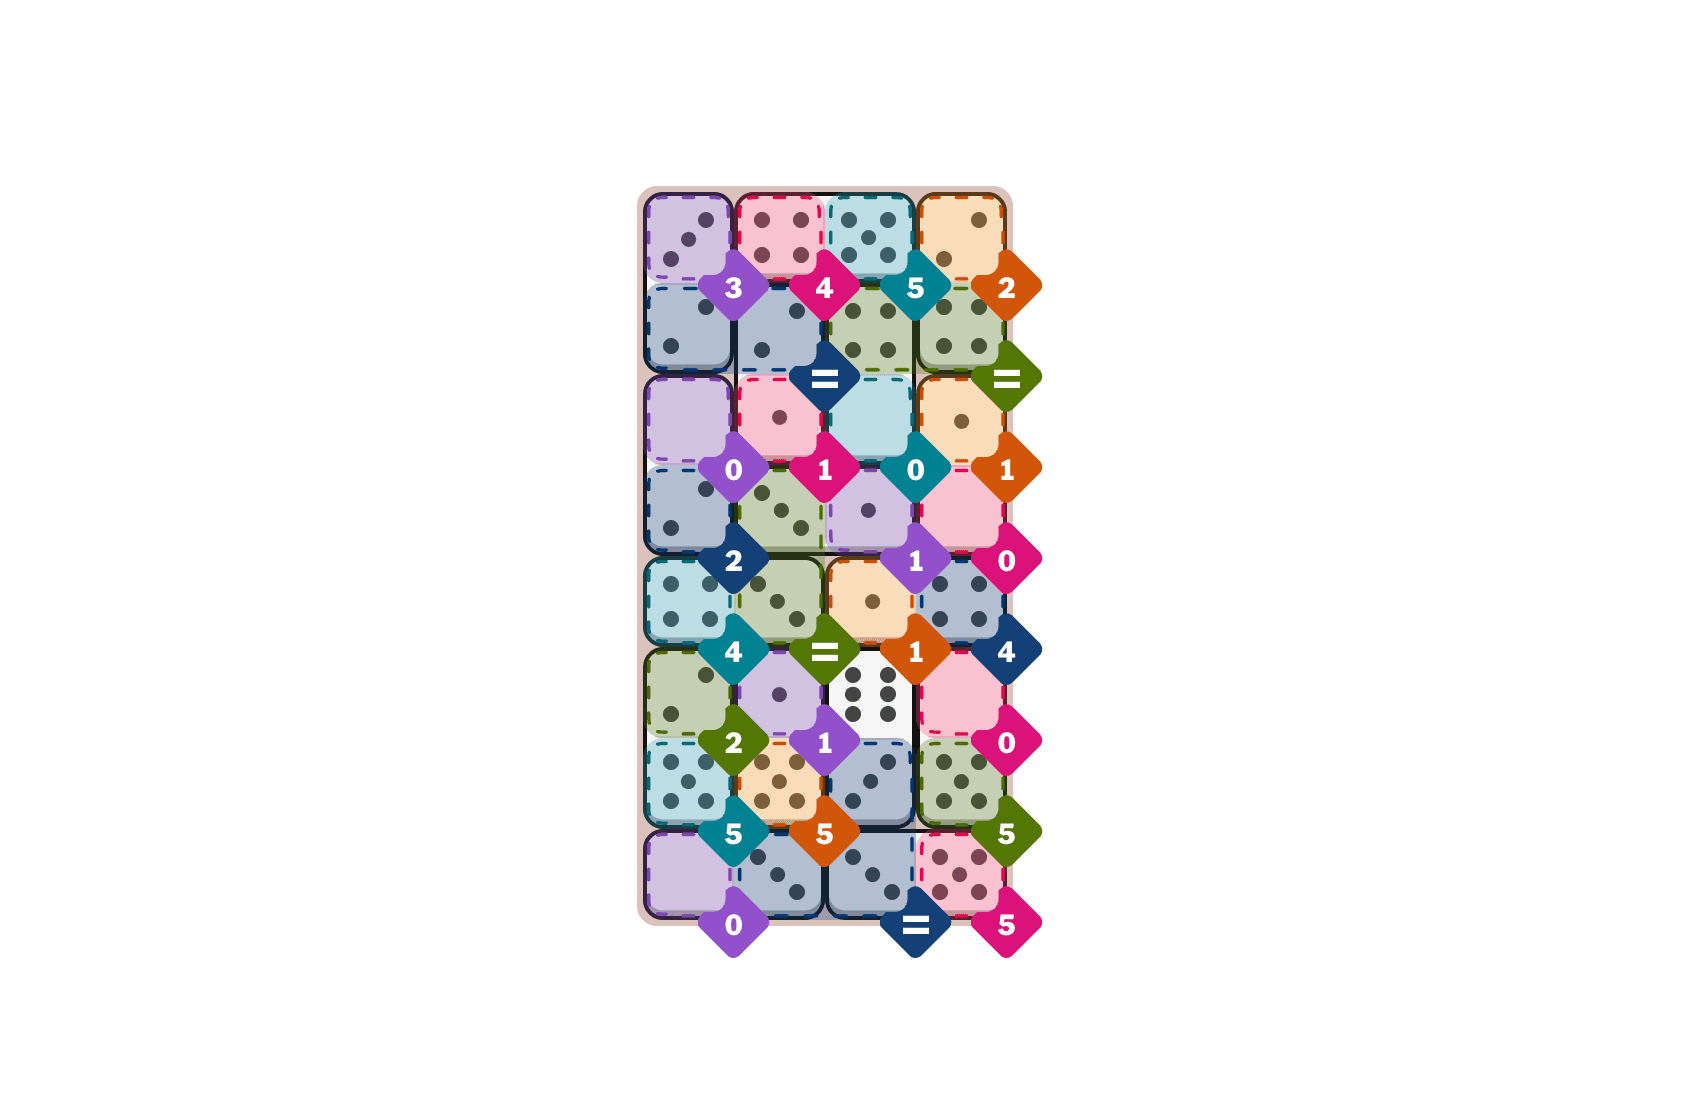
Today's Hard Pips
Quick Hints (No Spoilers)
Starting Point: Lock in the navy (=) and green (=) equal-condition zones first. These appear multiple times across the grid and their values propagate through the entire solution. A wrong value early means cascading failures later.
Key Insight: There are multiple navy (=) and green (=) zones, each with its own established value. Navy (=) zones use values 2, 1, 4, and 3. Green (=) zones use values 4, 1, 3, and 5. Track each one independently -- confusing them is the number-one failure mode.
Watch Out For: The exact-number zones with low targets are the most restrictive. Purple (0) and pink (0) can only accept domino halves with a pip value of 0. Orange (1) and purple (1) can only accept domino halves with a pip value of 1. The 0-value domino halves (0/2, 0/5, 0/3, 1/0, 4/0) are in high demand -- use them efficiently or you will run out before satisfying all the zero-sum zones.
Step-by-Step Walkthrough
- 1.Purple (3) needs exactly 3. The 3/2 domino has a 3 on one end. Place it vertically in purple (3) and navy (=). This establishes the navy (=) zone's value at 2. Every subsequent domino placed in this navy (=) zone must carry a 2 on the navy side.
- 2.Pink (4) needs exactly 4. The 4/5 domino has a 4 on one end. Place it horizontally in pink (4) and teal (5). Both exact-number zones are satisfied. The 4/5 domino is now locked.
- 3.Orange (2) needs exactly 2. The 2/4 domino has a 2 on one end. Place it vertically in orange (2) and green (=). This establishes the green (=) zone's value at 4. Every subsequent domino in this green (=) zone must carry a 4 on the green side.
- 4.Navy (=) from step 1 has a value of 2. The 2/1 domino has a 2 on one end. Place it vertically in the same navy (=) zone and pink (1). The navy (=) zone now has two 2s, consistent. Pink (1) gets the 1, satisfying its exact-number condition.
- 5.Green (=) from step 3 has a value of 4. The 4/0 domino has a 4 on one end. Place it vertically in the same green (=) zone and teal (0). The green (=) zone now has two 4s, consistent. Teal (0) gets the 0, satisfying its exact-number condition.
- 6.Navy (2) needs exactly 2. The 0/2 domino has a 2 on one end. Place it vertically in purple (0) and navy (2). Navy (2) gets the 2, satisfied. Purple (0) gets the 0, partially satisfying its condition.
- 7.A different green (=) zone needs its value established. The 3/1 domino has a 1 on one end. Place it horizontally in this green (=) zone and purple (1).
- 8.Orange (1) needs exactly 1. The 1/0 domino has a 1 on one end. Place it vertically in orange (1) and pink (0). Orange (1) gets the 1, satisfied. Pink (0) gets the 0, satisfying its condition.
- 9.Teal (4) needs exactly 4. The 4/3 domino has a 4 on one end. Place it horizontally in teal (4) and a green (=) zone. Teal (4) gets the 4, satisfied. The 3 must match the green (=) zone's established value, this works for a green (=) zone where 3 is the baseline.
- 10.Orange (1) needs another 1. The 1/4 domino has a 1 on one end. Place it horizontally in orange (1) and navy (4). Orange (1) gets another 1, satisfied. Navy (4) gets the 4.
- 11.Green (2) needs exactly 2. The 2/5 domino has a 2 on one end. Place it vertically in green (2) and teal (5). Green (2) gets the 2, satisfied. Teal (5) gets the 5.
- 12.There is another purple (1) zone that needs exactly 1 total. The 1/5 domino has a 1. Place 1/5 vertically in purple (1) and orange (5). Purple (1) gets the 1, satisfied. Orange (5) gets the 5.
- 13.The uncolored zone has no condition. The 6/3 domino goes vertically in the uncolored zone and a navy (=) zone. The 3 must match the navy (=) zone's established value.
- 14.Pink (0) needs exactly 0. The 0/5 domino has a 0. Place it vertically in pink (0) and green (5). Pink (0) gets the 0, satisfied. Green (5) gets the 5.
- 15.Purple (0) needs exactly 0. The 0/3 domino has a 0. Place it horizontally in purple (0) and a navy (=) zone. Purple (0) gets the 0, satisfied. The 3 must match the navy (=) zone's established value.
- 16.The final navy (=) zone and pink (5) zone remain. The 3/5 domino has a 3 matching the navy (=) value and a 5 for pink (5). Place it horizontally. All 16 dominoes placed, all conditions satisfied.
Hard Pips Solution
Last chance to solve independently
---
---
---
---
---
- 1.Place the 3/2 domino vertically in the purple (3) zone and navy (=) zone
- 2.Place the 4/5 domino horizontally in the pink (4) zone and teal (5) zone
- 3.Place the 2/4 domino vertically in the orange (2) zone and green (=) zone
- 4.Place the 2/1 domino vertically in the navy (=) zone and pink (1) zone
- 5.Place the 4/0 domino vertically in the green (=) zone and teal (0) zone
- 6.Place the 0/2 domino vertically in the purple (0) zone and navy (2) zone
- 7.Place the 3/1 domino horizontally in the green (=) zone and purple (1) zone
- 8.Place the 1/0 domino vertically in the orange (1) zone and pink (0) zone
- 9.Place the 4/3 domino horizontally in the teal (4) zone and green (=) zone
- 10.Place the 1/4 domino horizontally in the orange (1) zone and navy (4) zone
- 11.Place the 2/5 domino vertically in the green (2) zone and teal (5) zone
- 12.Place the 1/5 domino vertically in the purple (1) zone and orange (5) zone
- 13.Place the 6/3 domino vertically in the uncolored (no condition) zone and navy (=) zone
- 14.Place the 0/5 domino vertically in the pink (0) zone and green (5) zone
- 15.Place the 0/3 domino horizontally in the purple (0) zone and navy (=) zone
- 16.Place the 3/5 domino horizontally in the navy (=) zone and pink (5) zone
Puzzle Debrief
Overall Difficulty: Moderate to challenging. The 16-domino grid is larger than average, and the multiple equal-condition zones (navy = and green = appearing four times each) create a complex web of constraints that requires careful tracking.
Trickiest Puzzle: All three levels share the same grid and solution, so the Hard label comes from the absence of hints and the demand for precise pip-counting discipline. The real trap is the equal-condition zones -- placing a domino with the wrong matching value in a navy (=) or green (=) zone breaks the entire solution, and with 16 dominoes, backtracking is painful.
Our Take: Today's set is a masterclass in constraint propagation. The navy (=) and green (=) zones create a chain of dependencies that forces you to think multiple moves ahead. The zero-sum zones (purple 0, pink 0) add a resource-management layer -- there are only so many 0-value domino halves available, and you need to reserve them for the right spots. It is not a casual solve. It is a proper logic workout.
Tomorrow's Pips drops at midnight. See you then.