When your iPhone 17 Pro Max's email stops working, it can be incredibly frustrating. Whether you're missing important messages or can't send emails, these issues disrupt your daily communication. The good news is most email problems have straightforward solutions.
Before diving into troubleshooting, check these basics first. Make sure you're connected to the internet, either via Wi-Fi or cellular data. Verify your email service provider isn't experiencing an outage by checking their status page. Also, confirm you're using the correct email address and password.
Check Your Mail Fetch Settings
Your iPhone's mail fetch settings control how often your device checks for new emails. If these settings aren't configured properly, you might not receive messages automatically. Go to Settings > Mail > Accounts > Fetch New Data.
Turn on Push if it's available for your account type. If Push isn't available, it will default to Fetch. Choose a fetch setting like Automatically or set a specific time interval. Your device will fetch new data in the background only when charging and connected to Wi-Fi.
Switch Between Wi-Fi and Cellular Data
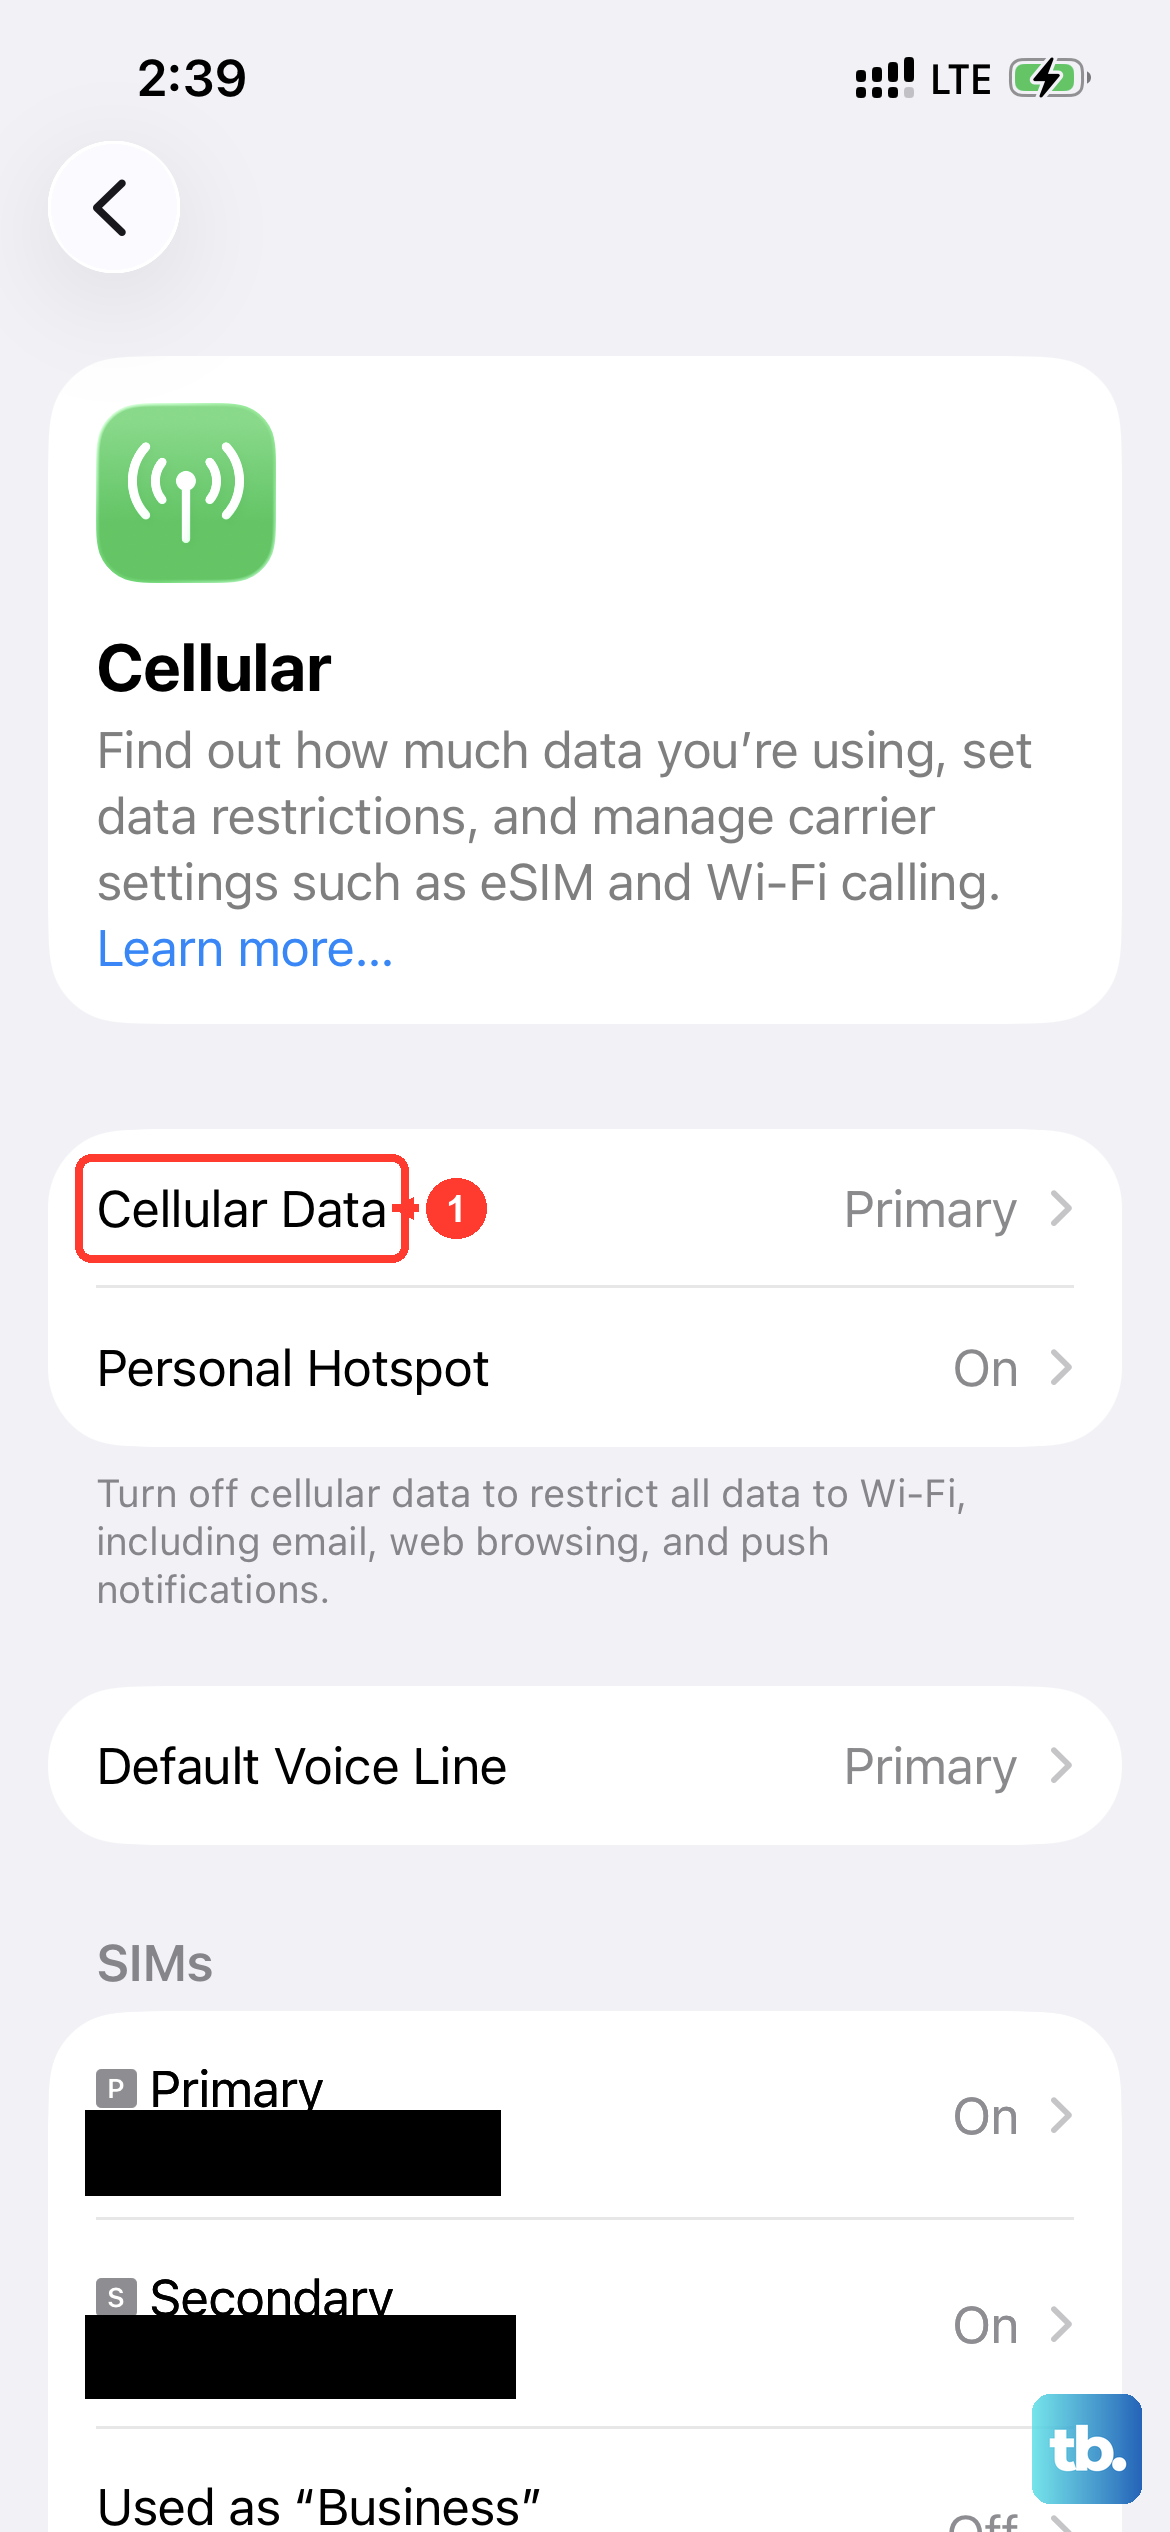
Sometimes email issues are related to your network connection. Try switching between Wi-Fi and cellular data to see if one works better. Turn off Cellular Data by going to Settings > Cellular and toggling it off, then connect to Wi-Fi.
If Wi-Fi isn't working, try cellular data again. I've found that simply toggling the connection can clear up temporary network glitches that stop mail from syncing.
Toggle Airplane Mode
Airplane mode can reset your network connections and resolve temporary connectivity issues. Swipe down from the top right of your screen to open Control Center. Tap the airplane icon to enable Airplane mode, wait about 30 seconds, then tap it again to disable it.
This forces your iPhone 17 Pro Max to re-establish connections with cellular towers and Wi-Fi networks. It's a quick fix that often works.
Restart the Mail App
A simple app restart can fix temporary glitches. On your iPhone 17 Pro Max, swipe up from the bottom of the screen and pause in the middle to enter the app switcher. Find the Mail app preview and swipe it up to close it completely.
Wait a few seconds, then tap the Mail icon to reopen it. This clears the app from memory and can resolve minor software hiccups.
Enable Background App Refresh
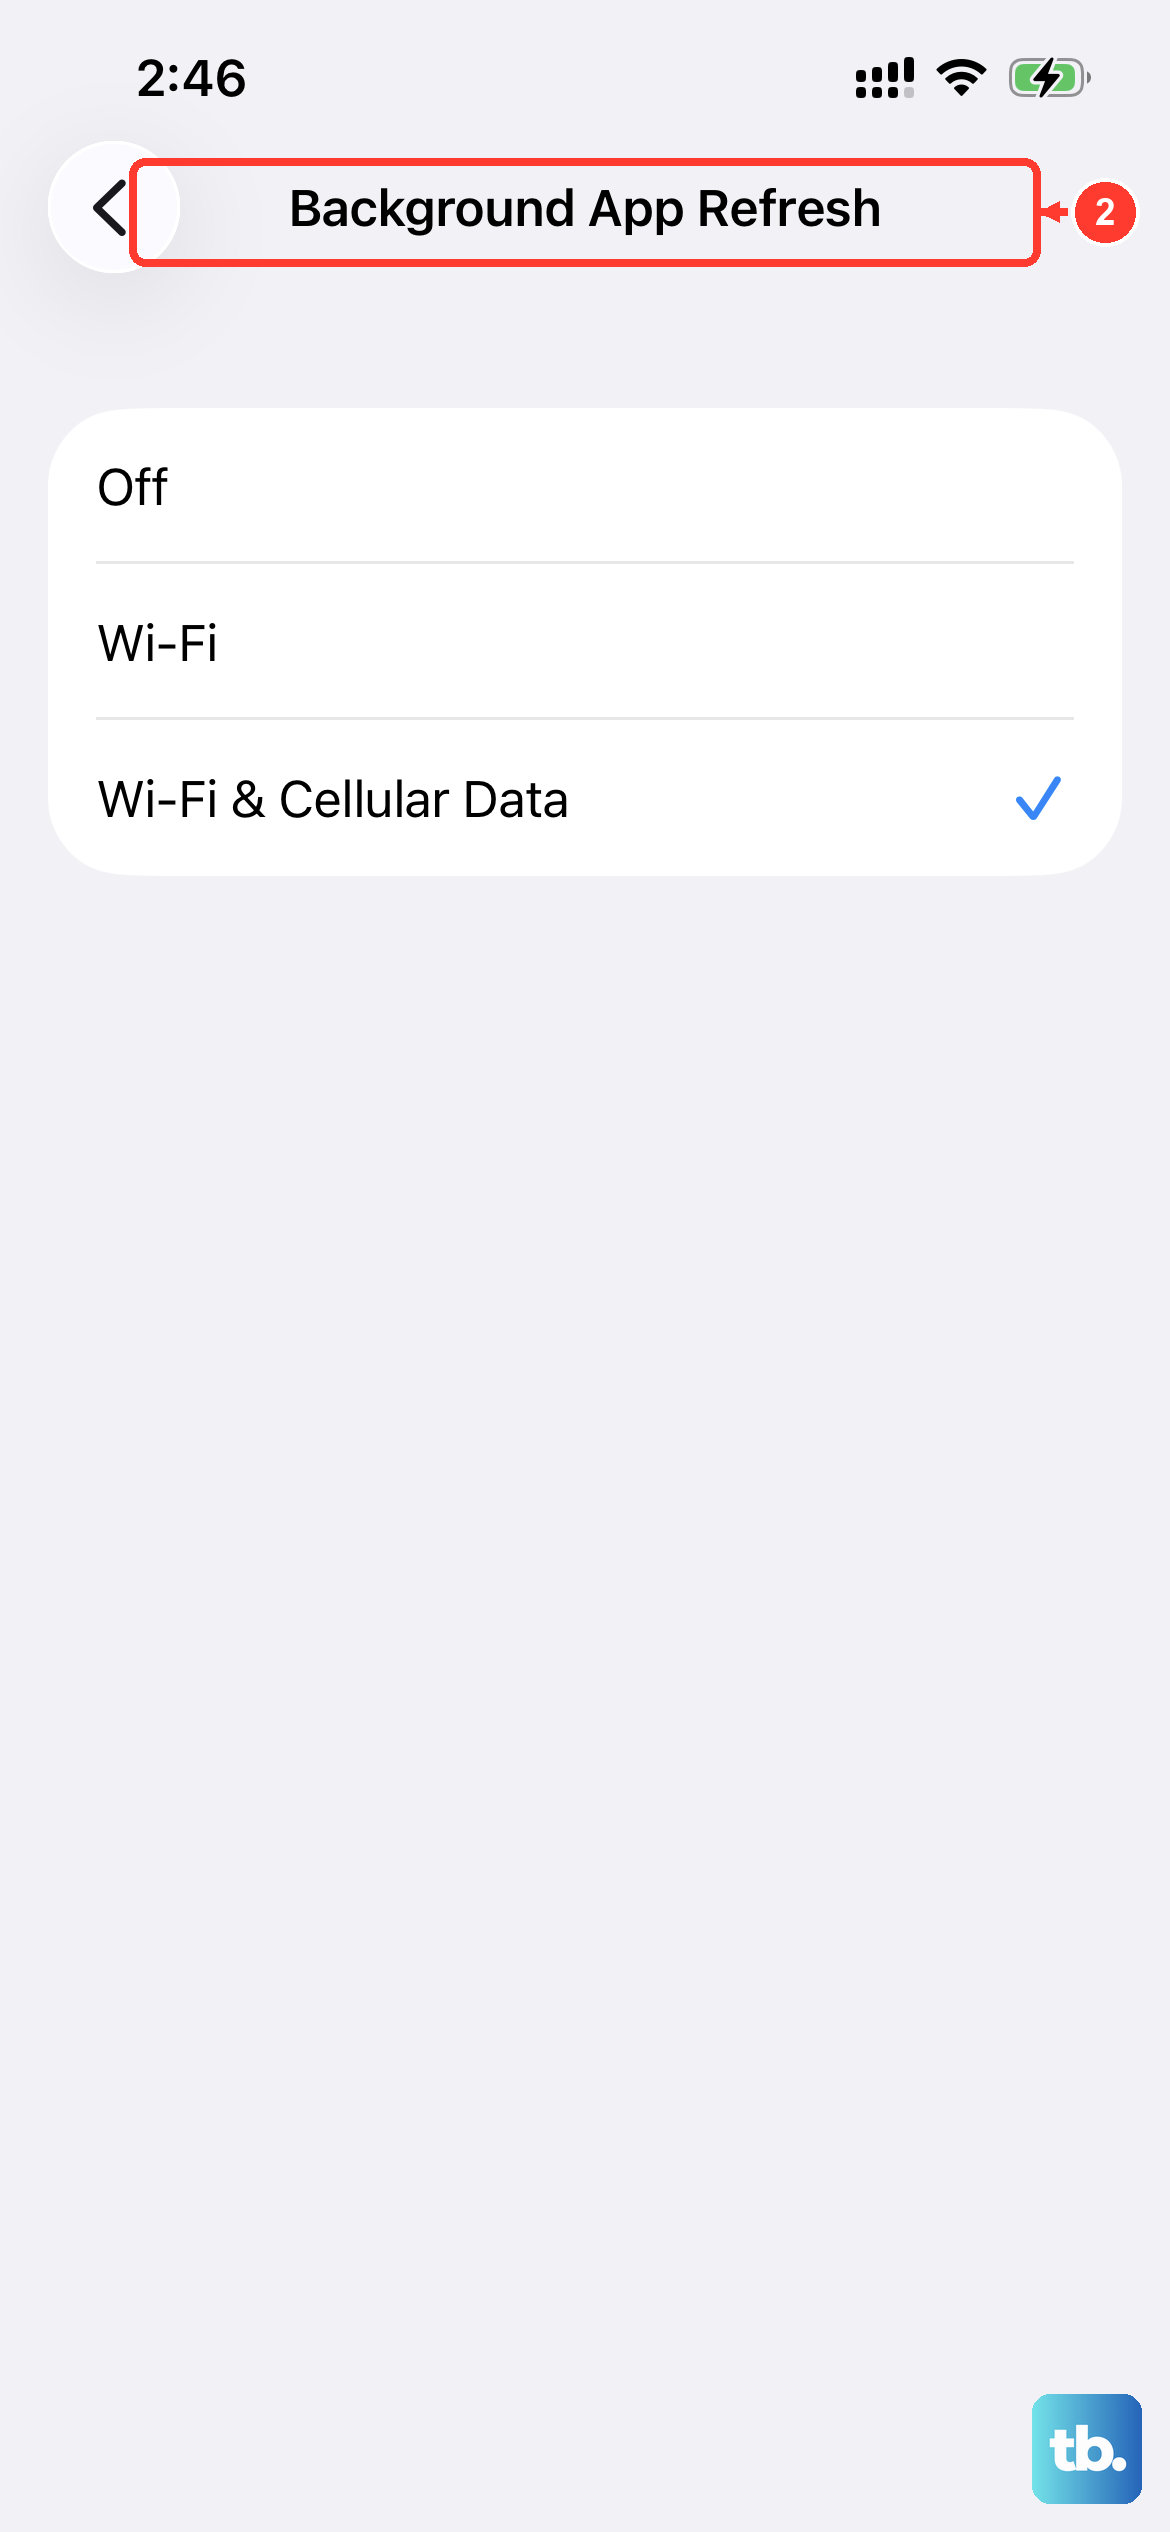
Background App Refresh allows apps to update content when your iPhone is connected to Wi-Fi or cellular data. Go to Settings > General > Background App Refresh.
Choose Wi-Fi & Cellular Data or Wi-Fi only. Make sure the toggle next to Mail is turned on. This ensures the Mail app can check for new messages even when you're not actively using it.
Verify Email Credentials
Double-check that you're using the correct login information. Try logging into your email account through a web browser on a computer or another device. If you can't log in there either, you likely need to reset your password.
If you reset your password, you'll need to update your email account settings on your iPhone with the new credentials. Go to Settings > Mail > Accounts, tap your account, then update the password.
Enable Cellular Data for Mail
If you're relying on cellular data, make sure it's enabled specifically for the Mail app. Go to Settings > Cellular. Scroll down through the list of apps until you find Mail.
Make sure the toggle is turned on. If it's off, the Mail app won't be able to send or receive messages when you're not connected to Wi-Fi.
Set Date and Time Automatically

Incorrect date and time settings can cause email synchronization issues, especially with security certificates. Connect to Wi-Fi, then go to Settings > General > Date & Time.
Turn on Set Automatically. This allows your iPhone to sync its clock with Apple's time servers, ensuring everything is in proper order for email protocols to work correctly.
Check for Service Outages
Contact your email provider or check their status page to see if there's a widespread service outage. For work or school accounts, ask your administrator if any new security features are enabled.
Features like two-step verification or new firewall rules might be blocking access from your device. They can provide the specific settings you need to reconfigure your account.
Disable VPN Connections
VPNs can sometimes interfere with email connectivity by routing traffic through servers that may be blocked. Go to Settings > General > VPN & Device Management.
Toggle off any active VPN connections. Try accessing your email without the VPN enabled. If it works, you may need to adjust your VPN settings or use a different server location.
Update Your Email App and iOS
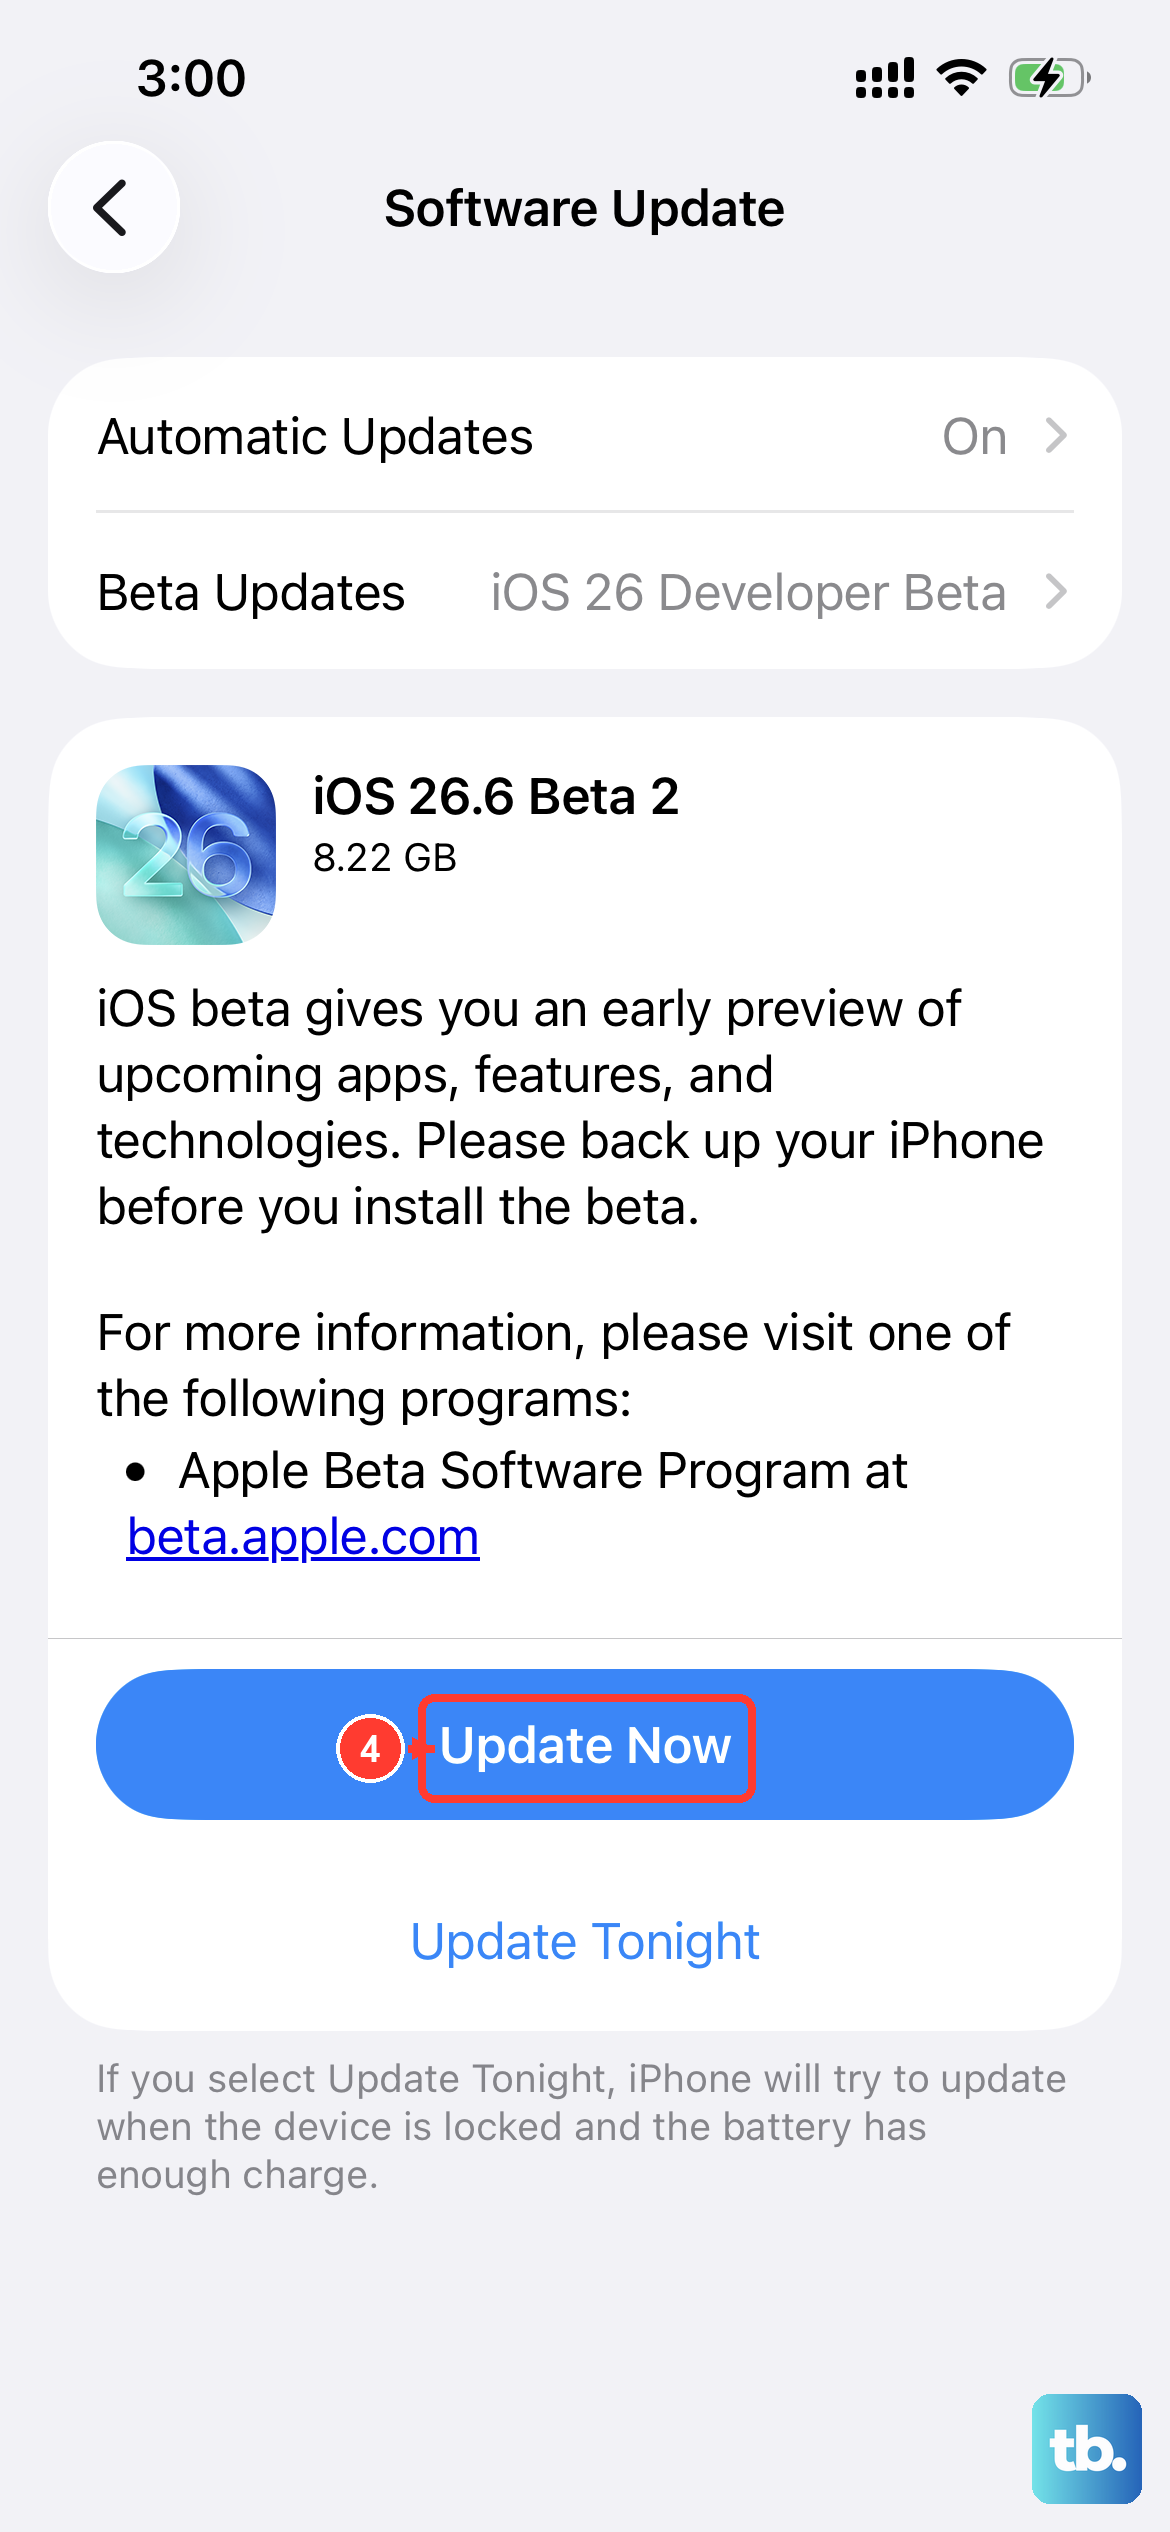
If you're using a third-party email app like Gmail or Outlook, make sure it's updated. Open the App Store, tap your profile picture in the top right, and scroll to see available updates.
Also, check for iOS updates. Go to Settings > General > Software Update. Software updates for iOS 26 often include bug fixes that can resolve mail synchronization issues.
Delete and Re-add Your Email Account
Sometimes removing and re-adding your email account can resolve persistent configuration issues. Go to Settings > Mail > Accounts. Select the problematic account and tap Delete Account.
Don't worry, this doesn't delete your emails from the server. After deleting, tap Add Account and go through the setup process again. This creates a fresh configuration file.
Check Notification Settings
If emails are arriving but you're not getting alerts, your notification settings might be off. Go to Settings > Notifications. Scroll down and tap Mail.
Turn on Allow Notifications. You can also adjust alert styles, sounds, and badge app icons here. Make sure the specific mailbox you're watching is set to notify you.
Restart Your iPhone 17 Pro Max
A simple restart can resolve many underlying software glitches. Press and hold the Side button and either Volume button, then slide the power off slider. Wait 30 seconds for the device to fully shut down.
Press and hold the Side button again until you see the Apple logo. For a more forceful reset, you can perform a force restart. Press and quickly release the Volume Up button, press and quickly release the Volume Down button, then press and hold the Side button until the Apple logo appears.
Reset All Settings
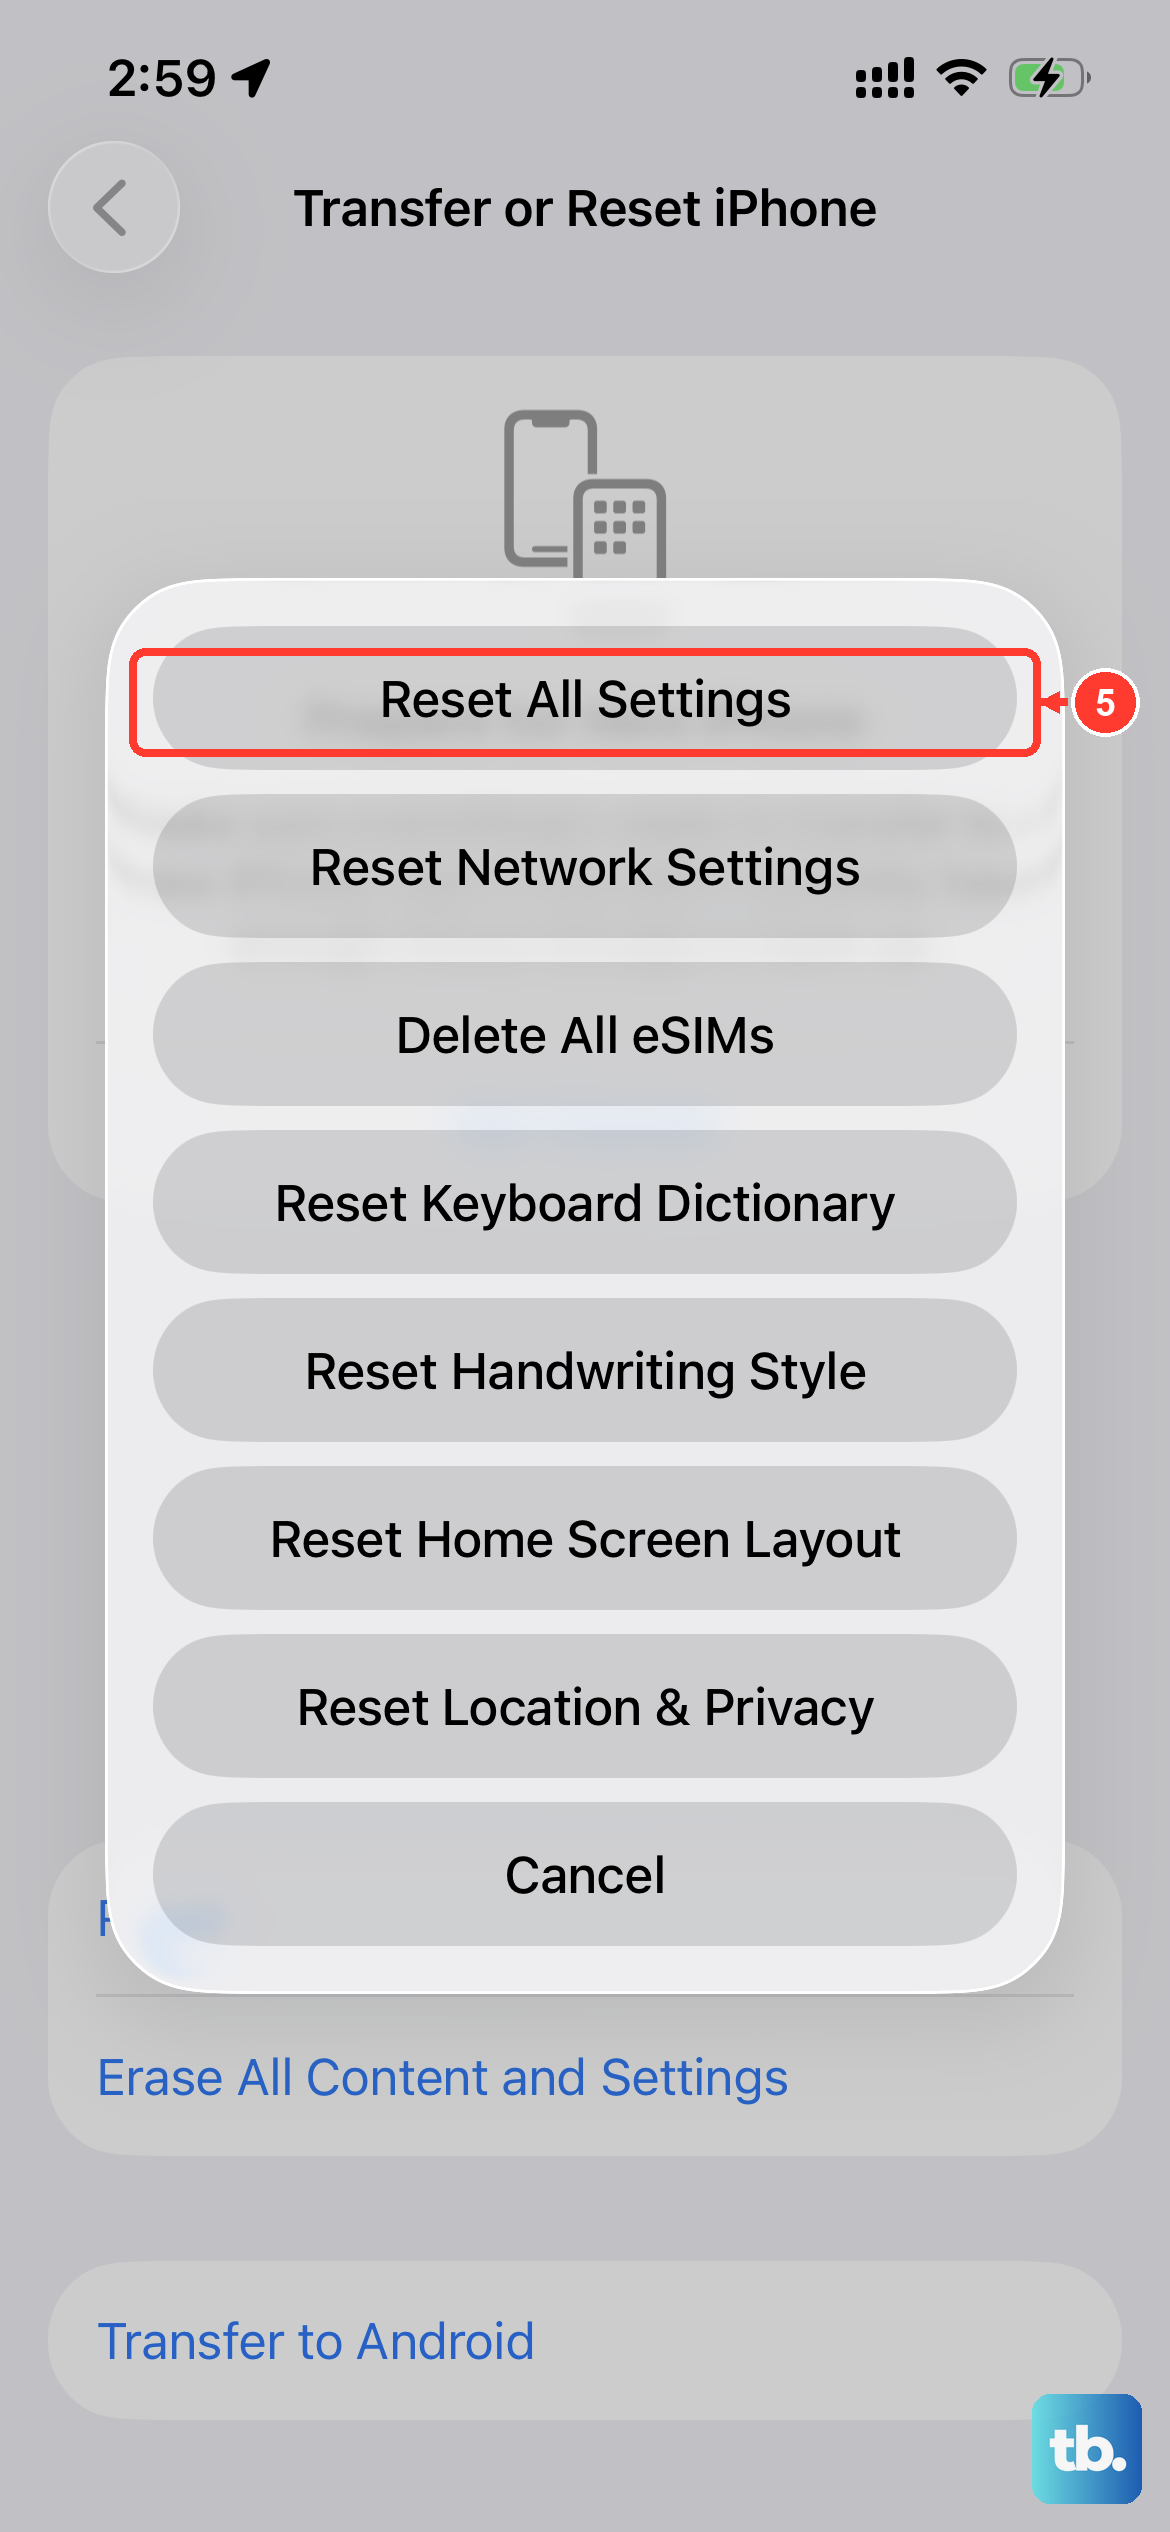
If nothing else works, resetting all settings can resolve deeper configuration issues without erasing your personal data. Go to Settings > General > Transfer or Reset iPhone > Reset.
Select Reset All Settings. Confirm your action. This will reset network settings, wallpaper, privacy permissions, and keyboard dictionary back to defaults, but your photos, messages, and apps will remain.


