
Email problems on an iPad Pro M5 can be a real pain, especially when you’re trying to stay on top of work or personal messages. Most of the time it’s a quick setting fix, not a hardware issue. Let’s walk through what usually works.
Start with the basics, make sure your iPad is actually connected to the internet. Open Safari and load a website. If that works, the problem is likely with the Mail app or your email account settings. Also check if your email provider is having a service outage; Gmail, Outlook, and iCloud all have status pages you can check.
Restart the Mail App
Close the Mail app completely and reopen it. On your iPad Pro M5, swipe up from the bottom of the screen and pause in the middle to see the App Switcher. Find the Mail app card and swipe it up to close it. Wait a few seconds, then tap the Mail icon again.
Toggle Airplane Mode
This resets your network connection and can clear up temporary glitches. Swipe down from the top-right corner to open Control Center, tap the airplane icon to enable Airplane Mode, wait about 30 seconds, then tap it again to turn it off. Check if emails start flowing again.
Switch Between Wi‑Fi and Cellular Data
If you’re using a Wi‑Fi‑only iPad Pro M5, you can skip this step. For the cellular model, try disabling cellular data and using Wi‑Fi, or vice versa. Go to Settings > Cellular Data and toggle it off, then connect to a known Wi‑Fi network. If that doesn’t help, turn cellular back on and disable Wi‑Fi. See if your email behaves differently on one connection.
Check Your Mail Fetch Settings
The Mail app on iPadOS 18 checks for new messages based on your fetch settings. Open Settings > Apps > Mail > Mail Accounts > Fetch New Data. If your email service supports Push, turn that on. Otherwise, choose Automatically or set a specific interval like every 15 minutes. Keep in mind that the iPad only fetches in the background when it’s charging and connected to Wi‑Fi.
Enable Background App Refresh for Mail
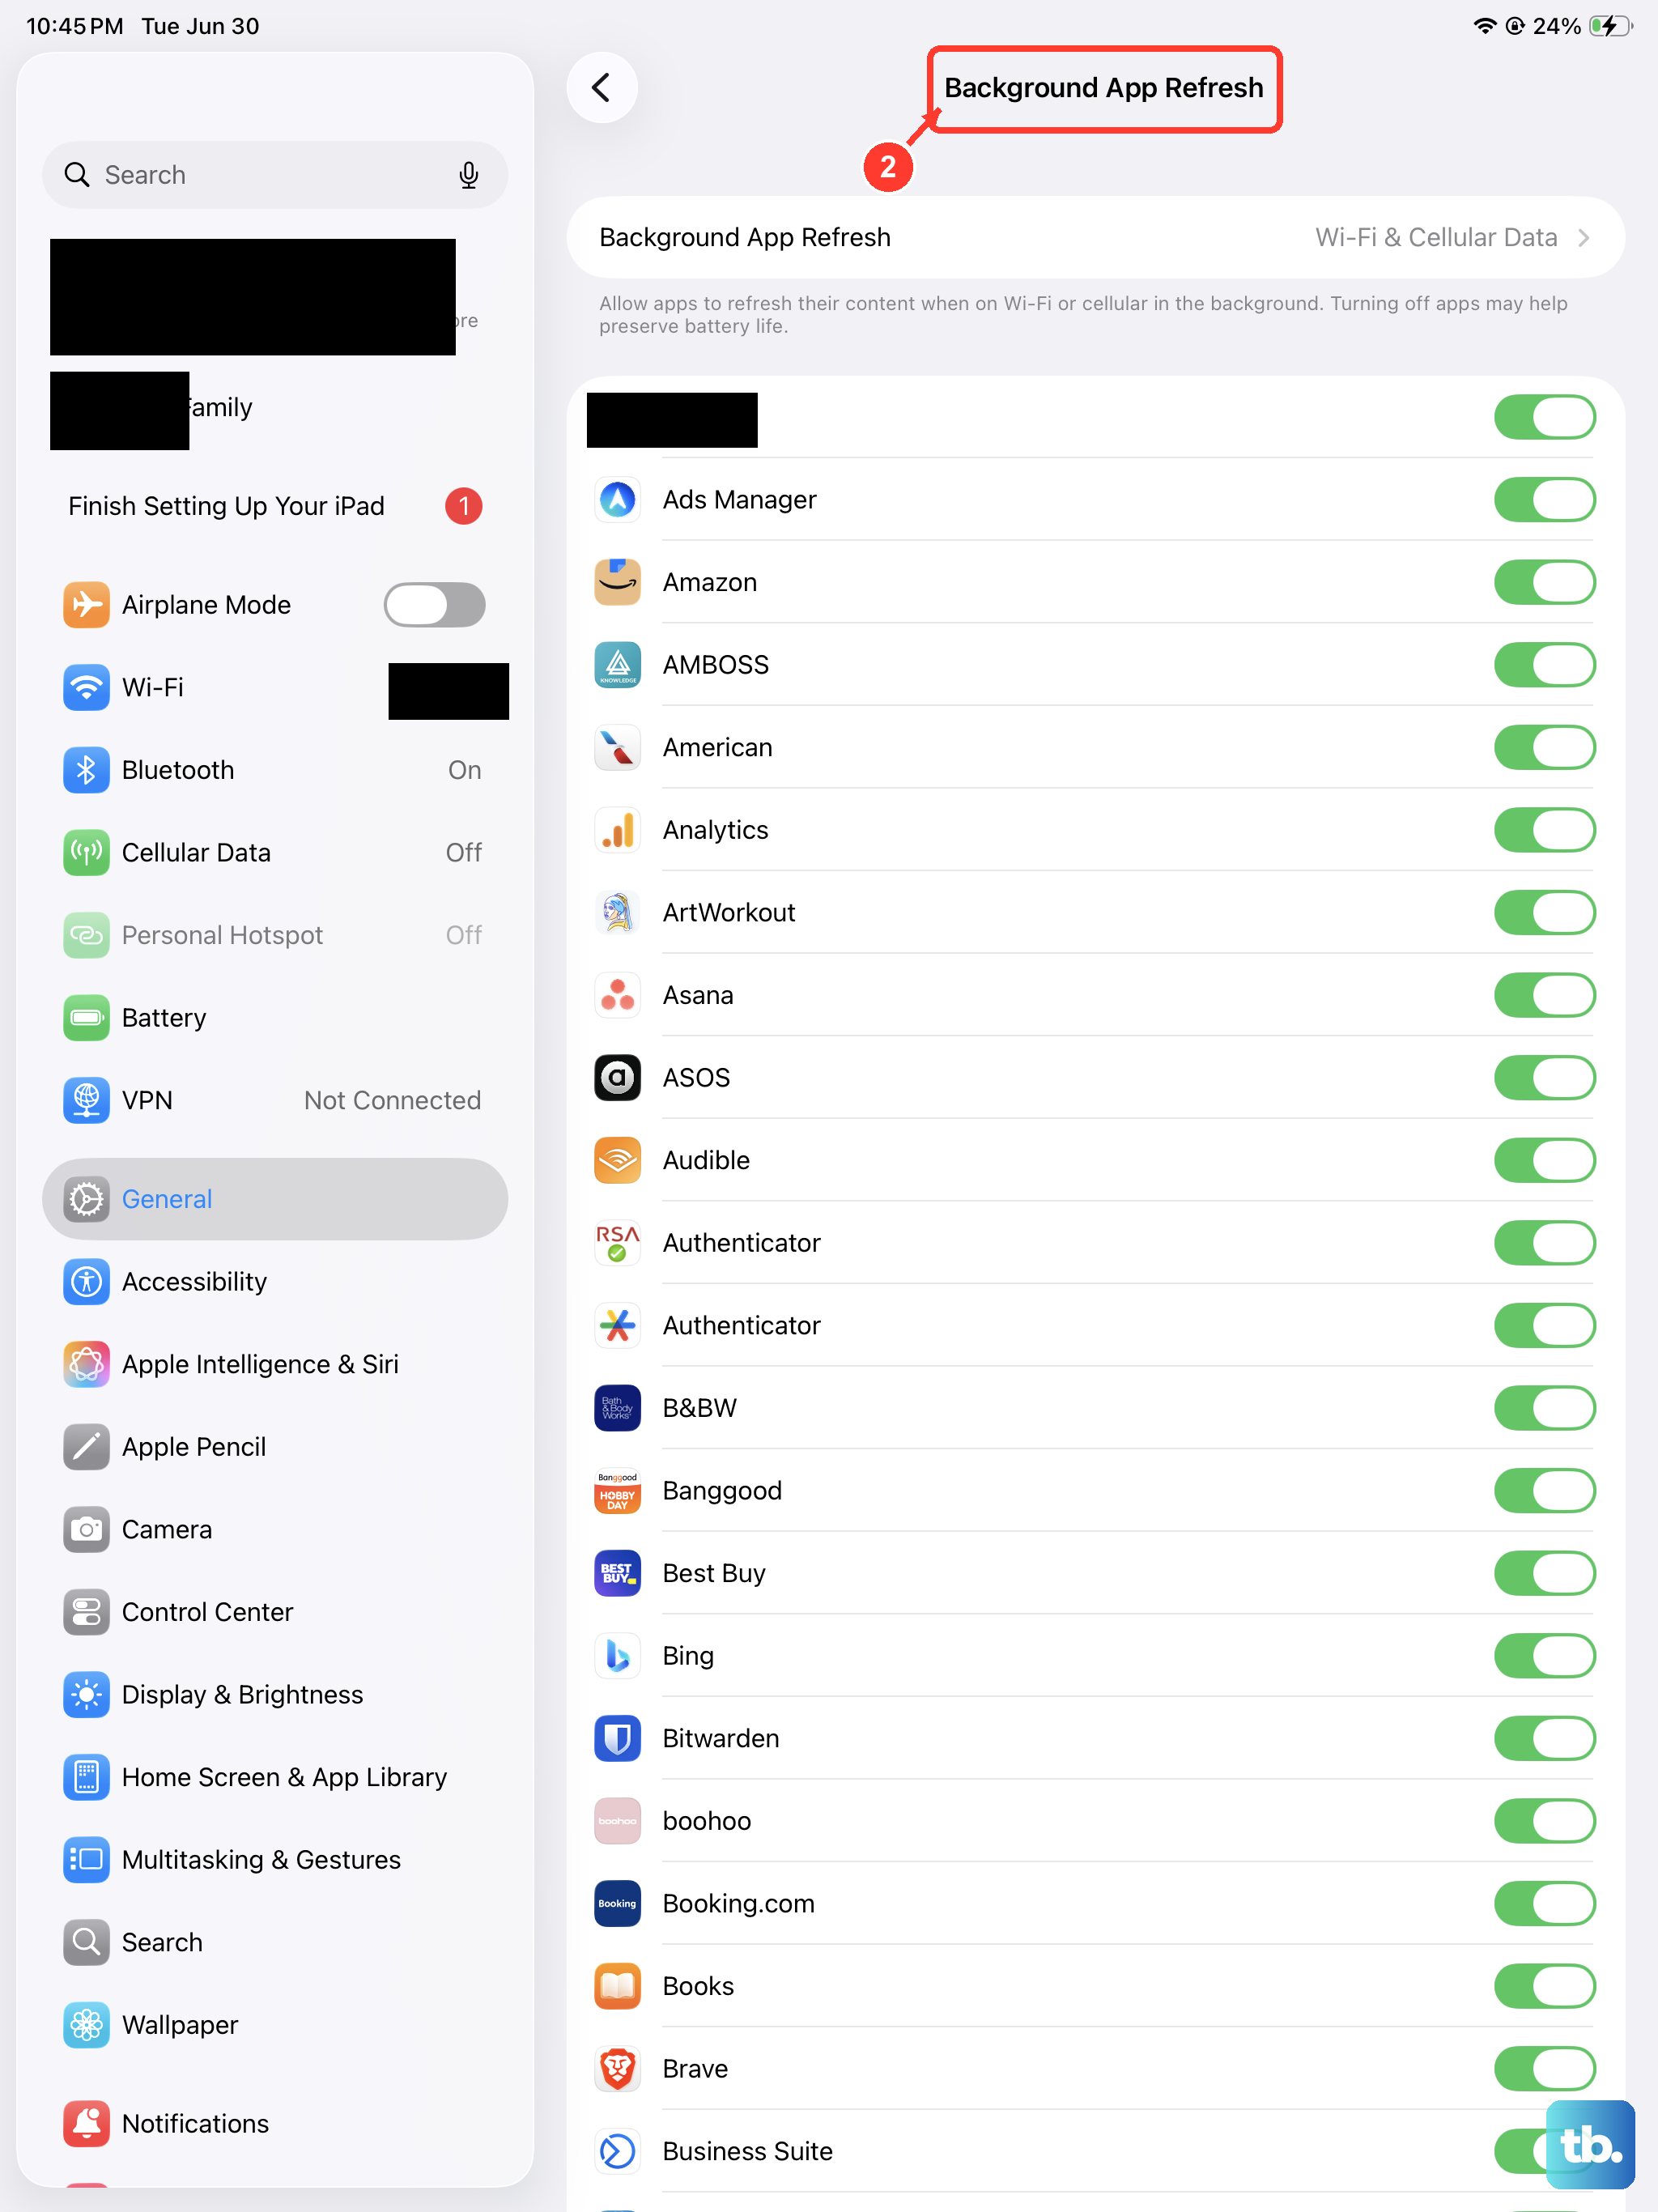
If Background App Refresh is off for Mail, new messages won’t download unless you open the app. Go to Settings > General > Background App Refresh. Make sure it’s turned on for Wi‑Fi & Cellular Data (or Wi‑Fi only), and that the Mail toggle is enabled.
Verify Your Email Credentials
Try logging into your email account in a web browser on a computer or another device. If you can’t log in, reset your password through your provider’s website, then update the password in the iPad Mail settings. Go to Settings > Apps > Mail > Mail Accounts, tap your account, then tap Account and update the password.
Set Date and Time Automatically
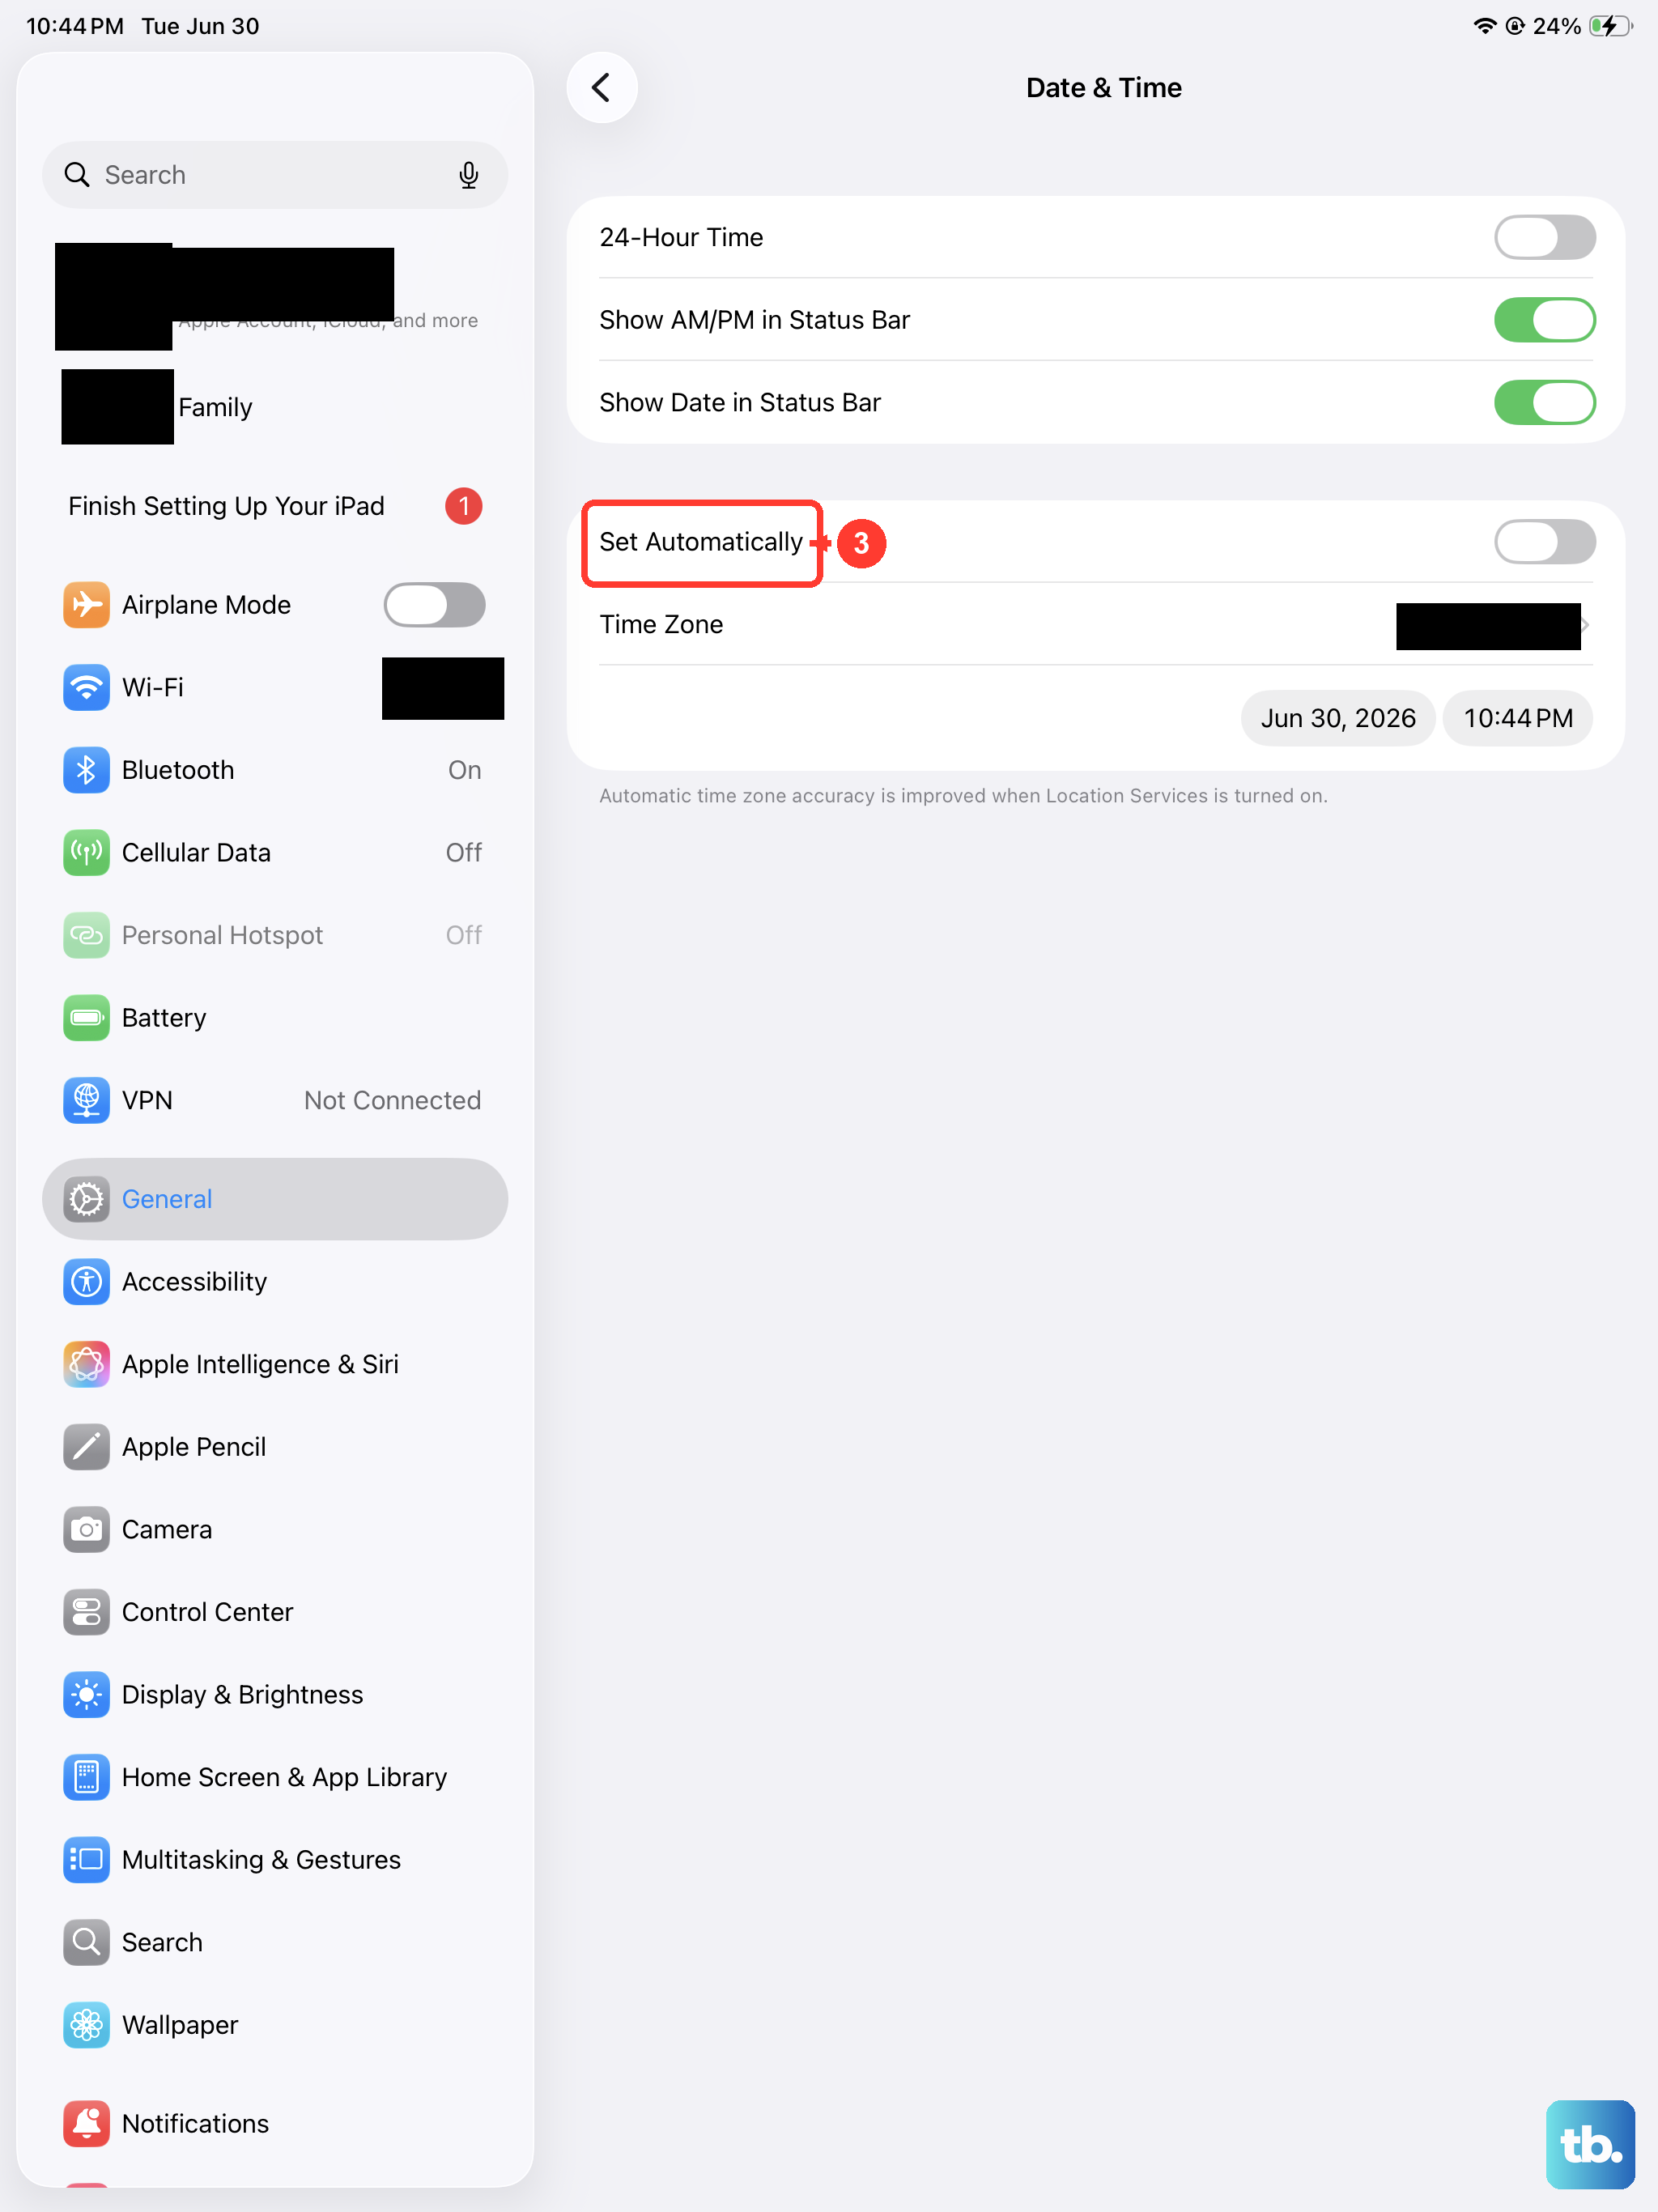
Incorrect date and time can mess with email encryption and sync. Go to Settings > General > Date & Time and turn on Set Automatically. Make sure your iPad is connected to the internet for this to work.
Disable VPN Connections
VPNs can block or delay email traffic. Go to Settings > General > VPN & Device Management and toggle off any active VPN. Try sending and receiving mail again.
Check Notification Settings
If emails are arriving but you’re not getting alerts, open Settings > Notifications > Mail. Make sure Allow Notifications is on. You can also customize alert sounds and badges from here.
Delete and Re‑add Your Email Account
This is often the most reliable fix for stubborn sync problems. Go to Settings > Apps > Mail > Mail Accounts. Tap the account causing trouble, then tap Delete Account. Don’t worry it only removes the account from the iPad, not from the server. Afterward, tap Add Account and set it up fresh with your email and password.
Force Restart Your iPad Pro M5
If the Mail app or the whole iPad feels unresponsive, a force restart can clear deeper software hiccups without erasing anything. Press and quickly release the Volume Up button, then press and quickly release the Volume Down button, then press and hold the Top button until the Apple logo appears. Let go and let the iPad restart normally.
Update iPadOS
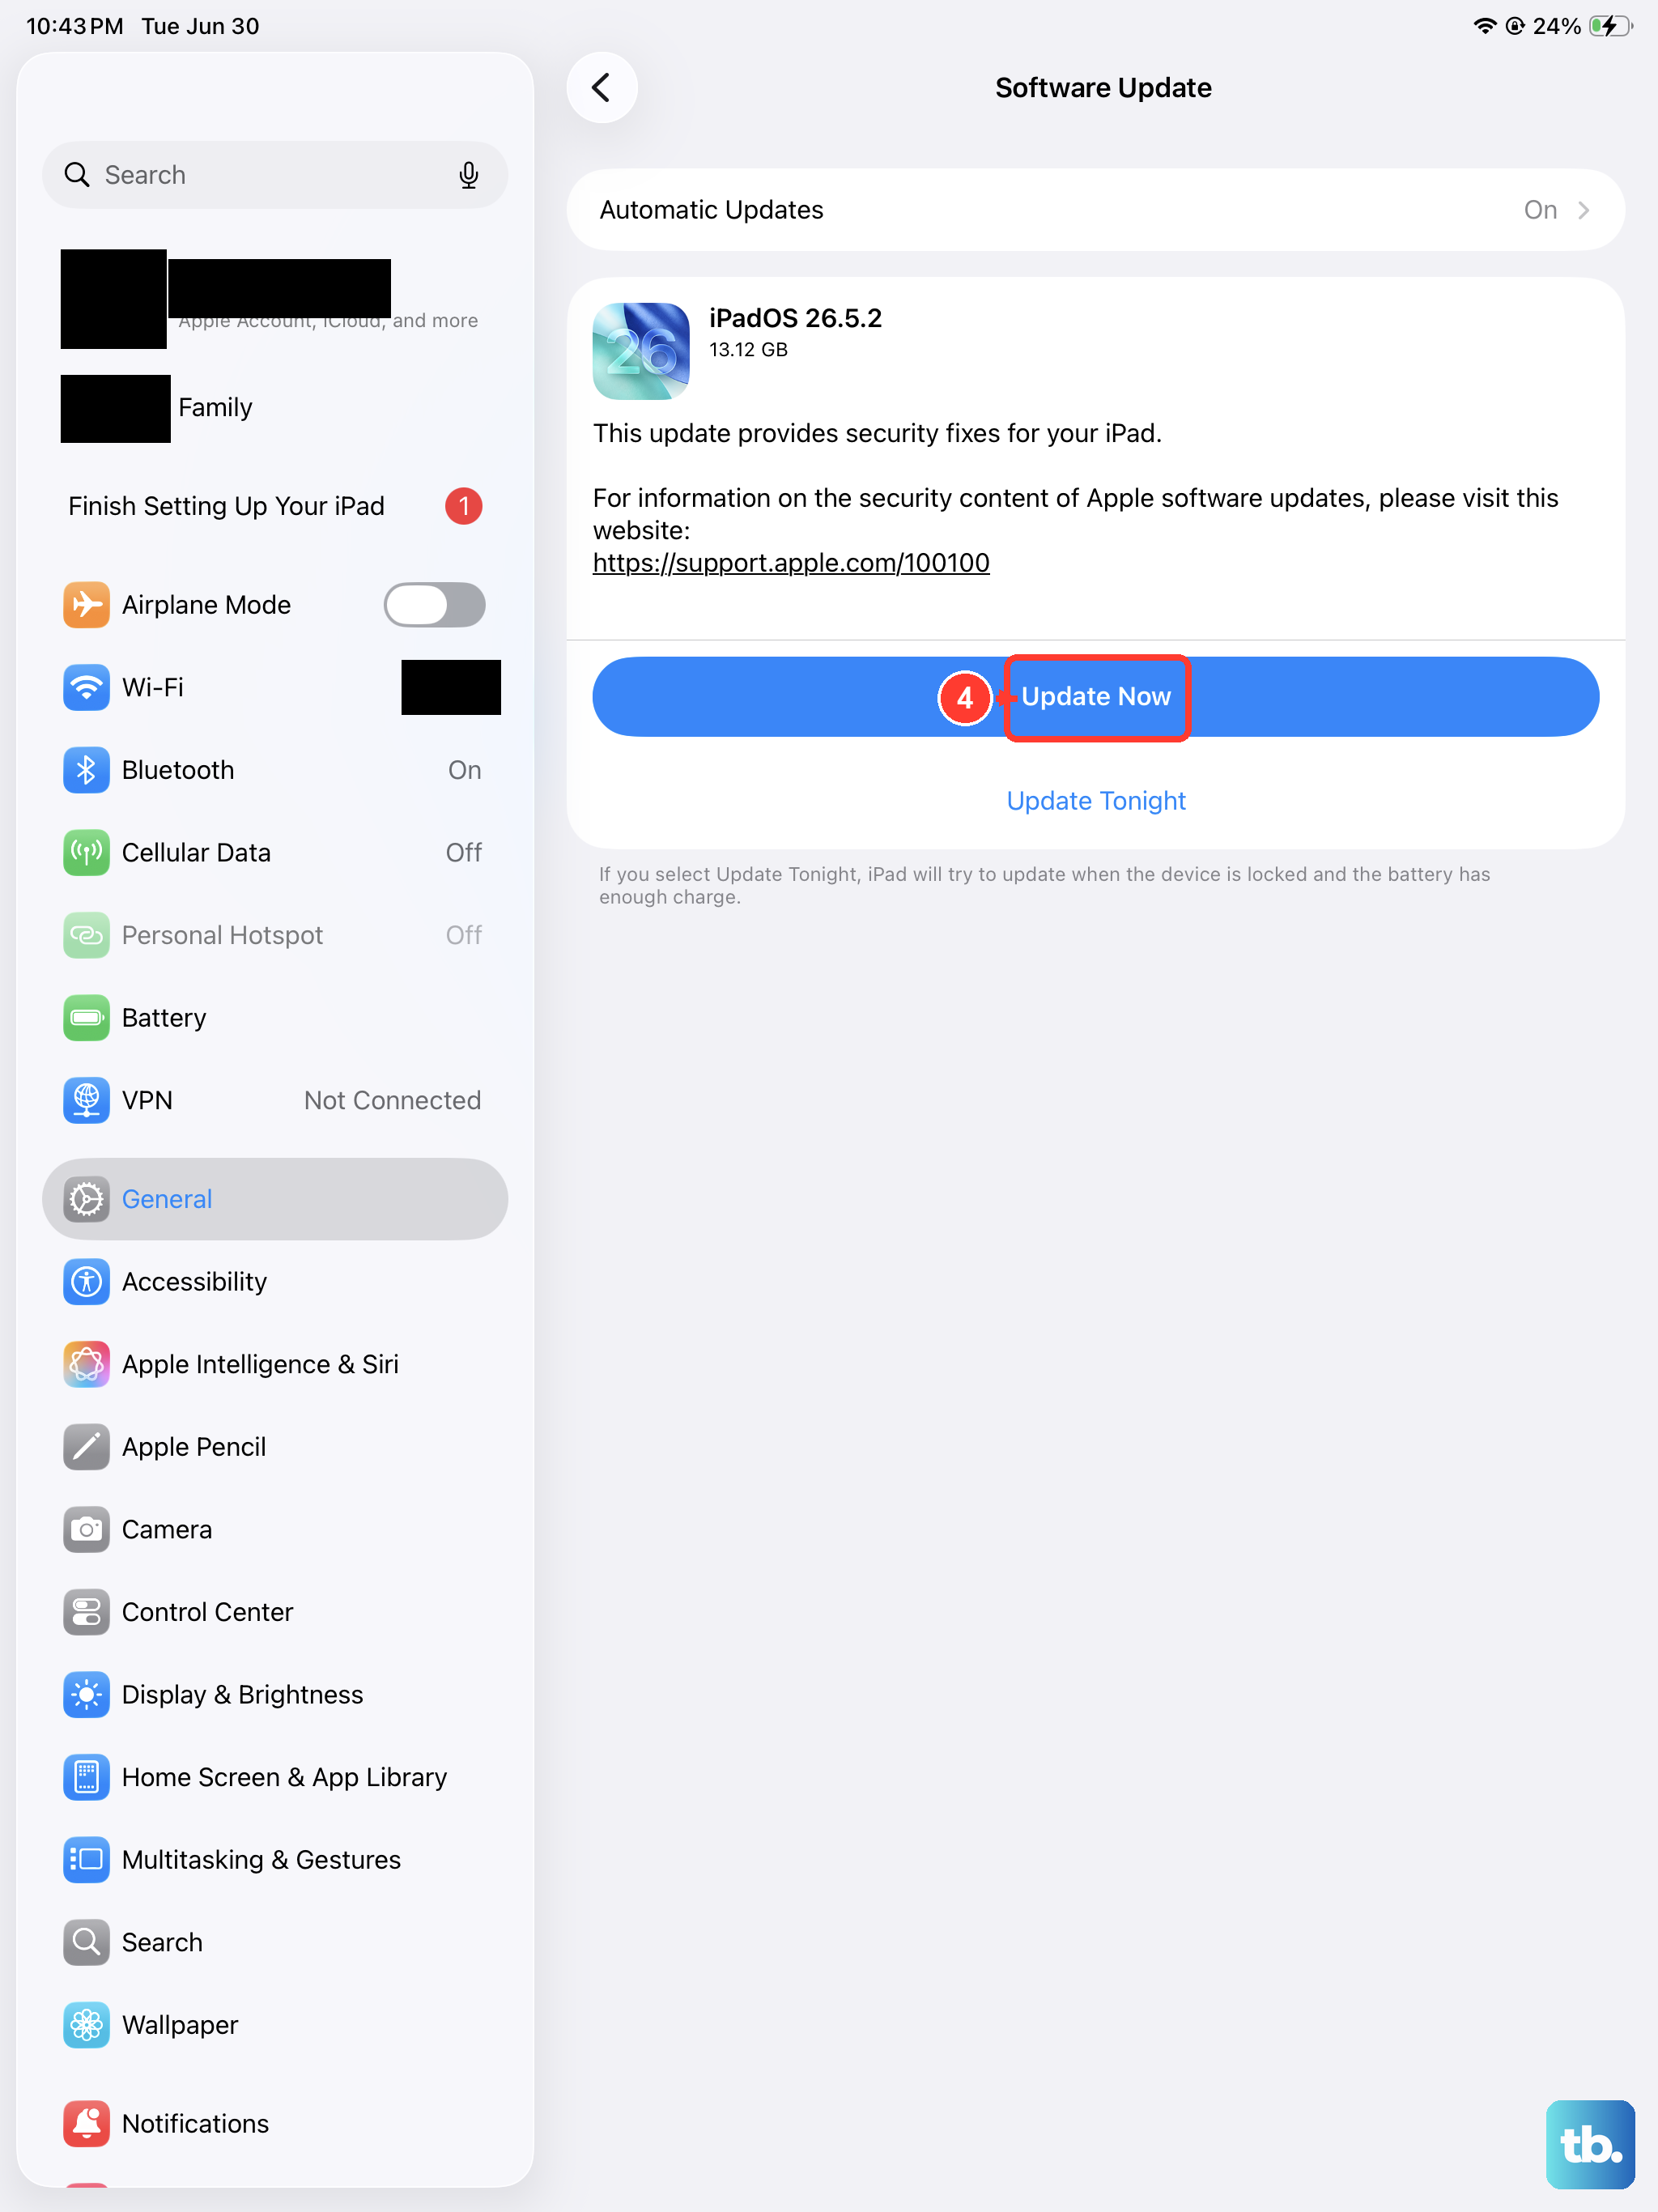
Apple regularly releases updates that fix Mail bugs. Go to Settings > General > Software Update. If an update is available, tap Download and Install. Make sure your iPad has at least 50% battery and is connected to Wi‑Fi.
Reset All Settings
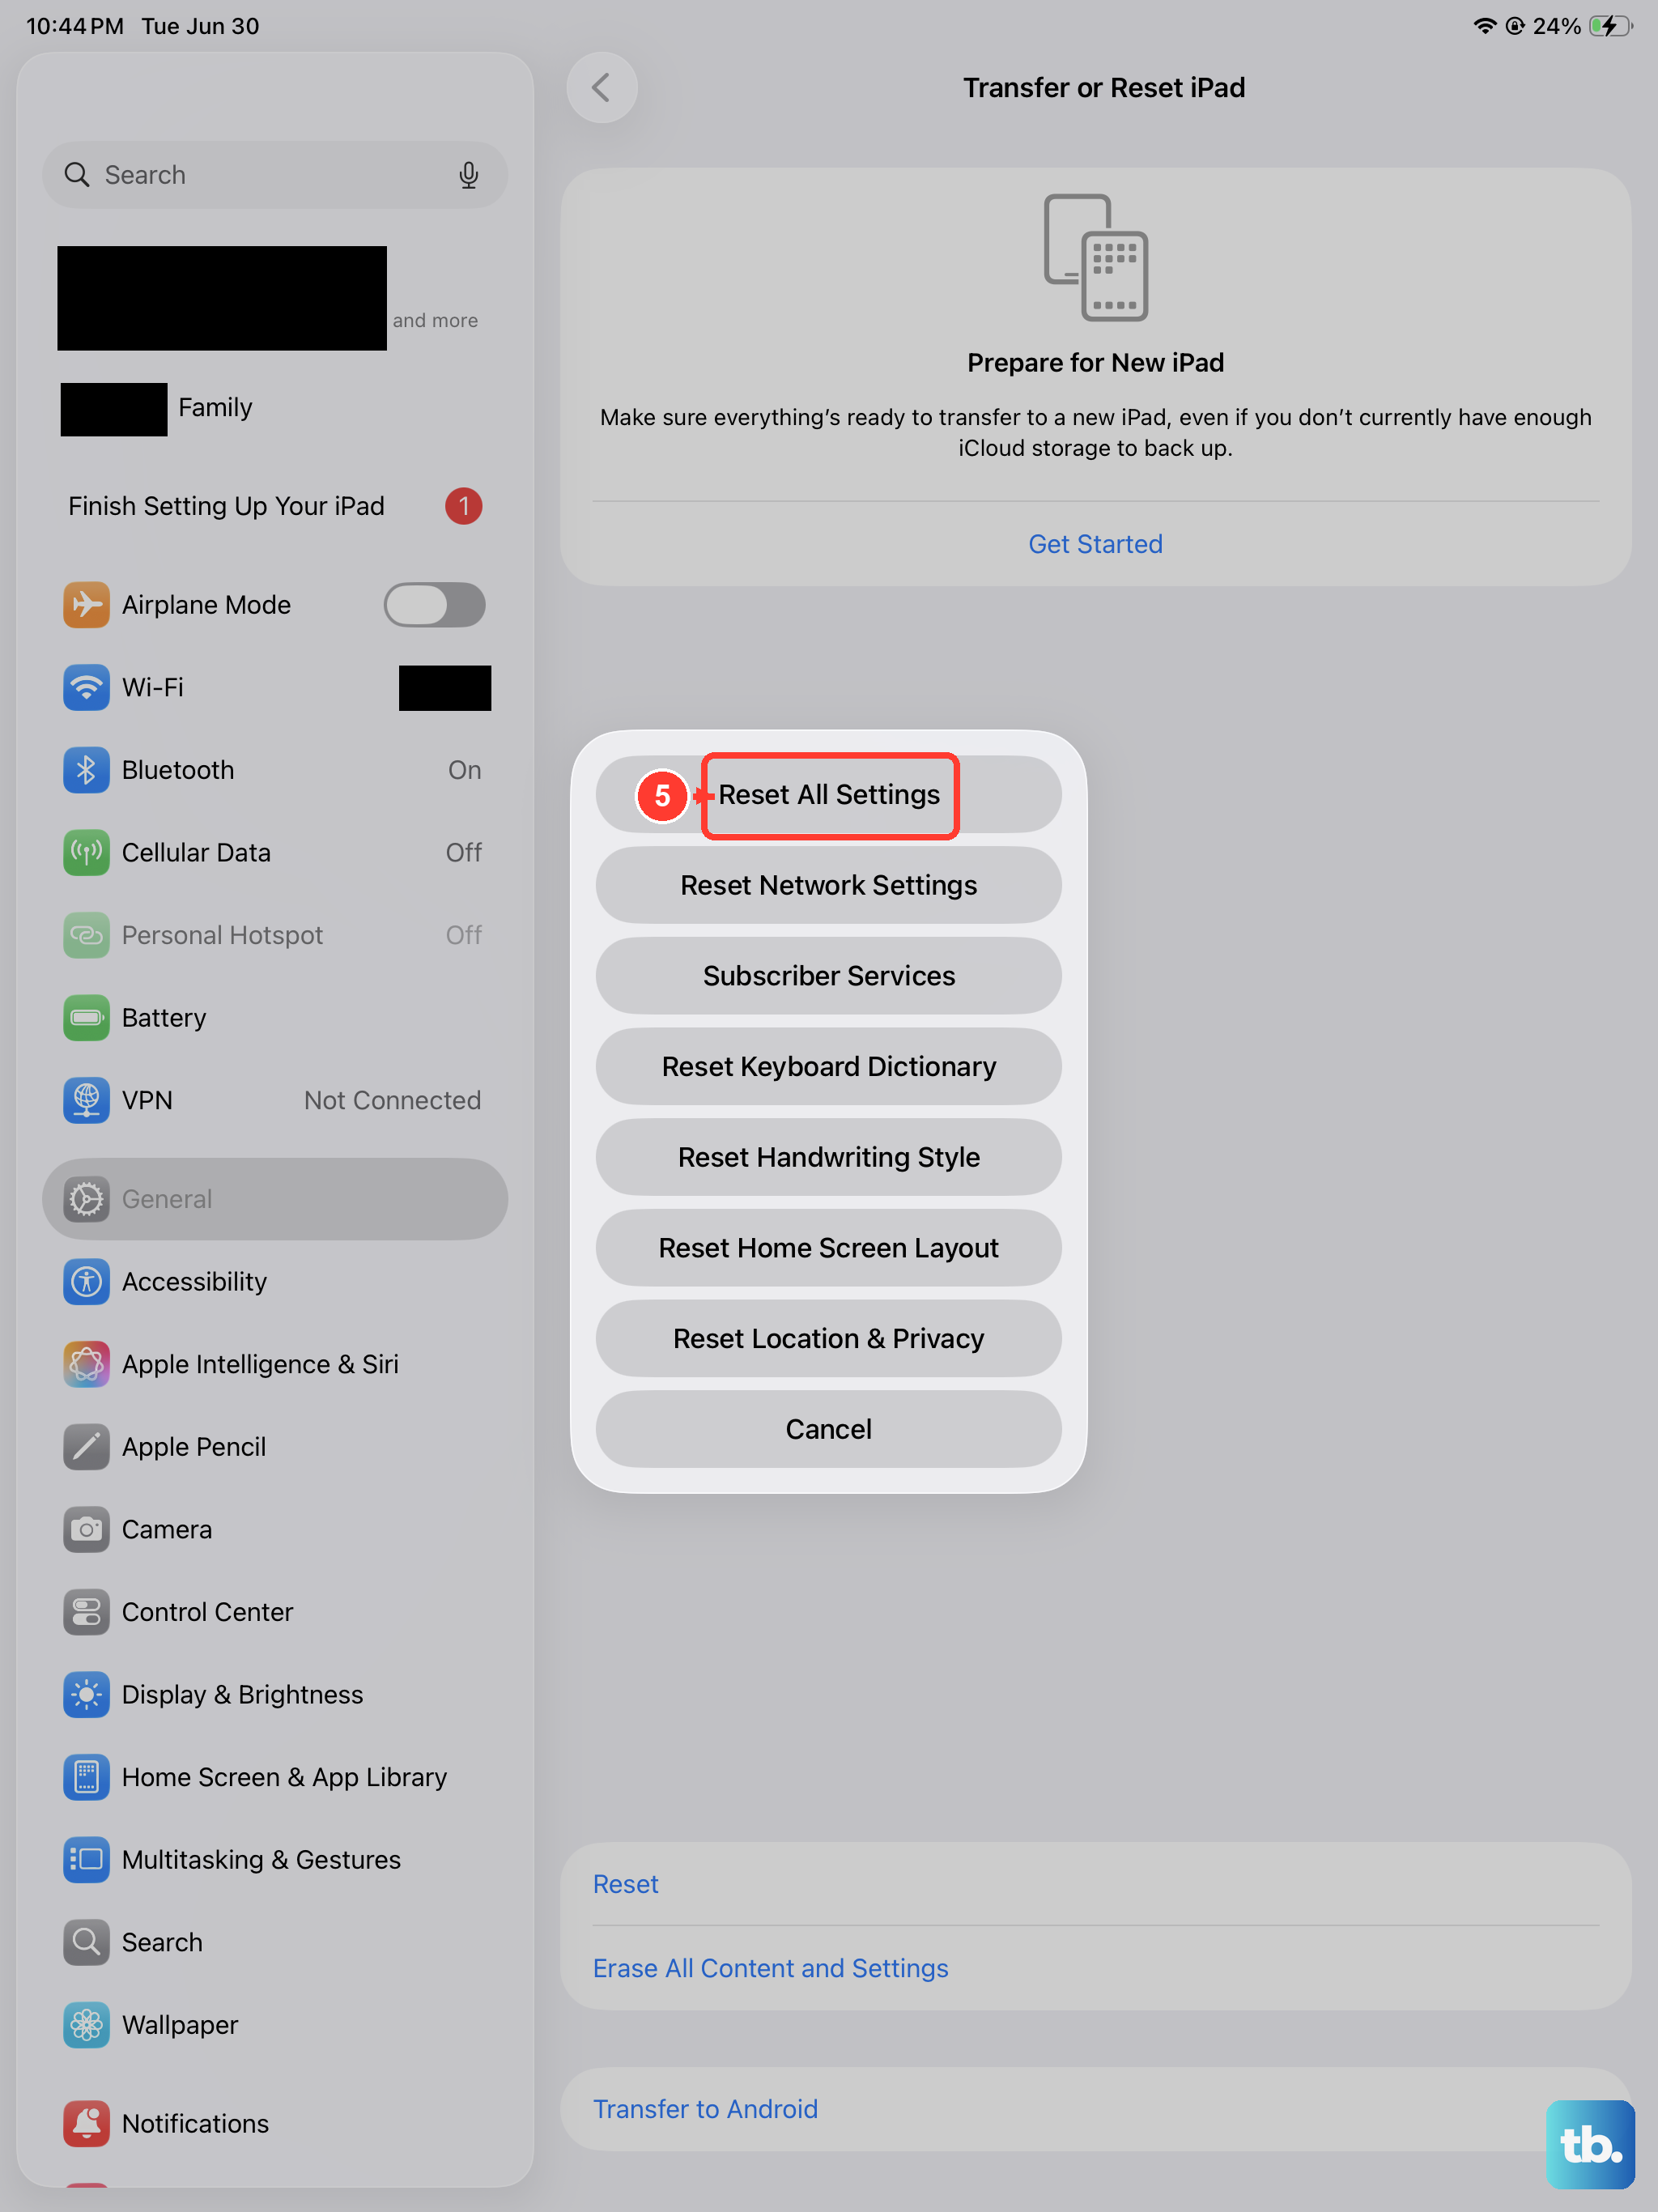
This is the nuclear option before you’d consider an erase. It resets all your settings (Wi‑Fi passwords, wallpapers, accessibility preferences) but keeps your data and apps intact. Go to Settings > General > Transfer or Reset iPad > Reset > Reset All Settings. Confirm the action and let the iPad restart. You’ll need to set up things like Face ID and Wi‑Fi again, but your email accounts and their data remain.