
Your iPad Air M3 shows "No Service" or the signal bars are completely grayed out, so you can't make calls, send texts, or get online over cellular. This is a known pain point for cellular iPad models, and it can stem from a quick software glitch, a carrier-side issue, or something with the eSIM or physical SIM card.
Most of the time, you can fix this in a minute or two. I'd start with the quickest solutions first and then move to the deeper fixes if those don't work.
Here's what to do when your iPad Air M3 loses its signal.
Toggle Cellular Data and Airplane Mode
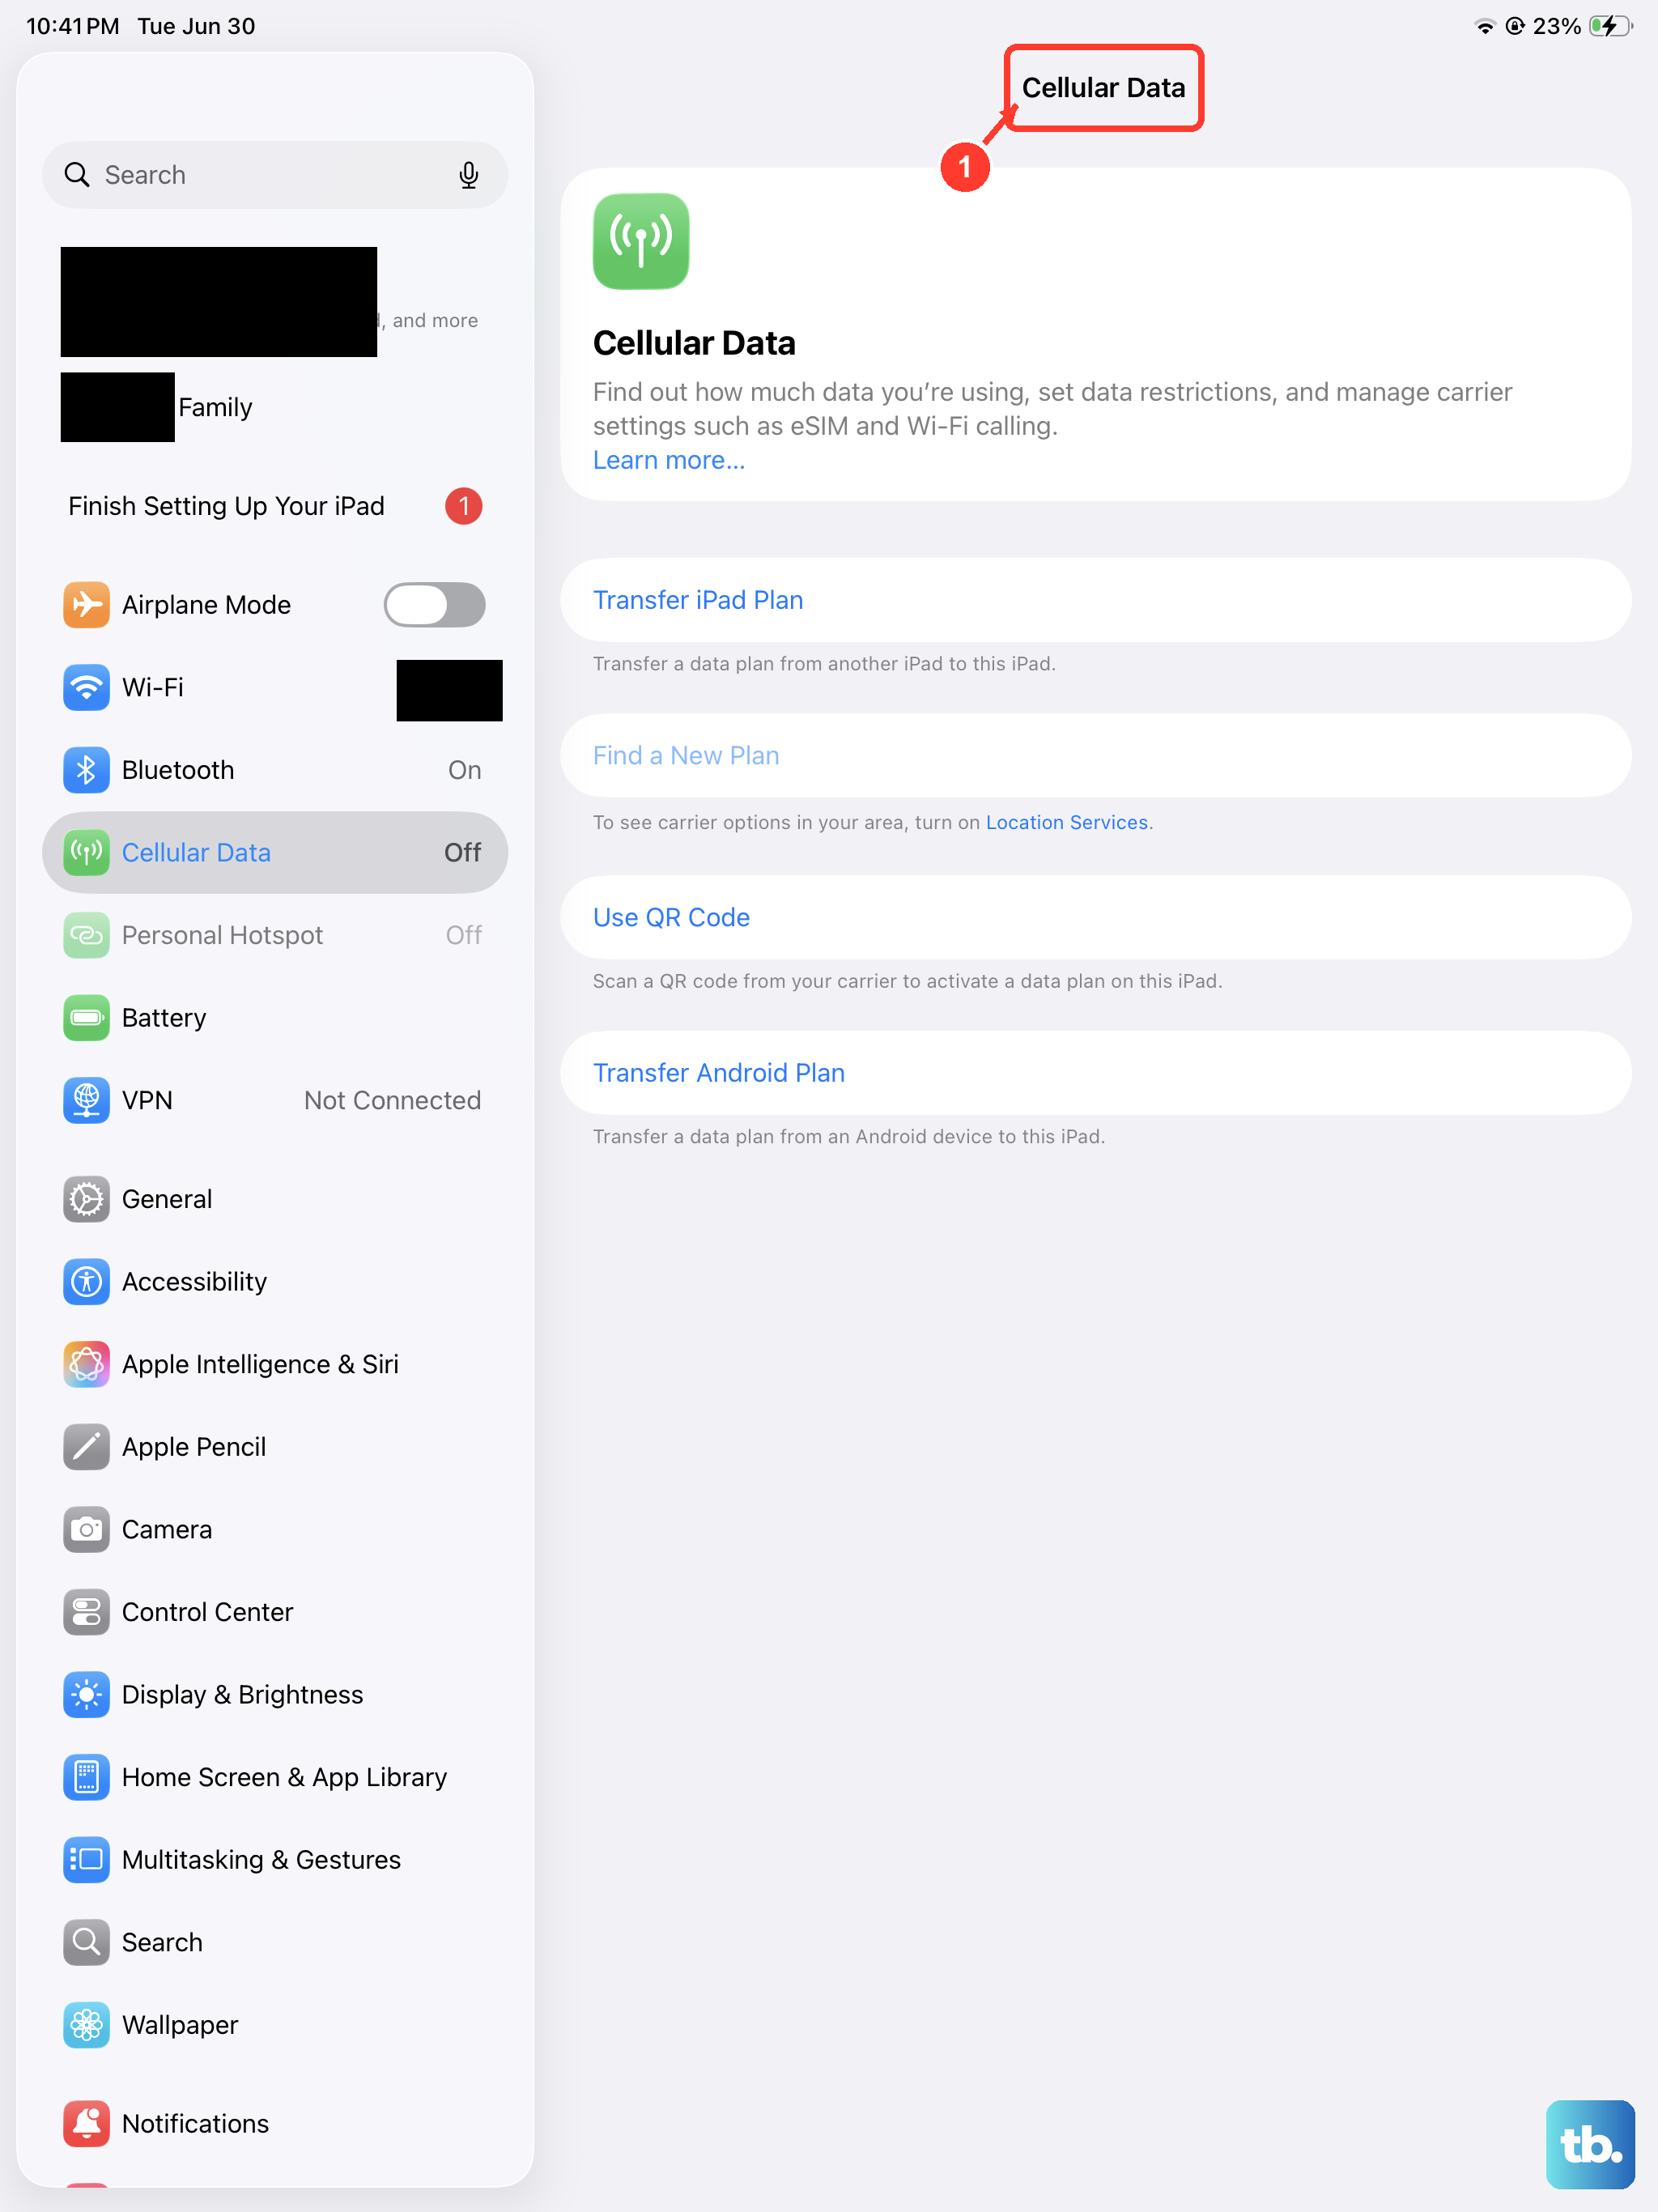
This sounds simple, but it's the first thing to try. Open Settings and tap the Cellular Data toggle to turn it off. Wait five seconds, then turn it back on. If that doesn't do anything, swipe into Control Center and tap the Airplane Mode icon to enable it. Wait about 15 seconds, then tap it again to disable it. This forces the iPad radios to reinitialize and reconnect to your carrier's network.
Do a Force Restart
A standard restart often isn't enough to clear a stuck cellular radio. The iPad Air M3 has a specific force restart sequence that you should use instead. Press and quickly release Volume Up, then Volume Down, then press and hold the Top button until the Apple logo appears. Don't let go too early, keep holding through the "slide to power off" screen. Once you see the logo, your iPad will reboot. Check the status bar after it comes back up to see if the signal returns.
Check Your Cellular Plan and eSIM
The iPad Air M3 supports both physical SIM cards and eSIMs. If you're using an eSIM, go to Settings > Cellular and tap on your cellular plan. Make sure it's turned On and that the status says "Connected." If you see "No SIM" or "Invalid SIM," tap the plan and choose "Remove Cellular Plan," then follow your carrier's instructions to re-add it. For a physical SIM, pop the tray out with a paperclip, inspect the SIM for any visible damage, and reinsert it firmly.
Turn Off Wi-Fi Calling Temporarily
Wi-Fi Calling can sometimes interfere with the iPad's ability to lock onto a cellular signal, especially if you're switching between Wi-Fi and cellular coverage. Go to Settings > Cellular > Wi-Fi Calling and toggle it off. Give your iPad about 30 seconds, then turn Wi-Fi Calling back on if you need it. This refresh can clear a negotiation issue with your carrier.
Reset Network Settings
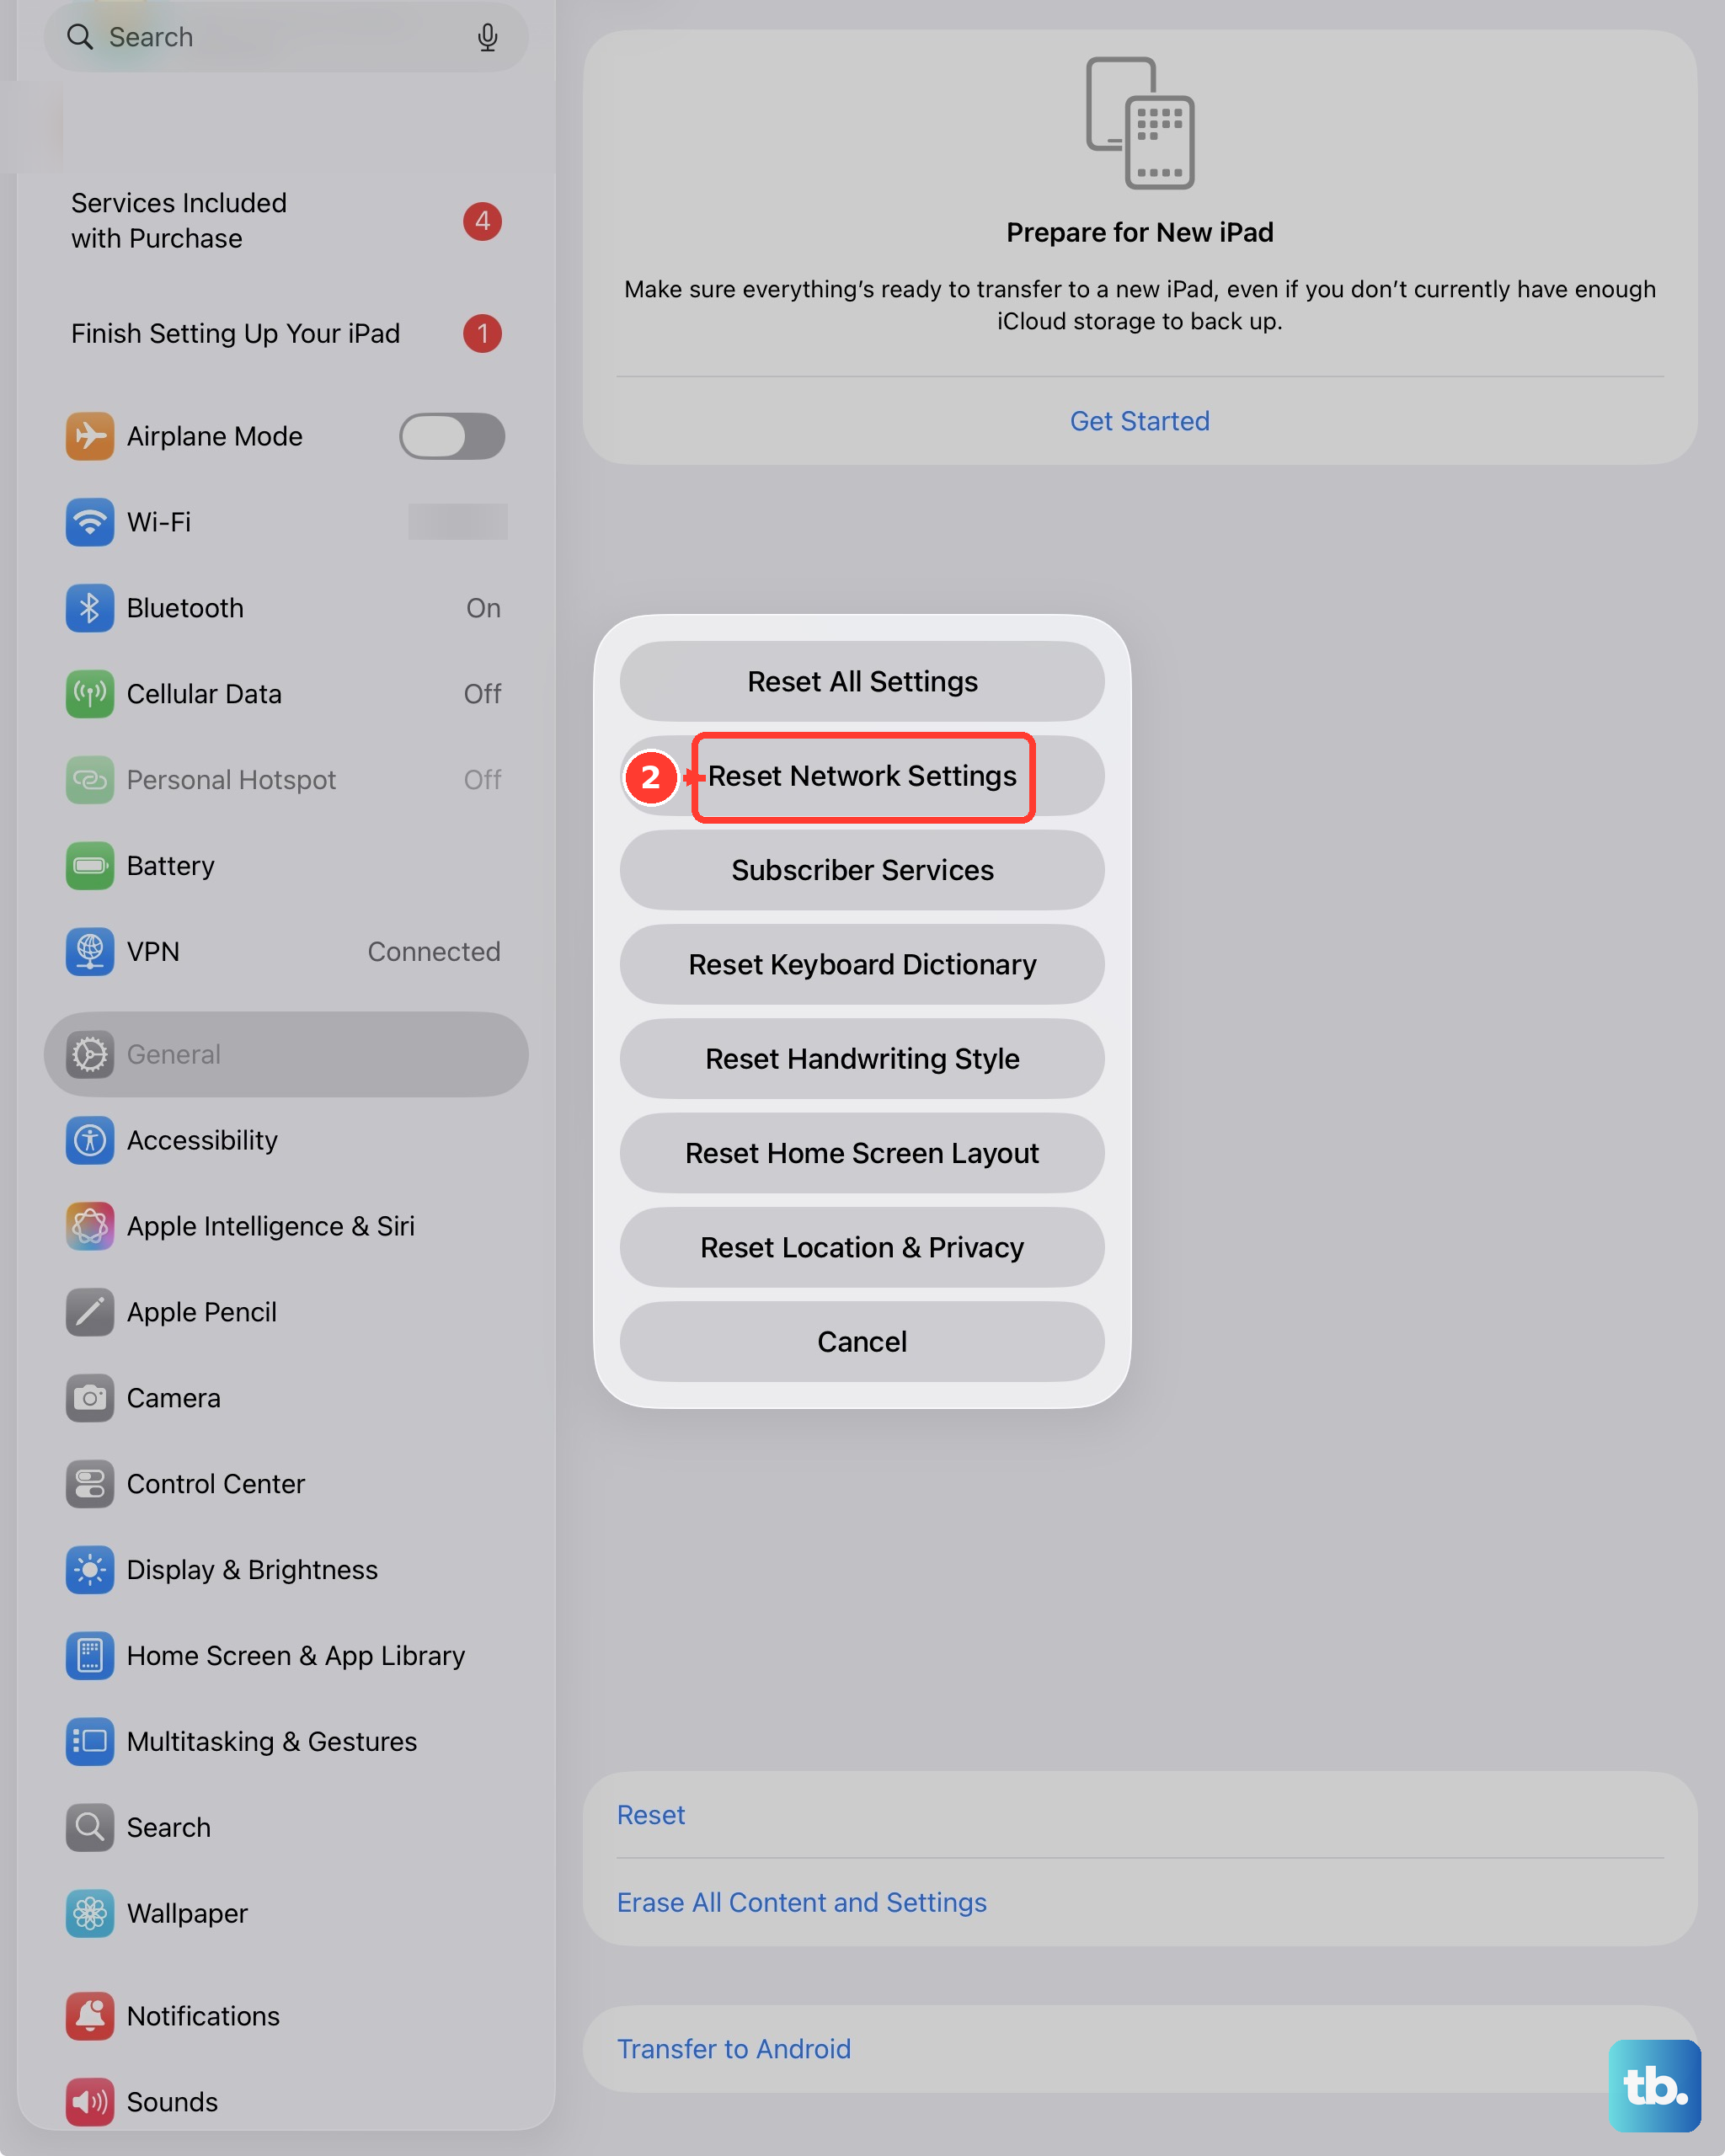
If the iPad still shows no service, corrupted network configurations might be the culprit. This step wipes saved Wi-Fi networks and Bluetooth pairings but won't touch your personal data. Go to Settings > General > Transfer or Reset iPad > Reset and tap Reset Network Settings. Your iPad will restart. You'll need to rejoin your Wi-Fi network, but the cellular radio should reconnect automatically.
Update Carrier Settings
Carriers push out small configuration updates that optimize network connectivity. Your iPad Air M3 might have a pending update that's blocking service. Make sure your iPad is connected to Wi-Fi, then go to Settings > General > About. Wait here for about 15 seconds. If a carrier settings update is available, a pop-up will appear asking you to tap Update. Follow the prompt, it takes under a minute.
Check for a Carrier Outage
Sometimes the problem isn't your iPad at all. Visit your carrier's website or social media page to check for known outages in your area. You can also call a friend with the same carrier and ask if they have service. If there's an outage, all you can do is wait for your carrier to fix it on their end.
Update iPadOS
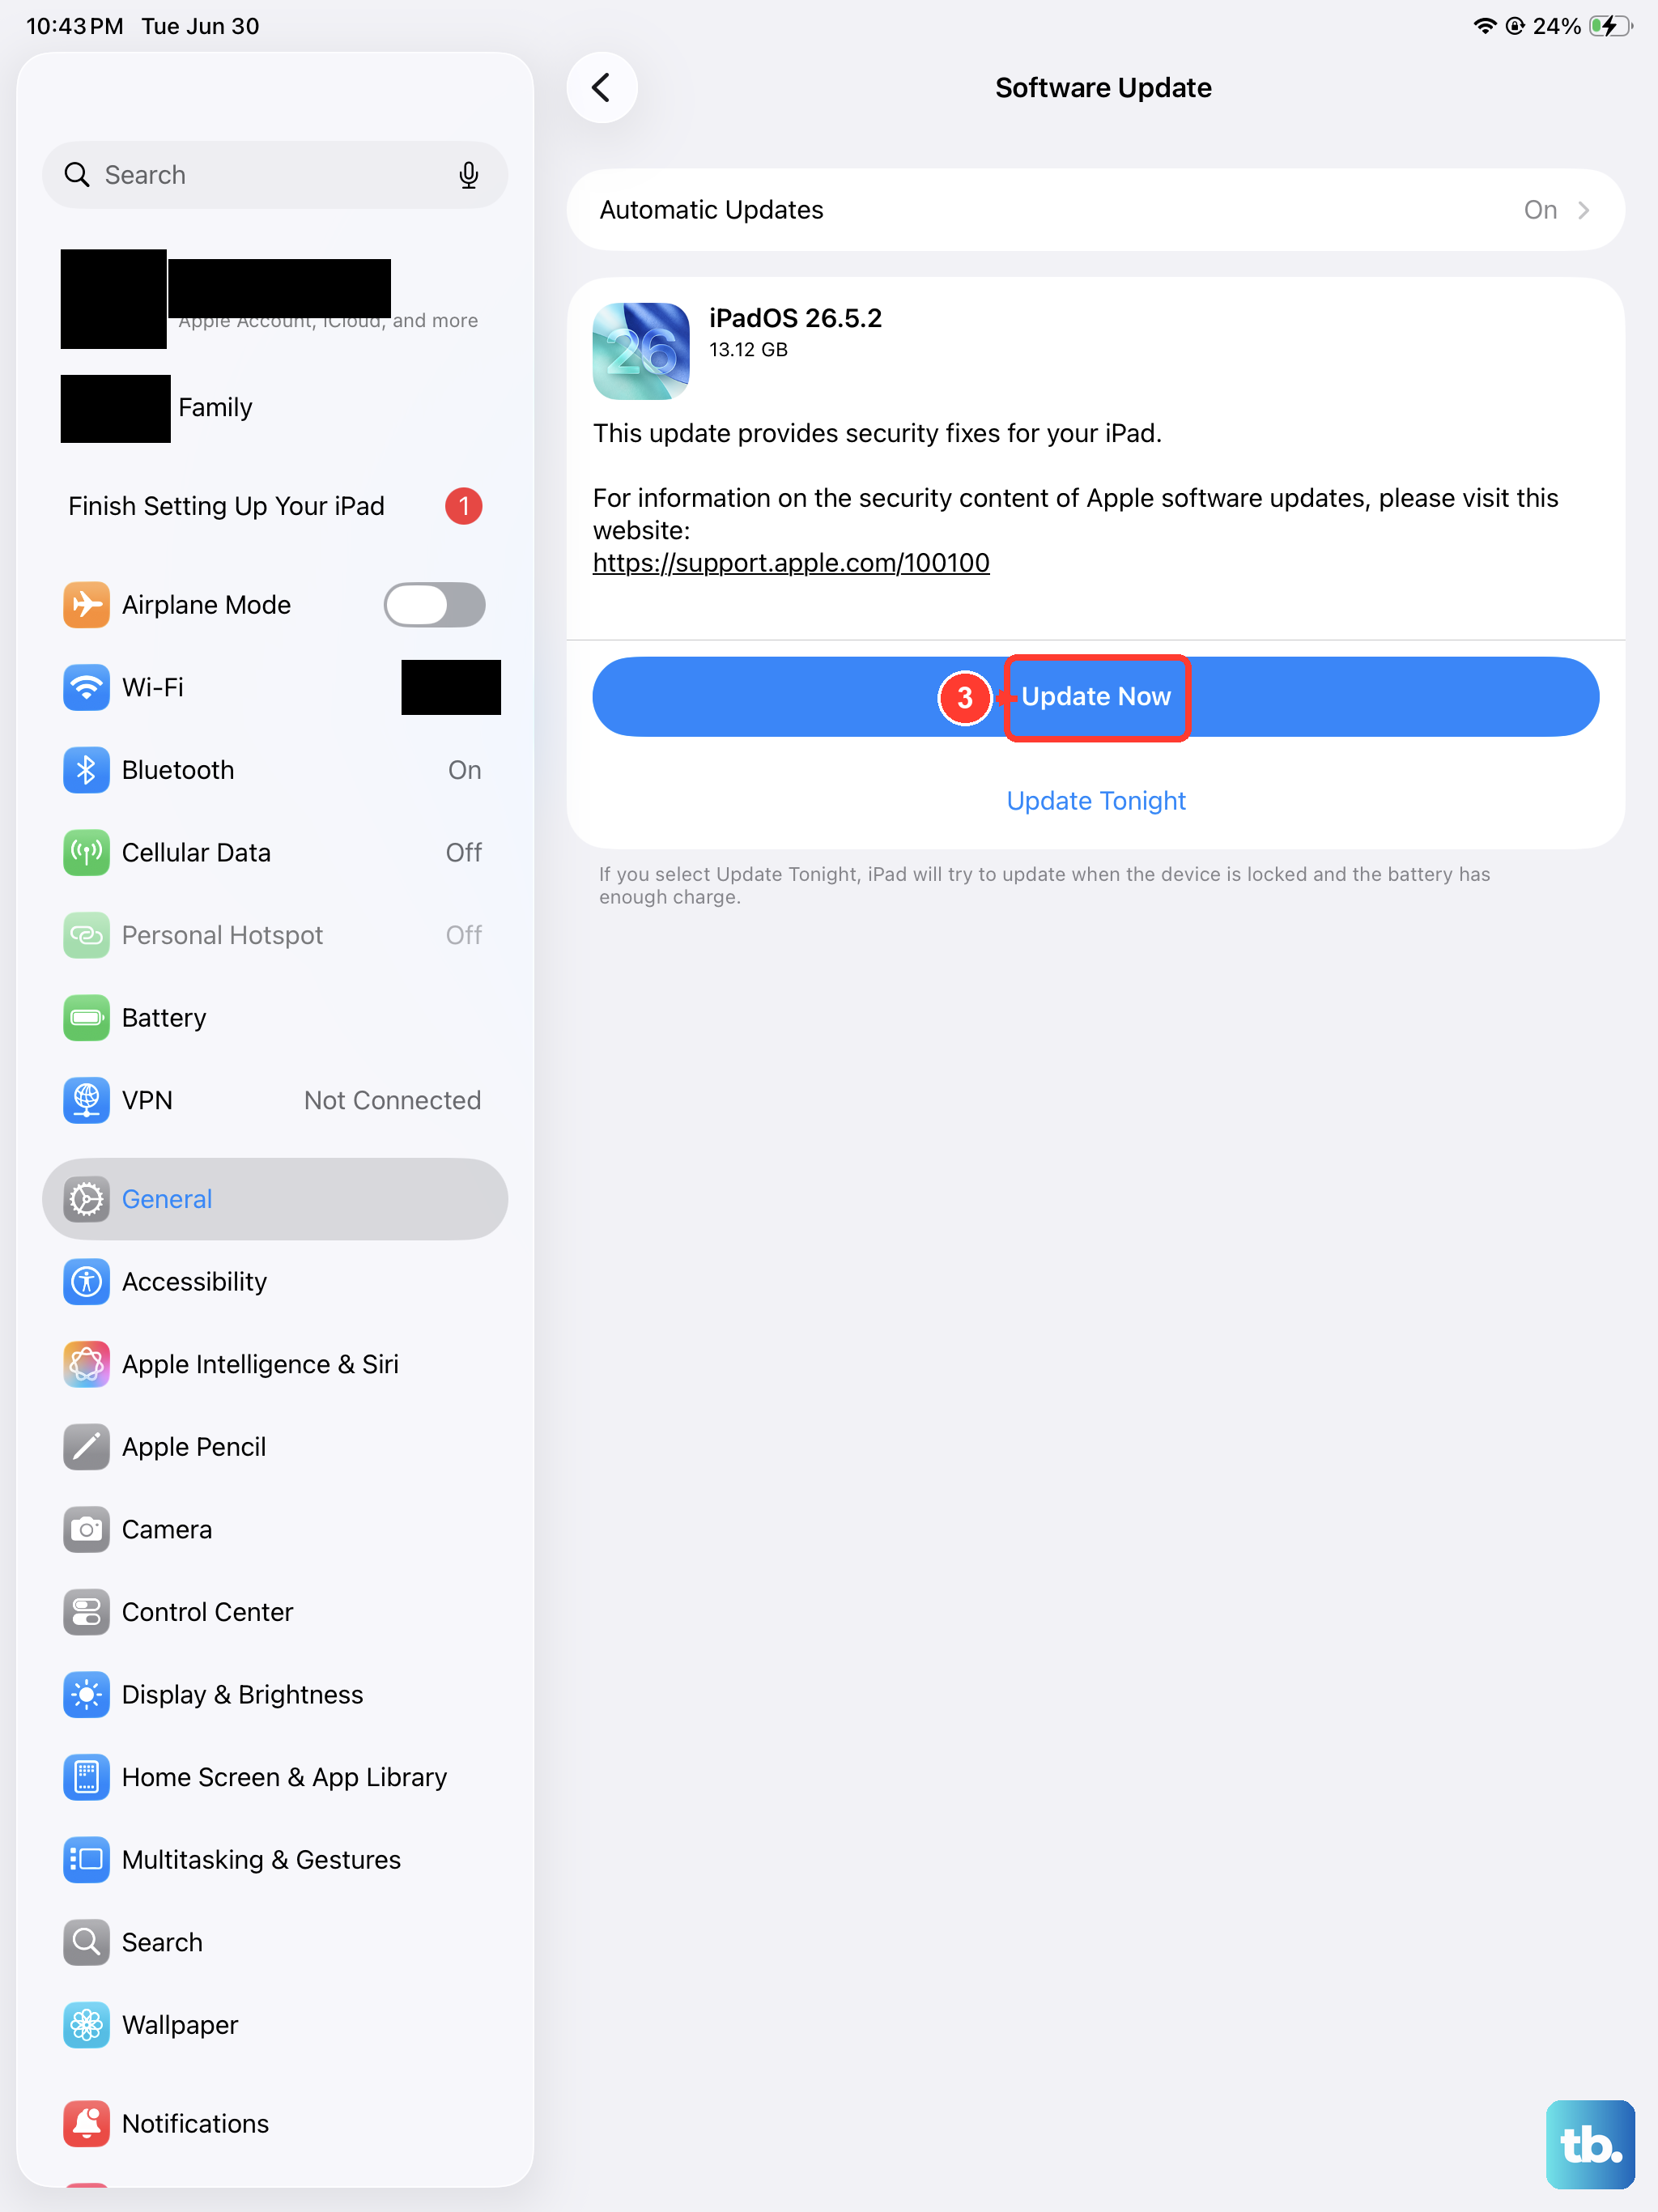
Apple frequently includes cellular bug fixes in iPadOS updates. Go to Settings > General > Software Update. If an update is available, tap Download and Install. This is especially important if you recently set up your iPad Air M3 and haven't updated it yet, as the initial software version might have known cellular bugs.
Check Data Roaming and Network Selection
If you're traveling or live near a coverage boundary, your iPad might be confused about which network to use. Go to Settings > Cellular > Cellular Data Options and toggle on Data Roaming. Then go back, tap Network Selection, and turn off Automatic. Wait for the list of available networks to populate, then tap your carrier's name. This forces the iPad to connect directly instead of hunting for a weak signal.
Reset All Settings
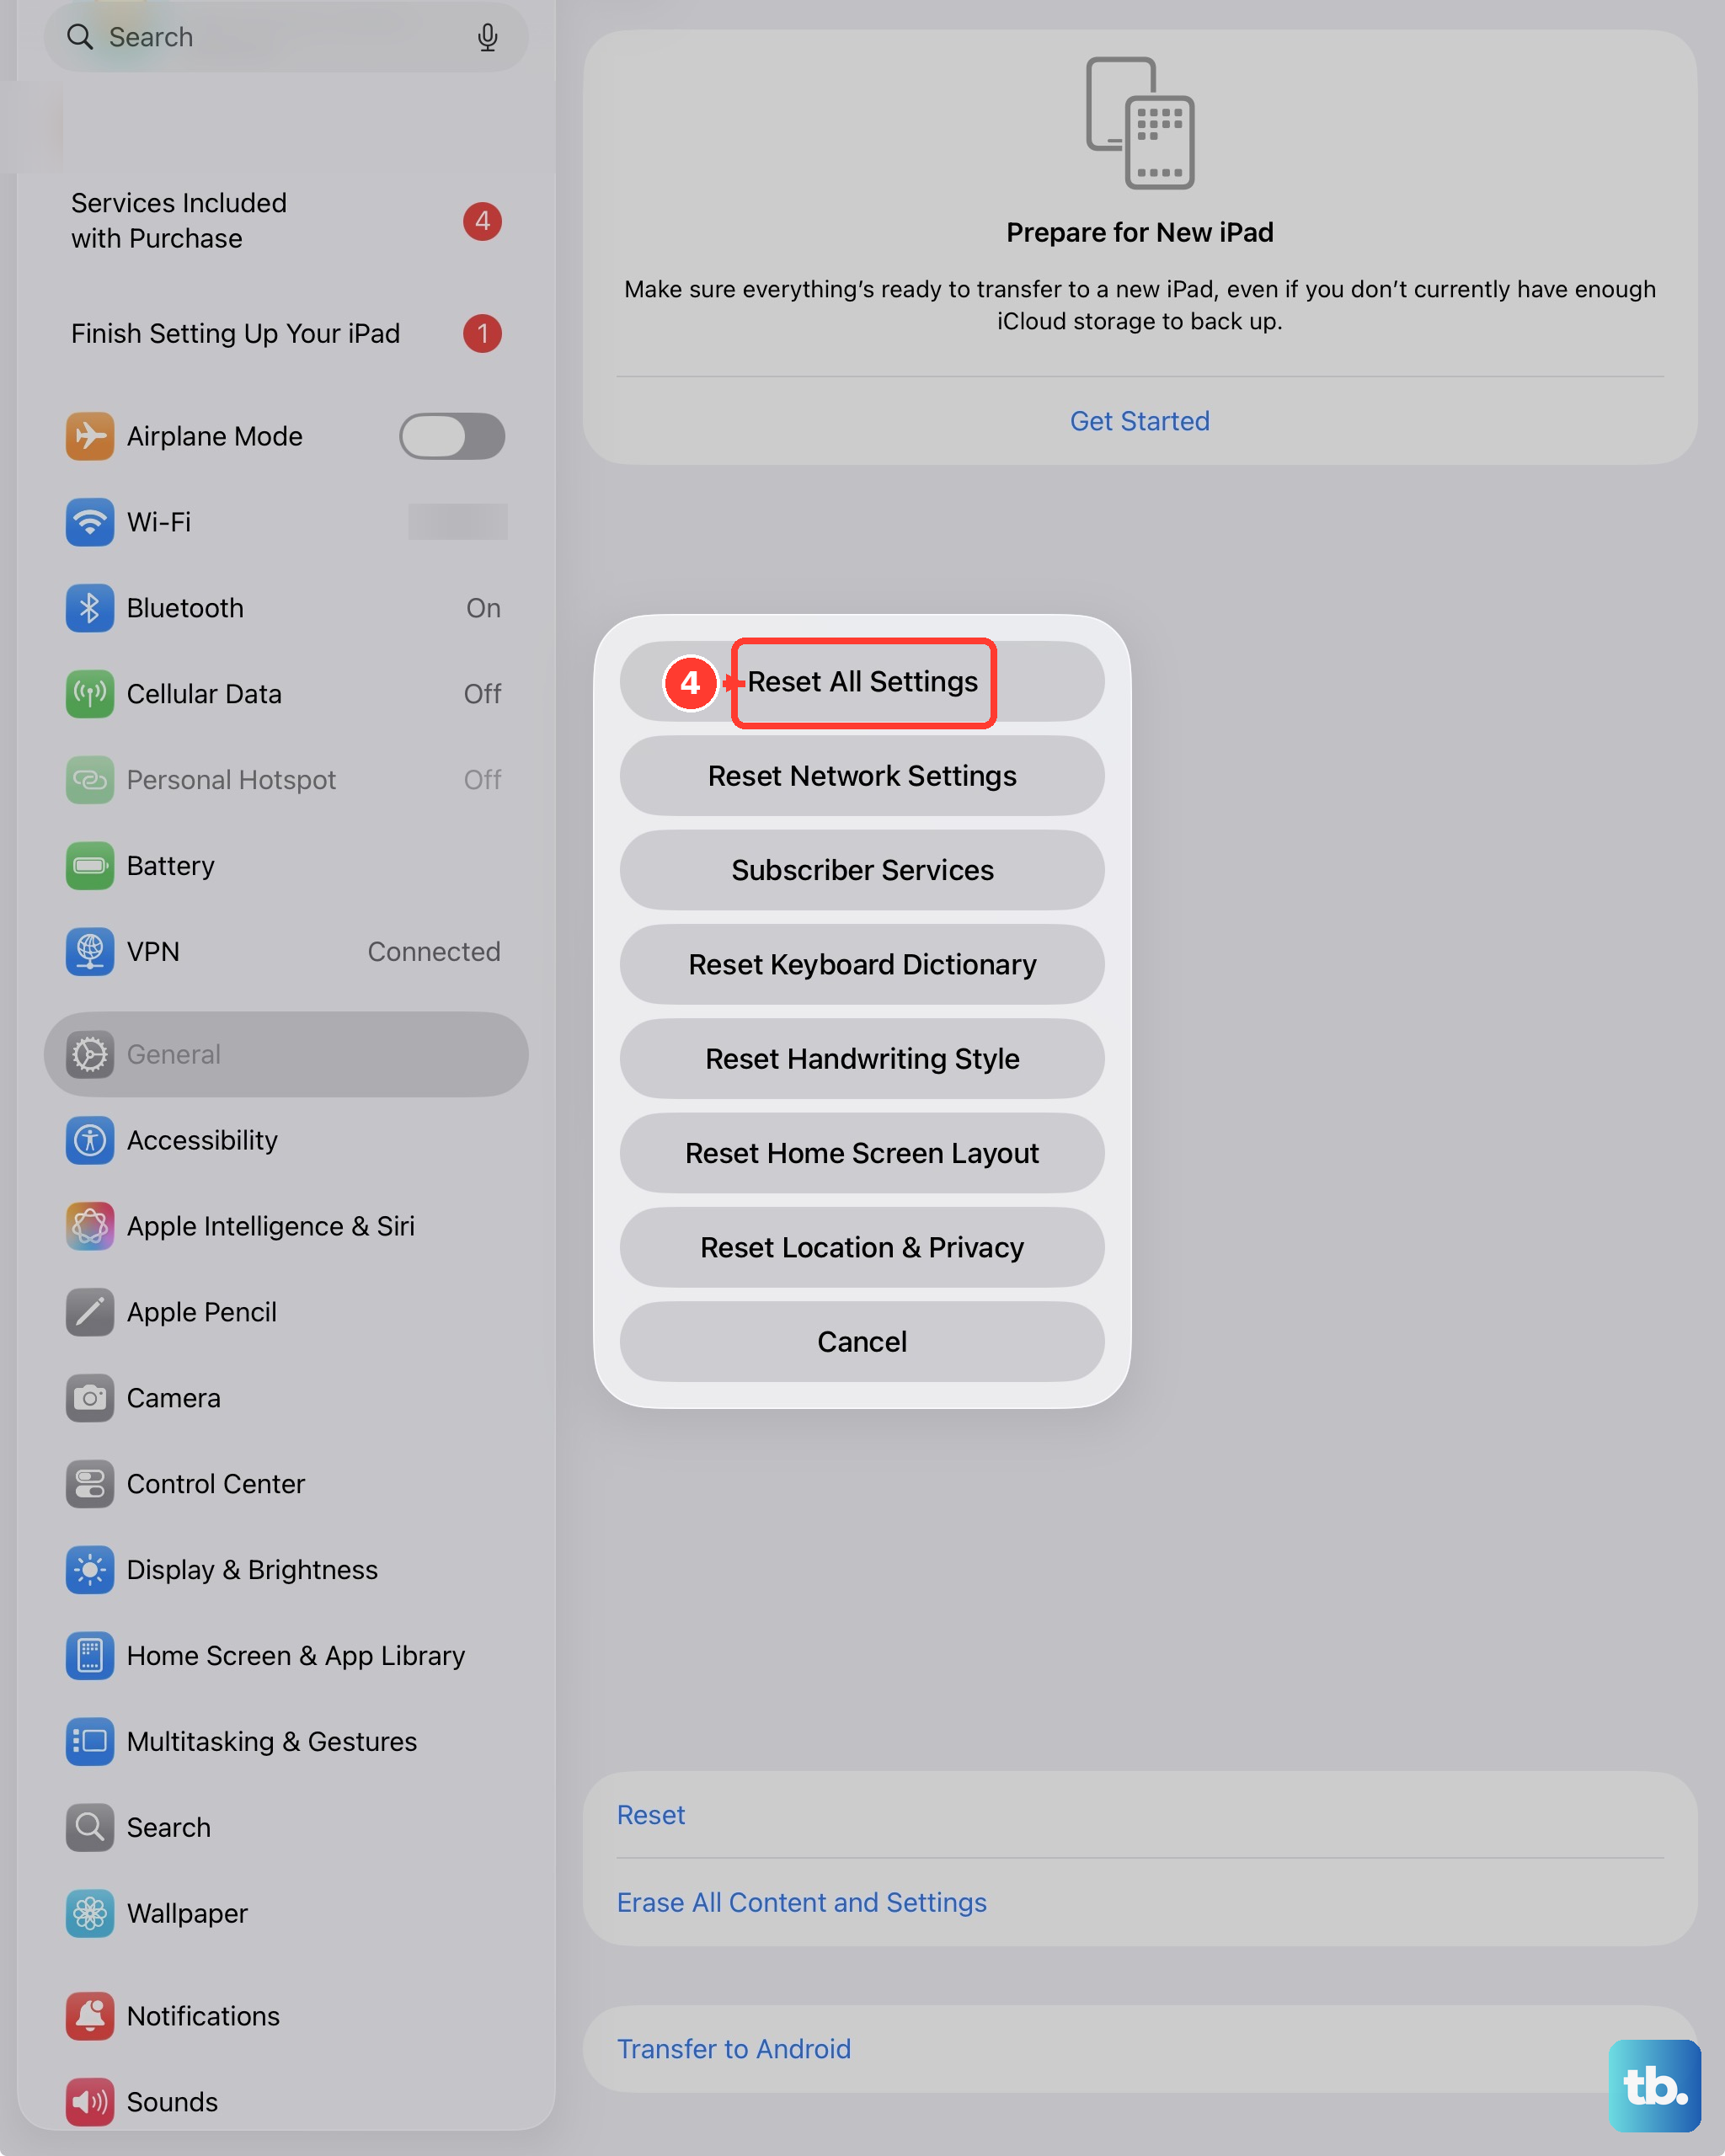
This is more aggressive than a network reset, it wipes all your personalized settings including wallpaper, keyboard dictionaries, and privacy preferences. Your data stays intact. Go to Settings > General > Transfer or Reset iPad > Reset and tap Reset All Settings. Your iPad will restart. You'll have to reconfigure things like Face ID and notification preferences, but this clears deeper configuration conflicts that can block cellular service.
If none of these steps restore your signal, the issue is likely hardware-related. The iPad Air M3 uses an eSIM-compatible modem, and a SIM tray or internal antenna failure would require direct service from Apple. But in my experience, one of the first seven fixes resolves "No Service" for the vast majority of people.