

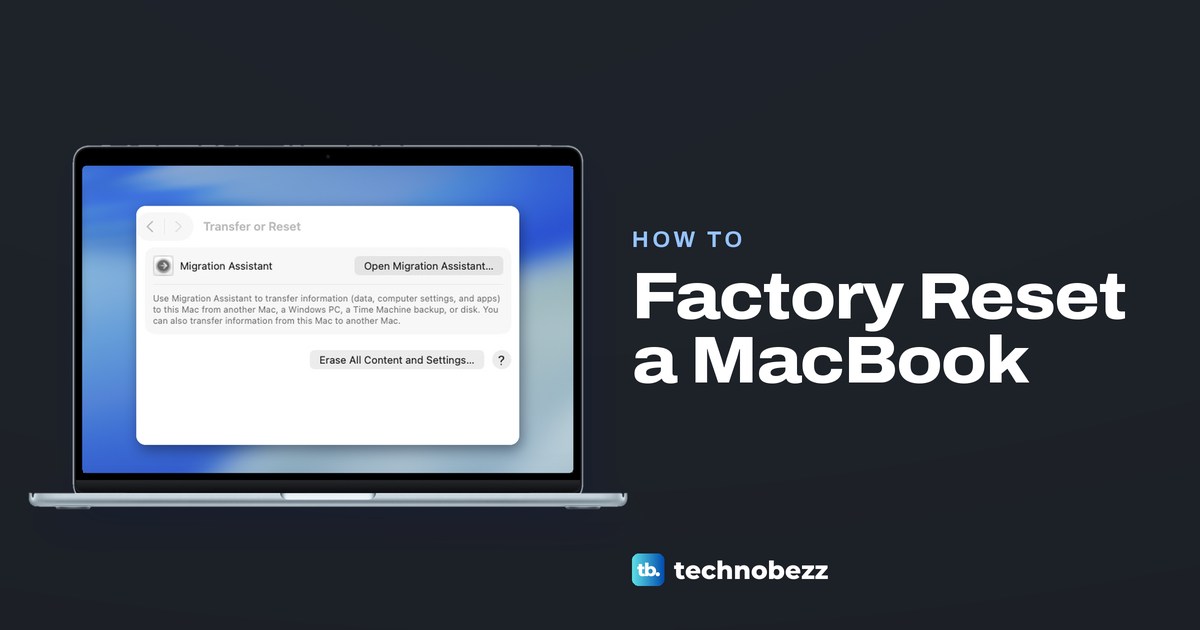
To factory reset a MacBook Air or MacBook Pro, back up your files, then on macOS Ventura or later choose System Settings > General > Transfer or Reset > Erase All Content and Settings. Monterey has it in the System Preferences menu, and both need Apple silicon or a T2 chip. Other Macs are erased in macOS Recovery with Disk Utility instead. If you are selling the Mac, stop when the setup assistant appears and turn it off.
MacBook Air and MacBook Pro follow the same steps, because Apple splits the routes by chip and macOS version, not by model name. Going by Apple's own model lists, every MacBook Air and MacBook Pro introduced in 2018 or later has either Apple silicon or the T2 chip.
The short version
- Back up first. Every route deletes your files, so make a Time Machine backup and check that it finished.
- Check About This Mac. Chip means Apple silicon. An Intel Mac shows Processor and needs the T2 chip for the quick route.
- macOS Ventura or later: System Settings > General > Transfer or Reset > Erase All Content and Settings. On Monterey it sits in the System Preferences menu.
- No Erase Assistant: sign out of iCloud and Messages, start up from Recovery, erase Macintosh HD in Disk Utility and reinstall macOS. Intel Macs start Recovery with Command + R, Apple silicon Macs by holding the power button.
- Selling: do not set the Mac up again. Hold the power button until it turns off, or press Command + Q after a reinstall.
Which reset route your Mac needs
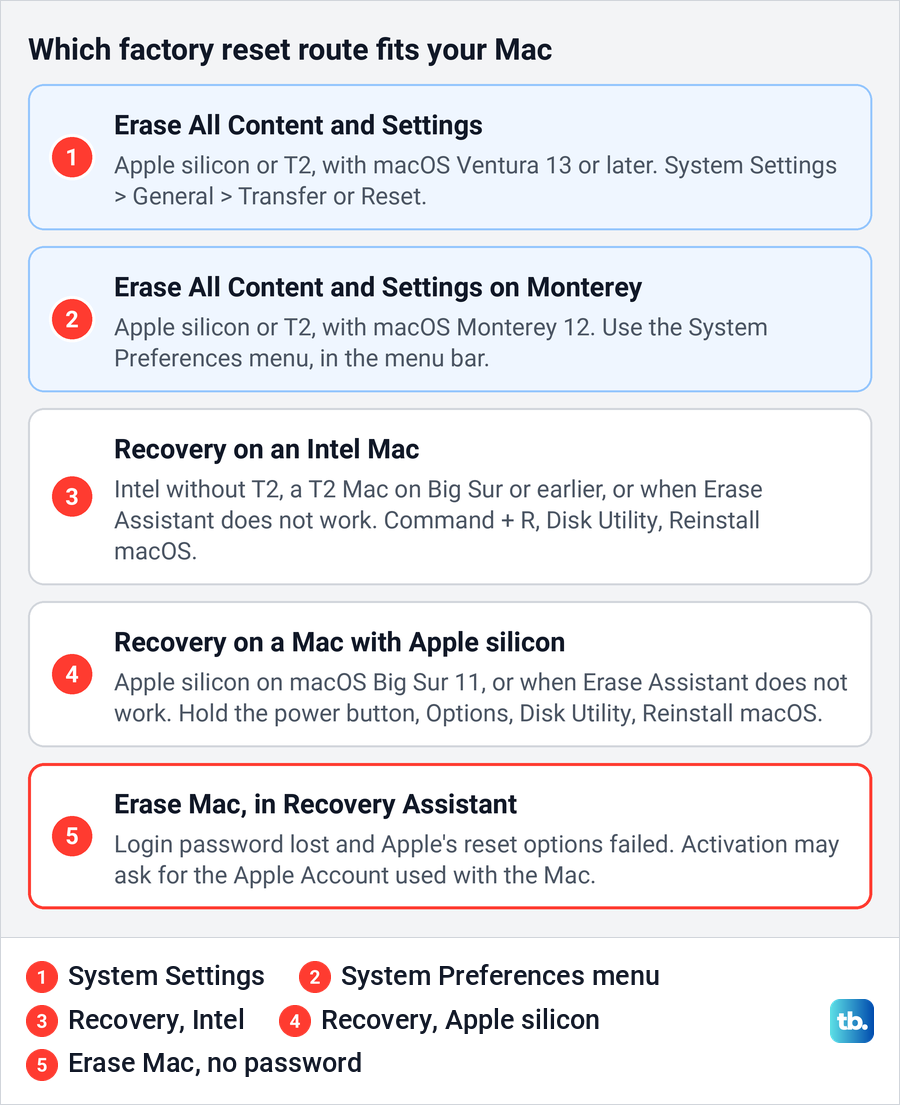
Two facts decide the route, the chip inside the Mac and the macOS version it runs. Apple says Erase All Content and Settings needs macOS Monterey 12 or later and a Mac with Apple silicon or the Apple T2 Security Chip, both at once. A Mac that misses either half is erased from macOS Recovery instead, with steps that differ for Intel and Apple silicon.
| Route | Use it when | What happens |
|---|---|---|
| System Settings > General > Transfer or Reset > Erase All Content and Settings | Apple silicon or T2, with macOS Ventura 13 or later | Erase Assistant removes users, data, apps and settings and keeps the installed macOS |
| System Preferences menu > Erase All Content and Settings | Apple silicon or T2, with macOS Monterey 12 | The same Erase Assistant, opened from a different menu |
| Sign out, then Command + R at startup > Disk Utility > Reinstall macOS | An Intel Mac without T2, a T2 Mac on Big Sur or earlier, or an Intel Mac where Erase Assistant does not work | The startup disk is erased and macOS is installed again |
| Sign out, then hold the power button > Options > Disk Utility > Reinstall macOS | Apple silicon on macOS Big Sur, or where Erase Assistant does not work | The disk is erased, the Mac activates online, then macOS is installed again |
| Recovery > Recovery Assistant > Erase Mac | The login password is lost and Apple's reset options failed | Every account and its data is removed, and activation may still ask for the Apple Account |
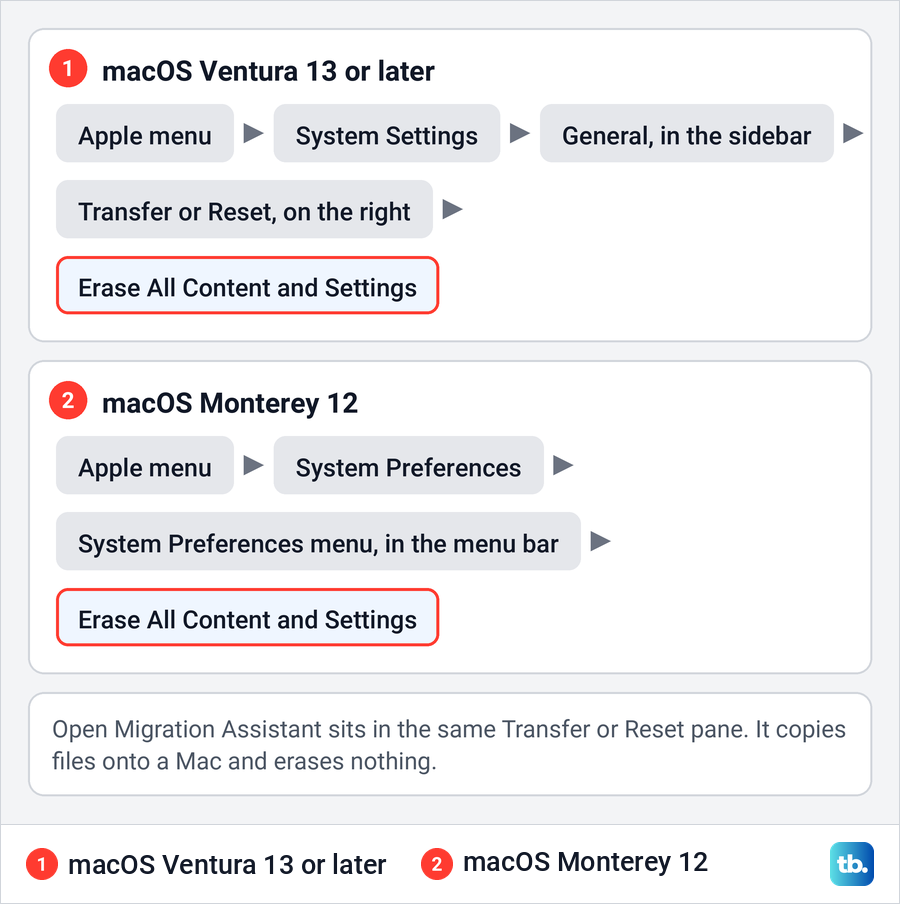
The cards below show the same decision by chip and macOS version, which About This Mac tells you. Find the card that matches your Mac, then follow the section for that route.
Back up the files you want to keep
Both routes delete every file on the Mac, and no factory reset option keeps your documents. Apple's advice is to back up first, and its tool for that is Time Machine with an external drive. Apple suggests a drive with ideally at least twice the storage of your Mac, used only for Time Machine backups.
In macOS Ventura or later, Apple's steps are System Settings > General > Time Machine, then Add Backup Disk, pick the drive and click Set Up Disk. Apple notes that setup might ask to erase the drive so Time Machine can use it. If that drive holds files you need, choose a different backup disk or volume instead of erasing it.
Then choose Back Up Now from the Time Machine menu in the menu bar and wait until the top of that menu shows the date and time of the latest backup. Check that the time shown is from the backup you just made, not an older one. Apple warns that the first backup might take longer than you expect.
Our guide shows how to back up your MacBook with Time Machine step by step, including on older versions of macOS. When it finishes, eject your backup drive safely before you unplug it, which Apple asks for too. Other user accounts on the Mac are erased along with yours, so make sure their files are in a backup as well.
One more check applies only to some Macs. If yours has Apple silicon and macOS 26 or later and was ever repaired, or you are not sure, Apple says to use Repair Assistant to check for an unfinished repair before you erase it. Apple explains that a part taken from another Mac could be locked to someone else's Apple Account.
Check your Mac's chip and macOS version
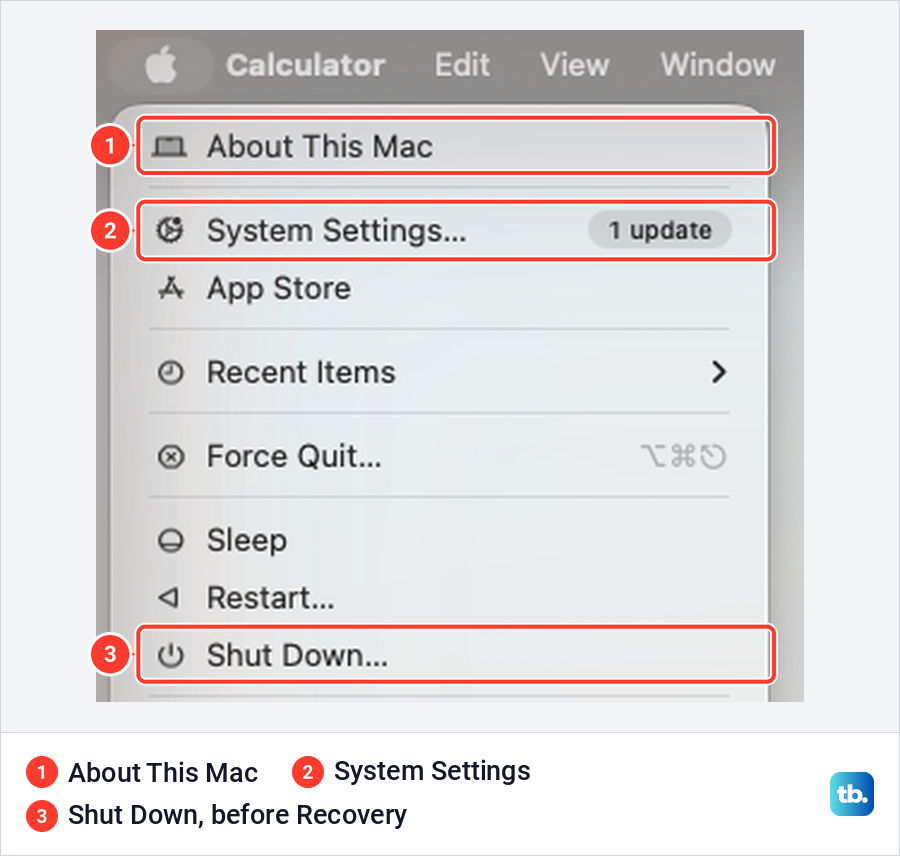
Open the Apple menu in the top left corner of the screen and choose About This Mac. On our Mac the menu listed About This Mac at the top, System Settings just under it and Shut Down near the bottom, the three items this guide uses.
The window that opens names the chip and the macOS version. Apple says a Mac with Apple silicon shows an item labelled Chip, while an Intel Mac shows Processor followed by an Intel processor name. Ours showed Chip, so it is an Apple silicon Mac, and the macOS line read Tahoe 26.5.
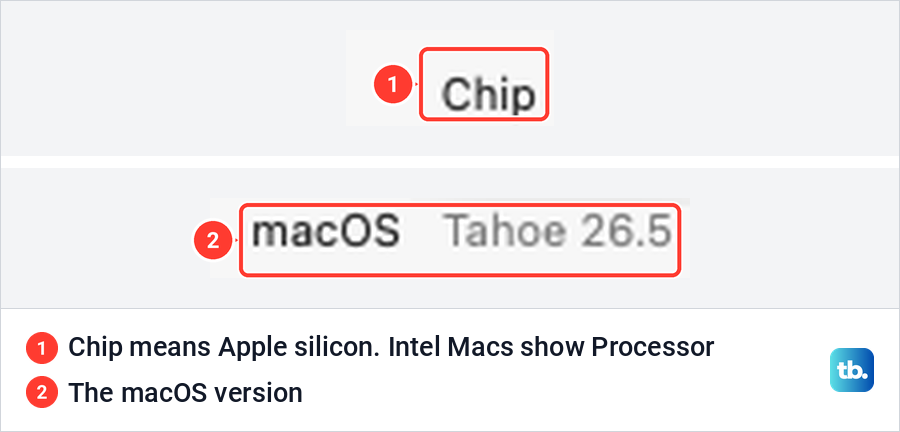
Any version from macOS Monterey 12 onward meets the software half, which takes in Ventura 13, Sonoma 14, Sequoia 15, Tahoe 26 and macOS 27. An Intel Mac needs one more check, because About This Mac does not show the T2 chip. Apple's way is to hold Option while you open the Apple menu, choose System Information, then select Controller or iBridge in the sidebar.
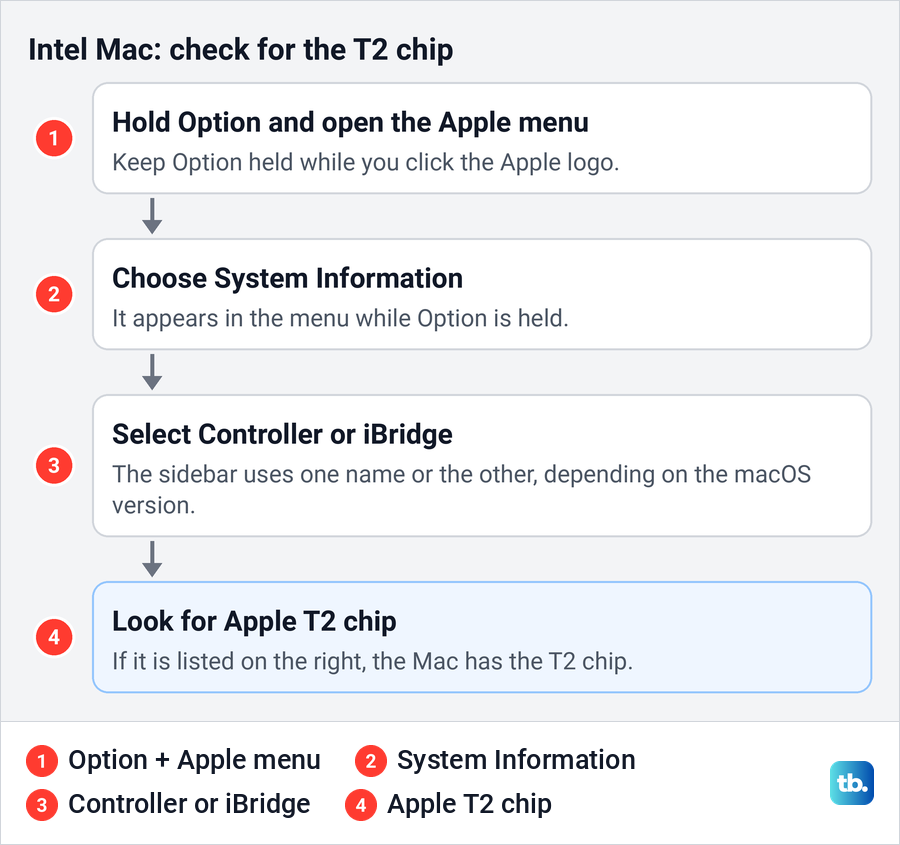
If Apple T2 chip appears on the right, the Mac has it. Apple's list of T2 Macs includes the MacBook Air and MacBook Pro models introduced from 2018 through 2020, apart from the M1 models of 2020, which have Apple silicon.
Erase a MacBook with Erase All Content and Settings
On macOS Ventura 13 or later, choose System Settings from the Apple menu and click General in the sidebar. Apple notes that you may need to scroll the sidebar to reach it.
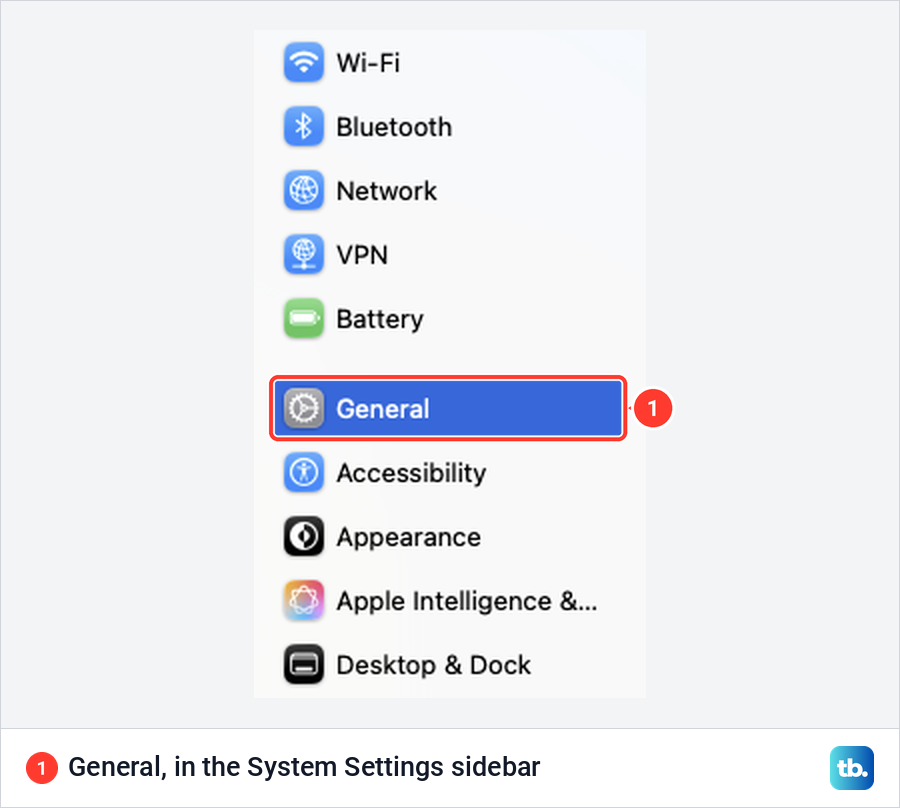
In General, scroll down on the right and click Transfer or Reset, then click Erase All Content and Settings. The same pane holds Open Migration Assistant, which Apple describes as the way to transfer files to a Mac, so leave that one alone.
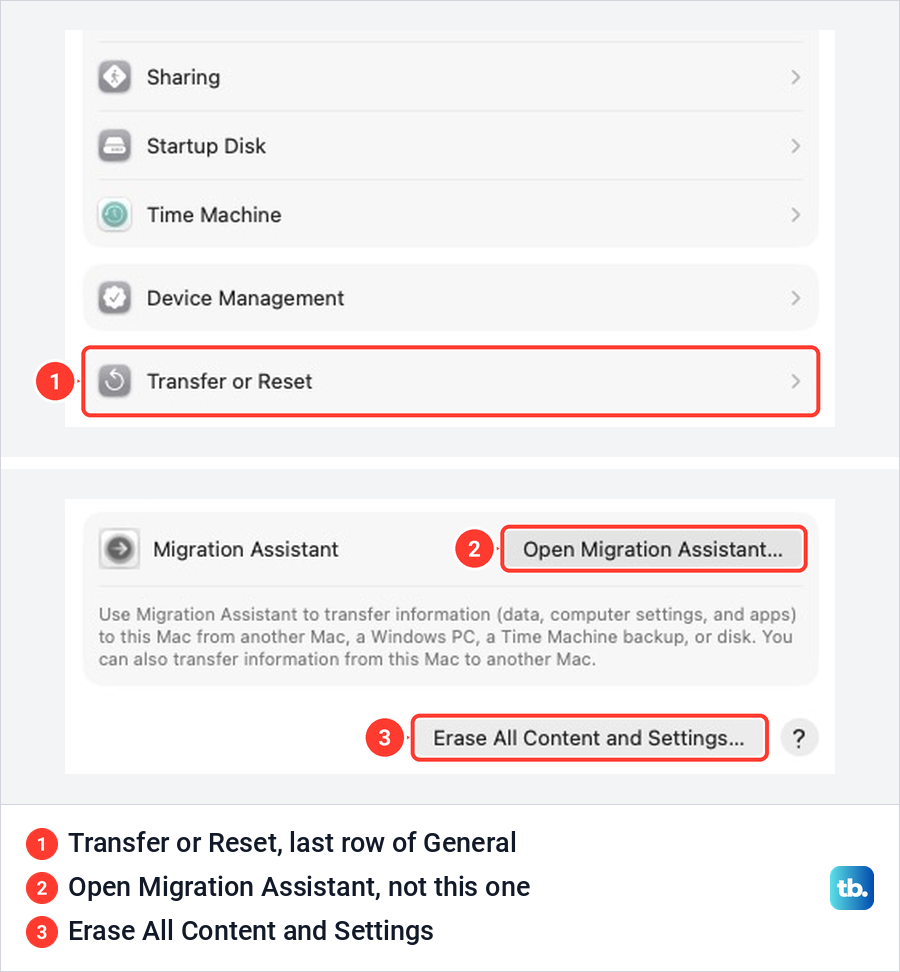
On our Mac with macOS Tahoe 26.5, Transfer or Reset was the last row of General, below Device Management. The pane it opened had two buttons: Open Migration Assistant in a box at the top, and Erase All Content and Settings under it. We stopped there and did not start an erase.
From here Erase Assistant takes over, and the steps follow Apple's instructions. Enter the password you use to log in to the Mac, which Apple calls your administrator information, and click Unlock. Review the list of items it will remove besides your content and settings, and if the Mac has several user accounts, Apple says you can expand each one to see its items.
Click Continue and follow the prompts. If you are asked for your Apple Account password, enter it, since that is a different password from the Mac login. When the Erase All Content & Settings button appears, click it. Apple warns that a message may ask whether you want to sign back in to iCloud, and says to ignore it and click Erase All Content & Settings.
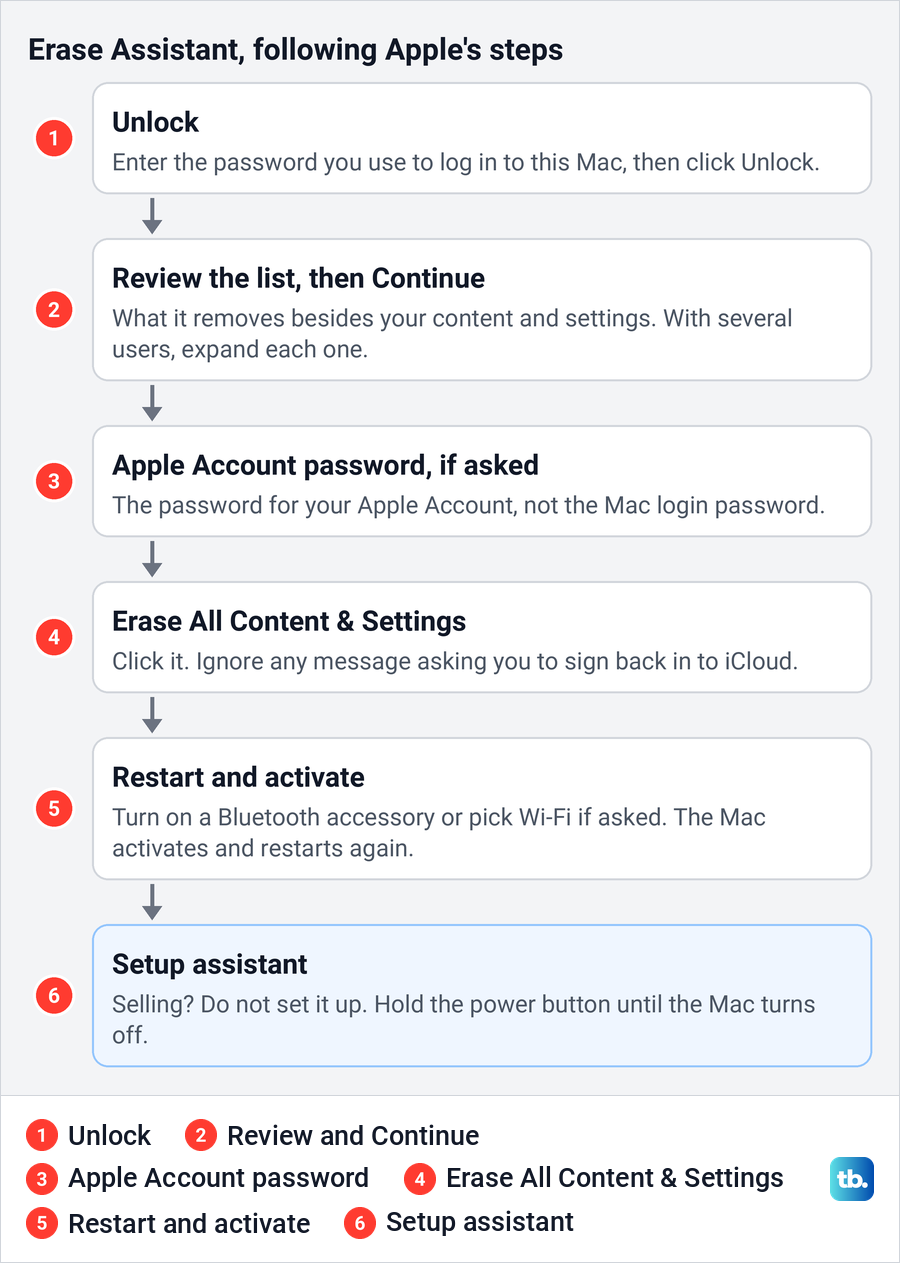
Apple says the Mac then restarts, may ask you to turn on a Bluetooth keyboard, mouse or trackpad, and may ask for a Wi-Fi network or a cable. It activates, restarts again and opens the setup assistant, which the Mac User Guide describes as a Hello screen. If you are keeping the Mac, set it up from there and restore your files from the backup.
Find Erase All Content and Settings on macOS Monterey
macOS Monterey 12 has no Transfer or Reset pane, so the steps above will not find the command. Apple's route is to choose System Preferences from the Apple menu, then open the System Preferences menu in the menu bar, next to the Apple logo, and choose Erase All Content and Settings.
The same Erase Assistant opens and asks for the same passwords. The Mac still needs Apple silicon or the T2 chip, since Monterey alone is not enough.
What Erase Assistant removes and what it keeps
Apple lists what Erase Assistant does. It signs you out of Apple services such as iCloud, turns off Find My and Activation Lock so the Mac is no longer linked to you, and erases your content, settings and the apps you installed. It also erases every user account with its data, not just yours, and every volume on the disk.
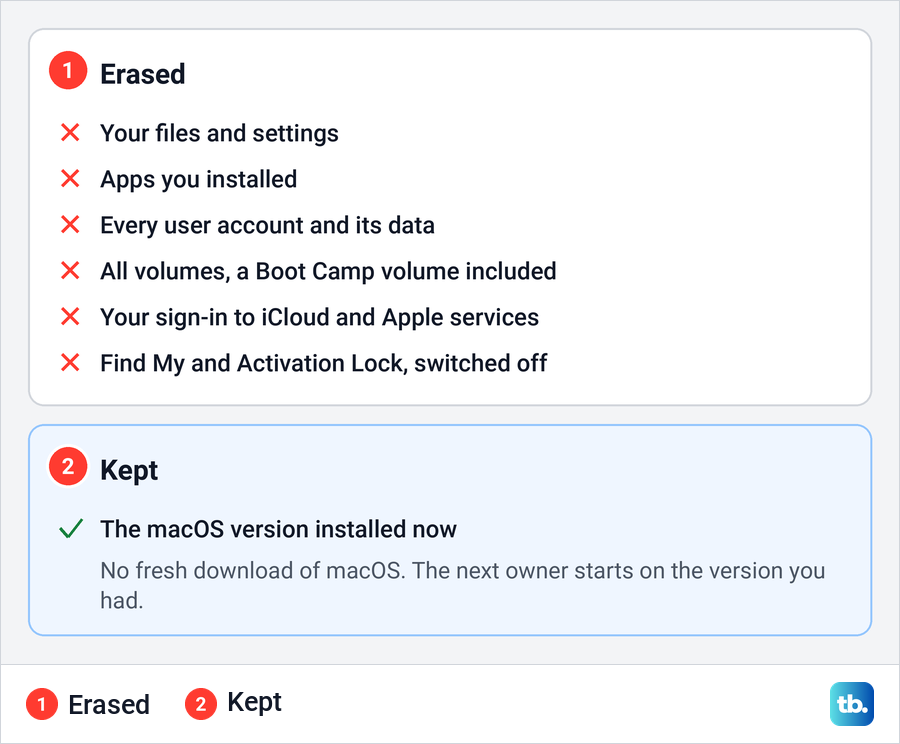
What it keeps is macOS itself. Apple says the feature erases data, settings and apps while maintaining the operating system currently installed, so the next owner starts on the macOS version you had, not a fresh download. Some guides tell you to delete the other user accounts or turn off FileVault first, but neither step is in Apple's instructions, and the assistant erases every account anyway.
Activation Lock comes from Find My, and Erase Assistant turns both off for you. If the assistant says other volumes need to be erased first, Apple says you might have used Boot Camp to install Windows. Its fix is to use Boot Camp to remove Windows and its partition, then run the erase again.
Prepare a MacBook without Erase Assistant for sale
Without Erase Assistant, the sign-outs it would do are yours to do by hand, and Apple's sale checklist puts them before the erase. Apple also says you can skip all of these steps on a Mac that can use Erase All Content and Settings. Work through them in order while the Mac still starts normally.
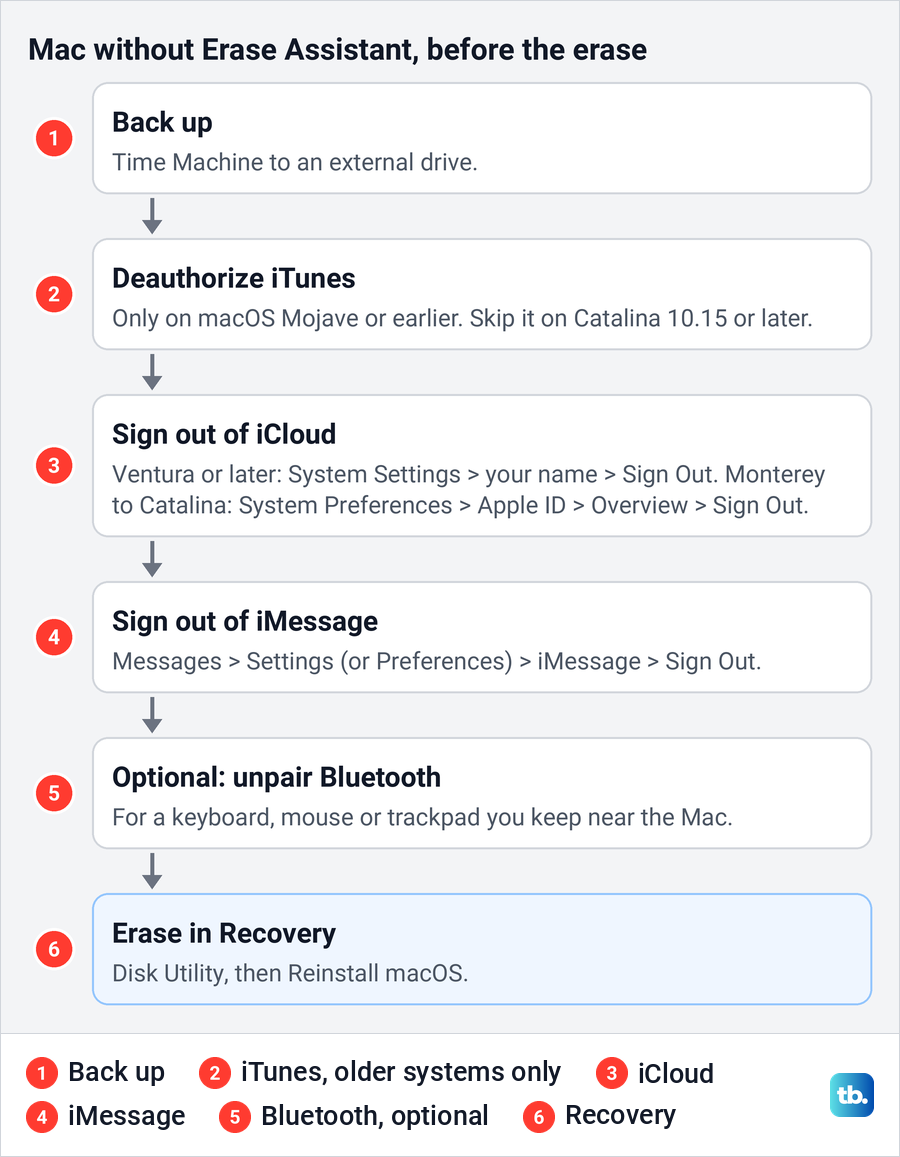
Skip iTunes on macOS Catalina 10.15 or later. On older systems, open iTunes and choose Account > Authorizations > Deauthorize This Computer. To sign out of iCloud on macOS Ventura or later, open System Settings, click your name in the sidebar and click Sign Out, and on Monterey, Big Sur or Catalina go to System Preferences > Apple ID > Overview > Sign Out.
On anything older, Apple's path is System Preferences > iCloud > Sign Out. Signing out asks whether to keep a copy of your iCloud data on the Mac, and Apple notes that keeping it is faster since the Mac is erased afterwards. Then open Messages, choose Messages > Settings (or Preferences) > iMessage and click Sign Out.
If you keep a Bluetooth keyboard, mouse or trackpad that will stay near the Mac, Apple suggests unpairing it in Bluetooth settings so it cannot send input to the Mac by accident. Its caution is that unpairing your only keyboard and mouse means connecting USB ones to finish.
Erase and reinstall macOS from Recovery
This is the route for any Mac that cannot use Erase All Content and Settings, after the sign-outs above. Apple gives separate Disk Utility steps for Intel Macs and for Macs with Apple silicon, so follow the part for your chip. Either way, connect the Mac to the internet and shut down your MacBook completely first.
On an Intel Mac
Apple's Disk Utility steps for Intel Macs cover an Intel Mac without T2 and a T2 Mac that cannot use Erase Assistant. Plug the MacBook into its power adapter, then press the power button and immediately hold Command + R until you see an Apple logo or a spinning globe. If asked to select a volume, choose Macintosh HD and click Next, and if asked to select a user you know the password for, select it, click Next and enter that user's login password.
Apple adds that a Mac which cannot load its built-in Recovery should show a spinning globe and start Recovery over the internet. If neither happens, see what to do when macOS Recovery will not open.
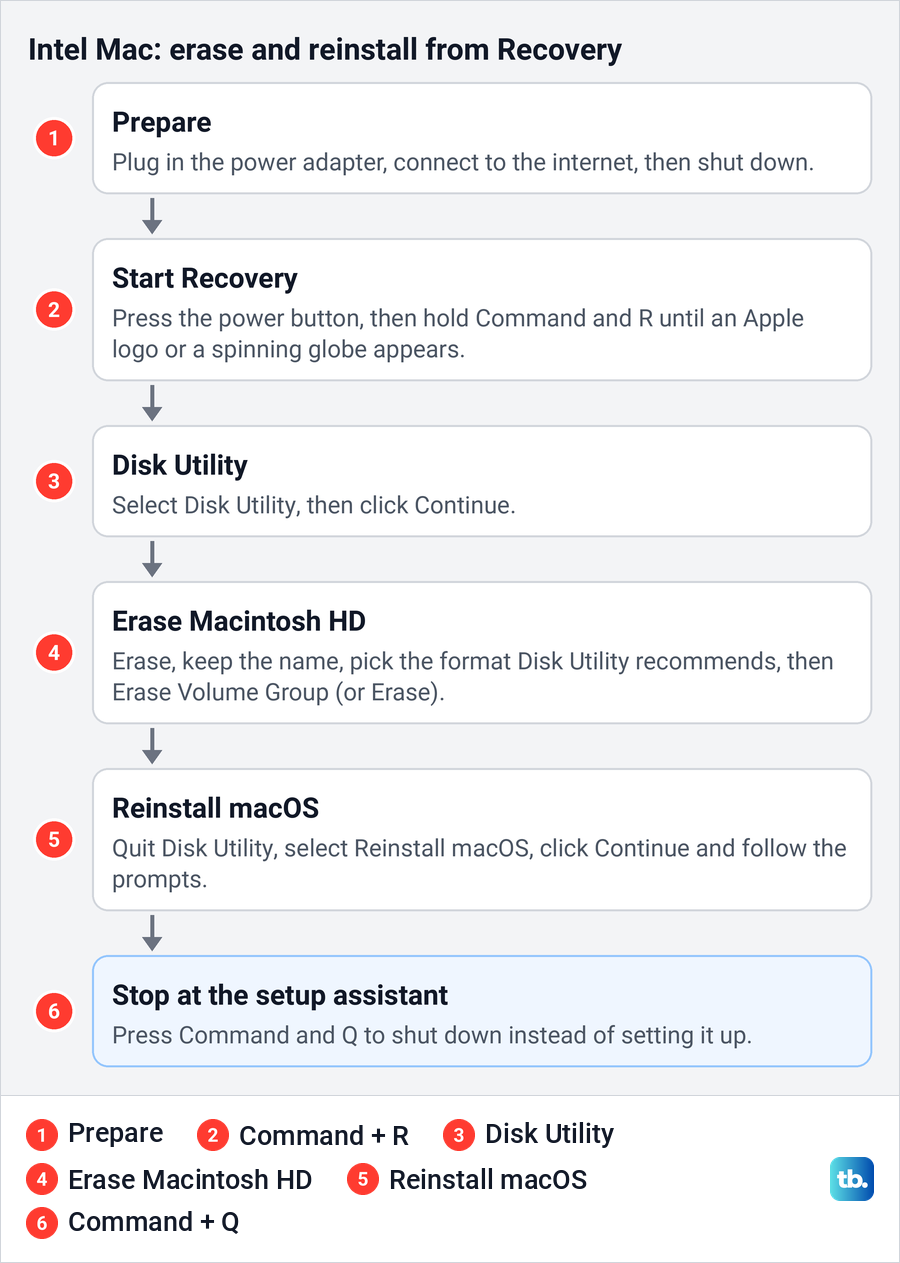
In the utilities window, select Disk Utility and click Continue. Select Macintosh HD in the sidebar, which Apple says is the built-in startup disk unless you renamed it, then click Erase in the toolbar. Keep the name Macintosh HD, choose APFS or Mac OS Extended (Journaled) as Disk Utility recommends, and click Erase Volume Group, or Erase if that button is not shown.
Enter your Apple Account details if you are asked. When the erase finishes, quit Disk Utility, choose Reinstall macOS in the utilities window, click Continue and follow the prompts. Apple says the Mac restarts to the setup assistant after the reinstall, and a seller should press Command + Q there to shut down instead of continuing.
On an Intel Mac, Apple's checklist ends with one more step, which is to reset NVRAM on an Intel Mac to clear user settings from memory and restore some security features. The Mac then starts to the setup assistant again, so press Command + Q once more to leave it in an out-of-box state.
On a Mac with Apple silicon
An Apple silicon Mac starts Recovery from the power button. Apple's steps are to press and hold it until you see Loading startup options, release it, then click Options and Continue. Apple warns that its erase steps disconnect Bluetooth devices, so connect a keyboard, mouse or trackpad with a USB cable if you can.
If asked to select a volume, choose Macintosh HD and click Next, and if asked to select a user you know the password for, select it, click Next and enter that user's login password. Then choose Disk Utility, select Macintosh HD, click Erase, keep the name Macintosh HD and choose APFS. Click Erase, or Erase Volume Group if you see it, enter your Apple Account details if asked, then click Erase Mac to confirm.
The Mac restarts, asks for a language and tries to activate, which Apple says requires an internet connection. After it activates, click Exit to Recovery Utilities, choose Reinstall macOS and follow the prompts. If you are selling, press Command + Q at the setup assistant to shut down.
Reset a MacBook without the password
Two passwords get mixed up here. The Mac login password unlocks your user account and Erase Assistant, while the Apple Account password belongs to iCloud and Activation Lock, and losing one is a different problem from losing the other. If it is the Apple Account password you have lost, reset that first, since Apple's erase steps link to its Apple Account password help at the point where that password is asked for.
If you forgot the login password, try to reset a forgotten MacBook login password first, so you can still back up your files. Apple's order is to restart the Mac normally so it opens at the login window, try the reset options there, such as the question mark beside the password field, then the reset options in Recovery, where Forgot all passwords? starts the process.
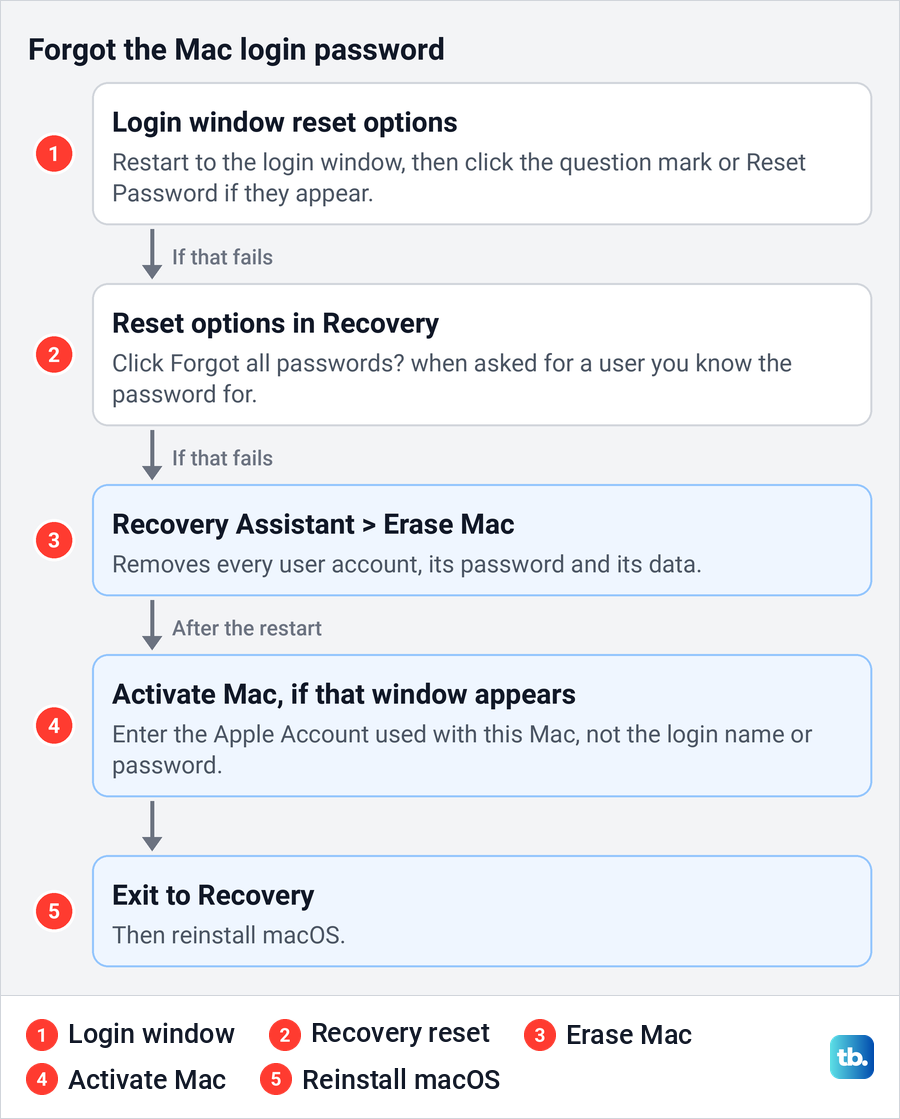
Apple's last resort is to erase the Mac. Start up from Recovery, and when you are asked to select a user you know the password for, choose Erase Mac from the Recovery Assistant menu in the menu bar. Click Erase Mac in the window that opens, then Erase Mac again to confirm, and Apple says the Mac restarts by itself when it is done.
This erase does not get past Activation Lock. If the Mac starts up to an Activate Mac window, Apple says to choose a Wi-Fi network if asked and enter the Apple Account information, not the login name or password. After activation, click Exit to Recovery and reinstall macOS.
Activation Lock stays on as long as Find My is on. If the Mac is still in your hands, Apple's way to turn it off is System Settings > your name > iCloud > See All (or Show More Apps) > Find My Mac, then switch it off and enter your Apple Account password. If the Mac is offline, Apple says you can also remove it at www.icloud.com/find by signing in, selecting the Mac and clicking Remove.
If you need help disabling Activation Lock, for example because you are the one locked out, Apple says you can start an Activation Lock support request. You need proof of purchase documentation for it.
When Erase All Content and Settings is missing
If Transfer or Reset has no erase button, or the System Preferences menu has no such command, check both halves of Apple's requirement first. Look in About This Mac for Chip or Processor and for macOS Monterey 12 or later, and on an Intel Mac check System Information for the T2 chip. A MacBook Air or MacBook Pro introduced in 2017 or earlier has neither Apple silicon nor T2, so it always takes the Recovery route.
If your Mac meets both and the option is still missing, or Erase Assistant does not work, Apple's fallback is the manual route above, meaning the sale checklist and then an erase and reinstall from Recovery with the steps for your chip. If the Mac never starts far enough for either route, begin with what to do when a Mac will not turn on.
Disk Utility can hit its own snag. If Macintosh HD is missing from its sidebar, Apple says to shut down, unplug every nonessential device and try again, and it warns that a Mac whose disk still does not appear, or whose erase fails, might need service.
How long a MacBook factory reset takes
Apple does not give a time for either route, so treat any fixed number of minutes with caution. Erase Assistant keeps macOS in place and skips a download, but the Mac still restarts, may need a network to activate and then restarts again.
The Recovery route has more to do, because after the erase it downloads and installs macOS, which is why Apple asks for an internet connection and, on a laptop, the power adapter. The backup before either route can be the slowest part, and Apple warns that a first Time Machine backup might take longer than you expect.
Leave the MacBook ready for its new owner
Whichever route you used, the Mac should end on the setup assistant with no account on it. Apple says not to use the setup assistant or your old Bluetooth devices if you want an out-of-box state. After Erase Assistant, press and hold the power button until the Mac turns off, and after a reinstall from Recovery, press Command + Q. If AppleCare covers the Mac, Apple notes that you can cancel the plan or transfer it to the new owner.
How we tested this guide
We tested this on a Mac with macOS Tahoe 26.5, going through General and Transfer or Reset up to the Erase All Content and Settings button.
Frequently Asked Questions
How do I factory reset a MacBook Air before selling it?
Back up, then check About This Mac. With Apple silicon or the T2 chip and macOS Monterey or later, use Erase All Content and Settings and turn the Mac off at the setup assistant; otherwise sign out of iCloud and Messages, then erase and reinstall macOS from Recovery.
Does Erase All Content and Settings reinstall macOS?
No. Apple says it erases your data, settings and apps while keeping the operating system currently installed, so the Mac starts again on the same macOS version.
Why is Erase All Content and Settings missing on my Mac?
Check both requirements first, macOS Monterey or later and Apple silicon or the T2 chip, and remember that on Monterey the command is in the System Preferences menu in the menu bar. If your Mac meets both and the option is still missing or does not work, Apple points you to the manual route, an erase and reinstall from Recovery.
Can I factory reset a MacBook without the password?
Without the login password, yes. If Apple's login password reset options fail, start up from Recovery and choose Erase Mac from the Recovery Assistant menu, which removes every account and its data. Without the Apple Account password, the Mac can be erased but may not activate until you reset that password or get help through an Activation Lock support request.
How long does a MacBook factory reset take?
Apple does not give a time. Erase All Content and Settings keeps macOS and needs no download, while the Recovery route also downloads and installs macOS, so it depends on your connection.
Which disk do I erase in Disk Utility?
Select Macintosh HD, the built-in startup disk, unless you renamed it. Apple says to click Erase and choose APFS, or on an Intel Mac the format Disk Utility recommends, then click Erase Volume Group if it is shown, otherwise Erase.
Can I factory reset a Mac and keep my files?
No. Every route erases your files, so back them up with Time Machine first and restore them afterwards if you keep the Mac.
Do I need to turn off FileVault before a factory reset?
No. Apple's steps for both routes leave it out. Erase Assistant erases every account and its data, and on the Recovery route Disk Utility erases the whole startup disk before macOS goes back on.