When your Samsung Galaxy shows the "not registered on network" message, your phone has lost its connection to your carrier's cellular network. You cannot make calls, send texts, or use mobile data until the phone re-registers with a tower. The error usually pops up when you try to place a call or as a status banner where your signal bars should be.
The good news is that this is almost always a software or SIM hiccup, not a dead phone. Most people fix it in under a minute with an airplane-mode toggle or a restart. The 12 fixes below are ordered from easiest to most involved, so start at the top and stop as soon as your bars return.
Quick fix box. Toggle Airplane mode on, wait 30 seconds, then toggle it off. If that fails, restart the phone, then reseat the SIM card. Those three steps clear the error for most users.
Common Causes and the Fix for Each
The same message can come from very different problems. Use this table to match your symptom to the most likely cause and jump straight to the fix that addresses it.
| Cause | Symptom | Fix |
|---|---|---|
| Temporary tower handoff glitch | Error appears suddenly after moving locations or leaving a dead zone | Airplane mode toggle or restart (Fixes 1 and 2) |
| Loose or dirty SIM | Error after a drop, a SIM swap, or "No SIM" warnings | Reseat and clean the SIM (Fix 4) |
| Disabled SIM line | One SIM works, the other shows the error on a dual-SIM phone | Re-enable the line in SIM manager (Fix 3) |
| Wrong or missing APN | Calls work but data fails, or a new SIM never connects | Update APN settings (Fix 8) |
| Stuck network selection | Phone has signal in an area but will not register | Select network manually (Fix 6) |
| Wrong network mode | Error after toggling 5G, or in older 2G/3G-only areas | Change the network mode (Fix 7) |
| Corrupted network config | Nothing above works and several connections act up | Reset network settings (Fix 9) |
| Outdated software | Error started right after, or instead of, an update | Update One UI (Fix 5) |
| Carrier or account problem | SIM also fails in another phone, or service is past due | Contact your carrier (Fix 12) |
| Hardware or IMEI fault | IMEI reads "Null," error survives a factory reset | Check IMEI, then service the phone (Fixes 11 and 12) |
Before you start, confirm you have an active plan with your current carrier and that Airplane mode is not stuck on. If you recently changed SIMs, ported a number, or activated an eSIM, give the carrier a few minutes to finish provisioning before you assume something is broken.
Fix 1 Toggle Airplane Mode
This is the fastest fix and it works more often than any other. Turning Airplane mode on and off forces your phone to drop every radio and search for a tower from scratch.
Swipe down from the top of the screen to open the Quick Settings panel and tap the Airplane mode icon. Wait about 30 seconds, then tap it again to turn it back off. You can also reach it from Settings > Connections if the tile is missing from your panel.
Watch the signal bars after you turn it off. If they fill in and the error clears, you are done.
Fix 2 Restart Your Phone
A restart clears the temporary software state that often causes a failed registration. It is the next thing to try when an Airplane-mode toggle does not stick.
Press and hold the Side button and Volume down together to open the power menu, then tap Restart. On most Galaxy models you can also open the Quick Settings panel and tap the Power icon, then Restart.
Let the phone finish booting and reconnect before you judge whether it worked. Registration can take up to a minute after the lock screen appears.
Fix 3 Turn the SIM Off and Back On in SIM Manager
If you use a dual-SIM phone or an eSIM, the line itself may have been disabled or may need a soft re-activation. Samsung lets you toggle each line without removing the physical card.
Go to Settings > Connections > SIM manager. Tap the switch next to the affected SIM or eSIM to turn it off, wait a minute, then turn it back on. Confirm any prompt that appears.
This is the cleanest way to bounce an eSIM, since you cannot physically reseat it. If you have two lines, make sure the one showing the error is enabled and set as a calling line.
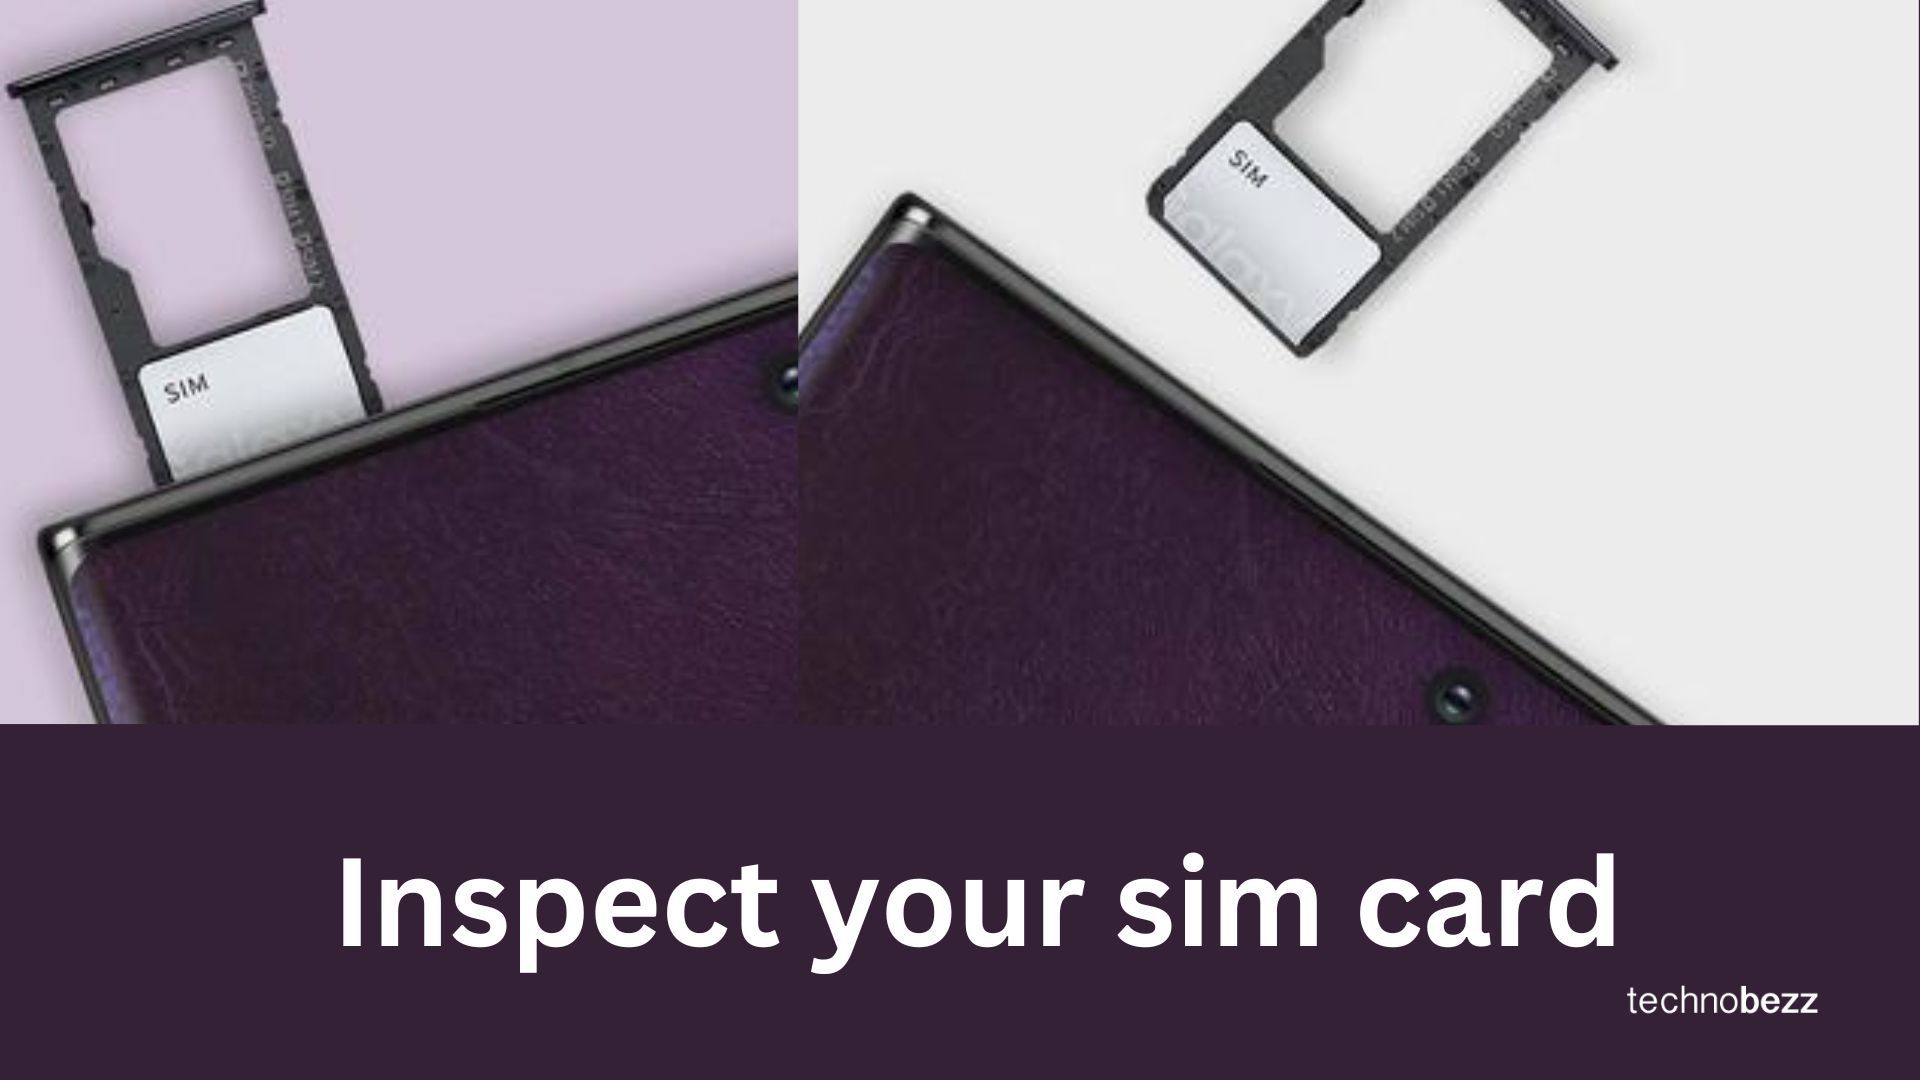
Fix 4 Reseat and Clean the SIM Card
A SIM that has shifted in its tray, collected dust, or aged out is one of the most common causes of this error. Physically reseating it restores the contact between the card and the reader.
- 1.Power off your phone
- 2.Use the ejector tool to pop out the SIM tray
- 3.Wipe the gold contacts gently with a soft, dry cloth
- 4.Seat the SIM flat in the tray and slide it fully back in
- 5.Power the phone on and wait for it to register
If the SIM looks scratched, warped, or is more than a few years old, that wear alone can break registration. A free replacement from your carrier often solves it.
Fix 5 Update One UI Software
An outdated build can be incompatible with current network protocols, and some carriers push critical connectivity fixes through software updates. Connect to Wi-Fi first so the download does not depend on the cellular link you are trying to fix.
- 1.Go to Settings > Software update
- 2.Tap Download and install
- 3.Wait for the update to download, then let the phone restart to apply it
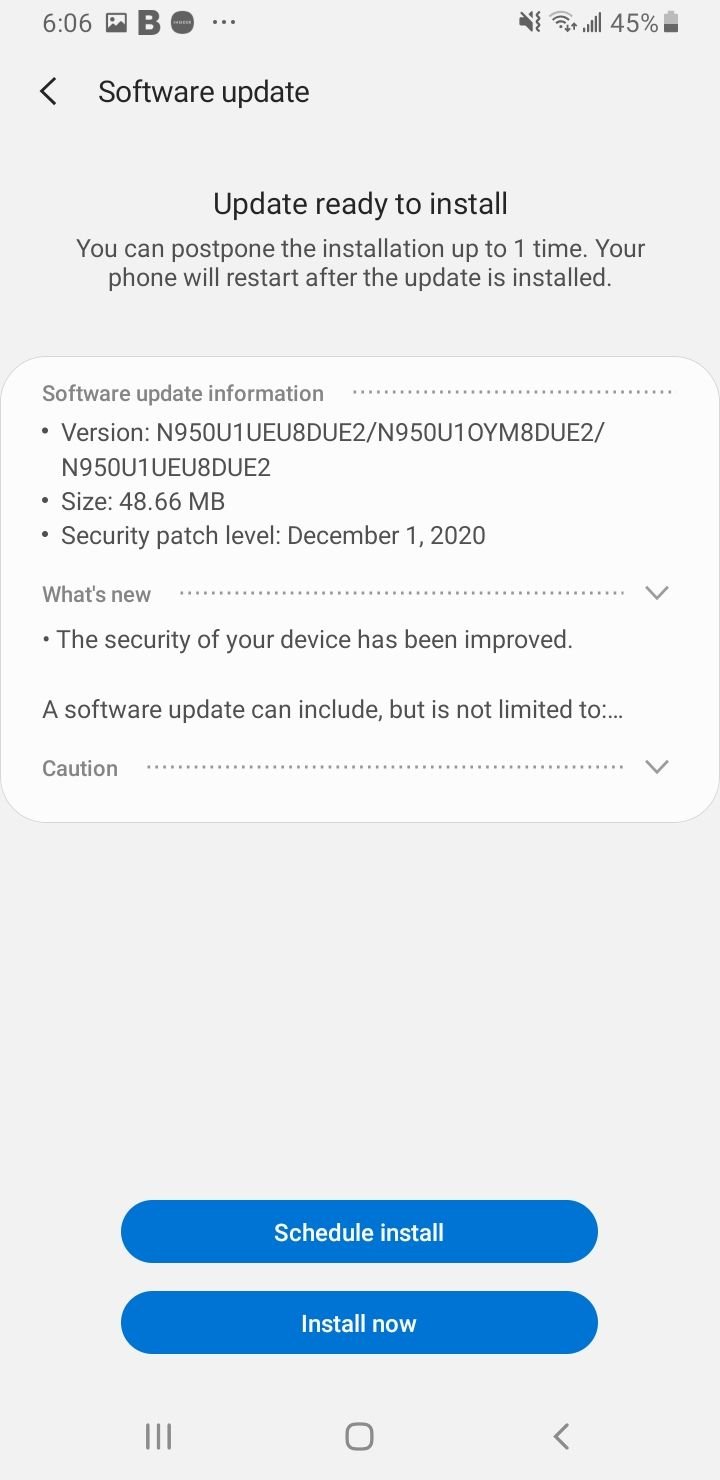
If the error appeared right after an update, the same menu may already have a follow-up patch waiting. Check again a day later, since carriers sometimes release a corrective build within days of a problematic one.
Fix 6 Select Your Network Manually
When automatic selection gets stuck, you can force the phone to attach to your carrier by name. This often works in places where the phone sees a tower but refuses to register on it.
- 1.Go to Settings > Connections > Mobile networks
- 2.Tap Network operators
- 3.Turn off Select automatically and let the phone scan
- 4.Pick your carrier from the list when it appears
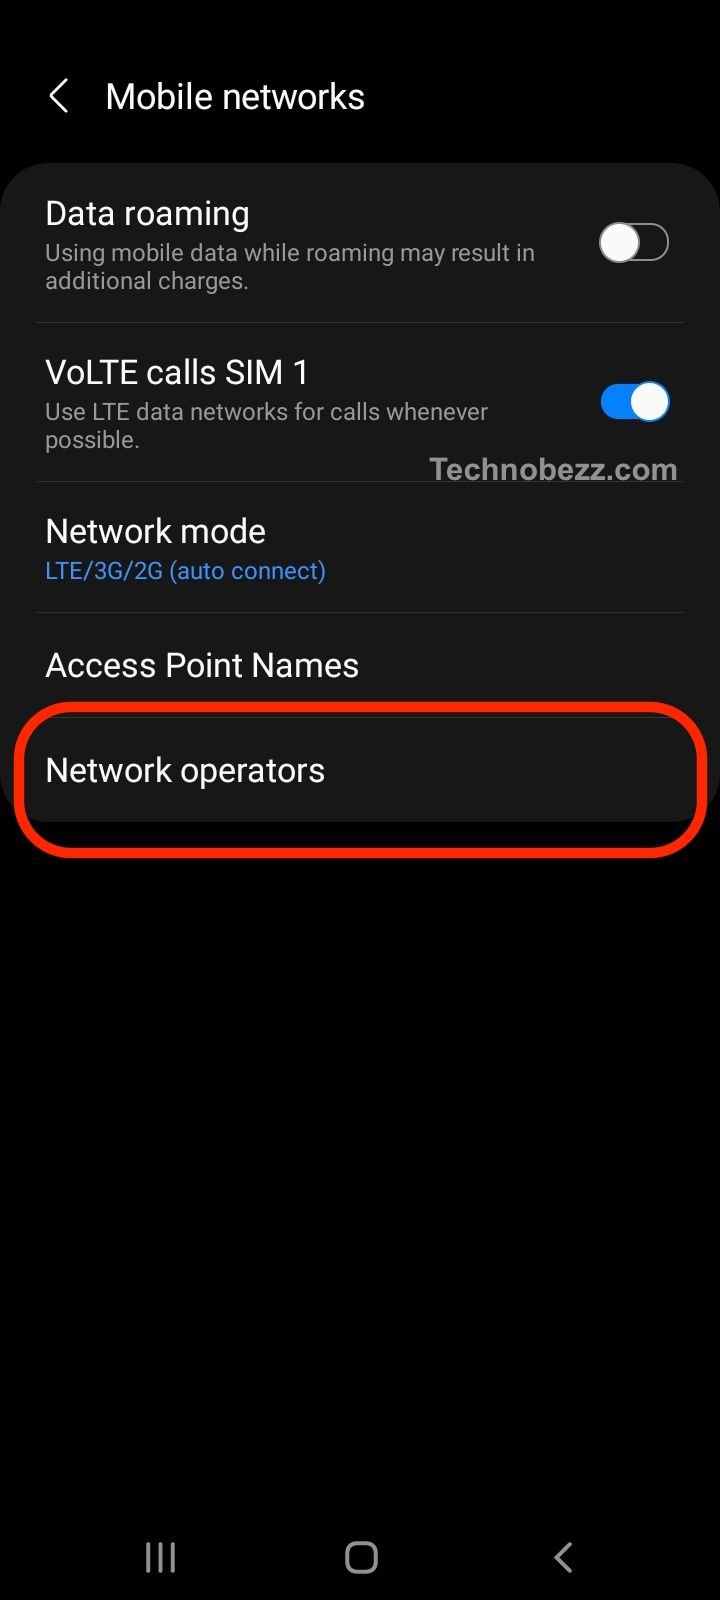
If your carrier shows up but will not connect, switch Select automatically back on afterward so the phone can hand off normally as you move. For the generic Android version of this problem, see our guide on how to fix mobile network not available on Android.
Fix 7 Change the Network Mode
The wrong preferred network type can leave you unregistered, especially after toggling 5G or in an area with weak coverage on your default band. Setting a broader mode lets the phone fall back to whatever it can reach.
Go to Settings > Connections > Mobile networks > Network mode and choose the broadest available option, such as the 5G/LTE/3G/2G auto-connect setting. On One UI 7 the 2G option may be hidden because some carriers and regions have retired 2G, so pick the widest mode your phone still offers.
If you suspect 5G is the culprit, drop to an LTE-first mode temporarily and see if registration returns. You can switch back once you are connected.
Fix 8 Update Your APN Settings
Incorrect Access Point Name settings can block registration entirely, which is common right after switching to a new SIM or a prepaid or MVNO carrier. The phone needs the exact APN your carrier uses to attach to its data network.
- 1.Go to Settings > Connections > Mobile networks
- 2.Tap Access Point Names
- 3.Tap Add or the menu to create a new APN
- 4.Enter your carrier's specific values, then save and select it
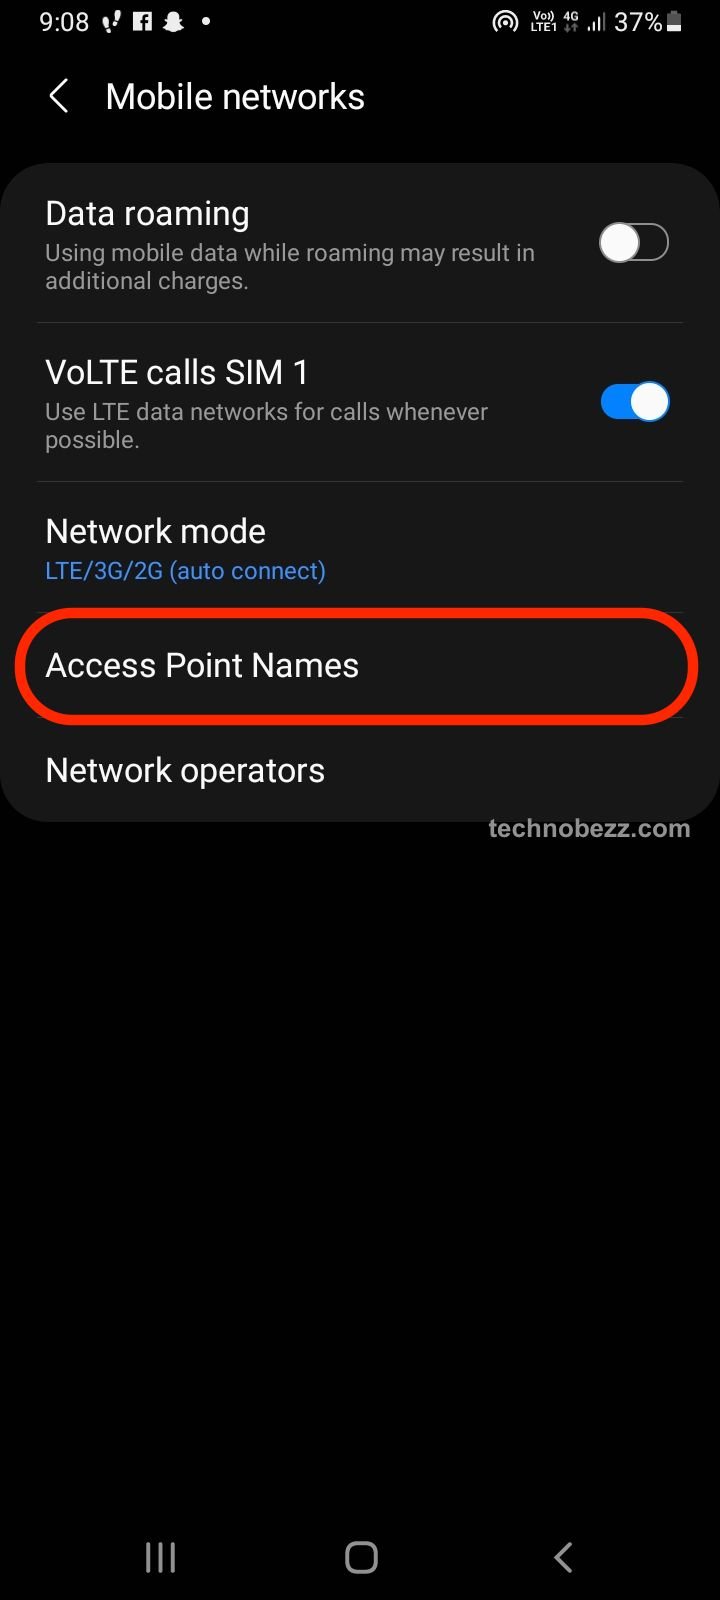
Many prepaid carriers can also push the right settings to you automatically. Straight Talk, for example, lets you text the word APN to 611611 so it can configure the phone for you. For exact values, see our list of updated APN settings for AT&T, Verizon, T-Mobile, and more carriers, and read the carrier section below for prepaid and MVNO notes.
Fix 9 Reset Network Settings
If individual tweaks have not worked, resetting all network configuration wipes corrupted Wi-Fi, Bluetooth, and mobile data settings without touching your photos, apps, or accounts. It is the most reliable software fix short of a factory reset.
- 1.Go to Settings > General management > Reset
- 2.Tap Reset network settings, labeled Reset mobile network settings on some versions
- 3.Tap Reset settings and confirm with your PIN or pattern
- 4.Let the phone restart and re-register
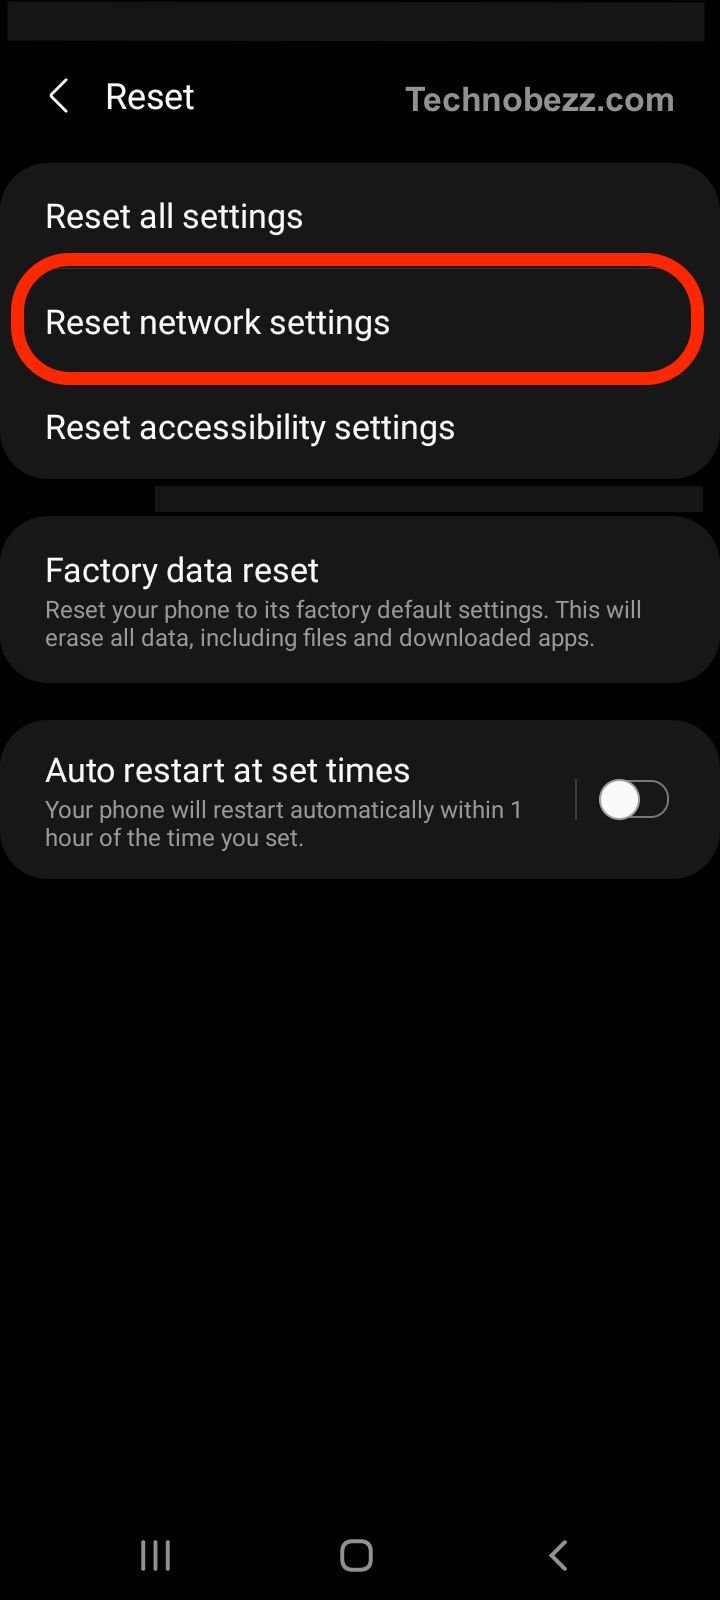
After the reset you will need to rejoin Wi-Fi networks and re-pair Bluetooth devices, since those are cleared too. Your personal data stays intact.
Fix 10 Test With a Different SIM
Swapping in another SIM tells you whether the problem is the card or the phone. It is the single most useful diagnostic step before you escalate to a reset or a repair.
- 1.Borrow a working SIM from the same carrier, or get a fresh one from a store
- 2.Power off, insert the other SIM, and power back on
- 3.See whether it registers
If the borrowed SIM connects, your original card is the problem and a replacement will fix it. If the new SIM also fails, the issue is the phone or your account, so move to the IMEI check and your carrier.
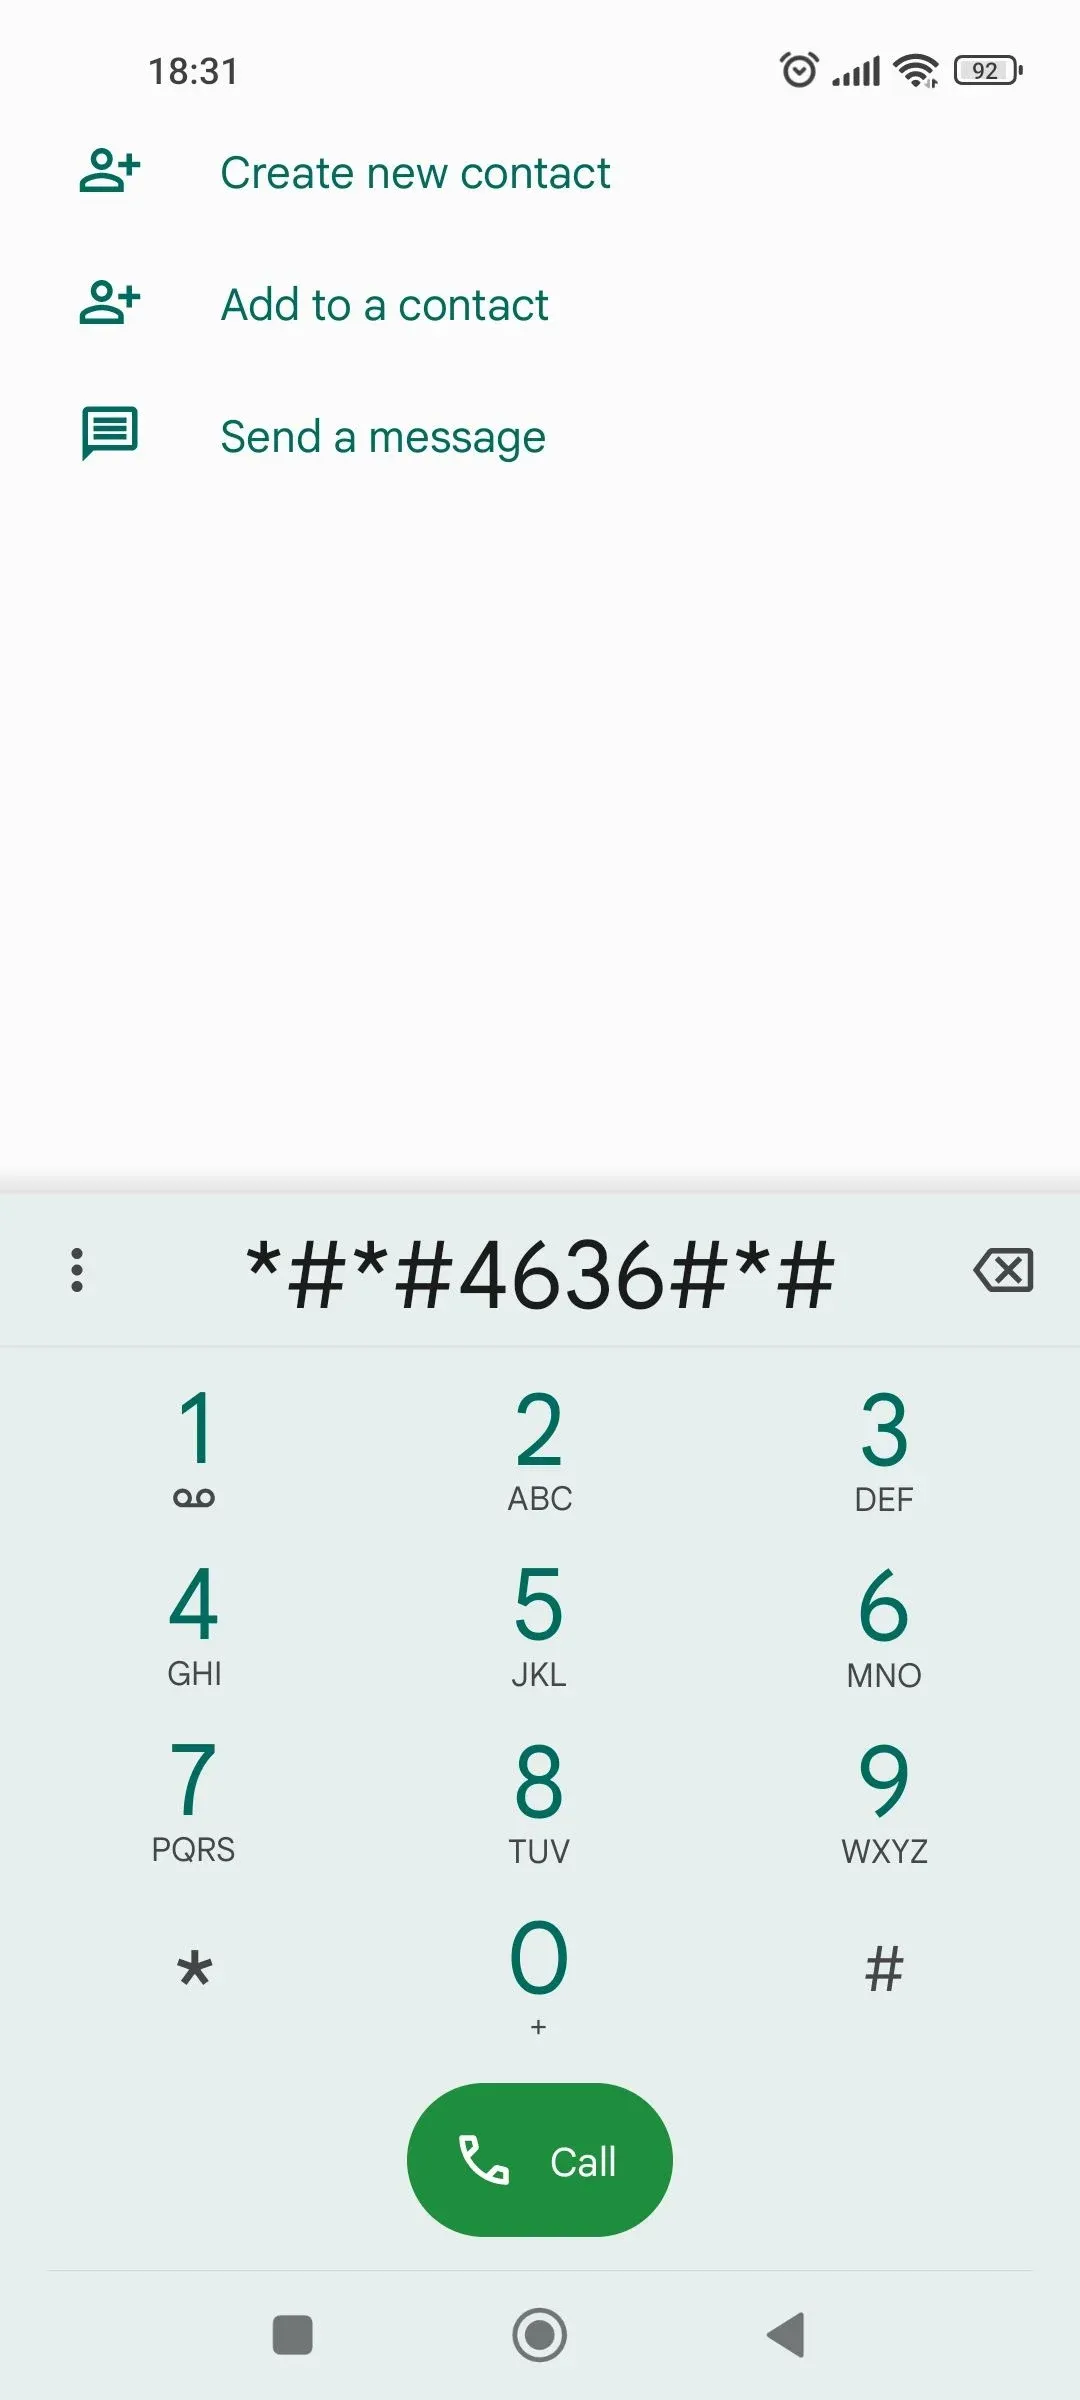
Fix 11 Check Your IMEI Number
Your IMEI is the unique identity your carrier uses to register the phone. A blank or "Null" IMEI almost always means a deeper firmware or hardware fault, and it is worth checking before you commit to a factory reset.
- 1.Open the phone dialer
- 2.Enter *#06#
- 3.Read the IMEI that appears on screen
If the IMEI shows a normal number, your hardware identity is fine and the problem is elsewhere. If it reads "Null," is blank, or does not appear, contact your carrier or Samsung support, since this is not something menu settings can fix. If your phone is locked to another carrier, see our guide on how to get a SIM network unlock PIN.
Fix 12 Factory Reset as a Last Resort
A factory reset clears every software cause of the error in one pass, but it also erases the phone, so save it for when nothing else works. Back up your data first.
- 1.Back up your photos, contacts, and accounts
- 2.Go to Settings > General management > Reset
- 3.Tap Factory data reset, then Reset
- 4.Tap Delete all and enter your credentials to confirm
Set the phone up again and check whether it registers before restoring a full backup, so you can tell if a backed-up setting was the cause. If the error survives a clean factory reset, the problem is hardware or your account, and your next stop is the carrier or a service center.
Fix Not Registered on Network for Your Carrier
Most carrier-specific cases come down to the right APN, an active line, and full provisioning. The steps above apply to every carrier, but a few common networks have their own quirks worth knowing.
Straight Talk and other MVNOs. Prepaid and MVNO carriers ride on a host network, so the SIM must use that host's APN. Straight Talk SIMs run on different host networks, and the carrier can configure your phone automatically when you text APN to 611611. If you set the APN by hand, match it to the host network printed on your SIM packaging and double-check there are no stray spaces in the fields.
Verizon. Verizon and Verizon-based prepaid lines need the line activated on your account before they register, and a new device sometimes needs to be added to the account by IMEI. If a Verizon SIM will not register on a phone bought elsewhere, confirm the phone is unlocked and compatible with Verizon's bands, then re-add the APN.
T-Mobile, AT&T, and their MVNOs. These networks register cleanly once the SIM is active and the correct APN is in place. For a network-specific walkthrough, our guide to mobile network not available on Android covers the same fixes for non-Samsung phones. Whatever your carrier, if the SIM also fails in another phone, the fix is with the carrier, not your settings.
Contact Your Carrier
If you have worked through the fixes above and the error remains, the problem is likely on your carrier's side. A quick call from another phone usually settles it.
- Ask whether there is a tower outage in your area
- Confirm your account is active and the bill is paid
- Verify the device and SIM are provisioned on your line by IMEI
- Request a replacement SIM if yours is old or damaged
Most "not registered on network" errors clear within the first few fixes, so start simple and only escalate when a step genuinely fails. Save the factory reset and the carrier call for when the SIM, IMEI, and reset steps have all come up empty.
Frequently Asked Questions
Why does my Samsung say not registered on network?
It means your phone could not attach to your carrier's cellular network, usually because of a temporary tower glitch, a loose or aged SIM, wrong APN or network settings, or a carrier or account issue. A tower handoff hiccup is the most common cause, which is why an Airplane-mode toggle or a restart fixes it so often.
Does not registered on network mean my SIM is bad?
Not always. The fastest way to tell is to put your SIM in another phone or put a known-good SIM in yours. If your SIM fails in a second phone, the card is the problem and a free replacement will fix it. If a different SIM works in your phone, your original card needs replacing.
How do I fix not registered on network without losing data?
Every fix here except the final factory reset leaves your data untouched. Even Reset network settings under Settings > General management > Reset only clears Wi-Fi, Bluetooth, and mobile settings, not your photos, apps, or accounts. Only resort to a factory reset, which does erase the phone, if nothing else works.
What does Reset network settings actually change?
It restores your Wi-Fi, Bluetooth, and mobile data settings to their defaults and clears any corrupted network configuration. You will need to rejoin saved Wi-Fi networks and re-pair Bluetooth accessories afterward, but no personal files are deleted.
Why does my new SIM or MVNO carrier show not registered on network?
New and prepaid SIMs often need the correct APN and a few minutes to finish provisioning. Set the APN to match your carrier's host network under Settings > Connections > Mobile networks > Access Point Names, or let carriers like Straight Talk configure it automatically by texting APN to 611611. If it still fails, confirm the line is active and the phone is unlocked.
What if my IMEI shows Null or is missing?
A blank or "Null" IMEI from the *#06# dialer code points to a firmware or hardware fault that menu settings cannot fix. Contact your carrier or Samsung support, since the phone needs a valid IMEI to register on any network.
First published October 14, 2025. Last updated June 4, 2026.