PCSX2 is the leading PlayStation 2 emulator for Windows, macOS, and Linux, letting you play your PS2 game library on a modern computer. It will not boot a single game, though, until you give it a valid PS2 BIOS. This guide walks through dumping the BIOS from your own console, adding it to PCSX2, and getting a game running, using the current Qt interface.
What the PS2 BIOS Does
The BIOS (Basic Input/Output System) is the firmware that shipped inside every PlayStation 2. PCSX2 uses it to behave like real hardware, so without it the emulator has nothing to boot.
These files are proprietary software. The official PCSX2 documentation is clear that the BIOS "must therefore be dumped from your own console," because the files are not distributed with the emulator and no open-source alternative exists. You need a PS2 you own to extract them.
Downloading BIOS files from random websites is both legally risky and a common source of malware and corrupted, mismatched dumps. Dumping your own console takes a little setup but gives you a clean, verified file.
What You Need Before Starting
Make sure your PC can handle PS2 emulation before you invest time in dumping. PCSX2 requires a 64-bit operating system and a 64-bit x86 processor, with the minimum tier needing SSE4.1 support and the recommended tiers needing AVX2.
Single-thread CPU performance matters most, since the PS2's emulation is largely single-threaded. You also want a GPU that supports a modern graphics API such as Vulkan, Direct3D, or Metal, plus enough RAM to leave headroom for the emulator.
On the hardware side, you will need your PS2 console, a USB flash drive, and a way to softmod the system. The two most common routes are FreeMcBoot and FreeDVDBoot, covered below.
Install PCSX2
Grab the emulator first so it is ready when your BIOS dump is done. Use the official source only.
- 1.Open the official PCSX2 downloads page
- 2.Download the build for your operating system, and on Windows choose the installer package
- 3.Run it and follow the on-screen prompts to complete the installation
During download you can pick a standard install or a portable build. Portable keeps all settings and files inside the PCSX2 folder, which is handy for a USB stick or a self-contained setup, while the standard install stores files in your user documents.
Softmod Your PS2 to Allow Homebrew
To run a dumping tool, your PS2 first needs to be able to launch homebrew software. The official guide recommends two software mods, neither of which permanently alters the console.
FreeMcBoot lives on a PS2 memory card and works with all fat models and all but the newest slim models. FreeDVDBoot is a better fit for slim units and runs from a burned disc, using an ISO matched to your exact PS2 model.
Pick whichever method suits your console, then set it up so the system boots into a homebrew launcher such as uLaunchELF. Once you can open homebrew, you are ready to dump.
Dump the BIOS to USB
The recommended dumping utility is biosdrain, which reads the BIOS and writes it to a USB drive without changing your console. Prepare the drive correctly first.
Format your USB flash drive as FAT32 with an MBR partition scheme. On Windows you can use Rufus with "Boot selection" set to "Non bootable," on macOS use Disk Utility with the "MS-DOS (FAT)" format and "Master Boot Record" scheme, and on Linux use a tool such as GNOME Disks.
- 1.Copy biosdrain.elf to the root of the formatted USB drive
- 2.Insert the drive into a USB port on your PS2
- 3.In uLaunchELF, open the device named mass:
- 4.Run biosdrain.elf and wait until it displays Finished Everything
- 5.Remove the drive and copy the files to your PC
The dump produces several files prefixed with your console's model ID, with extensions such as .rom0, .rom1, and .nvm. Keep them together in one folder.
Add the BIOS to PCSX2
When you launch PCSX2 for the first time, it opens the First-Time Setup wizard. The wizard walks you straight to the BIOS step.
- 1.Choose your interface language on the opening screen
- 2.On the BIOS screen, click Open Bios Folder to open the folder PCSX2 scans
- 3.Copy your dumped BIOS files into that folder
- 4.Click Refresh List so the files appear
- 5.Select the BIOS you want as the default, then click Finish
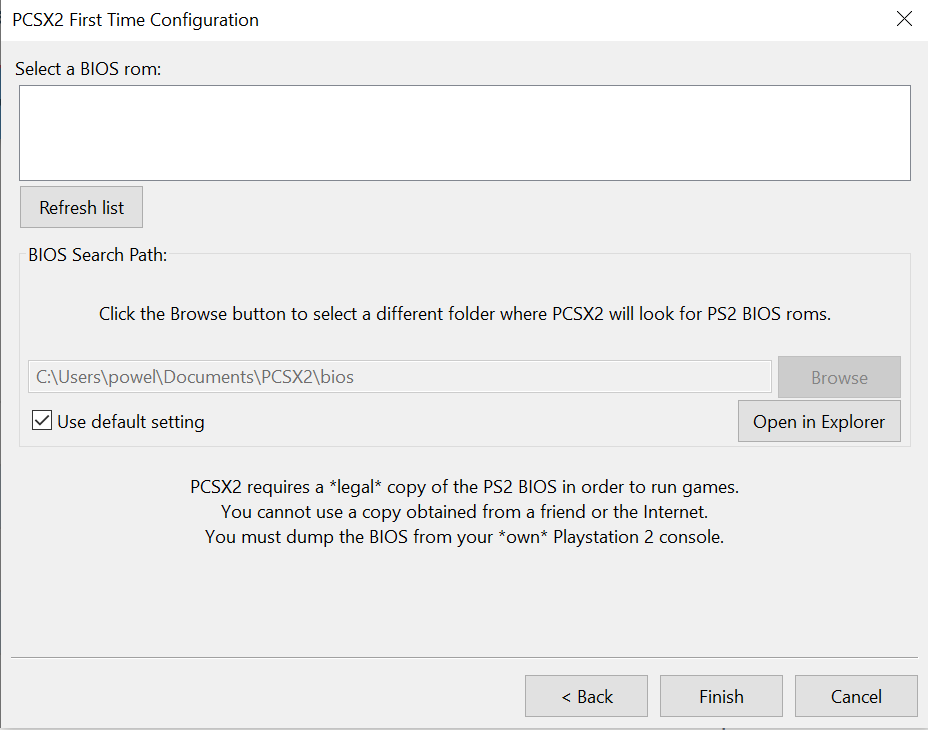
If the list stays empty, the files are not in the scanned folder. Click Browse to point PCSX2 at the folder where you actually saved the dump, then refresh the list again. This is common with the portable build, which uses its own folder rather than your documents directory.
Verify Your BIOS Dump
A clean dump matters, because a corrupt or mismatched BIOS can cause boot failures and odd behavior later. You can confirm your file is a known-good copy by checking its hash.
The ReDump project publishes a data file of hashes for every PS2 BIOS version. Calculate the SHA1 of your dump and compare it against that list using your system's tools.
On Windows run Get-FileHash [path] -Algorithm SHA1 in PowerShell, on macOS run shasum [path] in Terminal, and on Linux run sha1sum [path]. A match means your dump is valid.
Set Up Your Controller
With the BIOS in place, map a gamepad or keyboard so you can actually play. The current Qt interface handles this under one menu.
Go to Settings > Controllers to open the controller screen. Controller Port 1 and Controller Port 2 match the physical ports on the front of a real PS2, and most games expect player one on Port 1, so map that first.
- 1.Open Settings > Controllers
- 2.Select Controller Port 1
- 3.Click Automatic Mapping at the top right and pick your controller from the dropdown
- 4.For anything that did not map, click a button entry, then press the matching button on your controller
- 5.Repeat for a second controller on Port 2 if needed
To redo a mapping, right-click an individual entry to clear it, or use Clear Mapping to reset a whole port. PCSX2's Qt interface does not include a built-in input tester, so verify your buttons inside a game or with a homebrew pad-test app.
Add and Boot Your Games
PCSX2 plays your games as ISO files, which you create by dumping your own discs. On Windows you can use a tool such as ImgBurn or the Media Preservation Frontend to rip a disc to ISO, keeping in mind that lower drive speeds produce more accurate copies.
Once you have ISOs, point PCSX2 at the folder that holds them. Open Settings > Game List, choose Add Game Directory, select your folder, and allow a recursive scan if you keep games in subfolders. Your titles then appear in the game list.
To play a game in your library, simply double-click it in the list. To boot a single ISO that lives outside your library, use System > Start File and pick the file. PCSX2 remembers your library, so once it is set up you can jump straight back into your PS2 classics.
Frequently Asked Questions
Is it legal to use a PS2 BIOS in PCSX2?
Using a BIOS you dumped from a PlayStation 2 you own is the intended, legal route, and it is exactly what the official documentation tells you to do. Downloading a BIOS file from someone else is where you run into copyright problems.
Do I really need the BIOS, or can I skip it?
You cannot skip it. PCSX2 will not boot any game without a valid PS2 BIOS, because the BIOS is the firmware that makes the emulator behave like real hardware.
Which BIOS region should I select?
Pick the region that matches the games you play, such as USA, Europe, or Japan, since region can affect compatibility and language. If you have multiple dumps, you can keep them all in the folder and switch the default whenever you need.
Why is my BIOS list empty in PCSX2?
The files are not in the folder PCSX2 is scanning. Use Browse to select the correct folder and click Refresh List. This often happens with the portable build, which stores files in its own directory instead of your documents folder.
What hardware do I need to run PCSX2 well?
You need a 64-bit system with a 64-bit x86 CPU, strong single-thread performance, a GPU that supports Vulkan, Direct3D, or Metal, and a healthy amount of RAM. The minimum CPU tier needs SSE4.1, while the recommended tiers call for AVX2, and single-thread CPU speed has the biggest impact on emulation performance.
How do I know my BIOS dump is not corrupt?
Generate the SHA1 hash of your dumped file and compare it against the ReDump project's hash list. A match confirms you have a clean, known-good copy of that BIOS version.
First published October 14, 2025. Last updated June 4, 2026.