Tuesday brings a fresh set of NYT Pips puzzles that test your ability to match zone conditions with domino values. Today's set leans moderate across all three tiers, with the same zone layout appearing in Easy, Medium, and Hard. That means the conditions stay consistent while the puzzle logic tightens. We've got hints, step-by-step walkthroughs, and full solutions for all difficulty levels.
How to Play Pips
Pips is a domino placement puzzle where you fill a grid of color-coded zones. Each zone has a condition you must satisfy using the pip values on your dominoes. The twist: you must use every domino and meet every condition to win.
Zone Conditions:
- = All pips in this zone must equal the same number
- Not Equal All pips must be different numbers
- > Pips must be greater than the listed number
- < Pips must be less than the listed number
- Exact Number Pips must total that exact value
- No Color Free space, any domino value works
Click or tap dominoes to rotate them. Each puzzle has one or more valid solutions.
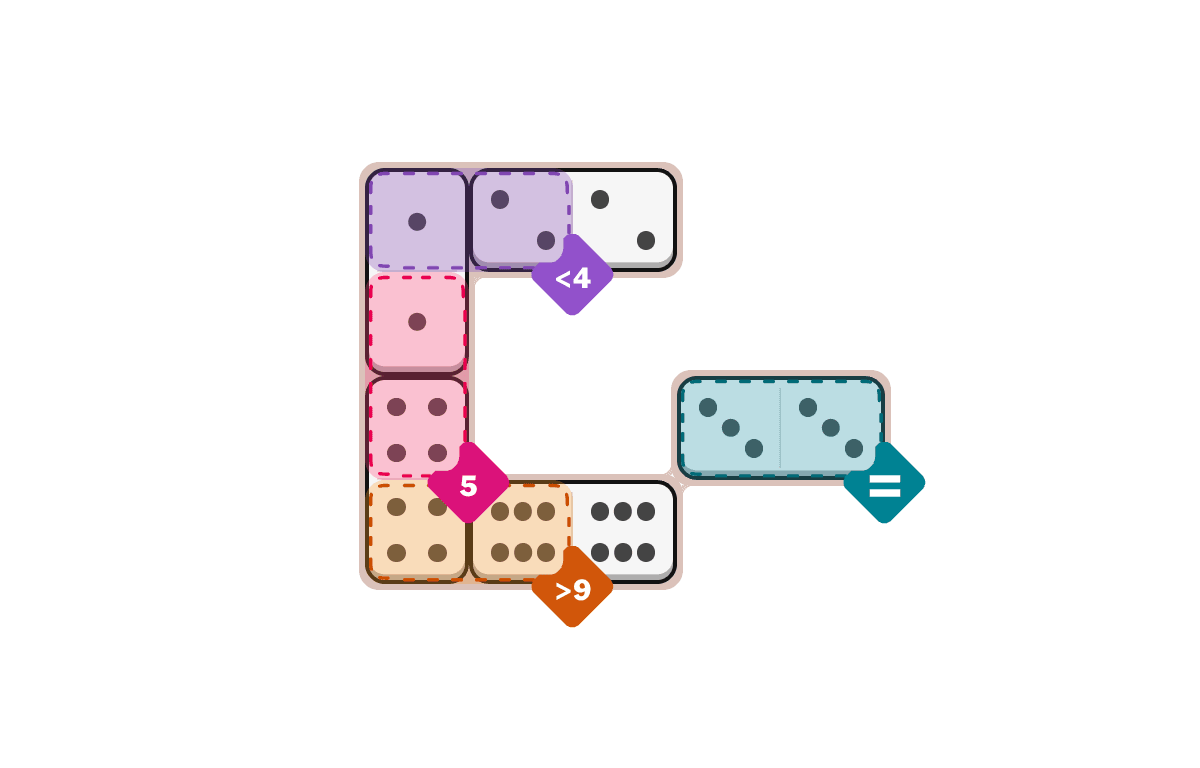
Today's Easy Pips
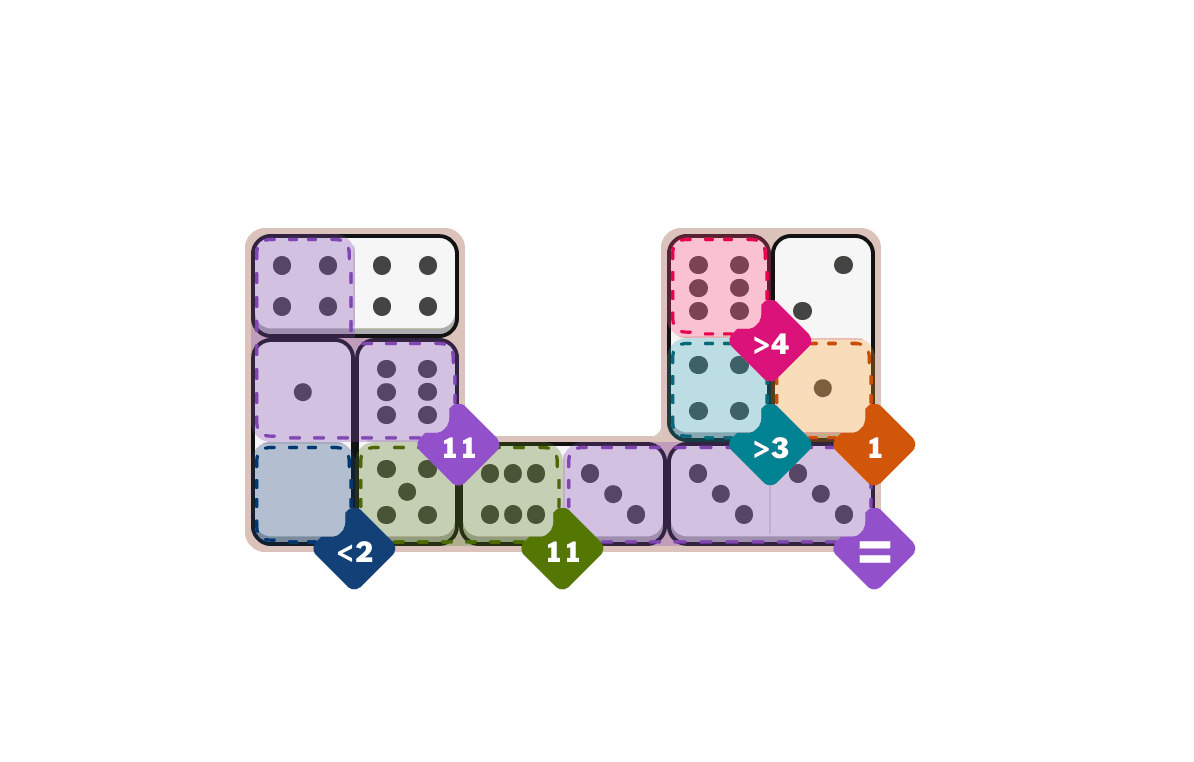
Today's Medium Pips
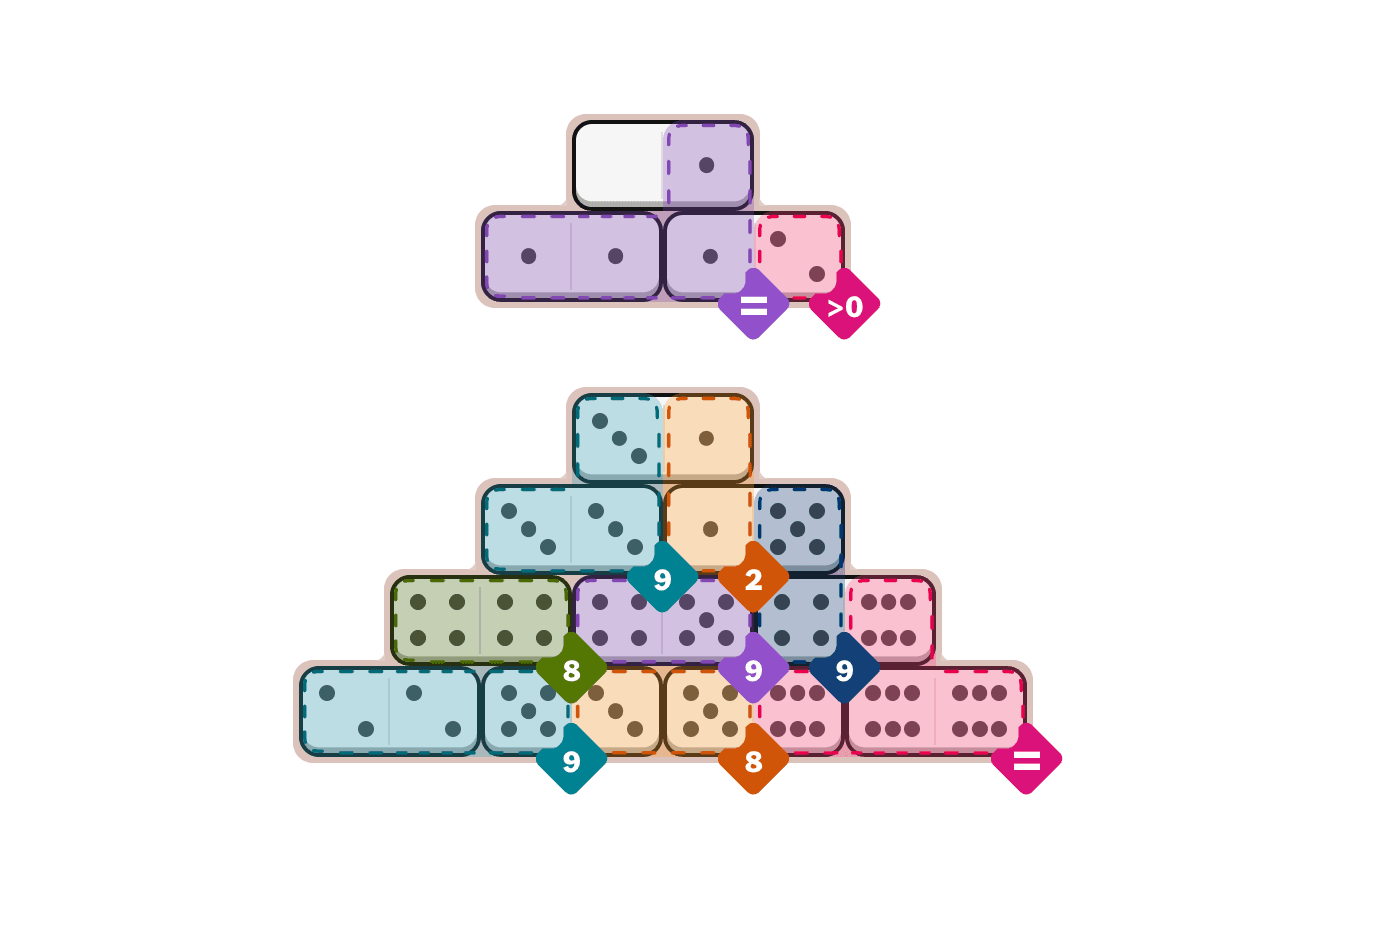
Today's Hard Pips
Quick Hints (No Spoilers)
Starting Point: The green (8) zone with 4/4 is your only forced placement. Everything else requires tracking zone totals across multiple overlapping placements.
Key Insight: The pink (=) zone spans three dominoes. All three must show the same pip value. Work backward from the 6/6 domino to determine that pink requires all 6s, then trace which dominoes feed into it.
Watch Out For: The teal (9) zones appear in multiple locations. It is easy to confuse which teal zone a domino belongs to. Double-check zone boundaries before locking any teal placement. Overfilling a teal zone to 10 or 11 will break the puzzle.
Step-by-Step Walkthrough
- 1.Place the 4/4 domino in the green (8) zone. This is the only domino with matching values that sum to 8, making it a forced opener. No other arrangement works for green.
- 2.Examine the purple (=) zone. It requires all pips to match. The only way to satisfy this with the available dominoes is to use the 0/1 (with 1 in purple), the 1/1, and the 1/2 (with 1 in purple). Place the 0/1 domino so the 0 sits in the uncolored zone and the 1 sits in purple.
- 3.Place the 1/1 domino entirely inside the purple (=) zone. This locks purple's value at 1.
- 4.Place the 1/2 domino across the purple (=) zone and the pink (>0) zone. The 1 joins the other 1s in purple, and the 2 satisfies pink's condition of greater than zero.
- 5.Now focus on the pink (=) zone. The 4/6, 5/6, and 6/6 dominoes all feed into pink. For pink's (=) condition to hold, all pinks must show the same number. The 6/6 domino forces that number to be 6. Place the 6/6 entirely in pink.
- 6.Place the 4/6 domino across the navy (9) zone and the pink (=) zone. The 6 end goes into pink, matching the established value. The 4 and 6 contribute 10 toward the navy total.
- 7.Place the 5/6 domino across the orange (8) zone and the pink (=) zone. The 6 end again goes into pink. The 5 and 6 contribute 11 toward the orange total.
- 8.Work the teal (9) zones. Place the 3/1 domino across the first teal (9) zone and the orange (2) zone. The 3 and 1 contribute 4 toward this teal zone's total.
- 9.Place the 3/3 domino entirely in a separate teal (9) zone. Two 3s sum to 6, leaving 3 more needed in this zone.
- 10.Place the 2/2 domino entirely in the third teal (9) zone. Two 2s sum to 4, leaving 5 more needed.
- 11.Place the 5/3 domino across the remaining teal (9) zone and the orange (8) zone. The 5 and 3 sum to 8 in teal, and the 3 goes into orange.
- 12.Place the 1/5 domino across the orange (2) zone and the navy (9) zone. The 5 satisfies the orange (2) condition, and the 1 and 5 add 6 to the navy total.
- 13.Place the 4/5 domino in the purple (9) zone. 4 plus 5 equals 9, matching the exact number requirement precisely.
Hard Pips Solution
Last chance to solve independently
---
---
---
---
---
- 1.Place the 0/1 domino horizontally in uncolored (no condition) zone and purple (=) zone
- 2.Place the 1/1 domino horizontally in purple (=) zone
- 3.Place the 1/2 domino horizontally in purple (=) zone and pink (>0) zone
- 4.Place the 3/1 domino horizontally in teal (9) zone and orange (2) zone
- 5.Place the 3/3 domino horizontally in teal (9) zone
- 6.Place the 1/5 domino horizontally in orange (2) zone and navy (9) zone
- 7.Place the 4/4 domino horizontally in green (8) zone
- 8.Place the 4/5 domino horizontally in purple (9) zone
- 9.Place the 4/6 domino horizontally in navy (9) zone and pink (=) zone
- 10.Place the 2/2 domino horizontally in teal (9) zone
- 11.Place the 5/3 domino horizontally in teal (9) zone and orange (8) zone
- 12.Place the 5/6 domino horizontally in orange (8) zone and pink (=) zone
- 13.Place the 6/6 domino horizontally in pink (=) zone
Puzzle Debrief
Overall Difficulty: Moderate challenge across all three tiers. The zone layout is identical for Easy, Medium, and Hard, which means the difficulty comes from how much guidance you need versus how much you can deduce independently.
Trickiest Puzzle: Hard - The multiple teal (9) zones require careful boundary tracking. It is easy to accidentally overfill a teal zone when you think you are placing into a different one. The pink (=) zone also demands forward planning since three dominoes must converge on the same value.
Our Take: Today's set rewards systematic thinking over speed. The green (8) zone with 4/4 is a generous giveaway in Easy, but in Hard, the same layout forces you to plan five moves ahead to avoid painting yourself into a corner. The purple (=) and pink (=) zones create a satisfying chain of logic that, once cracked, unlocks the rest of the board.
Tomorrow's Pips drops at midnight. See you then.