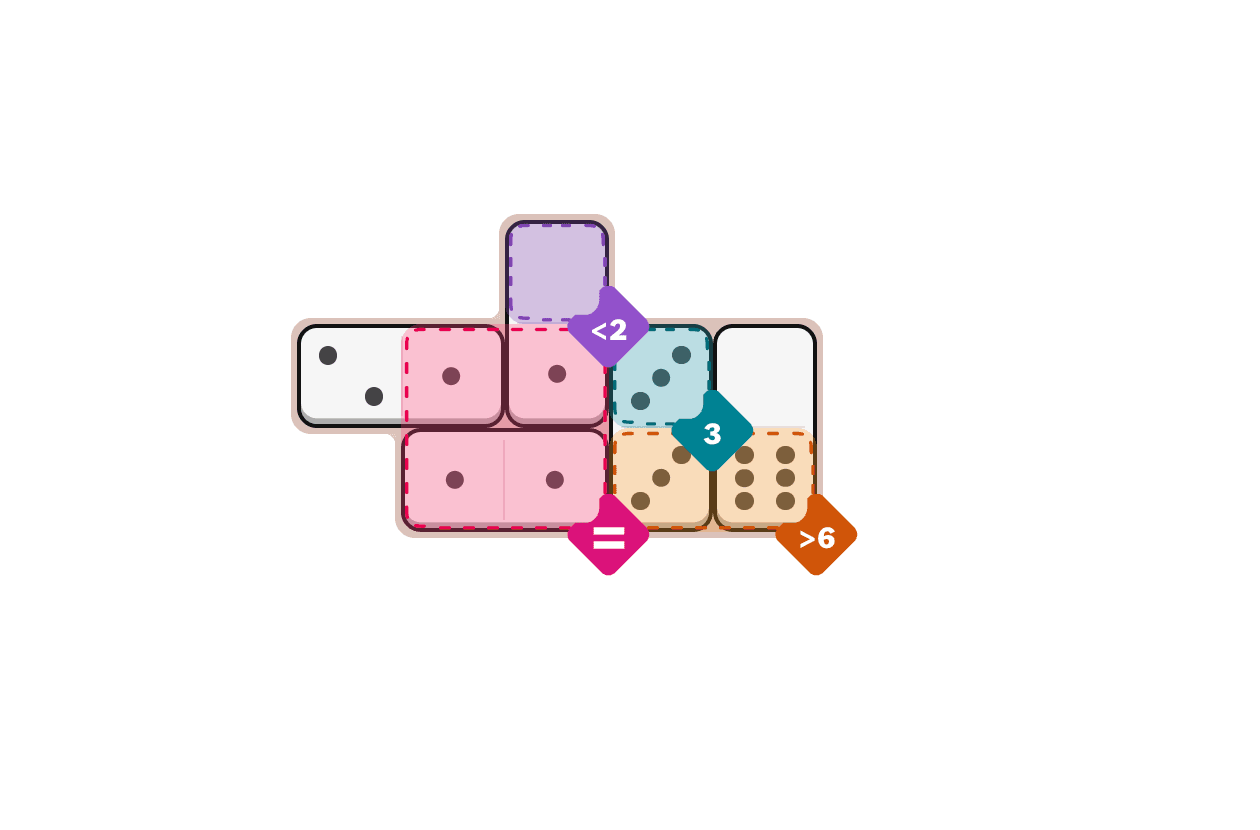
Friday brings a fresh set of NYT Pips puzzles. Today's grid serves up a dense 18-zone layout with heavy concentration on purple, teal, and green conditions across all three difficulty levels. The same zone configuration appears in Easy, Medium, and Hard, but the placement logic tightens with each tier. Here are hints, step-by-step walkthroughs, and full solutions for all three.
How to Play Pips
Pips is a domino placement puzzle where you fill a grid of color-coded zones. Each zone has a condition you must satisfy using the pip values on your dominoes. The twist: you must use every domino and meet every condition to win.
Zone Conditions:
- = All pips in this zone must equal the same number
- Not Equal All pips must be different numbers
- > Pips must be greater than the listed number
- < Pips must be less than the listed number
- Exact Number Pips must total that exact value
- No Color Free space, any domino value works
Click or tap dominoes to rotate them. Each puzzle has one or more valid solutions.
Today's Easy Pips
Today's Medium Pips
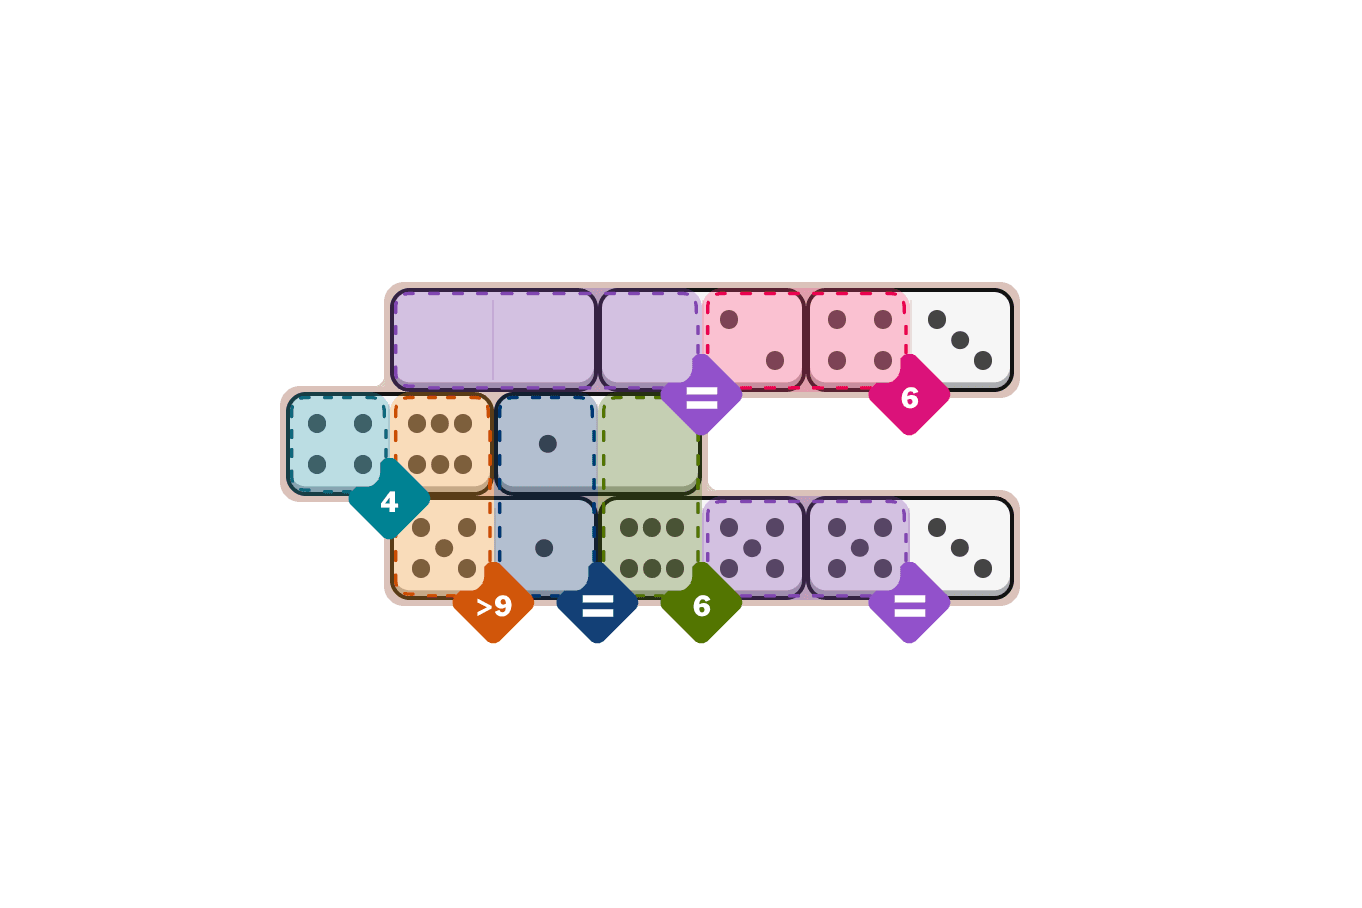
Today's Hard Pips
Quick Hints (No Spoilers)
Starting Point: The orange (>9) zone is your bottleneck. Only one domino combination sums above 9. Place it immediately and let that decision cascade through the grid.
Key Insight: The pink (=) zone requires three dominoes showing identical values on their pink-side ends. Cross-reference this with the green (=) zone, which also demands uniform values. The 3 and 5 values will dominate the center of the board.
Watch Out For: The teal (>4) and navy (2) zones share a domino boundary. If you misplace a high-value domino in navy (2) or a low-value domino in teal (>4), you'll dead-end the puzzle. The 6/2 domino is the only piece that satisfies both simultaneously. Place it correctly on your first attempt.
Step-by-Step Walkthrough
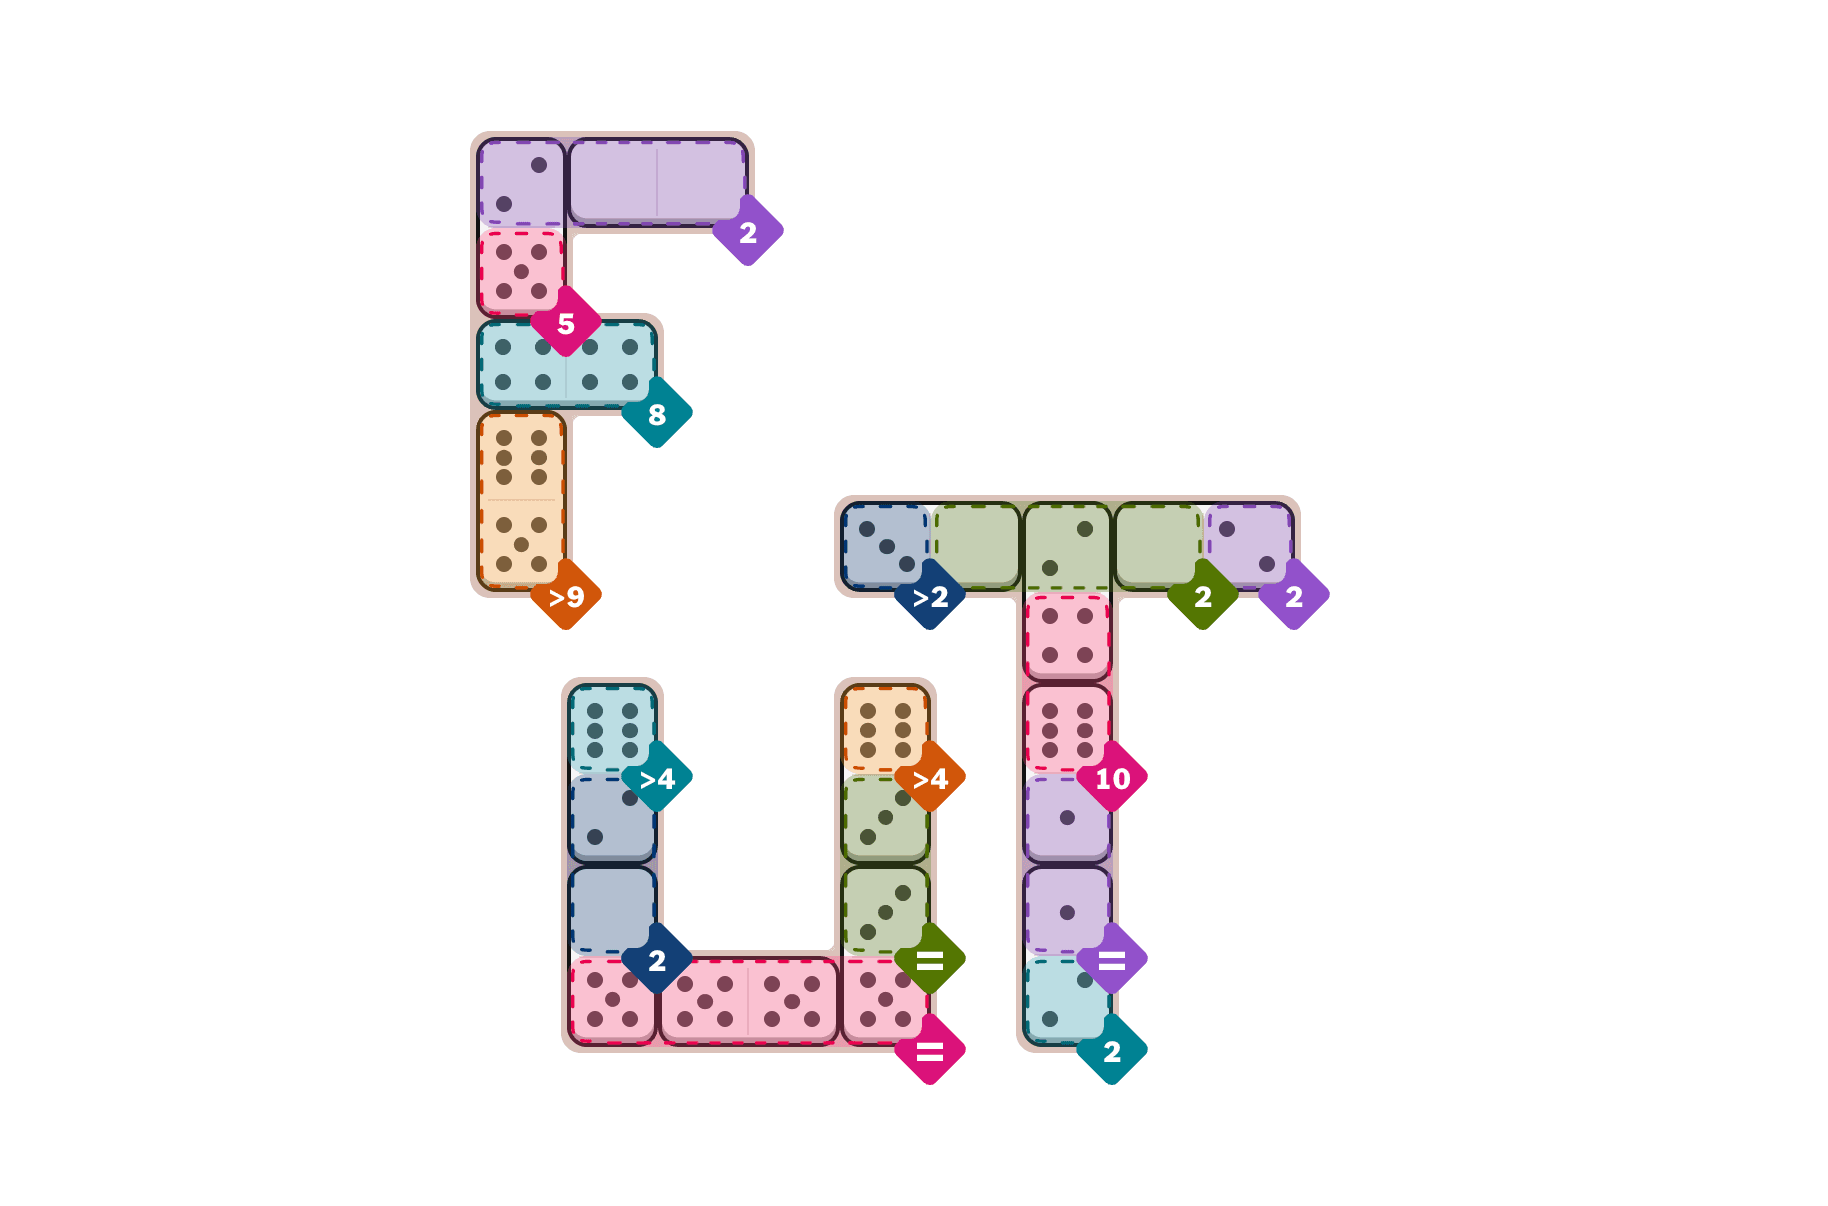
- 1.The orange (>9) zone is the most constrained. Only the 6/5 domino sums to 11, exceeding the threshold of 9. Place it vertically so the 6 occupies the orange zone. This also anchors the adjacent zone (pink (5)), where the 5 lands naturally.
- 2.Next, lock in the teal (8) zone. Place the 4/4 domino horizontally. This is the only exact-8 solution using a double, and it clears a domino from your pool immediately.
- 3.Now handle the teal (>4) and navy (2) shared boundary. The 6/2 domino is the critical piece here: the 6 satisfies teal's greater-than-4 condition, and the 2 satisfies navy's exact-2 condition. Place it vertically spanning both zones.
- 4.Address the pink (=) zone. You need three dominoes showing a 5 on the pink side. Place the 0/5 domino vertically (5 in pink), then the 5/5 domino horizontally, then the 3/5 domino vertically (5 in pink). The pink equal-value condition is now locked.
- 5.The green (=) zone must show all identical values. The 3/5 domino (from step 4) places a 3 in green. Place the 6/3 domino vertically so the 3 lands in green (=) and the 6 lands in orange (>4). Green's equal value is now 3.
- 6.Place the 3/0 domino horizontally across the navy (>2) zone and the green (2) zone. The 3 satisfies navy (>2), and the 0 satisfies green (2).
- 7.Work the remaining green (2) zone. Place the 2/4 domino vertically so the 2 lands in green (2) and the 4 lands in pink (10). Then place the 0/2 domino horizontally across green (2) and purple (2).
- 8.Finish the purple zones. Place the 2/5 domino vertically with the 2 in purple (2) and the 5 in pink (5). Place the 0/0 domino horizontally in the other purple (2) zone.
- 9.Complete the pink (10) zone. Place the 6/1 domino vertically so the 6 lands in pink (10) and the 1 lands in purple (=). Verify pink (10) totals exactly 10 (4 + 6).
- 10.Final placement: place the 1/2 domino vertically across purple (=) and teal (2). The 1 completes purple's equal-value condition (all 1s), and the 2 satisfies teal's exact-2 condition. All 14 dominoes placed, all 18 zone conditions satisfied.
Hard Pips Solution
Last chance to solve independently
---
---
---
---
---
- 1.Place the 2/5 domino vertically in the purple (2) zone and pink (5) zone
- 2.Place the 0/0 domino horizontally in the purple (2) zone
- 3.Place the 4/4 domino horizontally in the teal (8) zone
- 4.Place the 6/5 domino vertically in the orange (>9) zone
- 5.Place the 6/2 domino vertically in the teal (>4) zone and navy (2) zone
- 6.Place the 0/5 domino vertically in the navy (2) zone and pink (=) zone
- 7.Place the 5/5 domino horizontally in the pink (=) zone
- 8.Place the 3/5 domino vertically in the green (=) zone and pink (=) zone
- 9.Place the 6/3 domino vertically in the orange (>4) zone and green (=) zone
- 10.Place the 3/0 domino horizontally in the navy (>2) zone and green (2) zone
- 11.Place the 2/4 domino vertically in the green (2) zone and pink (10) zone
- 12.Place the 0/2 domino horizontally in the green (2) zone and purple (2) zone
- 13.Place the 6/1 domino vertically in the pink (10) zone and purple (=) zone
- 14.Place the 1/2 domino vertically in the purple (=) zone and teal (2) zone
Puzzle Debrief
Overall Difficulty: Moderate challenge. The zone layout is identical across all three tiers, which is unusual for Pips. Easy and Medium feel similar in practice; Hard demands tighter sequencing because one wrong placement early on cascades through the equal-value zones.
Trickiest Puzzle: Hard - The teal (>4) and navy (2) shared boundary is the trap. If you commit the 6/2 domino elsewhere before addressing those two zones, you'll run out of valid placements and have to backtrack significantly.
Our Take: Today's set plays like a single puzzle with escalating difficulty rather than three distinct grids. The dense 18-zone layout means every domino touches multiple conditions, so there's zero room for error on Hard. The pink (=) zone is the lynchpin -- identify it early and the rest of the board resolves cleanly. Solid Friday workout without being punishing.
Tomorrow's Pips drops at midnight. See you then.