You tap into Settings on your iPhone 14 expecting a quick iOS update, and instead nothing happens. Maybe the download stalls at a few percent, the install button refuses to respond, or you see a message saying there is not enough space. A phone that will not move past its current iOS version can feel stuck in place, especially when you know newer software is sitting right there waiting.
The good news is that the iPhone 14 (including the iPhone 14, iPhone 14 Plus, iPhone 14 Pro, and iPhone 14 Pro Max) fully supports over-the-air updates and is on Apple's official compatibility list for iOS 26, so the update path genuinely applies to your model. The fixes below start with the simplest, safest steps and end with the official last-resort options, so work through them in order and stop as soon as your update goes through.
Make sure your iPhone 14 actually meets the update requirements
Before troubleshooting anything, confirm the basics are in place. Apple states that to update you need a compatible device, a power source, an internet connection, and enough available storage. Your iPhone 14 is on Apple's iOS 26 compatibility list, so it qualifies on the hardware side.
Plug the iPhone into power and connect it to Wi-Fi before you start. Many failed updates come down to a missing power source or an unstable connection rather than anything wrong with the phone itself, so settling these first can save you the rest of this process.
Run the update again from the Software Update screen
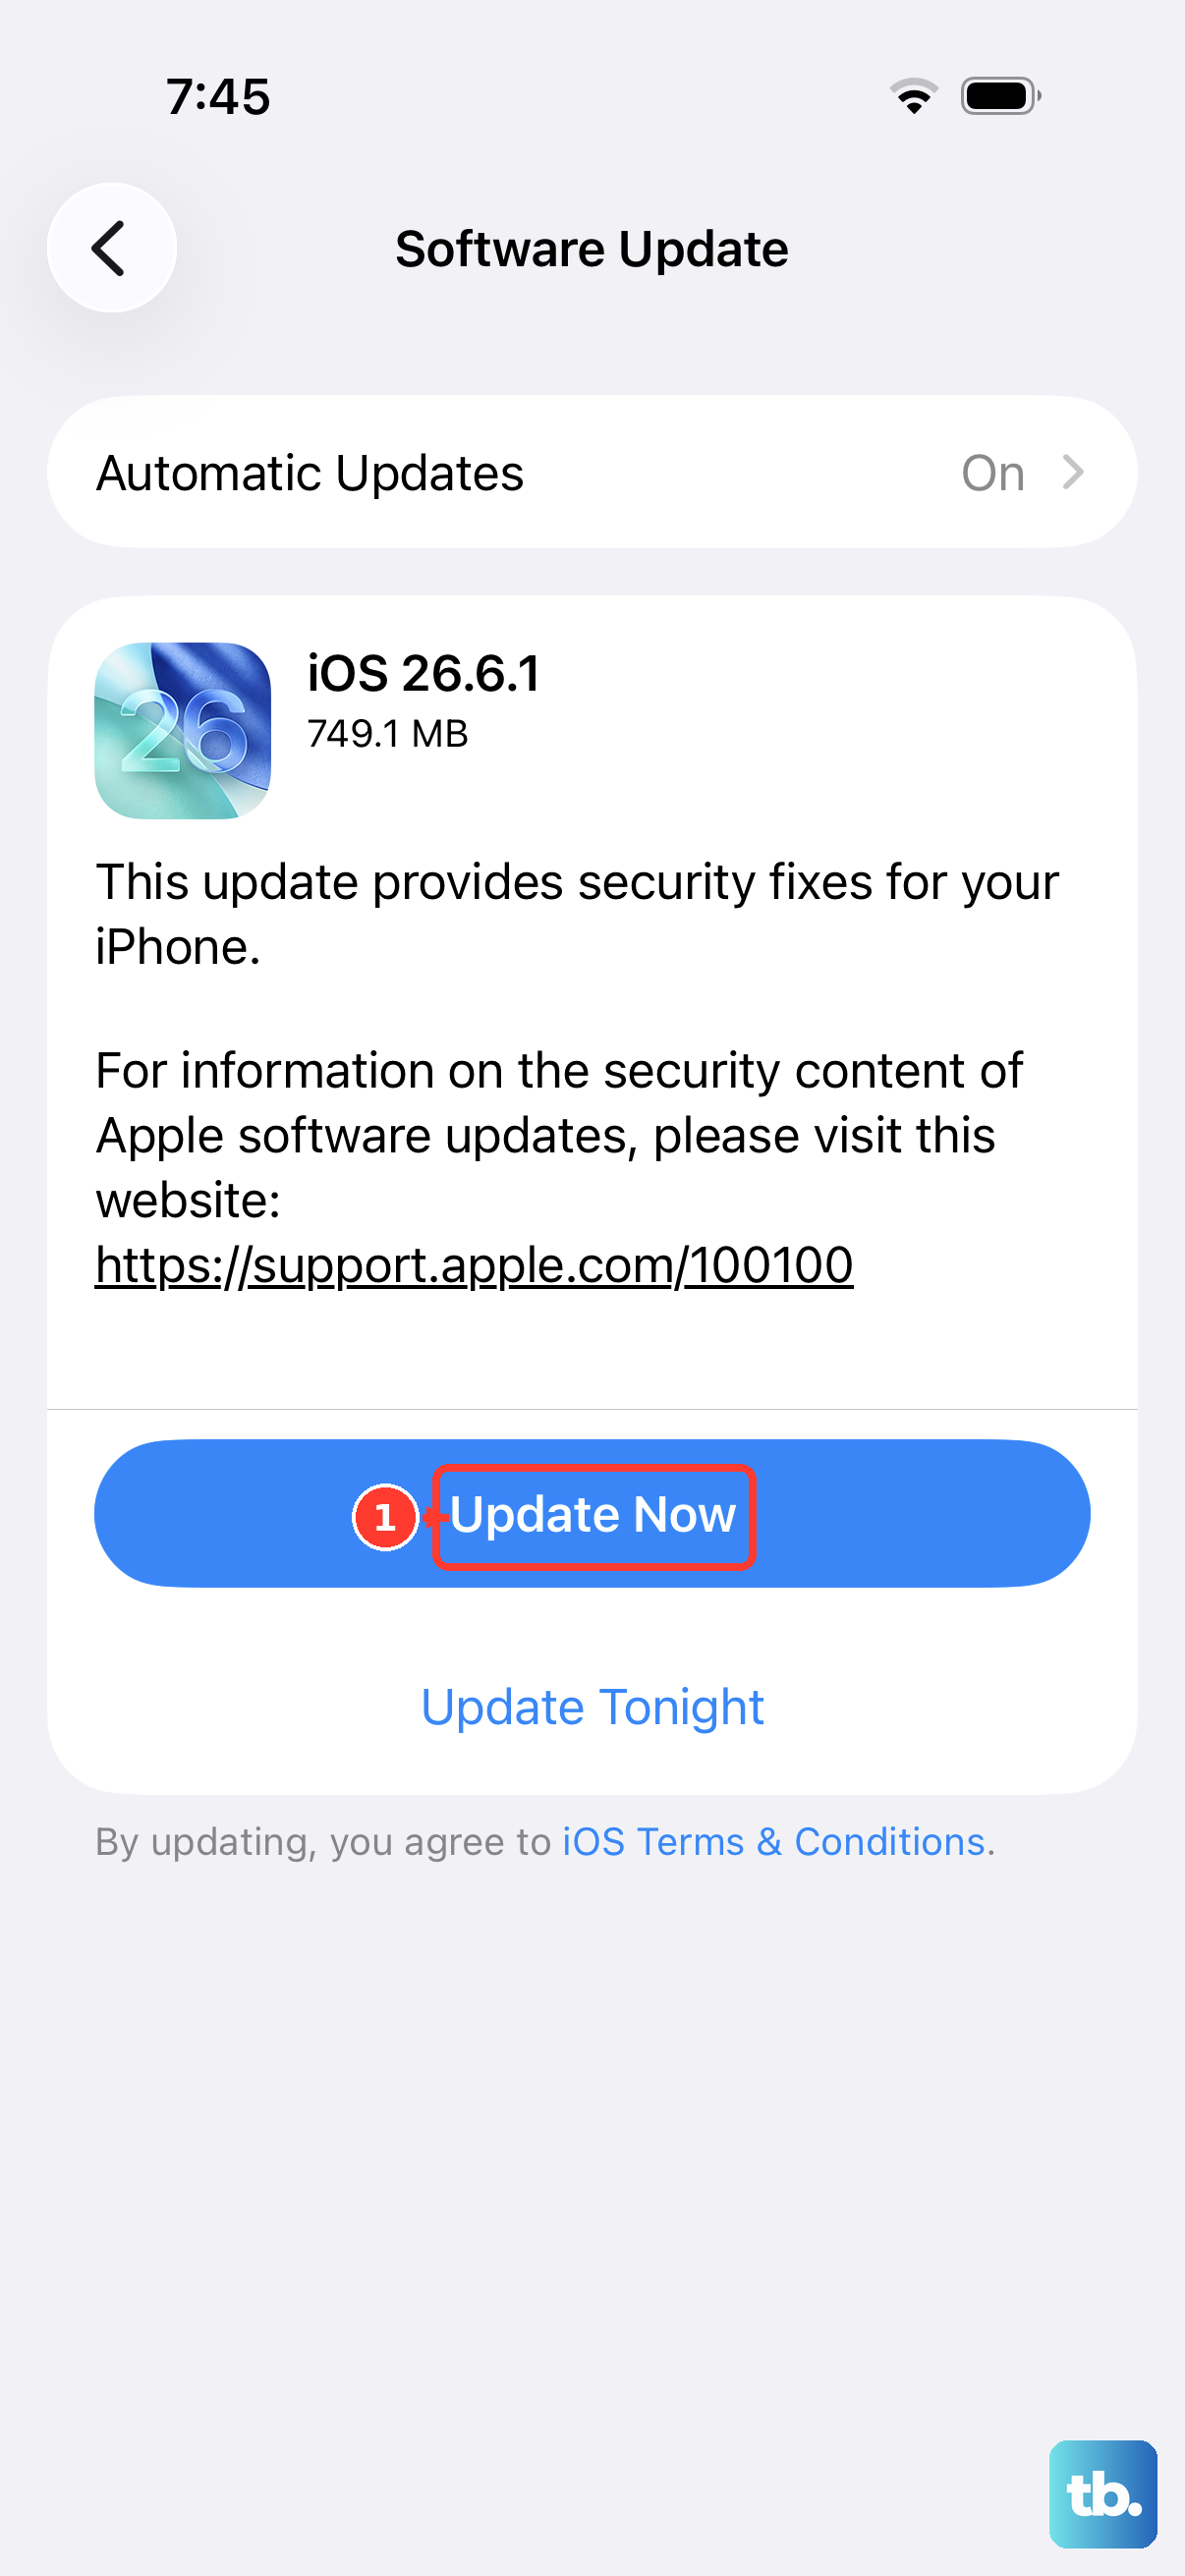
Sometimes the update simply needs a clean second attempt. Open the dedicated update screen and let your iPhone 14 re-check what is available.
Go to Settings > General > Software Update.
Review the installed iOS version and any available update shown there.
If an update is available, tap Download and Install and follow the onscreen instructions.
Keep the device on Wi-Fi and connected to power throughout the update.
Staying on power and Wi-Fi the whole time matters, because dropping either partway through is a common reason an update fails to finish.
Clear out storage so the download has room
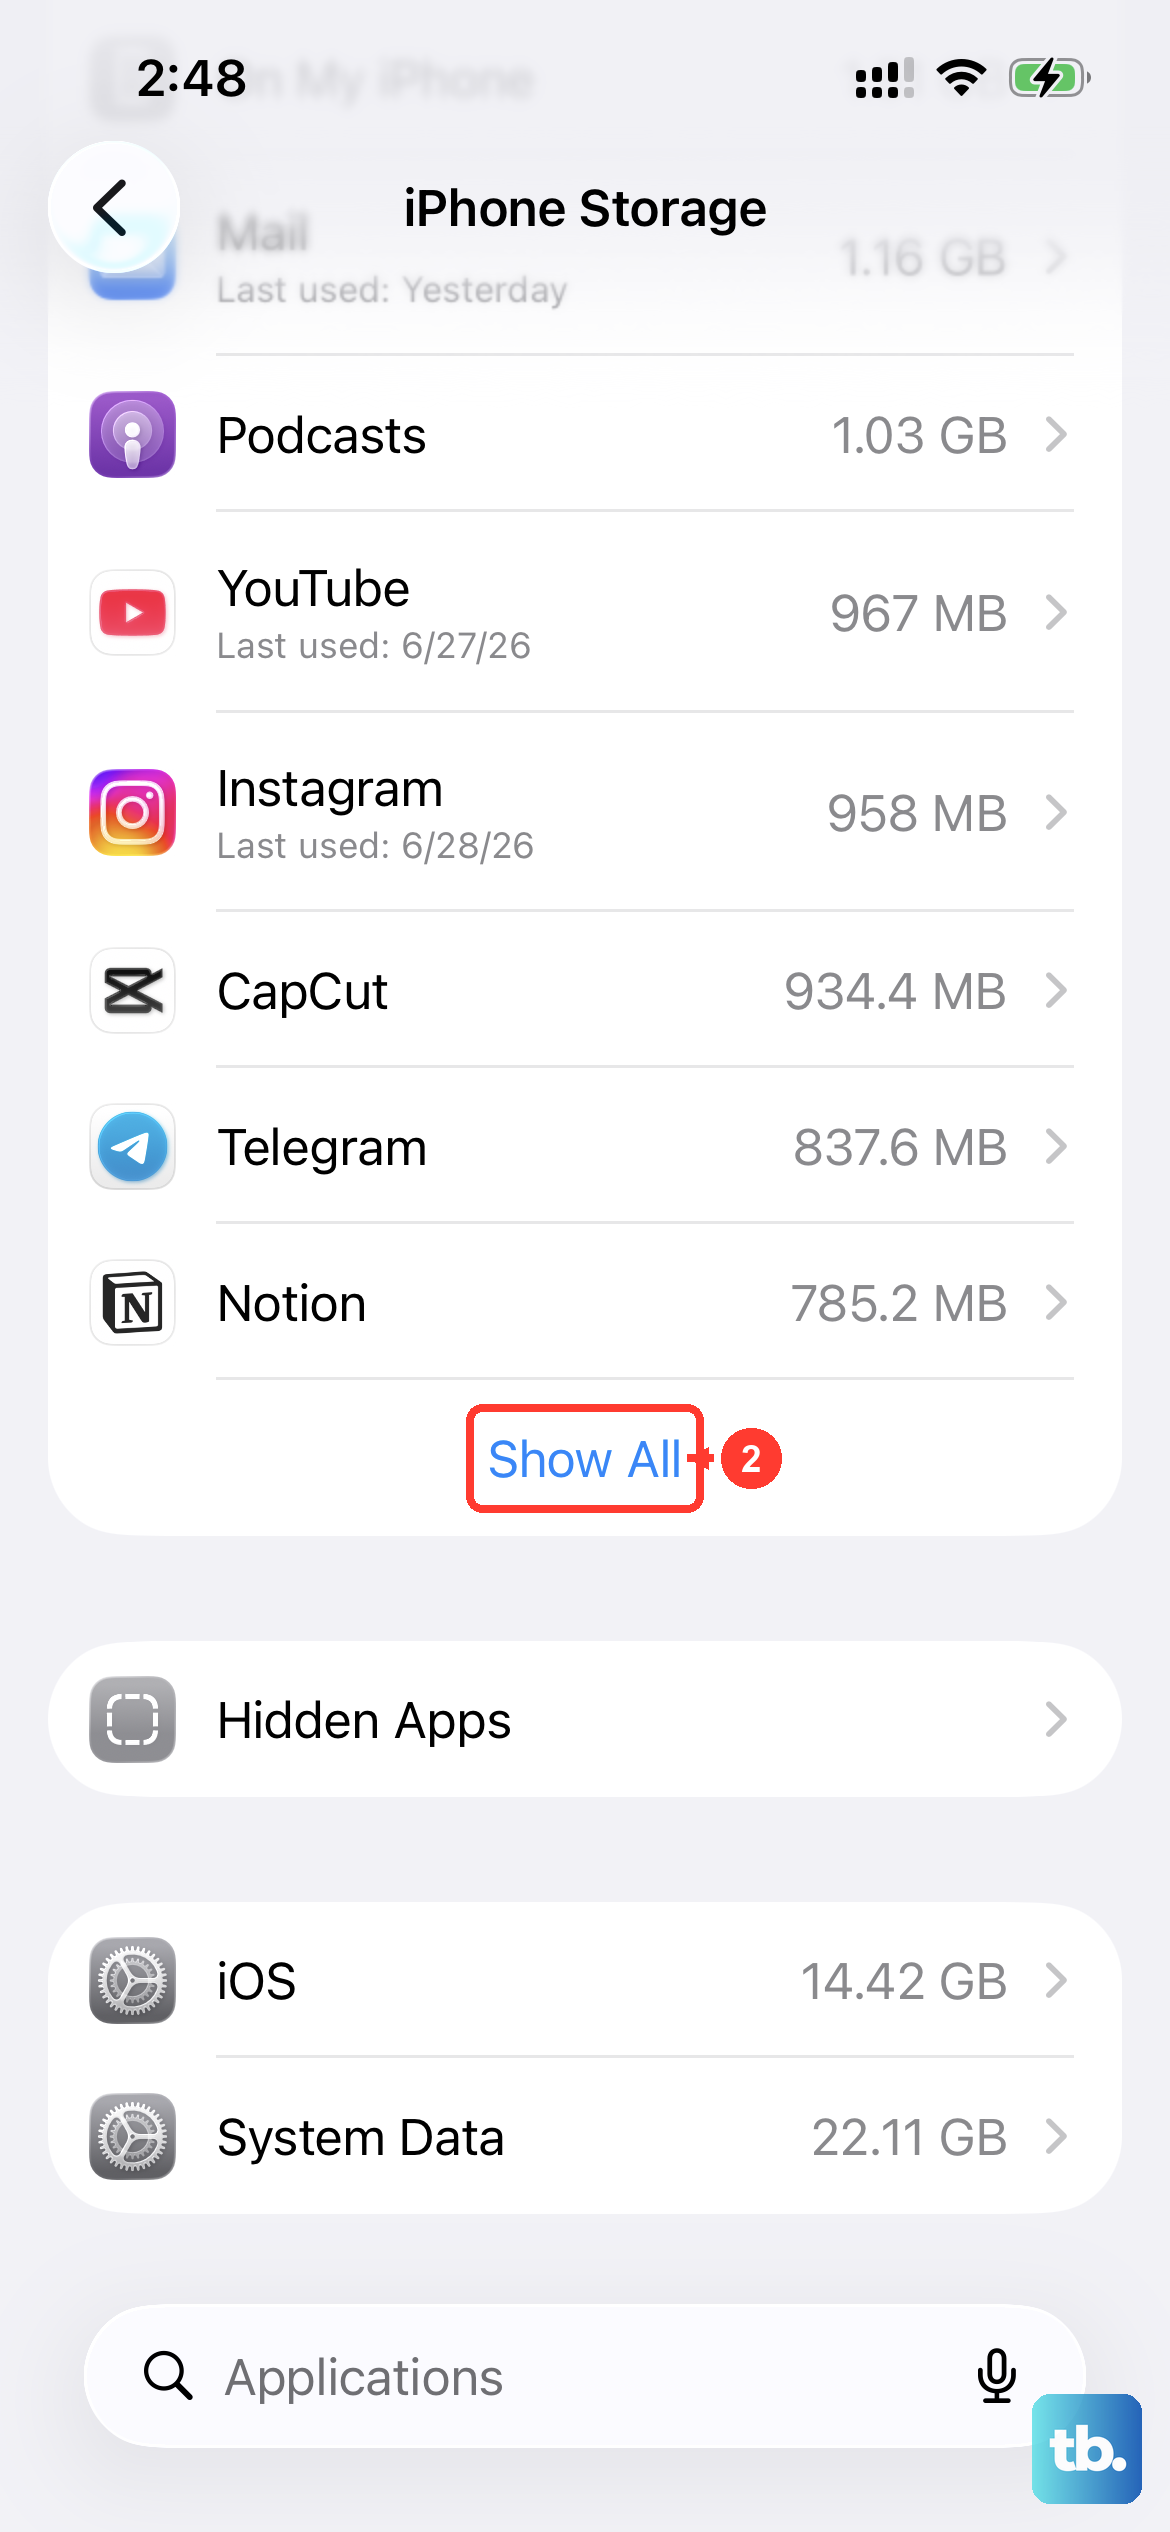
An update that will not download or install is often a space problem. If there is not enough room, Apple may ask to temporarily remove apps to make space; tap Continue to allow this, and those apps are reinstalled automatically afterward.
You can also free space yourself ahead of time. Go to Settings > General > [Device] Storage and tap Enable next to Offload Unused Apps, or delete content you no longer need, then try the update again.
Offloading is a gentle way to reclaim space because it removes the app while keeping its documents and data, so reinstalling later picks up where you left off.
Delete the stuck update file and download it fresh
If the update seems frozen or keeps failing partway, the downloaded update file itself may be corrupted. Removing it forces your iPhone 14 to grab a clean copy.
Go to Settings > General > [Device] Storage.
Find the update in the list of apps.
Tap the update.
Tap Delete Update.
Go back to Settings > General > Software Update and download the update again.
This is one of the most reliable fixes for a download that hangs at the same percentage every time, since the second attempt starts from scratch rather than resuming a broken file.
Restart the iPhone 14 and try once more
A normal restart clears temporary glitches that can quietly block an install. On the iPhone 14, the restart sequence uses the volume and side buttons together.
Press and hold either volume button and the side button until the power-off slider appears.
Drag the slider.
Wait 30 seconds for the device to turn off.
Press and hold the side button until you see the Apple logo to turn it back on.
Retry the update from Settings > General > Software Update.
Give the phone the full 30 seconds to power down before turning it back on, so the restart is complete rather than interrupted.
Force restart a frozen or unresponsive iPhone 14
If your iPhone 14 is frozen, unresponsive, or stuck mid-update, a force restart is the next step. This is the correct sequence for the iPhone 14, a Face ID model, and the button presses must be done in this exact order.
- 1.Press and quickly release the volume up button.
- 2.Press and quickly release the volume down button.
- 3.Press and hold the side button, and when the Apple logo appears, release the side button.
Do not hold the volume buttons; they are quick presses. Only the final side-button press is held, and you release it as soon as the Apple logo shows.
Confirm you are on a working Wi-Fi connection
Update error messages can specifically point to no internet connection or a requirement for a Wi-Fi network. That makes your connection one of the first things to double-check when an update will not proceed.
Confirm you are connected to a working Wi-Fi network, not just a network that appears connected but has no real internet access. Once you have a solid connection, try the update again from Settings > General > Software Update.
Update through a computer when over-the-air keeps failing
When the wireless update refuses to cooperate no matter what you try, a wired update through a computer is the official fallback. Your iPhone 14 uses a Lightning connector and ships with a USB-C to Lightning Cable, so use that cable (or another Apple-certified USB cable) plugged into a direct USB port.
The tool you use depends on your computer. On a Mac running macOS Catalina or later, use Finder; on Windows or older Macs, use the Apple Devices app or iTunes.
Connect the iPhone 14 to the computer with its USB cable.
Make sure the computer's software (macOS, iTunes, or the Apple Devices app) is up to date.
Select the device.
Use Check for Update.
Choose Download and Update.
Do not disconnect the device until the download completes.
A wired update can succeed where over-the-air fails because it does not depend on the same on-device download process, and the computer can also help recover an update that got stuck.
Erase and set up again, or contact Apple Support
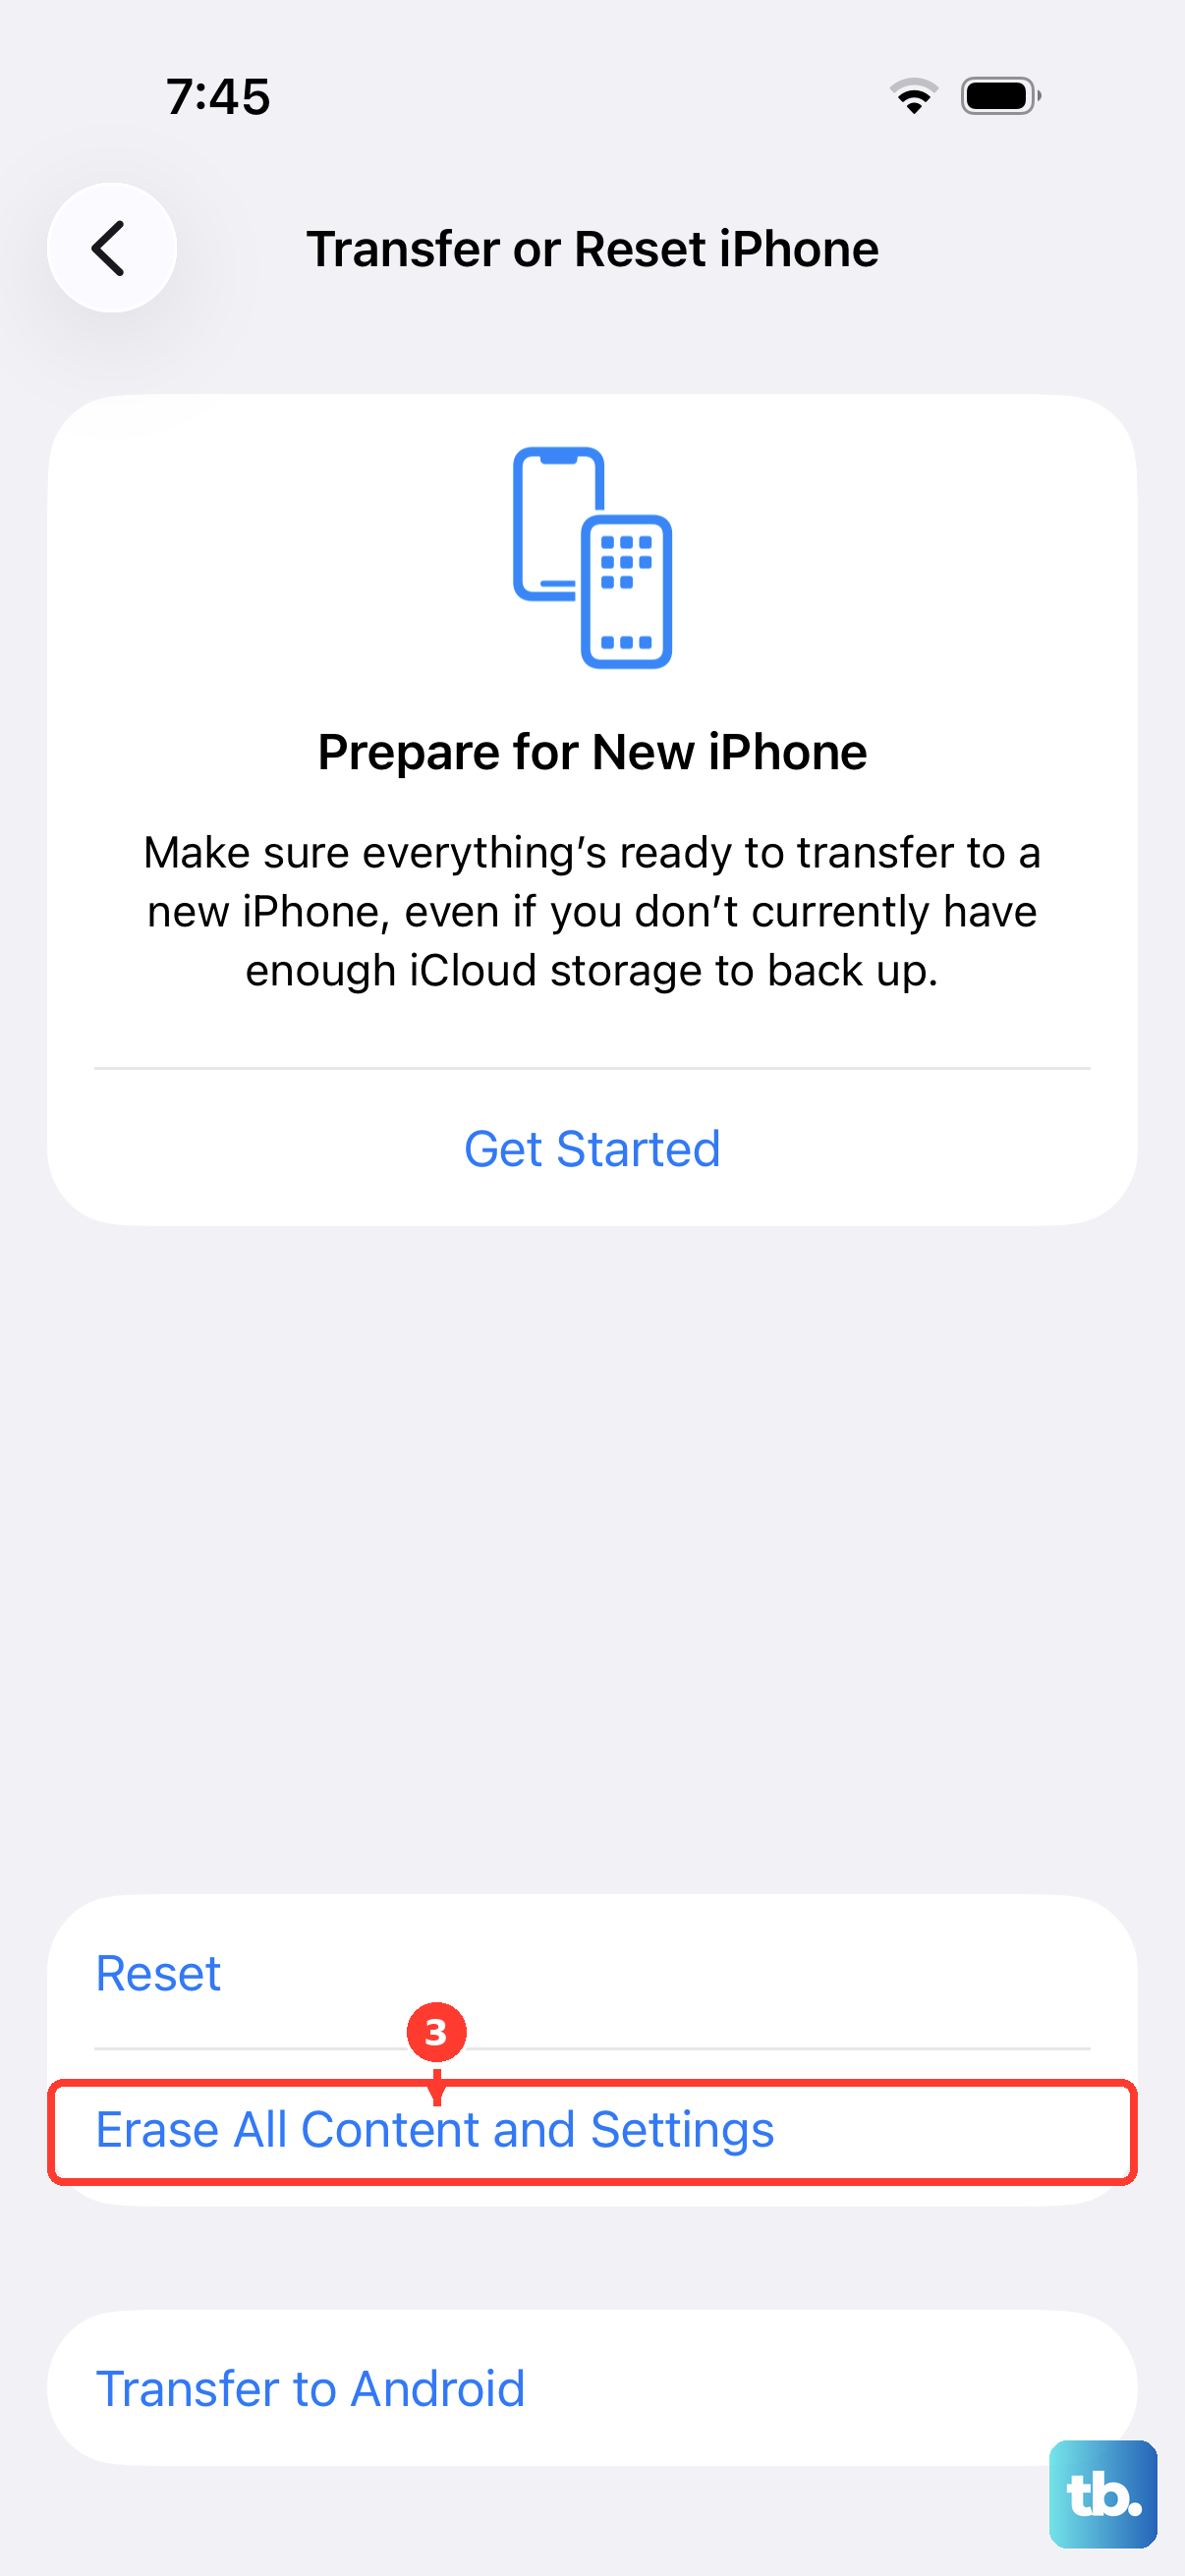
If nothing above works, the final options are a full erase or reaching out to Apple. Treat the erase as a genuine last resort, because it is destructive.
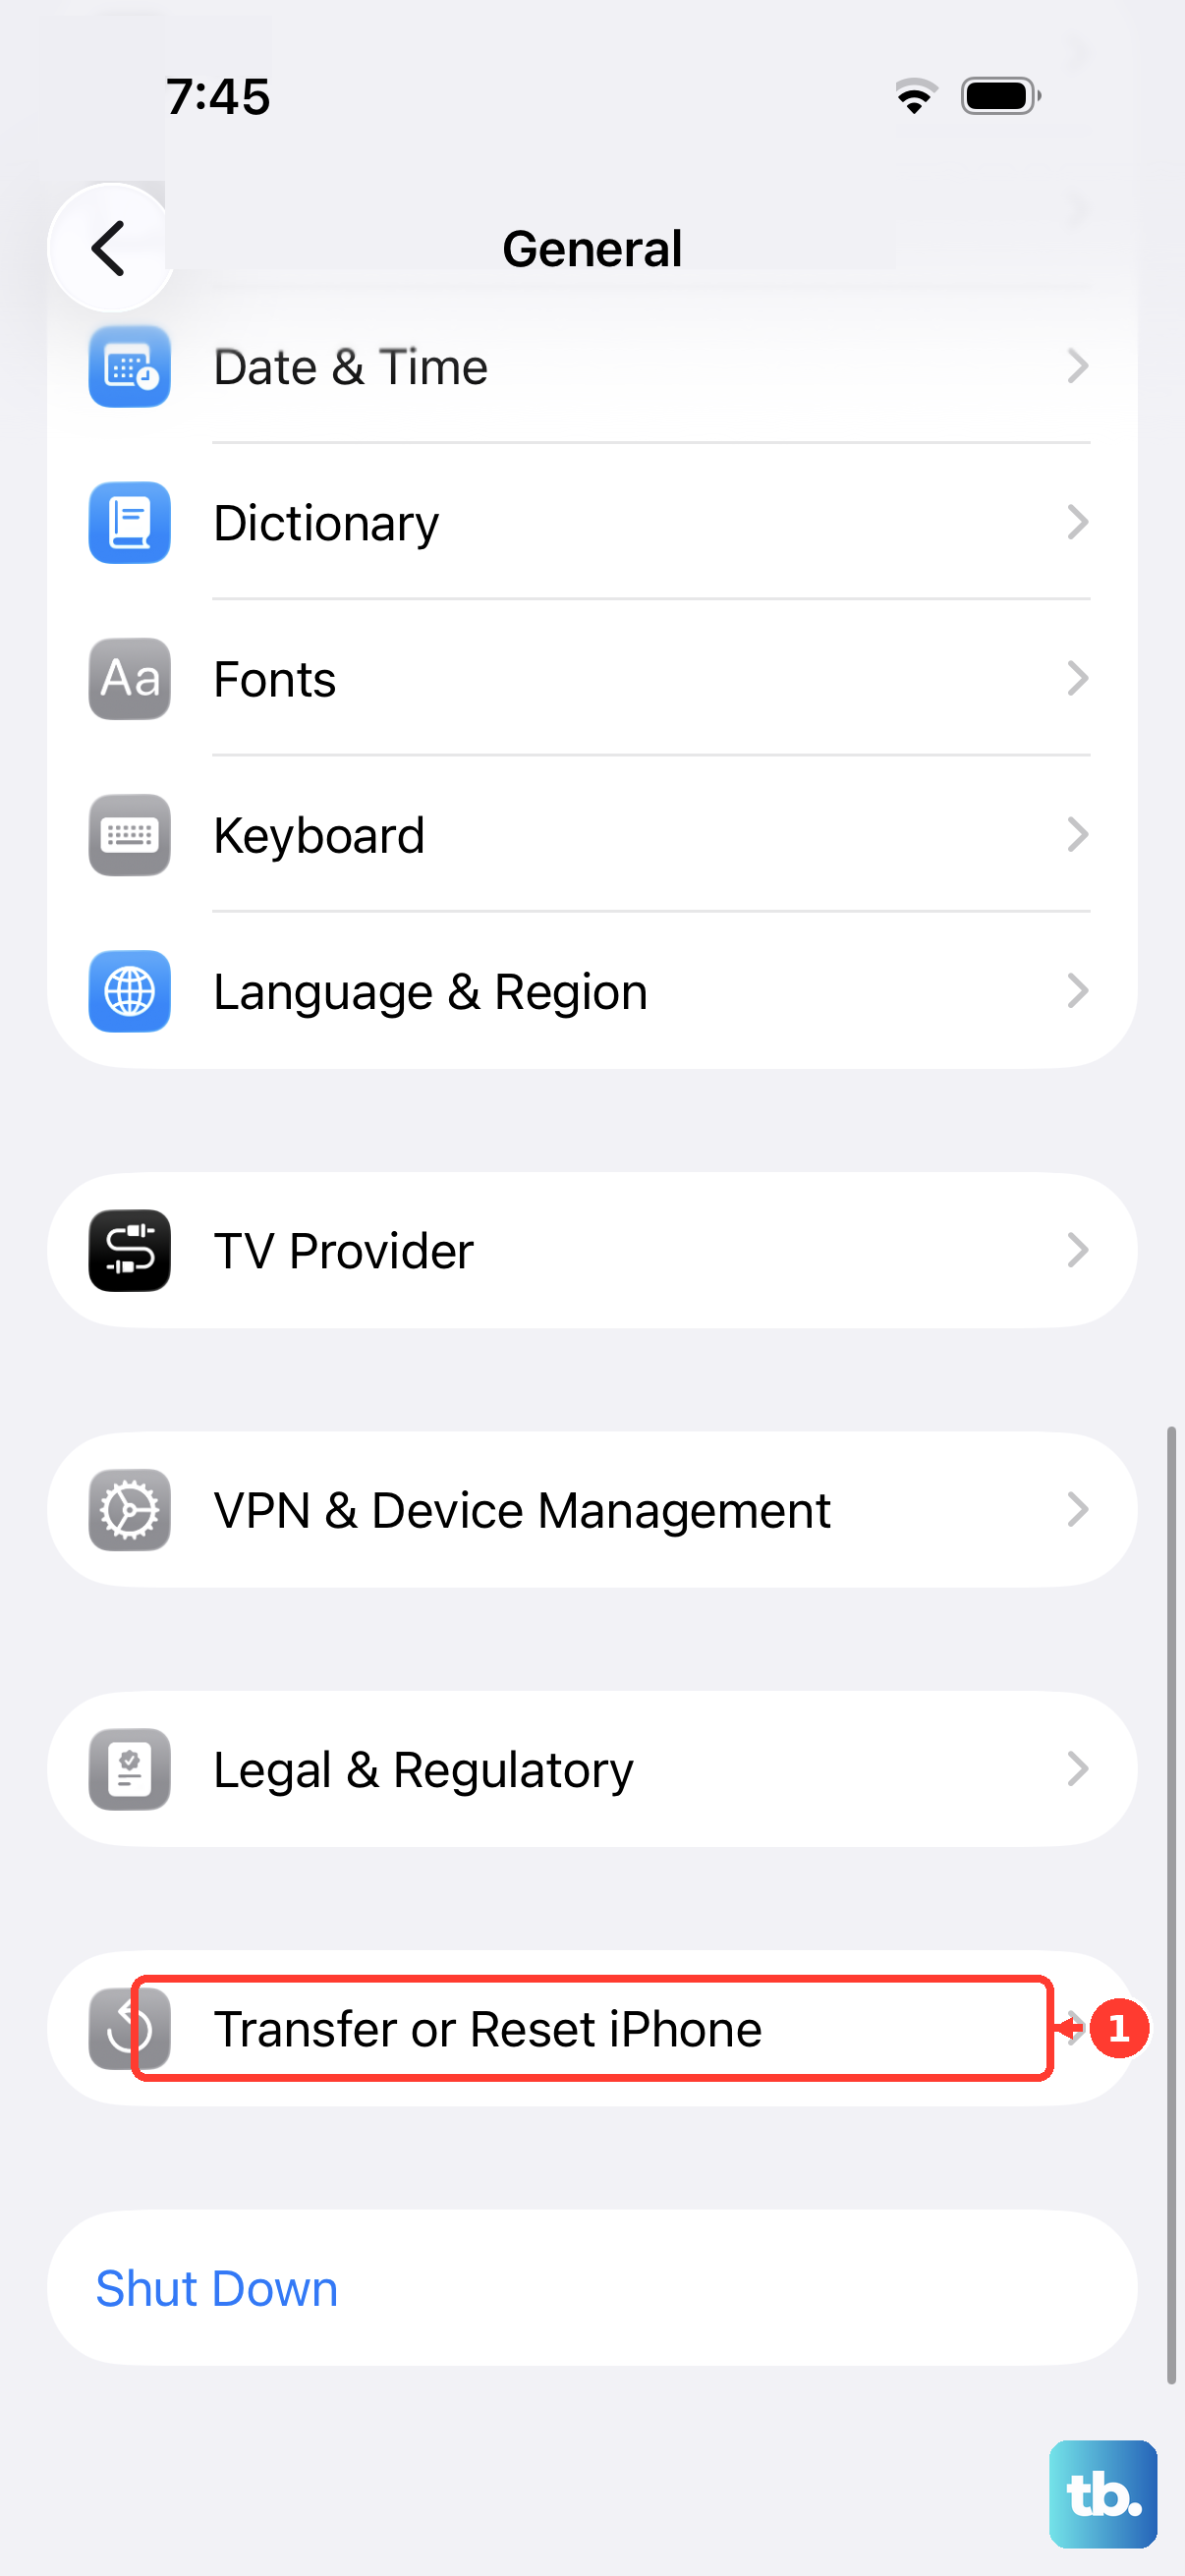
Back up your iPhone 14 first, then go to Settings > General > Transfer or Reset iPhone > Erase All Content and Settings, tap Continue, and enter your passcode and Apple Account password. This restores the iPhone to factory settings and removes all your content and data, so a backup is essential before you begin.
If the update still fails after that, the issue may go beyond software, and the right move is to contact Apple Support for further help.
Keep future updates from getting stuck
Once your iPhone 14 is current again, you can reduce the odds of running into the same wall next time. Turning on automatic updates lets the phone handle installs at a convenient moment instead of leaving them for you to wrestle with manually.
Go to Settings > General > Software Update > Automatic Updates and turn on Automatically Install and Automatically Download. With these on, updates can install overnight while the iPhone is charging and on Wi-Fi, which is exactly the condition where updates are most likely to complete cleanly.
Frequently Asked Questions
Is the iPhone 14 still supported for iOS updates in 2026?
Yes. The iPhone 14 is on Apple's official compatibility list for iOS 26, so it supports current over-the-air iOS updates. You can check and install available updates from Settings > General > Software Update.
Why does my iPhone 14 say there is not enough storage to update?
Updates need enough available storage to download and install. If space is short, Apple may offer to temporarily remove apps (tap Continue), or you can free space yourself at Settings > General > [Device] Storage by tapping Enable next to Offload Unused Apps or deleting content you do not need, then trying again.
What is the correct force restart for an iPhone 14?
Press and quickly release the volume up button, press and quickly release the volume down button, then press and hold the side button and release it when the Apple logo appears. This is the right sequence for the iPhone 14 as a Face ID model, and it is useful when the phone is frozen during an update.
Can I update my iPhone 14 with a computer if the wireless update fails?
Yes. Connect the iPhone 14 with its USB cable, then use Finder on a Mac running macOS Catalina or later, or the Apple Devices app or iTunes on Windows or older Macs. Select the device, use Check for Update, then Download and Update, and do not disconnect until the download completes.
Will erasing my iPhone 14 to fix an update delete my data?
Yes. Choosing Settings > General > Transfer or Reset iPhone > Erase All Content and Settings restores the iPhone to factory settings and removes all your content and data. Always back up first, and treat this as a last resort before contacting Apple Support.