

Restoring an iPhone or iPad from iCloud or iTunes is a great practice, and it comes in help when there is a situation that you have bought a new iPhone and want to restore from the old device to the new one. Furthermore, you can choose to restore iPhone from iCloud back up after resetting your iPhone. iCloud restore transfer all the data on the iPhone without any change in the folder or place. However, it is a must to reset or restore an iPhone before you perform this iCloud restore process first.
The process of restore iPhone from iCloud backup is completely different than the iTunes backup. In case of iTunes, you need to have a computer with iTunes installed on it. But iCloud restore process does not require a computer, and this is possible on the iPhone only. It takes 20-25 minutes as all the apps and accounts will be re-downloaded on the iPhone. Unlike iTunes, there is no need to log into any account other than the iTunes account.
Make sure that you are connected to Wi-Fi before starting this process as there might be some large apps that require Wi-Fi connectivity. Also, this process uses the huge power to restore iPhone from iCloud. So it is better to be connected to the power source to make the whole process smooth.
If you face any issues with your iPhone such as iPhone 5s touch screen issue, iPhone 4s Bluetooth issue or any other, check out our previous posts.
See also- How to unjailbreak iPhone, iPad, and iPod touch without restore
Here is the step by step process that will guide you to restore iPhone from iCloud in detail
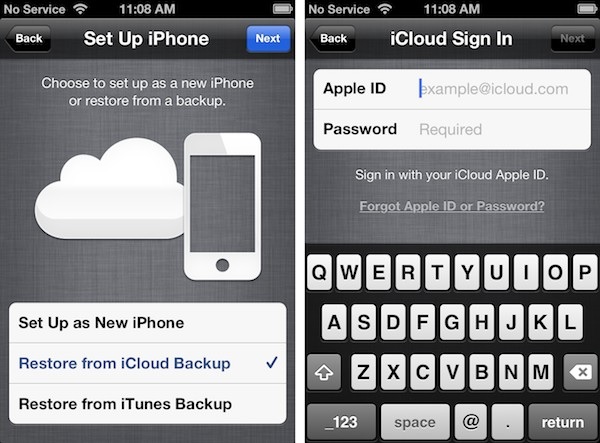
- First, when your iPhone shows the Hello screen, swipe the screen to start the setup and connect to Wi-Fi. On the next screen, you will be provided with the option to enable the location service, turn it on if you need it for some apps.
- A new screen will be displayed again containing options to restore the device from many backup options, such as iTunes, iCloud, etc. Here, you need to choose the option ‘restore from iCloud backup’ and provide the Apple ID and password when prompted. Choose the option ‘Agree’ to go ahead with the process. You might have to wait a few minutes for setting up the Apple ID.
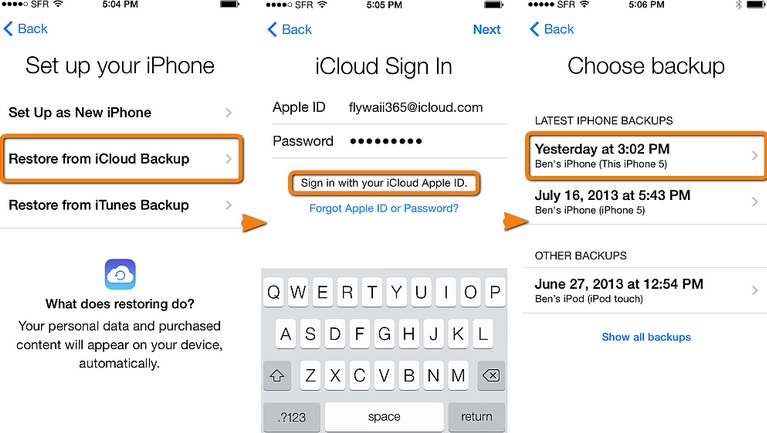
Image source – www.copytrans.net
- Now you need to tap the backup that you want. In the next screen, a list of backups will be displayed from where you need to choose the one you are looking for. If you want to restore from the iCloud backup that you have made in this device, find and choose it. However, if you want to restore an old iPhone to a new iPhone, choose that backup.
- When most of the update is completed, a second hello screen will be displayed and you need to swipe and choose ‘continue’.
- Again, you will be required to provide the Apple ID and password. Next, the iMessage and Facetime will be set up once chosen. On the next screen, options to set up the Touch ID, Apple Pay and create passcode will be shown. You can either set this or choose to skip. You will be asked for the permission to set up iCloud Keychain on the next screen. It can be set here, or else, you can set up this by verifying with other devices also.
- After a few minutes, your iPhone will boot to home screen automatically and there will be some apps that will not be completely installed till then. Also, there will be some apps in gray color, which says that those apps need to be downloaded before using. Provide the Apple ID and password again when prompted in the iMessage pop up.
- Wait for several minutes until the restore downloads all the apps. The apps will be downloaded and will be located at the same place as before. If you find that several apps’ icons are in grey color, just go into the App store, choose update and then update all. This process will take some time to complete.
Image source – www.iskysoft.com
See also: How to bypass iCloud activation iPhone 4 iOS 7.1.2
The whole process is discussed in full detail, so you can now easily restore your iPhone from iCloud without facing any issues. Just follow the step by step guide, and you will be done with it.
