You search for a file you know is on the Mac, and Finder returns nothing useful. The fix starts with the search scope, because Finder can search the current folder, the whole Mac, or the last scope you used. Start with the fast Finder checks, then move to Spotlight indexing and deeper macOS repairs.
1. Start with Finder's search controls
Set the scope and criteria shown in the Finder search window before changing system settings.
- 1.Click the Finder icon in the Dock.
- 2.Type the file name or search term in the Finder window search field, then press Return.
- 3.Use the scope buttons under the toolbar, such as the current folder button or This Mac.
- 4.Click the Add button below the search field.
- 5.Choose a criterion such as Kind or Name.
- 6.For Boolean criteria, hold Option, then click the More button.
When you know the exact file name, use a Name rule. That keeps Finder from treating the search like a broad text search.
2. Set the default place Finder searches
Open Finder, choose Finder, then Settings, and click Advanced. Open When performing a search, then choose the default scope you want: search the entire Mac, search the current folder, or use the previous search scope.
If every new search starts in the wrong place, this changes Finder's default search scope. On macOS Ventura 13 or later, Apple uses Finder and Settings for this path.
3. Compare the result in Spotlight
Use Spotlight as a clean cross-check: if it finds the same file through its file search, Finder's scope or criteria are the next place to correct.
Press Command-Space bar, then click Files, or press Command-2. Type the file name. To open a Finder search window directly, press Option-Command-Space bar.
When Spotlight and Finder both miss the file, move to Spotlight categories, privacy exclusions, and indexing.
4. Restore Spotlight categories and privacy access
Spotlight settings decide which result categories appear, and Search Privacy decides which folders and disks Spotlight excludes. Open the Apple menu, choose System Settings, click Spotlight, then under Results from Apps and Results from System, turn on the apps and categories whose content should appear in search results.
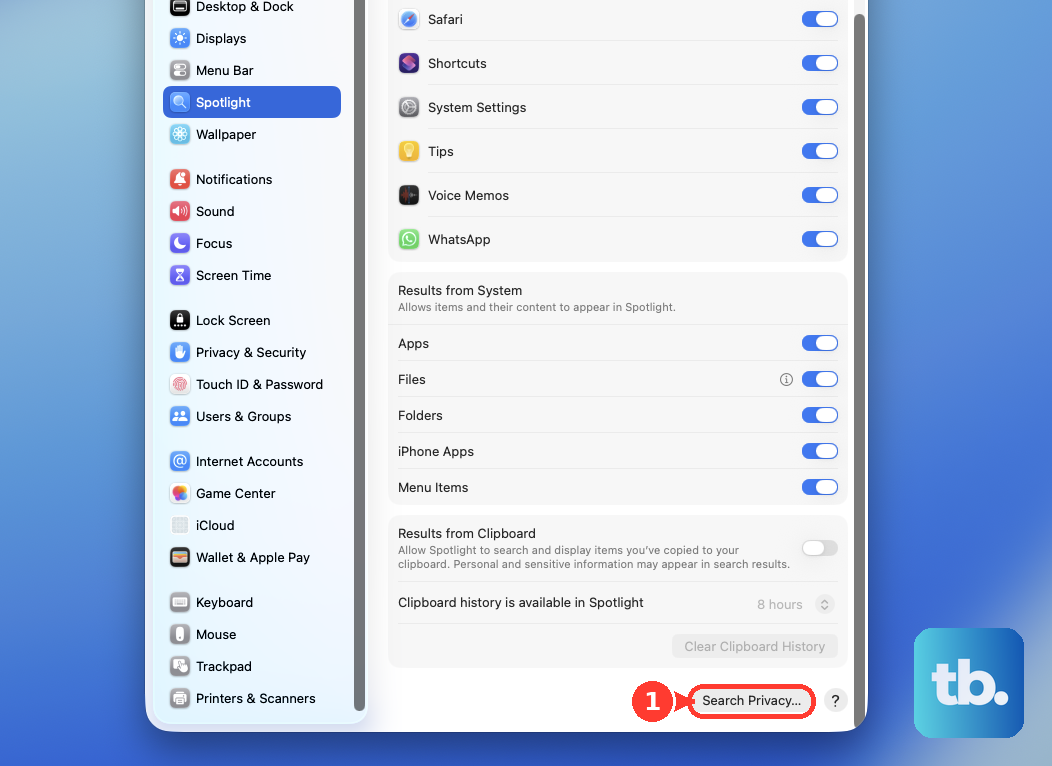
Click Search Privacy, then select any excluded folder or disk that should be searchable. Click the Remove button, then click Done. A folder or disk listed in Search Privacy stays out of Spotlight results until you remove it from that list.
5. Rebuild the Spotlight index
Apple's supported consumer fix for unexpected Mac search results is to remove and re-add the target disk or folder through Spotlight privacy controls.
Open the Apple menu, choose System Settings, and open Spotlight or Siri & Spotlight. Open Search Privacy or Spotlight Privacy, then drag the disk or folder into the privacy list, or click the Add button and select it. Click OK if macOS prompts you, then wait a few seconds.
Select the same disk or folder, click the Remove button, and click Done. Quit System Settings. After you remove it from the privacy list, Spotlight indexes it again.
For Terminal users, sudo mdutil -E / erases the local metadata store for the startup volume so Spotlight rebuilds it. Use mdutil -s / to show indexing status and mdutil -i on / to turn indexing on.
Do not delete .Spotlight-V100 or unload Apple metadata launch daemons as a normal fix. Use the Search Privacy reindex method or the documented mdutil erase-index command.
6. Download missing iCloud Drive files
Open the Apple menu, choose System Settings, click your name, and open iCloud. Open Drive, then turn on Sync this Mac.
Open Finder, go to iCloud Drive, and Control-click the cloud-only item. Choose Download Now. To keep the item local, Control-click it again and choose Keep Downloaded.
Finder searches what is available through your Mac and iCloud Drive setup. Confirm iCloud Drive sync, then download the file when it is cloud-only.
7. Remove extensions that interfere with search
Test third-party login items, file provider extensions, Finder extensions, Spotlight extensions, and cloud-sync tools next.
On Apple silicon, open the Apple menu, choose Shut Down, press and hold the power button until Loading startup options appears, select a volume, hold Shift, then click Continue in Safe Mode.
On an Intel Mac, turn on or restart the Mac, immediately hold Shift until the login window appears, then log in.
After testing search, open the Apple menu, choose System Settings, open General, and open Login Items & Extensions. Under Open at Login, select an item and click the Remove button.
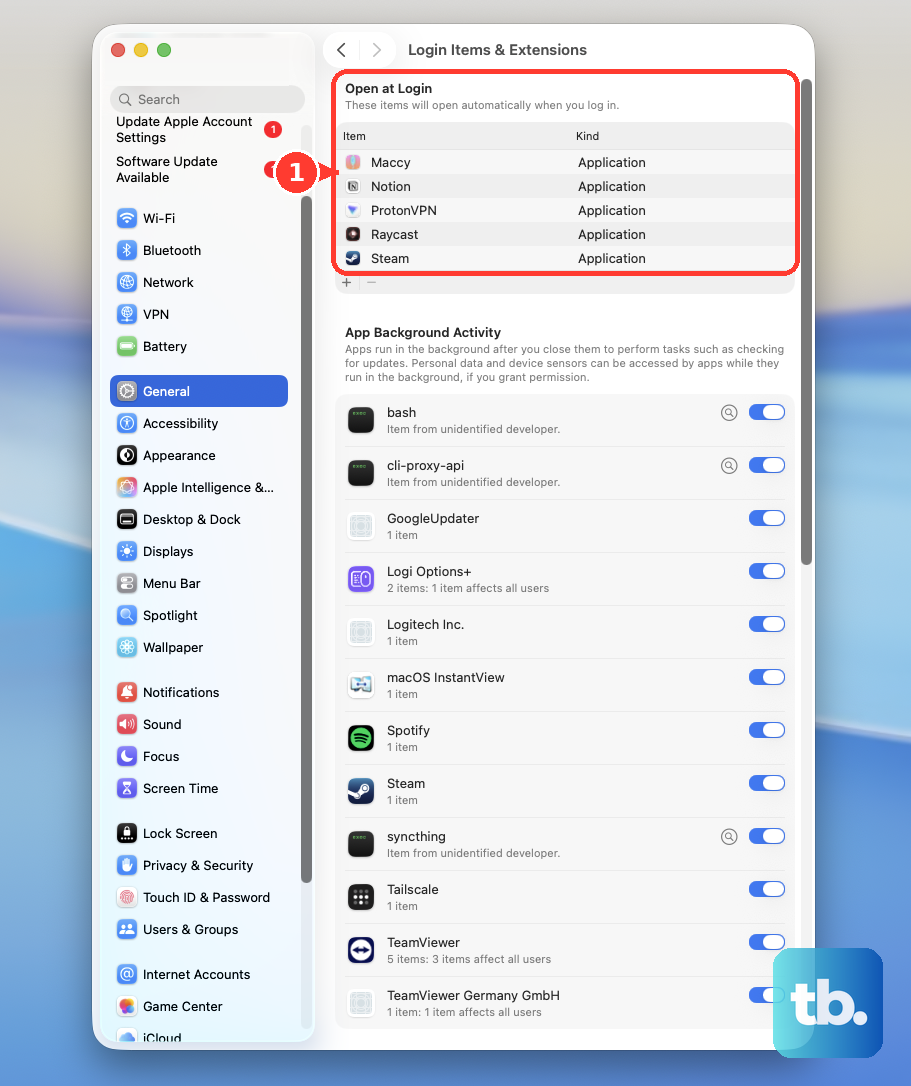
For extensions, click the Info button next to a category. Turn off Finder, Spotlight, file provider, and cloud-sync related extensions first.
To remove an app that affects Finder or Spotlight, open Finder, go to Applications, open the app's Uninstaller when it has one, or drag the app from Applications to the Trash.
8. Escalate to macOS repair steps
To relaunch Finder, press Option-Command-Esc, select Finder, then click Relaunch.
If the Mac is stuck, open the Apple menu and choose Restart. If the Mac is unresponsive, press and hold the power button until it shuts down, then press the power button again.
When search failures appear with corrupted files, apps quitting unexpectedly, or storage devices misbehaving, open Disk Utility, choose View, then Show All Devices. Run First Aid on each volume, then each container, then the storage device.
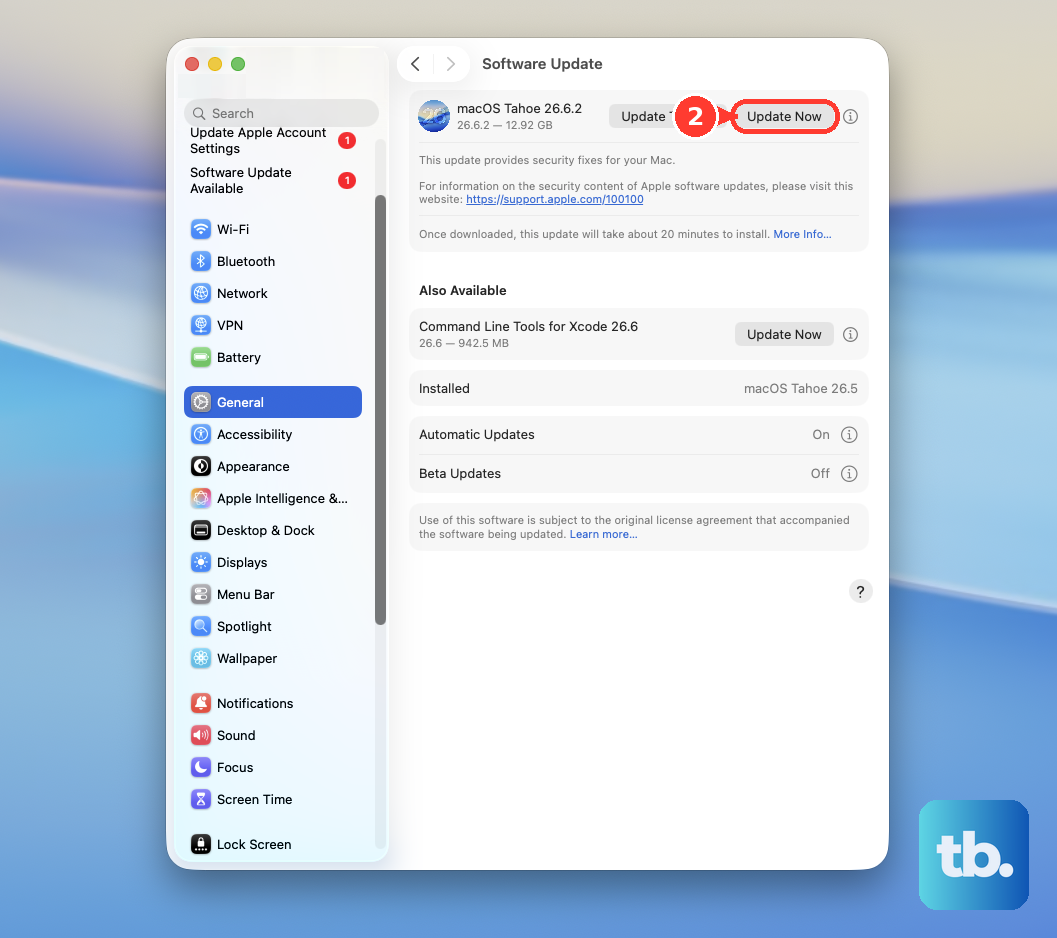
To update macOS, open the Apple menu, choose System Settings, open General, then open Software Update. Click Update, Upgrade, or Restart Now when available.
For a work or school Mac, open the Apple menu, choose System Settings, open General, then check Device Management when present. Older macOS versions may list this as Profiles instead. Contact the organization administrator when management restrictions are installed.
To reinstall macOS on Apple silicon, open the Apple menu, choose Shut Down, hold the power button until startup options appear, click Options, then click Continue. In Recovery, click Reinstall macOS, then click Continue and follow the onscreen instructions.
To reinstall macOS on an Intel Mac, open the Apple menu, choose Restart, then immediately hold Command-R, Option-Command-R, or Option-Shift-Command-R. In Recovery, click Reinstall macOS, then click Continue and follow the onscreen instructions.
Use these last, because they address Finder crashes, disk problems, system updates, management restrictions, and macOS itself. First Aid checks and repairs formatting and directory-structure errors, but it cannot repair every disk problem. Apple says reinstalling macOS from Recovery keeps files and user settings intact.
Frequently Asked Questions
What is the fastest fix when Finder search looks empty?
Open Finder, run the search again, and switch the scope to This Mac. Then add a Name or Kind rule with the Add button to make Finder search the right target.
Where is the Finder search default setting on newer macOS versions?
Open Finder > Settings > Advanced > When performing a search. On macOS Ventura 13 or later, Apple uses Settings for this Finder path.
What should I do if Spotlight Privacy shows a permissions error?
Select the disk, folder, or file in Finder, choose File > Get Info, expand Sharing & Permissions, unlock the panel if needed, and set the user privilege such as Read & Write or Read only.
Can Siri help when Finder search is not finding a document?
Yes. Turn on Siri in System Settings > Apple Intelligence & Siri or Siri, set the listening and keyboard shortcut options, then ask Siri to find or open the document by name.