Dictation won't start, stops hearing you, or types words in the wrong language. Start with a quick menu test, then follow the fixes that match what you're seeing. These steps use macOS Tahoe 26 and cover both Mac Dictation and the separate voice typing tools in apps and websites.
Get Dictation running from the app menu
Use the app menu first to check whether the keyboard shortcut is the problem.
- 1.Open the Apple menu > System Settings > Keyboard, then find Dictation.
- 2.Turn Dictation on and click Enable if prompted. If it is already on, turn it off and back on as a troubleshooting test. Cycling the switch does not guarantee a repair.
- 3.Click an editable text area in your app. Choose Edit > Start Dictation if the app offers this command, then speak a short sentence.
- 4.If the menu command works but the shortcut fails, return to Dictation settings and open Shortcut. Select a shortcut, or choose Customize and press your preferred combination.
- 5.On a keyboard with a Microphone key, press and release it. Holding it activates Siri when Siri is enabled.
- 6.For double-press activation, open System Settings > Keyboard. Set Press fn key to or Press Globe key to to Start Dictation, then press that key twice.
Make sure your Mac hears the right microphone
Open the Apple menu > System Settings > Keyboard > Dictation.
Select your intended microphone under Microphone source, especially if Automatic selects an unwanted device.
Open System Settings > Sound > Input.
Select the microphone you want to test.
Speak while watching the Input level meter to check whether the microphone receives your voice.
Raise Input volume if the signal is low and the control is available.
Unmute your headset's hardware switch if it has one.
Uncover the microphone.
Speak clearly at moderate volume from your normal working position.
Reduce background noise and echo.
Try a headset microphone in a noisy room.
If a wired headset keeps overriding your display's microphone, disconnect the headset.
Then select the display microphone under Sound > Input.
Tip: If your Mac has no internal microphone, connect a compatible external microphone and select it in Sound or Keyboard settings.
Turn off Voice Control or use its dictation mode
Standard Dictation is unavailable while Voice Control is on, although Voice Control has its own text-entry system. The older Enhanced Dictation and dictation keyword-phrase features belong to macOS Mojave, not the current setup.
To switch to standard Dictation, open the Apple menu > System Settings > Accessibility > Voice Control.
Turn Voice Control off.
If you prefer to keep Voice Control, say “Start listening” when it is paused.
Click an editable text field.
Use Dictation mode to enter text. Command mode handles commands.
If speech recognition still fails, select the language you speak under Language in Voice Control settings.
Select your intended input under Microphone. Voice Control uses separate language and microphone settings from standard Dictation.
Match the language to what you speak
If Dictation hears you but gets the words wrong, check the language and region.
Open the Apple menu > System Settings > Keyboard > Dictation.
Under Languages, click Edit and select the language and region you speak.
Deselect any unwanted language to keep it out of your language choices.
With multiple languages enabled, switch to the intended language using the language indicator beside the dictation microphone or the Globe key.
If unwanted punctuation is the problem, turn off Auto-punctuation in Dictation settings.
Speak punctuation explicitly. Automatic punctuation support depends on the language.
Check connectivity and restart after long pauses
Dictation's internet requirements depend on your Mac, language, and text-entry context. Check your setup before treating a lost connection as the cause.
Open System Settings > Keyboard.
Enable Dictation if it is off.
Read the processing information below Dictation.
Check your connection under System Settings > Network if your setup requires internet access.
After a long pause, choose Edit > Start Dictation again in an app that offers it, or press your configured shortcut. Dictation stops after 30 seconds without detected speech. That is a silence timeout, not a 30-second limit on the whole session.
If Dictation still fails, check the permissions below for an app or website's own speech feature. For standard Mac Dictation, continue to the app restart and macOS update steps.
Allow microphone access for app and website voice typing
A blocked microphone permission prevents an app or website's own voice typing feature from hearing you.
Open the Apple menu > System Settings > Privacy & Security > Microphone.
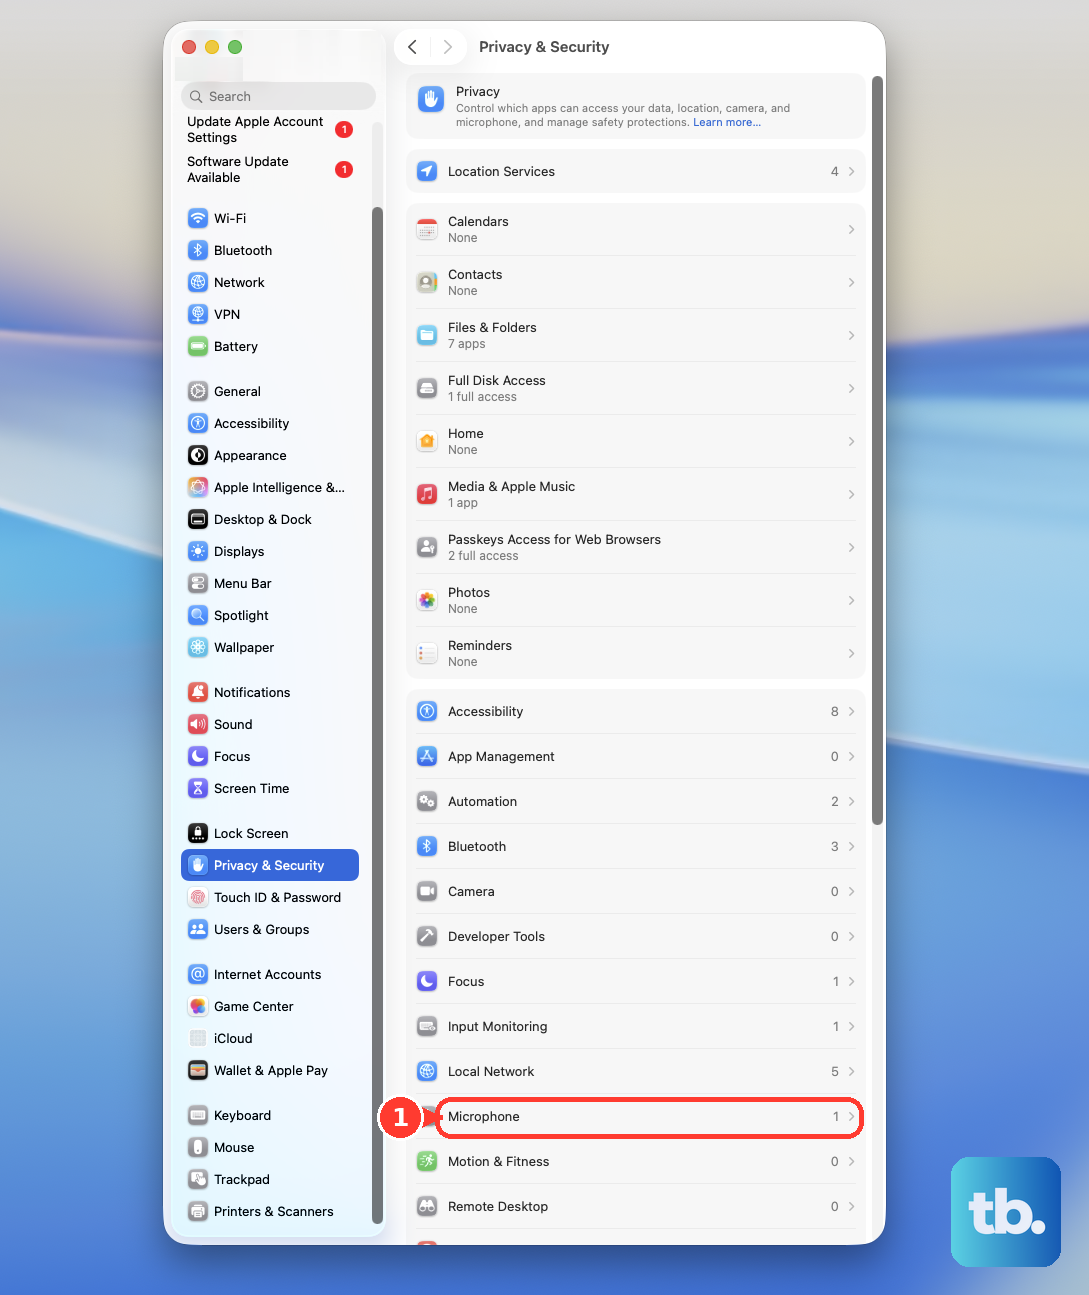
Enable the affected app or browser in the list. These permissions control its own speech tools; they are not a universal requirement for inserting text with standard Mac Dictation.
For an app that requests Apple's speech-recognition permission, open System Settings > Privacy & Security > Speech Recognition.
Enable the relevant listed app.
In Safari, open Safari > Settings > Websites > Microphone.
Set the affected website to Allow.
In Chrome, open More > Settings > Privacy and security > Site settings > Microphone.
Select the intended microphone.
Open the blocked site's entry.
Change its microphone permission to Allow.
Restart Chrome if macOS requests it after the permission change.
Unmute the website's microphone control if it is muted.
Restart the affected app and update your Mac
These steps address app failures and bring macOS up to date.
Save your work.
Quit the affected app with Command-Q.
Reopen the app.
Test Dictation using Edit > Start Dictation where available, or your configured shortcut.
Try another document to check whether the failure is limited to one file.
If the app is unresponsive, open the Apple menu > Force Quit.
Select the affected app.
Click Force Quit.
If Dictation still fails, restart your Mac through the Apple menu > Restart.
Back up your Mac before installing a macOS update.
Open the Apple menu > System Settings > General > Software Update.
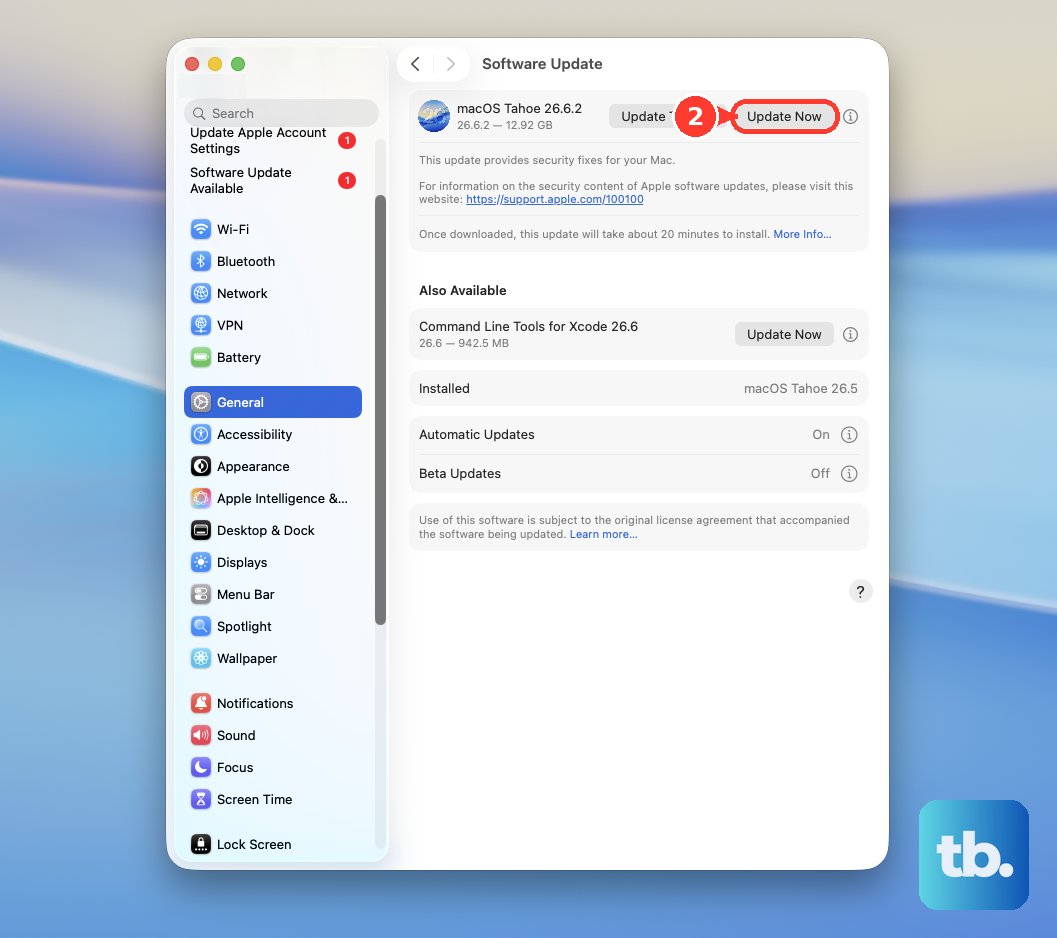
Install the offered compatible update using the displayed Update, Upgrade, or Restart Now button.
Check restrictions that block Dictation
Screen Time restrictions block access to Siri and Dictation. Check here when Dictation remains unavailable despite being configured correctly.
Open the Apple menu > System Settings > Screen Time.
Select the relevant Family Member if that selector appears.
Open Content & Privacy > Intelligence & Siri.
Allow Siri & Dictation. A parent or guardian must make changes protected by family restrictions.
If this does not restore Dictation on a work or school Mac, ask your administrator to review Modify Dictation and Force on-device-only dictation in the organization's management service. A locked Chrome microphone setting also requires the administrator's help.
Frequently Asked Questions
Can I use Voice Control offline?
Yes. Voice Control works offline after its initial download. While connected to the internet, open the Apple menu > System Settings > Accessibility > Voice Control, turn it on, and complete the download.
How do I start Google Docs voice typing on a Mac?
In the latest Chrome, Edge, or Safari, open a Google Docs document and choose Tools > Voice typing. Click the microphone and allow microphone access. In Google Slides, choose Tools > Dictate speaker notes. If the feature is missing on a managed account, ask your administrator whether it is disabled.
Why is Word's Dictate feature unavailable even though Mac Dictation is enabled?
Word's Dictate feature has its own requirements. Desktop Word Dictate requires an active Microsoft 365 subscription, an internet connection, and an editable document. Sign in with your subscription account, open an editable document, and choose Home > Dictate.
Can I use my iPhone as the microphone for Mac Dictation?
Yes, with a compatible Mac and iPhone that meet Continuity Camera requirements. On your iPhone, open Settings > General > AirPlay & Continuity and enable Continuity Camera. On your Mac, select the iPhone under System Settings > Sound > Input. Mount the iPhone on an iPhone-compatible mount or stand in a stable position near your Mac, in landscape orientation, and keep it stationary and locked with its screen off. If it pauses, tap Resume and mount the iPhone again; if it disconnects, plug it into your Mac with a USB cable and mount it.