To enable Secure Boot on Windows 11, open Settings > System > Recovery, use Advanced startup to enter UEFI firmware, then enable Secure Boot and save your changes. Before restarting, check the boot mode and have your BitLocker recovery key ready if the drive is encrypted.
The short version
- Check BIOS Mode and Secure Boot State before changing anything.
- Windows Settings opens the firmware menu; the Secure Boot switch is inside that menu.
- Use the instructions for your PC or motherboard, because menu labels differ.
- Do not switch a Legacy installation to UEFI before preparing the system disk.
- After saving and restarting, confirm that Secure Boot State reads On.
| Method | What it does | Time | Use it when |
|---|---|---|---|
| Windows Settings | Opens UEFI firmware | About 3 minutes | Windows starts normally |
| Startup key | Opens firmware at power on | About 2 minutes | You cannot use Settings |
| Dell | Enables the firmware switch | About 3 minutes | You have a Dell PC |
| HP and Lenovo | Finds the brand menu | About 5 minutes | You have either brand |
| Acer locked setting | Uses a supervisor password | About 10 minutes | Acer blocks the switch |
| ASUS | Enables Secure Boot or restores keys | About 5 minutes | You have an ASUS PC or board |
| MSI and GIGABYTE | Configures board firmware and keys | About 5 to 10 minutes | You have either board brand |
| Microsoft Surface | Changes Surface UEFI security | About 3 minutes | You have a Surface device |
These estimates cover menu changes and restarts on a prepared PC. MBR conversion, BIOS updates, and recovery from a startup error take additional time.
Check the boot mode before you restart
Press Windows + R, type msinfo32, and press Enter to open System Information. In System Summary, check BIOS Mode and Secure Boot State. If they read UEFI and On, Secure Boot is already enabled, so you can leave the firmware settings alone.
If the state is Off, continue with the route for your computer. If BIOS Mode reads Legacy, stop before changing the boot mode. A Windows installation prepared for Legacy boot can fail to start after a direct switch to UEFI.
Check the system disk as well: right-click Start and select Disk Management. In the lower pane, right-click the disk number for the Windows disk, select Properties, and open Volumes. Read Partition style to see whether it uses GUID Partition Table (GPT) or Master Boot Record (MBR).
Prepare an MBR system disk
Back up important files before conversion, and confirm that your PC supports UEFI. If BitLocker protects the disk, suspend protection first. Read Microsoft's MBR2GPT instructions before proceeding, including its requirements for recreating BitLocker protectors afterward.
Open Command Prompt as administrator and run mbr2gpt /validate /allowFullOS. If validation succeeds, run mbr2gpt /convert /allowFullOS; if it fails, resolve the reported problem before continuing. After successful conversion, restart into firmware and set the boot mode to UEFI before trying to start Windows.
If the drive uses BitLocker or Device Encryption, locate its recovery key before changing firmware settings. Those changes can trigger a recovery prompt, and a key saved to a Microsoft account or work account may be needed to open the drive. Save your open work before entering the restart sequence.
Open UEFI firmware from Windows Settings
Open Settings, select System, and open Recovery. Beside Advanced startup, select Restart now. If Windows asks you to save your work, do so before confirming the restart.
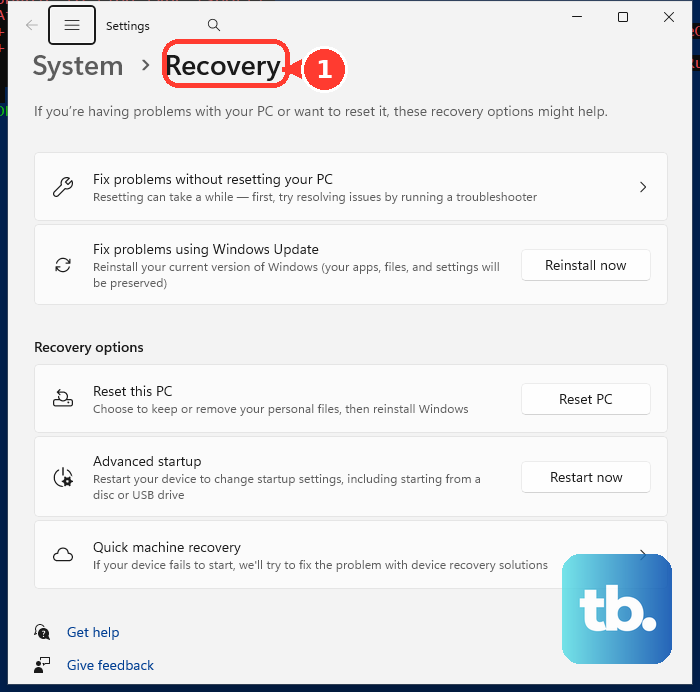
On Windows 10, the path is Settings > Update & Security > Recovery. Select Restart now under Advanced startup, then continue with the same recovery screen choices below.
On the recovery screen, select Troubleshoot > Advanced options > UEFI Firmware Settings, then choose Restart. The next screen is your PC's firmware interface. Follow the matching brand section below to find the Secure Boot control and save the change.
Look for a Boot, Security, or Authentication menu if the layout differs from the examples. Select Secure Boot and enable it using the control your firmware provides. Use its save and exit command, rather than leaving without saving.
Enter firmware with the startup key
If you cannot reach the firmware through Windows, use the startup key documented for your model. Turn on the PC and press that key as the maker's logo appears. Dell uses F2, while Lenovo Think systems use F1. ASUS, MSI and GIGABYTE motherboards and most Acer desktops use Delete.
On an HP PC, repeatedly press Esc during power on to open Startup Menu, then choose BIOS Setup with F10. For more help reaching the menu, follow the steps to get to BIOS on a Windows PC.
Enable Secure Boot on a Dell PC
At the Dell logo, tap F2 to open BIOS setup. Find Secure Boot and change it to Enabled. Choose Apply or Save and Exit, depending on the labels your model displays.
Use your Dell system manual if the firmware layout differs. A boot mode control may appear under Boot or Boot Sequence, with a Boot List option. Only change that option from Legacy to UEFI after resolving the disk and boot mode checks above.
Find the setting on HP and Lenovo PCs
HP notebooks and desktops
On an HP consumer notebook, press F10, then open System Configuration > Boot Options. Set Legacy Support to Disabled if listed, then set Secure Boot to Enabled. Press Enter to save the change, then F10 to save and reboot, or use File > Save Changes and Exit > Yes if your notebook offers that path.
On HP commercial notebooks and workstations, open Security > Secure Boot Configuration in BIOS. Select the Secure Boot box, then use Main > Save Changes and Exit and confirm Yes.
On HP desktops, open Security > Secure Boot Configuration and press F10 at the message. Set Legacy Support to Disable where present and Secure Boot to Enable. Press F10 to accept, then F10 again and Enter twice to restart.
Lenovo Think and IdeaPad systems
On ThinkPad, ThinkCentre, and ThinkStation systems, tap F1 at the Lenovo or Think logo. Open Security > Secure Boot, choose Enabled or On where offered, and press F10 to save. A ThinkStation graphical menu may instead show Save & Exit (F10).
For an IdeaPad, try F2 or Fn + F2 immediately after power on. On models with a Novo button, shut down first, press that button, and select BIOS Setup. Look under Security for Secure Boot.
If a ThinkPad will not let you enable Secure Boot, check Platform Mode. When it reads Setup Mode, select Restore Factory Keys to return to User Mode, then enable Secure Boot and restart.
Fix a grayed out setting on Acer
On an Acer notebook, press F2 when the Acer logo appears; Acer desktops commonly use Delete, with some using F2. Look under Security, Boot, or Authentication. Check the boot mode first, because Legacy or CSM mode can leave Secure Boot unavailable.
Some Acer models require a supervisor password before you can change the switch. Open Security > Set Supervisor Password, then create and confirm a password. Return to Secure Boot, choose Enabled, then press F10 and confirm Yes to save and restart.
After saving, you can remove a password created only for this change. Return to Security > Set Supervisor Password, enter the current password, leave the new password fields blank, and save and exit. If you keep the password, write it down and store it somewhere safe.
A missing setting can require a BIOS update for your model or indicate that the model lacks support. Check Acer's support information before changing unrelated firmware controls. If the maker directs you to install an update, follow the steps to update BIOS safely on a Windows PC.
Enable Secure Boot on ASUS devices
Notebooks all in one PCs and handhelds
With an ASUS notebook or all-in-one PC shut down, hold F2, press the power button, and release F2 when BIOS appears. On a gaming handheld, hold Volume Down while pressing Power instead.
Press F7 for Advanced Mode or Advanced Settings in MyASUS in UEFI. Open Security > Secure Boot and set Secure Boot Control to Enabled. Save with F10, then select Ok or Confirm, as displayed.
If the state remains Not Active, enable Secure Boot Control and open Key Management. Choose Reset To Setup Mode > Yes, then Restore Factory Keys > Yes. Save with F10; resetting deletes existing key databases, so ask IT before replacing organization keys.
Desktops and motherboards
On ASUS desktops, press F7 or click Advanced Mode, then open Boot > Secure Boot and set OS Type to Windows UEFI mode. Save with F10 and Ok. ASUS motherboards use Delete during startup to enter BIOS; select Advanced Mode before following the Boot menu path.
The gray Secure Boot State field is a readout linked to the keys: User means keys are present and Setup means they are absent. For the documented desktop key restore, set Secure Boot Mode to Custom and open Key Management. Choose Clear Secure Boot Keys > Yes, then Install Default Secure Boot Keys > Yes, and save with F10 and Ok.
Enable Secure Boot on MSI and GIGABYTE boards
MSI motherboards and laptops
On MSI X570 and B550 boards with the Windows OS Configuration layout, open Settings > Advanced > Windows OS Configuration. After confirming GPT and a prepared UEFI installation, set BIOS UEFI/CSM Mode or BIOS CSM/UEFI Mode to UEFI, as labeled. Open Secure Boot, enable it, and press F10 to save and reboot.
On MSI notebooks, press Delete at the MSI logo, then use Security > Secure Boot > Enable. Press F10 to save and restart. If a Secure Boot Violation error prevents Windows from starting, follow MSI's notebook recovery workflow below.
Disable Secure Boot in the same menu and save with F10 to reach Windows. Prepare an empty USB drive as FAT32, then find MSI's support FAQ titled [Troubleshooting] Secure Boot Violation Error at Startup. Download its recovery tool, extract it, and copy the entire EFI folder to the USB drive.
Connect that drive to the affected notebook, restart, press F11 at the MSI logo, and choose the USB device. The tool runs and restarts the system automatically. Re-enter BIOS with Delete, enable Secure Boot again, and save with F10.
GIGABYTE AM4 and sTRX4 motherboards
First confirm GPT and UEFI, and complete the maker's TPM preparation if needed. Press Delete to enter BIOS, then open Advanced Mode > Boot > CSM Support and choose Disabled. This exposes the Secure Boot settings.
Open Boot > Secure Boot > Secure Boot Mode and choose Custom, then select Restore Factory Keys. Confirm Yes at Install Factory Defaults and Yes at Reset Without Saving. After the restart, re-enter BIOS and check that Secure Boot shows Active.
Newer motherboard layouts
Other MSI layouts place Secure Boot under Settings > Security, while newer GIGABYTE AMD 800 series firmware keeps it under Boot. MSI X870, X670, B850, and B650 platforms enable Secure Boot and TPM 2.0 by default; GIGABYTE describes those features as typically enabled by default on AM5 and sTR5 systems running Windows 11. Check msinfo32 before making changes.
Use Surface UEFI on Microsoft Surface
Shut down your Surface and wait about 10 seconds. Hold Volume Up, press and release Power, and keep holding Volume Up until the UEFI screen appears. You can also use the Windows Settings route described above.
Open Security, select Change Configuration under Secure Boot, choose Microsoft only and select OK. Have your BitLocker recovery key ready, because the next start may ask for it. Use Exit > Restart now to save and restart.
Enabling the switch and updating its certificates are separate tasks. Most Surface users receive the needed certificate updates automatically through Windows Update. For manual deployment, check the supported model and minimum UEFI version in Microsoft's Surface certificate instructions before following that page's configuration steps.
Microsoft warns that this manual certificate deployment triggers BitLocker recovery, so have the recovery key available. Check your model and its UEFI version in the table on that page before you start.
Check the result and recover from a failed start
After Windows restarts, open System Information again and check Secure Boot State. You want On, with BIOS Mode showing UEFI. If the state reads Unsupported, check both the boot mode and the model's Secure Boot support rather than treating that message as an Off switch.
If Windows stops starting immediately after a firmware change, re-enter firmware and restore the previous Secure Boot and boot mode settings. If you already converted the system disk to GPT, keep the UEFI mode required by that conversion. For the specific MSI notebook violation error, use the recovery workflow above instead of repeatedly toggling the switch.
What if work manages your firmware
On a work or school Surface, firmware settings can be controlled through Microsoft Intune and Device Firmware Configuration Interface, or DFCI. Organizations can also deploy Secure Boot certificate updates through Intune, Group Policy, or registry-based methods. Ask your IT administrator to handle a locked setting or certificate deployment rather than replacing managed keys yourself.
On a personal PC with Secure Boot off, none of this applies: use the firmware steps for your model above. Those steps change only the switch, not the certificates your organization deploys.
Frequently Asked Questions
Can I enable Secure Boot from inside Windows?
Windows Settings can restart your PC into its UEFI firmware menu. Enable Secure Boot in that menu, save your changes, and confirm the result in System Information after Windows starts.
Which BIOS key opens Secure Boot settings?
The key depends on the model: Dell uses F2, Lenovo Think systems use F1, and HP provides Esc followed by F10. ASUS, MSI and GIGABYTE motherboards and most Acer desktops use Delete. Check the maker's model instructions when these examples do not match your PC.
Why is Secure Boot grayed out?
Legacy or CSM mode can make the control unavailable, and some Acer models require a supervisor password. On affected ThinkPads, Setup Mode requires restoring factory keys before enabling the switch.
Is msconfig Safe boot the same as Secure Boot?
No, the Safe boot checkbox belongs to Windows Safe Mode startup settings. Secure Boot is a firmware security feature, so use the UEFI menu for this task.
Does enabling Secure Boot also enable TPM?
Secure Boot and TPM are separate settings with separate status checks. If you also need TPM enabled, follow the steps to enable TPM 2.0 on a Windows PC.
Will enabling Secure Boot delete my files?
Changing the Secure Boot switch does not delete your personal files or installed programs. Preparing an MBR installation for UEFI is a separate disk task, so back up before that work.