Windows says TPM 2.0 is missing, but the fix is often already sitting inside your PC firmware. Most modern Intel and AMD systems use a built-in firmware TPM, labeled as Intel PTT or AMD fTPM, and it only needs to be switched on in UEFI or BIOS. Start with the quick Windows check, then use the firmware path that matches your PC or motherboard brand.
1. Check TPM 2.0 in Windows first
First, confirm whether TPM 2.0 is already ready before digging through BIOS menus.
- 1.Press Win + R.
- 2.Type tpm.msc.
- 3.Press Enter.
- 4.Under Status, look for TPM is ready for use.
- 5.Under TPM Manufacturer Information, check Specification Version.
- 6.If Specification Version says 2.0, TPM 2.0 is enabled.
Windows 11 gives you another check too. Open Settings > Privacy & security > Windows Security > Device security > Security processor details, then confirm Specification version is 2.0.
2. Restart into UEFI from Windows 11
Open Settings, select System, and then select Recovery. Under Advanced startup, select Restart now.
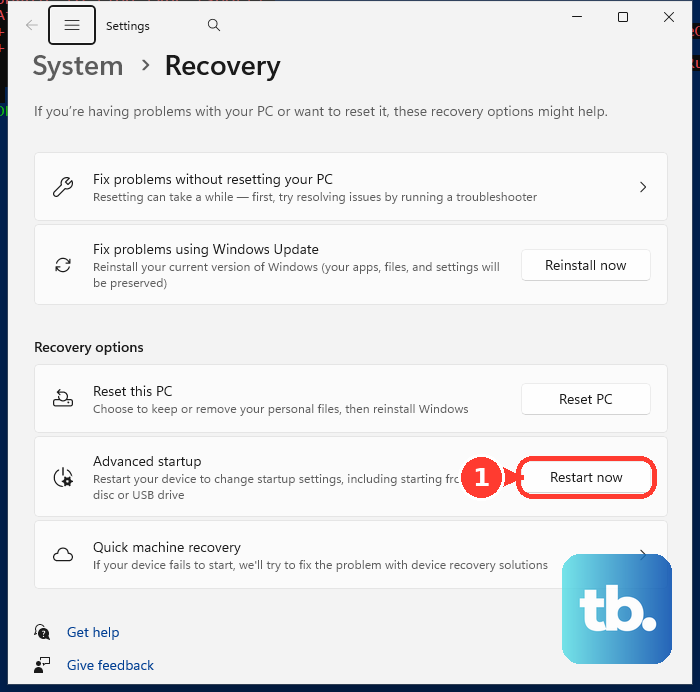
In Windows Recovery Environment, choose Troubleshoot, then choose Advanced options. Choose UEFI Firmware Settings, then select Restart.
This is the cleanest route when Windows still boots. On Windows 10, use Settings > Update & Security > Recovery > Restart now. You can also hold Shift while selecting Power > Restart, then choose Troubleshoot > Advanced options > UEFI Firmware Settings > Restart.
3. Enable the TPM option in BIOS
Once UEFI or BIOS opens, look in Advanced, Security, or Trusted Computing. Turn on the TPM setting, then save and restart.
The switch can use the label Security Device, or it may appear as Security Device Support. Another possible label is TPM State.
On AMD systems, look for AMD fTPM switch. The setting may also be labeled AMD PSP fTPM.
On Intel systems, look for Intel PTT. The full Intel label is Intel Platform Trust Technology.
On Intel PCs, Intel PTT or Intel Platform Trust Technology is the firmware TPM setting. On AMD PCs, AMD fTPM is the firmware TPM setting.
4. Use the startup key instead
Restart the PC. As soon as the maker logo appears, press the firmware key repeatedly. Try F1, F2, F10, Del, or Esc.
Open Security, Advanced, Boot, or Trusted Computing. Enable TPM, PTT, fTPM, or Security Device Support, then save changes and exit.
Use this startup-key route if Windows does not show UEFI Firmware Settings.
5. Find the switch on Dell HP Lenovo and Surface
Big PC brands hide the same TPM control behind different labels. Match your machine and follow the exact menu path.
Dell Latitude, OptiPlex, Precision, Vostro, and select XPS: restart, press F2 once a second at the Dell logo, then open Security > TPM 2.0 Security > TPM On > Apply > Exit.
Dell Alienware: restart, press F2 at the Dell logo, then select Security > Firmware TPM > Enabled > Exit > Save Changes.
Dell Inspiron: restart, press F2, then open Security > Intel Platform Trust Technology > On. On Aptio Setup Utility systems, use Firmware TPM > Enabled > Enter > Apply Changes > F10 > Yes.
HP: restart and press F10. On the Security tab, set TPM Device to Available, set TPM State to Enabled, press F10, then select Yes. If prompted, press F1 to confirm and restart.
Lenovo: open UEFI from Windows Recovery, then select Security > Security Chip. Verify Security Chip Type is TPM 2.0, set Security Chip to Enabled, then save and exit.
Lenovo ThinkPad, ThinkStation, and ThinkCentre: turn on the PC, tap F1 at the Lenovo or Think logo, then open Security > Security Chip and set the chip to Enabled or Active, whichever your model shows. If the menu lists Discrete TPM 2.0 and Pluton TPM 2.0, pick the chip your model guide names, then set it to Active.
Surface Pro, Surface Pro 2, Surface Pro 3, and Surface 3: shut down, hold Volume Up, press and release Power, then release Volume Up at the Surface logo. These early models use a standard BIOS rather than the Surface UEFI on newer devices. In the BIOS menu, select Trusted Platform Module (TPM), set it to Enabled, then choose Exit Setup > Yes.
Newer consumer Surface devices do not expose a standard TPM toggle in the same way. Surface for Business firmware management uses Surface Enterprise Management Mode or DFCI.
6. Match the label on a custom motherboard
ASUS AMD: press Del, enter Advanced Mode, then choose Advanced > AMD fTPM configuration > Firmware TPM switch > Enable Firmware TPM. Save and restart.
MSI Click BIOS 5: open Settings > Security > Trusted Computing > Security Device Support. Enable PTT on Intel boards or AMD CPU fTPM on AMD boards, then press F10.
MSI Click BIOS or GSE Lite: open Security > Trusted Computing > Security Device Support, enable PTT or AMD CPU fTPM, then save and exit.
GIGABYTE AMD AM4 or sTRX4: enter BIOS with Delete, then choose Advanced Mode > Settings > AMD CPU fTPM > Enabled. Save and reboot.
GIGABYTE Intel: enable Platform Trust Technology (PTT), then save and exit.
ASRock Intel: open the Security page, set Intel Platform Trust Technology to Enabled, then save and exit.
ASRock AMD: open Advanced > CPU Configuration > AMD fTPM switch > AMD CPU fTPM, then save and exit.
Custom desktops often call TPM by the CPU platform name, so use the board maker’s wording. For a new Windows 11 installation on ASRock boards, disable CSM before using Intel PTT or AMD CPU fTPM.
7. Confirm TPM 2.0 after reboot
After saving the firmware change, boot back into Windows and check again. Press Win + R, type tpm.msc, and press Enter.
Confirm Status says TPM is ready for use. Then confirm Specification Version says 2.0.
On Dell PCs, Device Manager gives you another confirmation path. Right-click Start, select Device Manager, expand Security devices, and confirm Trusted Platform Module 2.0 appears.
8. Update BIOS only from the maker
Dell: use Dell Support Drivers & Downloads with your Service Tag or model.
HP: use HP Software and Driver Downloads for your exact model.
Lenovo: use Lenovo Support > Drivers & Software.
ASUS: use ASUS Download Center for your motherboard or PC model.
MSI: use MSI Support or Download for your model.
GIGABYTE: use GIGABYTE Support for your model.
ASRock: use ASRock Support > Download for your motherboard model.
If the TPM option is missing on supported hardware, use the official support page for your exact PC or motherboard model. Do not use third-party BIOS downloads.
Buy a discrete TPM 2.0 module only after confirming the exact motherboard model, TPM header type, pinout, and vendor compatibility list. Many newer Intel and AMD systems use firmware TPM instead.
9. Leave managed PCs to IT
Work and school PCs are a different story. Dell Command | Configure, Lenovo BIOS WMI, HP BIOS Configuration Utility, and Surface Enterprise Management Mode are administrative tools for supported business systems.
If the PC belongs to an organization, contact the support desk before changing firmware security settings. TPM changes on managed devices belong with the team that controls BIOS policy, recovery keys, and device enrollment.
Frequently Asked Questions
Can I enable TPM 2.0 without BIOS?
Windows can send you to UEFI firmware settings, but the TPM switch itself is normally inside UEFI or BIOS. Windows tools such as tpm.msc and Windows Security confirm TPM status.
Is Intel PTT the same as TPM 2.0?
Intel PTT is Intel’s firmware TPM implementation. On supported Intel PCs, enabling Intel PTT exposes TPM 2.0 to Windows.
Is AMD fTPM the same as TPM 2.0?
AMD fTPM is AMD’s firmware TPM implementation. On supported AMD PCs, enabling AMD fTPM exposes TPM 2.0 to Windows.
Should I clear TPM to turn on TPM 2.0?
No. Clear TPM resets TPM state after TPM is already enabled. It does not enable TPM 2.0, and it can break Windows Hello PIN or biometric sign-in until you set them up again.