Saturday brings a fresh set of NYT Pips puzzles. Today's grid runs a consistent zone layout across all three difficulty levels, but the challenge escalates through tighter constraints and trickier domino routing. We've got hints, step-by-step walkthroughs, and full solutions for Easy, Medium, and Hard difficulty levels.
How to Play Pips
Pips is a domino placement puzzle where you fill a grid of color-coded zones. Each zone has a condition you must satisfy using the pip values on your dominoes. The twist: you must use every domino and meet every condition to win.
Zone Conditions:
- = All pips in this zone must equal the same number
- Not Equal All pips must be different numbers
- > Pips must be greater than the listed number
- < Pips must be less than the listed number
- Exact Number Pips must total that exact value
- No Color Free space, any domino value works
Click or tap dominoes to rotate them. Each puzzle has one or more valid solutions.
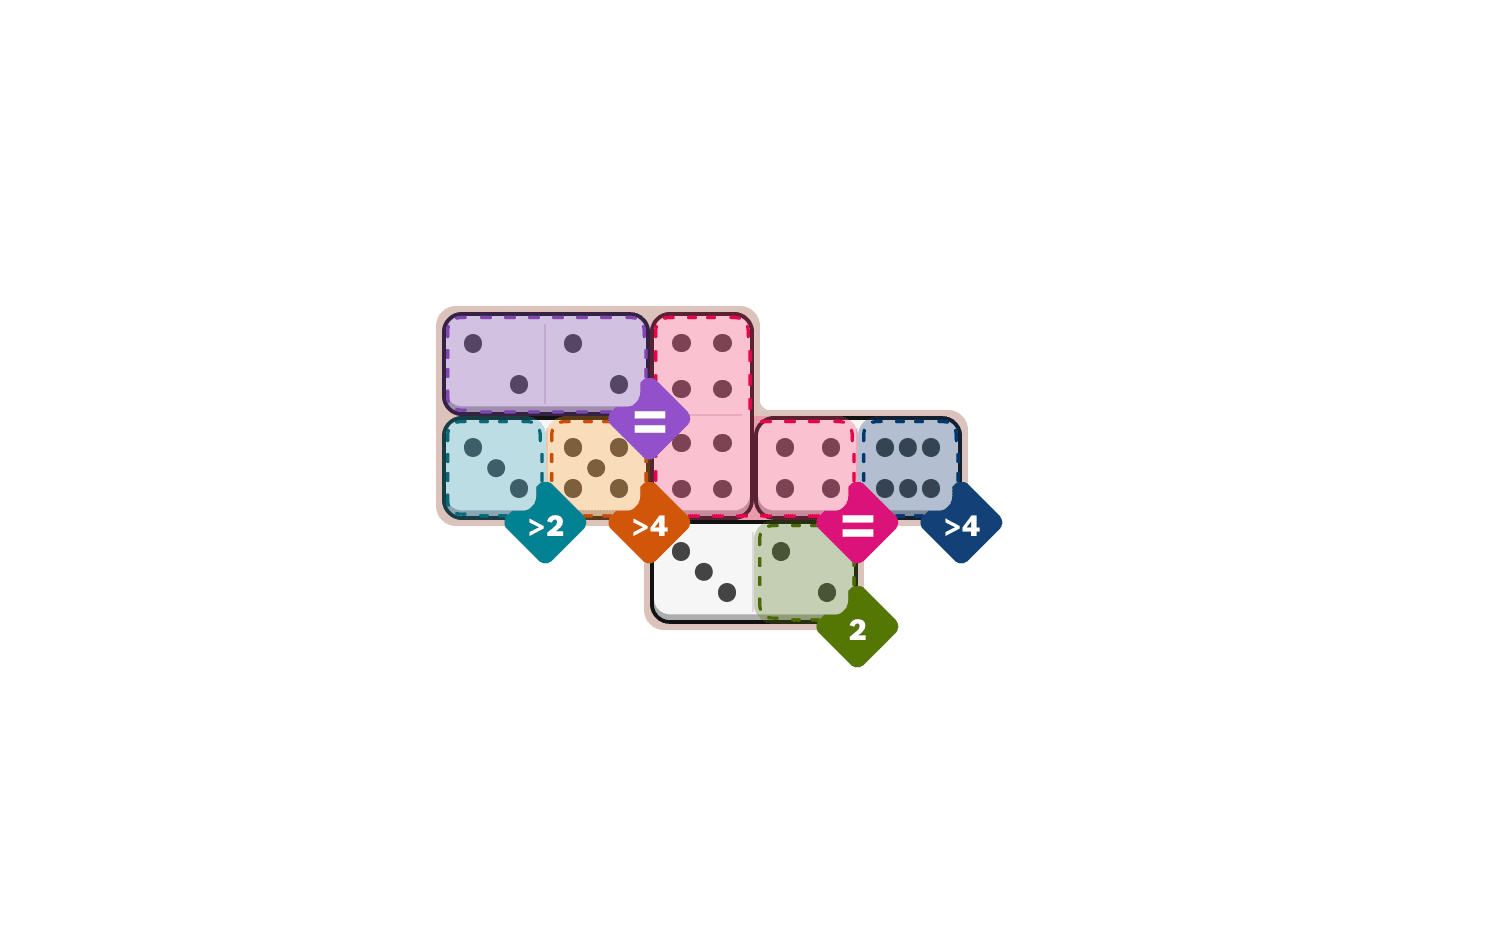
Today's Easy Pips
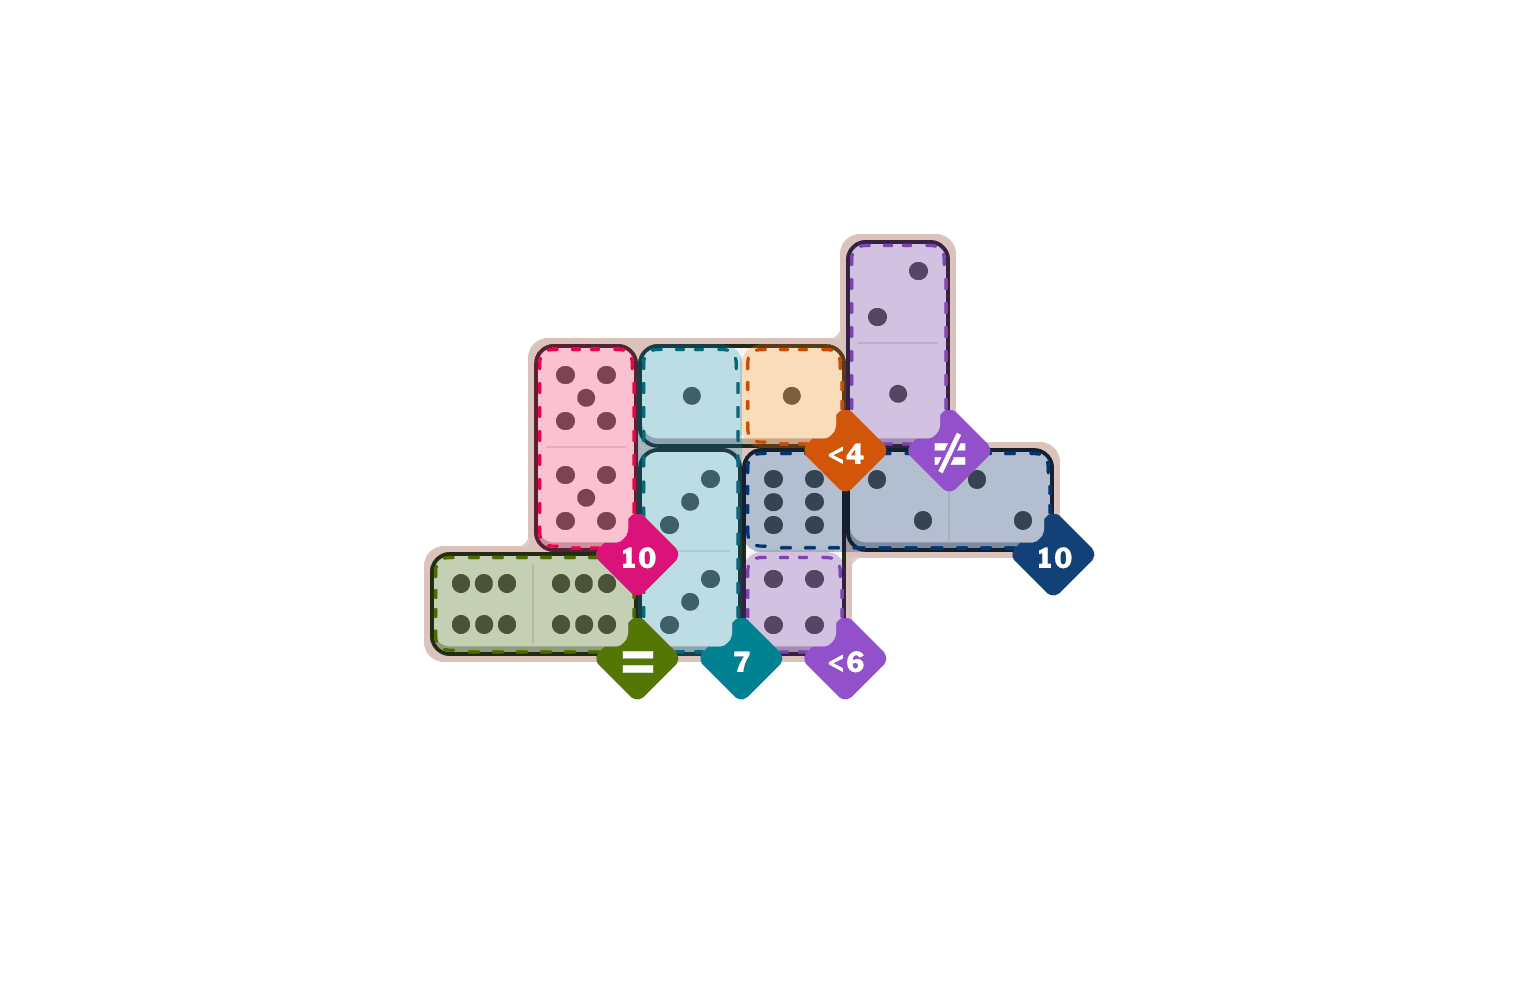
Today's Medium Pips
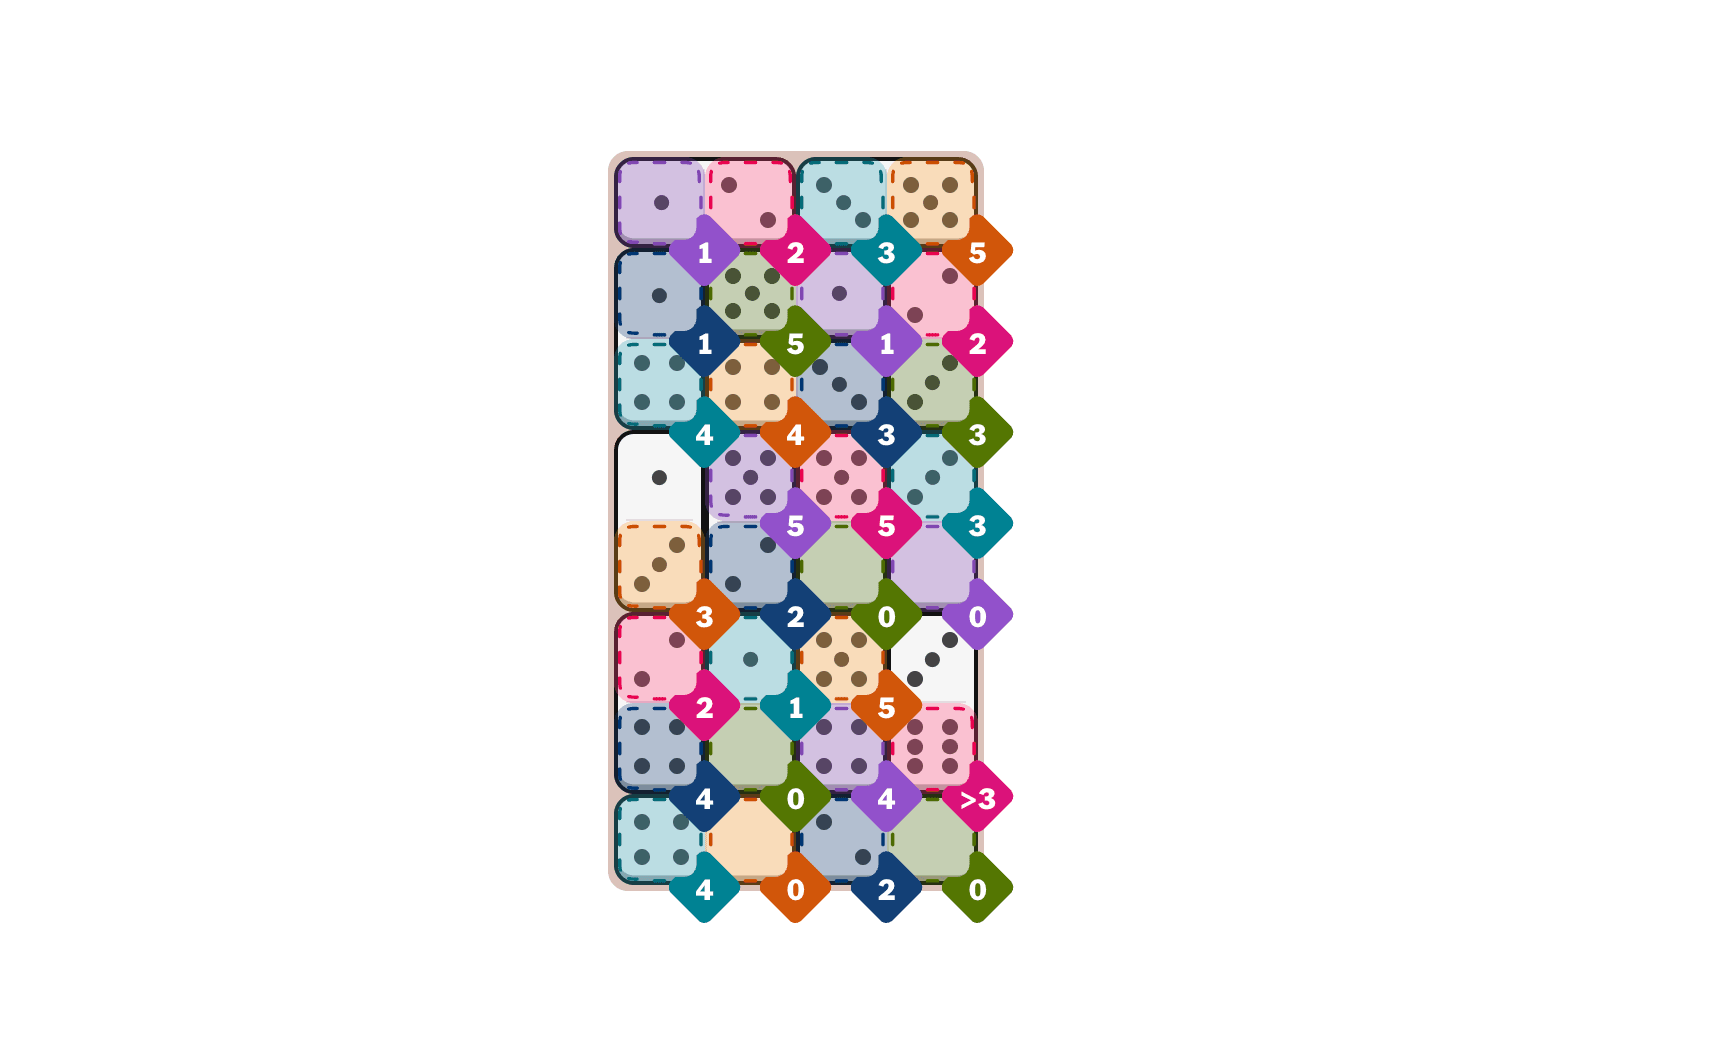
Today's Hard Pips
Quick Hints (No Spoilers)
Starting Point: The grid has a dense cluster of exact-number zones in the upper half and a scattering of zero-value zones in the lower half. Begin with the top-row pairs -- purple (1)/pink (2) and teal (3)/orange (5) -- where the domino values match the zone requirements exactly.
Key Insight: Three green (0) zones and one purple (0) zone require blank-ended dominoes. There are exactly four dominoes with a zero in the set: 5/0, 3/0, 1/0, 4/0, and 2/0. Count carefully -- you have five blanks available for four zero zones, which gives you one spare for the uncolored zones or the pink (>3) zone pairing.
Watch Out For: The pink (>3) zone in the bottom section is easy to miss if you fill the grid top-to-bottom too quickly. It requires a value of 4, 5, or 6. The only domino with a 6 is 3/6, and it must be placed vertically with its 3 end in the uncolored zone. If you use the 3/6 domino elsewhere, you'll have no way to satisfy the greater-than condition.
Step-by-Step Walkthrough
- 1.Lock in the top row. The purple (1) and pink (2) zones are adjacent horizontally. Place the 1/2 domino across both. This is the only domino that satisfies both exact-number conditions simultaneously.
- 2.Next pair on the top row: teal (3) and orange (5). Place the 3/5 domino horizontally. The 3 lands in teal, the 5 in orange. Two more zones locked.
- 3.Drop down one row. Navy (1) sits directly above teal (4). Place the 1/4 domino vertically. The 1 goes into navy, the 4 into teal. This establishes a vertical placement pattern you'll repeat across the grid.
- 4.Move to the center-left. Green (5) sits adjacent to purple (1) below it. Place the 5/1 domino horizontally. The 5 satisfies green's exact-5 condition.
- 5.Continue right. Orange (4) sits next to navy (3). Place the 4/3 domino horizontally across them.
- 6.Go vertical here: pink (2) above green (3). Place the 2/3 domino vertically. Both zones accept these values directly.
- 7.Central column: uncolored (no condition) above orange (3). Place the 1/3 domino vertically. The 3 satisfies orange; the 1 goes into the free zone.
- 8.Right side, upper section: purple (5) above navy (2). Place the 5/2 domino vertically.
- 9.Continue the vertical run: pink (5) above green (0). Place the 5/0 domino vertically. The blank satisfies the green (0) exact condition. This is your first zero-zone solved.
- 10.Next column: teal (3) above purple (0). Place the 3/0 domino vertically. Second zero zone solved.
- 11.Pink (2) above navy (4). Place the 2/4 domino vertically.
- 12.Teal (1) above green (0). Place the 1/0 domino vertically. Third zero zone solved.
- 13.Orange (5) above purple (4). Place the 5/4 domino vertically.
- 14.Bottom section: uncolored zone next to pink (>3). Place the 3/6 domino vertically. The 6 satisfies the greater-than-3 condition. This is the critical placement.
- 15.Bottom row left: teal (4) next to orange (0). Place the 4/0 domino horizontally. Fourth zero zone solved.
- 16.Final placement: navy (2) next to green (0). Place the 2/0 domino horizontally. The spare blank goes into the last green (0) zone. All 16 dominoes placed, all conditions satisfied.
Hard Pips Solution
Last chance to solve independently
---
---
---
---
---
- 1.Place the 1/2 domino horizontally in the purple (1) zone and pink (2) zone
- 2.Place the 3/5 domino horizontally in the teal (3) zone and orange (5) zone
- 3.Place the 1/4 domino vertically in the navy (1) zone and teal (4) zone
- 4.Place the 5/1 domino horizontally in the green (5) zone and purple (1) zone
- 5.Place the 4/3 domino horizontally in the orange (4) zone and navy (3) zone
- 6.Place the 2/3 domino vertically in the pink (2) zone and green (3) zone
- 7.Place the 1/3 domino vertically in the uncolored (no condition) zone and orange (3) zone
- 8.Place the 5/2 domino vertically in the purple (5) zone and navy (2) zone
- 9.Place the 5/0 domino vertically in the pink (5) zone and green (0) zone
- 10.Place the 3/0 domino vertically in the teal (3) zone and purple (0) zone
- 11.Place the 2/4 domino vertically in the pink (2) zone and navy (4) zone
- 12.Place the 1/0 domino vertically in the teal (1) zone and green (0) zone
- 13.Place the 5/4 domino vertically in the orange (5) zone and purple (4) zone
- 14.Place the 3/6 domino vertically in the uncolored (no condition) zone and pink (>3) zone
- 15.Place the 4/0 domino horizontally in the teal (4) zone and orange (0) zone
- 16.Place the 2/0 domino horizontally in the navy (2) zone and green (0) zone
Puzzle Debrief
Overall Difficulty: Moderate challenge. The zone layout is identical across all three levels, which is unusual -- typically Easy, Medium, and Hard shuffle zone positions or conditions. Today the difficulty comes from the same grid, but the Hard puzzle demands more precise domino routing and tighter inventory management of your blank-ended dominoes.
Trickiest Puzzle: Hard - The pink (>3) zone is the trap. It requires a value greater than 3, and the only domino carrying a 6 (the 3/6) is the obvious candidate. But if you've already committed that domino elsewhere in your solve, you'll hit a dead end and have to backtrack. The zero-value zones also create friction -- with four zones needing blanks and five blank dominoes available, you have exactly one spare, which leaves no room for error.
Our Take: Today's set rewards methodical top-to-bottom placement. The zone conditions are generous on exact numbers, so if you start with the top-row pairs and work downward in vertical columns, the solve flows naturally. The Hard puzzle is less about raw difficulty and more about discipline -- don't use the 3/6 domino early, and track your blanks. Solid Saturday session.
Tomorrow's Pips drops at midnight. See you then.