Want to speak instead of typing, but can't get your Mac to start listening? Built-in Dictation turns your speech into text, and setup starts in Keyboard settings. Here's how to turn it on, choose a shortcut, and handle punctuation, corrections, and microphone trouble.
Turn on Dictation in Mac settings
Start with the Dictation switch in Keyboard settings.
- 1.Open the Apple menu and choose System Settings.
- 2.Select Keyboard, then find Dictation.
- 3.Turn Dictation on.
- 4.Click Enable if prompted.
- 5.To disable Dictation later, return to this setting and turn Dictation off.
Start speaking in a text field
Click where you want your words to appear.
Press and release the Microphone key in your keyboard's function-key row, if it has one. Keep it brief: holding this key activates Siri when Siri is enabled.
Begin speaking when the cursor pulses or you hear the readiness tone.
Press Escape to finish. The Microphone key and your configured Dictation shortcut also stop listening. Dictation stops automatically after 30 seconds without detected speech; there is no total dictation-length timeout.
If the key doesn't start Dictation, try the app's menu instead. With the insertion point in an editable field, choose Edit > Start Dictation. Pages, Numbers, and Keynote support this command.
Configure Fn or Globe to start Dictation
An Fn or Globe key assigned to another action won't start Dictation when you press it twice.
Open the Apple menu > System Settings > Keyboard.
Set Press fn key to or Press Globe key to, depending on your keyboard, to Start Dictation.
Click an editable text field.
Press the corresponding key twice to start listening.
Prefer another combination? Open Shortcut under Dictation in Keyboard settings.
Choose a listed shortcut, or select Customize to enter your own key combination.
Press your chosen shortcut in an editable field to start Dictation. Double-pressing Fn or Globe works only when configured for that action.
Add punctuation and correct your words
A few spoken commands give your text the punctuation and layout it needs.
- 1.Say “comma” or “question mark” to insert punctuation, and “new line” or “new paragraph” to separate text.
- 2.Say “caps on” and “caps off” to control capitalization, or “no space on” and “no space off” to control spacing.
- 3.In a supported language, say an emoji's name followed by “emoji” to insert it.
- 4.Click a blue-underlined ambiguous word and choose an alternative, or replace it by typing or dictating.
- 5.For automatic punctuation in supported languages, open System Settings > Keyboard > Dictation and turn Auto-punctuation on. Turn it off to handle punctuation yourself.
- 6.On an Apple silicon Mac, type without ending Dictation, then resume speaking.
Switch to another language
Open System Settings > Keyboard > Dictation > Edit next to Languages.
Select the language and region you want to use. Available languages and regions vary, and automatic punctuation and emoji support depend on the language.
To remove a language, deselect it in the same settings.
With multiple languages configured, click the language abbreviation beside the cursor during Dictation.
Choose the language you want to speak.
If the text still doesn't match the language you're speaking, return to Languages and select the intended language and region.
Fix a microphone that isn't picking up speech
The wrong microphone source or a quiet audio input prevents Dictation from picking up your speech.
Open System Settings > Keyboard > Dictation.
Under Microphone source, choose your connected microphone or Automatic.
Next, open System Settings > Sound > Input.
Select the microphone you want to use.
Increase its Input volume where that control is available.
If your Mac has no usable built-in microphone, connect an external microphone.
For a third-party dictation app or browser recording tool, open System Settings > Privacy & Security > Microphone.
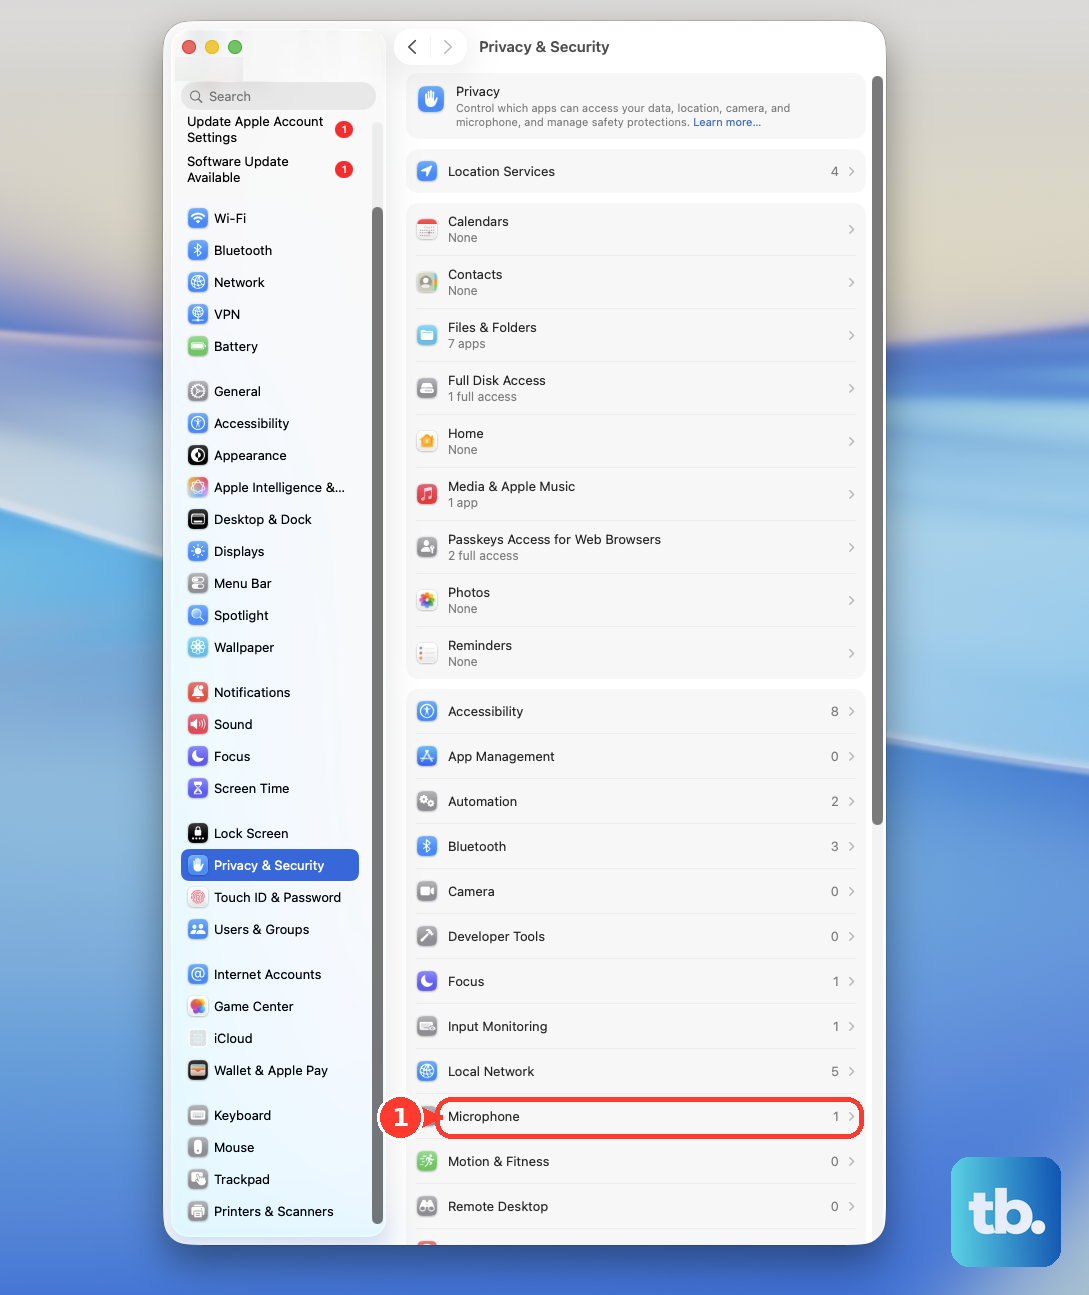
Turn on access for the relevant app or browser. Website recording permissions are separate from using built-in macOS Dictation in a webpage text field.
For an app that requests Apple's speech-recognition permission, open System Settings > Privacy & Security > Speech Recognition.
Turn on access for that app. This permission is separate from microphone access.
Use Voice Control for hands-free editing
Voice Control adds spoken text editing and works offline after its initial download.
Open System Settings > Accessibility > Voice Control.
Turn Voice Control on.
Allow the initial file download, which requires internet access.
Click an editable text field.
Say “Dictation mode” to enter words.
Say an editing command such as “Replace cat with dog” in a compatible field. Available commands depend on the language and app.
Say “Show commands” for contextual help.
Say “Stop listening” to pause Voice Control.
Say “Start listening” to resume.
Turn Voice Control off in its settings to return to standard macOS Dictation. Standard Dictation is unavailable while Voice Control is on.
Check offline use and recording privacy
Before relying on Dictation without internet, check its processing requirements for your configuration and the context in which you dictate. The text below the Dictation setting explains whether speech is processed locally.
With Dictation enabled, open System Settings > Keyboard.
Read the explanatory text below Dictation.
Click About Ask Siri, Dictation & Privacy for more detail.
To change recording-sharing preferences, open System Settings > Privacy & Security > Analytics & Improvements.
Turn Improve Siri & Dictation on or off.
If you're asked during setup whether to improve Siri and Dictation, choose Share Audio Recordings or Not Now.
Older instructions mention Enhanced Dictation and System Preferences. Current macOS uses System Settings > Keyboard > Dictation, with spoken editing commands under Voice Control.
Frequently Asked Questions
Do I need to download a Dictation app for my Mac?
No. Dictation is included with macOS and has no separate consumer installer.
Can I use Microsoft Word's own Dictate feature on a Mac?
Yes. Word for Microsoft 365 for Mac includes a subscriber-only Dictate feature that requires a microphone and internet access. Sign in to Microsoft 365. Open a document. Choose Home > Dictate, or press Option-F1. Speak when listening begins. Click Dictate again to stop.
Can Google Docs use voice typing on a Mac?
Yes, in the latest Chrome, Edge, or Safari. Open a Google document. Choose Tools > Voice typing. Click the microphone button. Allow microphone access when prompted. Speak, then click the microphone again to stop.
Can I turn a recorded audio file into text on my Mac?
Yes. Word for the web supports transcription of WAV, MP4, M4A, and MP3 files in Edge or Chrome. A qualifying Microsoft 365 subscription and internet access are required, and transcription limits apply. Open Home > Dictate dropdown > Transcribe > Upload audio. Choose your file. After transcription, select Add all to document or add selected sections.